Welcome to the site site! Friends, on our site you can find a lot of interesting and useful things for yourself, your loved ones and children. We offer a huge assortment of brushes, frames, styles, shapes, icons and many other additions to your photography.
Frames for photoshop
Especially popular are frames for photoshop, with which you can decorate your photo without any effort. You just need to find a suitable frame, insert your photo, which will serve as a creative decoration for your workplace or family album. Also, you can create a fun room for your baby. A large selection of children's frames will help you with this. Even novice users can master these types of frames.
We draw your attention to frames for wedding photos, for family photos, vignettes, for lovers, "for you", congratulations, calendars, Great Easter, February 23, Happy New Year, birthday, Valentine's Day. You can download all these frames at this link.
Download templates for Photoshop
It's time to talk about the main section of our site - "Templates for photos". First of all, it is popular among girls of different age categories. After all, a girl always strives for charm and beauty. It is in this section, dear girls, that you can experience the image of a stranger in the moonlight, or vice versa, a good fairy. You just need to follow this link. Let's not forget about our dear men, because our site has prepared for them also many interesting templates, in the image of which a man will feel himself: a hardworking gardener, a musketeer, a knight, a pilot, a biker, a cowboy, a king, iron man, German officer, a race car driver, etc. And all this absolutely free, you just need to click on the mouse button and.
Dear users, the administration of our site has prepared a surprise for your children: the section "Templates for children". Your child will feel like a sweet bunny, a little one, a pirate, a duckling, a spider, a king, an elf, etc. Click the mouse faster and follow the link and have a lot of fun.
We recommend that you pay attention to the "Icons" section. We offer a large selection of not only "frames", but also "icons". You can use this section for different purposes - from an ordinary amateur photo to a large-scale design project. It is with us that you can find a lot of fun!
Our site does not stand still, we are constantly developing, filling the site with useful information and of course we listen to the opinions of users. You can leave all your comments and suggestions in the "Feedback" section .. site administration!
Site help
Do you like the site? Have the lessons been helpful? You can support the project simply by downloading and installing the "Flashlight" application for Android. The application was written by the author of the site and expects to publish his applications in the future. The flashlight controls the LED on your phone's camera flash, and also turns on the backlight on the screen at full brightness.
Advantages: flexible settings. You can set in the settings so that the flashlight turns on immediately when you start the application and automatically turns on the timer when you start the application. The settings allow you to turn off the screen lock and lock the flashlight with the power button of the phone. You can also set the timer time yourself.
If the application gains popularity, it will give an incentive to the author to create new applications, taking into account the wishes of site visitors.
Thanks in advance, Dmitry.
QR code for installation:
If you liked the material, say your "thanks", share the links with your friends on social networks! Thanks!
What will we create
In this article, I will show you how to draw a realistic beard and two short hairstyles. And also what hair brushes for Photoshop use.
1. Basic principles of creating short hair
There are many types short hairstyles... Today we will take a look at two trendy hairstyles that people often wear, and are also often used in their work by designers and illustrators.
Follow the direction
No matter which style you choose, one rule remains the same. For best results, paint the hair following the direction it grows out of the skin.
Let's consider this principle in practice:
Starting at the top of your head, notice which direction your hair takes depending on your hairstyle. When you start sketching and organizing the layers, keep this in mind to create the right hairstyle shape and choose the right one.
Challenge yourself
Try to draw hair that you would not have dared to depict before, and explore different curl patterns that will look interesting:
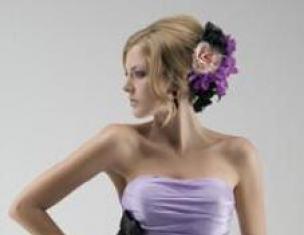
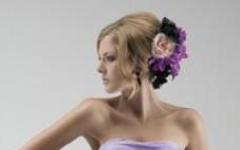
Choose the right hair photo
Choose photos that are clear and have good lighting so that you can easily determine how your hair should be colored. If you're new to drawing, choose hair colors that are easier to recreate. Here are the resources used in this tutorial:
- Pompadour Hairstyle;
- Short haircut;
- Beard .
2. Which brushes to use
I will be using brushes from the list of Adobe Photoshop Brush Presets. You can paint a lot with a basic round brush. Experiment with the Stiffness values hair brushes in Photoshop to get soft or hard edges for the effects you want:
Brush Hardness - 0% (top) and Brush Hardness - 100% (bottom)
The following brush is a Hard Round Opaque Pressure Simulation Brush which can also be found in the Presets:
Make sure the Opacity is set to Pressure for even more versatility.
And for each brush, turn on Pen Pressure under Shape Dynamics to keep every stroke fluid and elegant. I use this function a lot for subtle strokes:
Custom hair brushes and templates
Using custom brushes for Photoshop hair you can achieve a realistic effect by drawing several strands at a time. Choose this option if you are an advanced illustrator or want to save time drawing. You can also use hair templates to directly blend into your portrait.
3. How to Draw Realistic Short Hair: Pompadour
The pompadour is a mixture of different hairstyles. Popular in the 50s in modern interpretation This retro haircut includes trimmed or shaved sections on the sides.
Step 1
Draw a sketch of the Pompadour using a smooth brush. I will use this hairstyle as a base.
Note that the hair is slicked back at the top and down at the sides:
Step 2
Apply continuous Brown color for the base. Place this layer below the sketch layer. Set the new layer as " Clipping mask"For the canvas, and change its Blending Mode to Multiply. On this new layer paint shadows using shades of the same brown:
To understand which brush to paint hair in Photoshop, keep in mind that changing the blending mode in this way will automatically darken the color. The new shade is multiplied by the base shade.
Step 3
Set a few more layers as " Clipping mask"If you need to add more shadows. Then create a new layer and set its blending mode to "Overlay". Set the foreground color to white to start painting warm highlights where the light hits. Apply multiple highlights, making sure to match the lighting logic of the hair:
Step 4
You can remove the hard black strokes of the sketch by mixing them with the colored parts. To do this, set the blending mode of the sketch layer to "Overlay". Then add a new layer and set it to “ Linear Dodge". Create lighter areas of the face by sketching in the areas around them hair brushes for Photoshop light beige:
Step 5
Adjust the hair color with an adjustment layer. Go to Layer> New Adjustment Layer> Color Balance and adjust the settings of the adjustment layer to deepen the reds, blues and magenta of the hair:
Step 6
Now that we have adjusted the colors, in the next step, sharpen the small details. Ask brushes for drawing hair in Photoshop hardness 100% and draw arcs that will represent the hair lines:
Step 7
Decrease the brush size to paint fine, thin strands of hair around the edges of the head. Finally, add a nice gradient background behind the head. Paint some of the hair around the edges of the head with a background color to make the whole head look more realistic and blend in more harmoniously with the scene:
Here's what the finished Pompadour hairstyle will look like!
4. How to Draw Realistic Short Hair: Curly Hair
Step 1
Use this image to create a base. Using the same brushes for painting hair in Photoshop sketch out the face and hair. Notice the change in directionality of the hair. The hair in this image is longer and therefore curls in different directions:
Step 2
Now apply the base colors. Apply each color on a separate layer. Use them as clipping masks to create shadows. Set the Blending Mode of the shadow layers back to Multiply and use the same colors you used for the base to paint the shadows:
Step 3
Reduce the Opacity of the Sketch Layer to 25%. Create two new layers, one set to Blending Mode "Overlay" and the other set to " Lightening the base". On the first layer paint some bright blue highlights. And then paint in areas of pink highlights on the hair for an interesting effect:
Step 4
Reduce size Photoshop brushes hair strands to 5px and set the hardness to 100%. Color in the strands, observing the direction of each of them. Try not to lose sight of which parts of the strands are overlapping, and remember to remove the areas that extend beyond the boundaries of the strands:
Step 5
Add a new layer with the blending mode " Linear Dodge»To paint more intense highlights. Apply pink to the edges of the hair to match the background color. They will add a sense of definition and shine to the hair. Let the background show through the hair in some places so that it does not look stuck together:
Step 6
Conduct additional processing. Sharpen the strands with highlights, and also draw in additional strands to make them crisp and appear to be moving. Finish up the image by adding a new Levels adjustment layer to adjust the intensity of the colors:
Here is a finished image of a curled hair style.
5. How to draw realistic facial hair
Another type of short hair that we cannot forget about is facial hair. Even though they are not located on the top of the head, they behave in a similar manner. Let's get a look, what brush to paint hair in Photoshop.
Step 1
I used this image as an example. Start with a preliminary sketch by reversing Special attention on the direction of the hair. In this case, we must remember that the hair is directed downward:
Step 2
Adjust the base colors and reduce the Opacity of the sketch layer to 20%. Use a Soft Round Brush to paint shadows on a new layer and set this layer to Multiply Blending Mode. Facial hair color varies by skin tone, so make sure you blend harmoniously between skin areas and adjacent beard and mustache areas.
,) it does not have a clear place in the general algorithm for processing hairstyles, therefore it can be applied both at the beginning of work (after removing the hairs that have come out of the hairstyle), and at the very end.
In this article, we will look at the features of how hair looks in a photo and how to properly set up a brush in Photoshop in order to paint whole "natural" hair strands as quickly as possible.
3 characteristic features of hair structure
If you look closely at the “natural” (non-drawn) strand of hair, you can easily notice three characteristic features. It is them that we have to recreate when drawing - this is the only way to achieve a natural result.

These features are:
- Hair texture... Even perfectly groomed hair, due to its flexibility and scaly structure, reflects light slightly differently along its entire length.
- Uneven color and brightness... There are no two hairs that are identical in color and brightness. Some will be a little brighter, some will be darker, some will cast a shadow on the neighboring ones, others will glare. This feature is especially characteristic for light or red hair, but it must be taken into account when processing the hairstyles of burning brunettes - otherwise, when drawing strands, individual hairs will quickly merge into a single-colored spot.
- Uneven illumination... Strands of hair are never perfectly straight, one way or another they bend (at least - "flowing" around the oval of the head). Thus, according to the law of incidence and reflection of light, somewhere the hair will glare, and somewhere it will be darker.
Setting up the hair brush
The good news is that setting up and using the correct brush types automatically fulfills two of the three natural conditions! Let's take a look at these settings.
Brush type and setting
We need a brush like Round Fan (red)... The choice of the type of brush is carried out through dropdown menu (green), but since we need advanced brush settings, it makes sense to immediately open the menu Brush (fuchsia).

Consider the settings for the parameters of the brush villi:
- Shape - Round Fan... This shape of the brush is symmetrical in shape, so it will be convenient for drawing in any direction, even on tablets of initial models.
- Bristles (Number of villi)... Determines how many hairs are drawn in one brush stroke. Avoid high values - with it 1) the hair will blend in color 2) the perfect repetition of the shape of individual hairs will look unnatural and "give out" the retoucher. Typically 20% works well for drawing strands. For single hair, choose 1%.
- Length... The longer the villi of the hand, the less controllable and predictable they will be. Let's choose the minimum value - 25%.
- Thickness... This parameter determines the thickness of the villi and, accordingly, the thickness of the drawn hairs. When drawing large strands in large portraits, it makes sense to first increase this value a little (to create a dense "base" of the strand), and then reduce it to a minimum (to draw thin hair and giving natural strands).
- Stiffness... Similar to the length of the villi, it determines how controllable the behavior of the brush will be when painting. Let's choose 100%.
- Angle... This parameter is necessary for artists when using brushes of complex shapes and is usually set by simply rotating the Art pens when using top-end tablet models. Leave the default value: 0.
- Spacing... Determines how often the brush fires during a stroke. At large values, a dotted line will be drawn, which is not suitable for our purposes. Set the value to 2%.
Note ... Unfortunately, it is almost impossible to draw high-quality hair with a mouse. A graphics tablet is needed, at least the most inexpensive one.
In my experience, I can recommend the Intuos Pro (for the most comfortable and ergonomic work) or One by Wacom (for those looking to save money). Size M (medium). This is my personal opinion, I do not intend to advertise Wacom products.
Setting brush options
Texture
To make the drawn hair immediately have the optimal texture, put a check in the Texture box and adjust the appropriate parameters, as shown in the screenshot:

- in the drop-down menu, select the type of texture, circled in red;
- Scale: 62%;
- Brightness: 6;
- Contrast: -20;
- Checkbox for Texture Each Tip (Use a texture each time you apply a brush);
- Mode: Linear Light;
- Depth: 21%;
- Depth Jitter (Change the depth of the texture): 0%;
- Control: Off.
Color change
In order for each new hair (or a group of hairs drawn in one stroke) to be unique in color, put a tick in the Color Dynamics box and configure the color change parameters as follows:
- Apply Per Tip(Use with every brush application) - NOT ticked;
- Foreground / Background Jitter(The degree of color change from foreground to background): 100%. This parameter determines the "corridor" / "field" of colors with which the brush will paint. In the future, to set these colors, it is only necessary to select a pair of the main and background colors using the eyedropper (or manually), the brush will randomly change the color in the "corridor" between these parameters, each time "choosing" new color from the resulting gradient. For the best effect, in most cases, a pair of 1) dark and saturated and 2) bright low or medium saturated colors will be optimal;
- Hue jitter(Color tone change), Saturation Jitter(Saturation change) and Brightness jitter(Brightness change): 4%. These parameters will further expand the variability of the selection of colors, including adjacent colors and shades from the area around our "corridor";
- Purity(Color purity): 0%.

Other parameters
Also, in the Brush menu, you need to check the Wet Edges and Smoothing boxes - this will provide the best texture mapping and give the necessary smoothness to the painting.
The Transfer parameter determines the relationship between the opacity of the brush and the pressure applied to the tablet pen. To draw translucent and / or thick hair, you can leave it on, while drawing the thinnest hair and strand it will be more convenient to turn it off.
The immediate size (Radius) of the brush is determined by the retoucher based on his own preference and the size of the portrait. It is also recommended to combine the brush size changes with the Thickness parameter described above for maximum efficiency.
Note ... In order not to memorize all these parameters, it is recommended to adjust the brush once and create the appropriate preset. Or you can download.
Giving volume
After setting up the brush and setting the appropriate pair of colors, create a new layer (Ctrl + Alt + Shift + N) and draw a flat strand on it.
If you are drawing a strand from the edge of a hairstyle, for extra naturalness, do not forget to draw some “loose” hairs that seem to have been accidentally knocked out.
Note ... It is also convenient to draw single hairs using a similarly adjusted pencil type brush with parameters: Softness - 0%, Shape - Erodible Point.
Now, in order to draw the volume of only this strand and not change the photo itself or (in our case) the background, create another empty layer and set it to Clipping Mask mode to the previous one (Ctrl + Alt + G or Alt + Click between layers). Select Soft Light or Overlay as the blending mode.
Note ... If you want to greatly change the volume of the strand and use the method using the Color Burn and Color Dodge blending modes, as described in, you will need to create a couple of empty layers and put each of the them.
On an empty layer, paint the volume of the strand in the usual mode (with a regular round black and white soft brush with a convenient opacity for you). We make sure that the brightness of our strand matches the shape and brightness of the corresponding part of the hairstyle.

Site help
Do you like the site? Have the lessons been helpful? You can support the project simply by downloading and installing the "Flashlight" application for Android. The application was written by the author of the site and expects to publish his applications in the future. The flashlight controls the LED on your phone's camera flash, and also turns on the backlight on the screen at full brightness.
Advantages: flexible settings. You can set in the settings so that the flashlight turns on immediately when you start the application and automatically turns on the timer when you start the application. The settings allow you to turn off the screen lock and lock the flashlight with the power button of the phone. You can also set the timer time yourself.
If the application gains popularity, it will give an incentive to the author to create new applications, taking into account the wishes of site visitors.
Thanks in advance, Dmitry.
QR code for installation:
If you liked the material, say your "thanks", share the links with your friends on social networks! Thanks!