
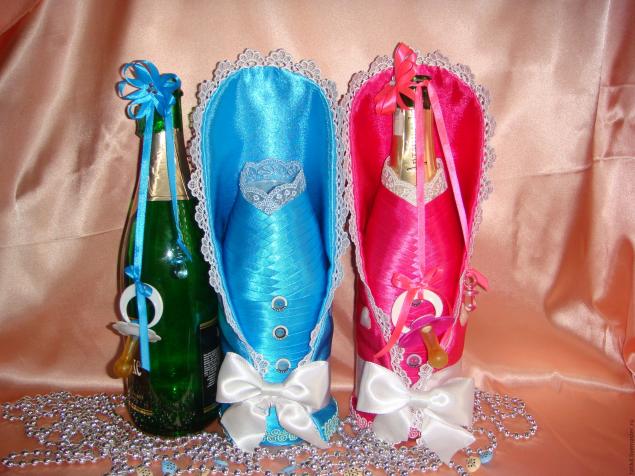
Crocheted covers for a bottle Wedding champagne. A “groom” case and a “bride” case.
Everything at a wedding should be beautiful. Even champagne bottles can turn into bride and groom. We present a master class on “quick” knitted covers for wedding champagne.
These cases can truly be called an express option. Everything is knitted very quickly, and even a novice craftswoman can do such beauty. Give your loved ones an original gift!
Materials: white acrylic (or any other yarn) with lurex (you can safely take not the thinnest one), black acrylic, some yarn in pink shades (2-3 colors), pink beads, thin ribbons for a hat (pink and black), decorative flowers for decoration , a piece of black satin ribbon (for the bow tie), 3 black and 2 white buttons.
The covers are crocheted 1.6 mm.
Master class:
"Bride"
1. Chain of 40 VP ( air loops) we close it in a ring. We knit in a circle.
1st row: 3 VP lifting, * 1 VP, 1 C1H (double crochet) into the second loop of the chain (that is, skip 1 loop)* - repeat the rapport until the end of the row, at the end we close the ring with a connecting loop.
2nd row: knits similarly. C1H should be located under the columns of the previous row, this creates a “grid”.
"Grid" diagram.3rd row: knitted similarly, but every 3 repeats we make an INCREASE.
INCREASE: we knit an additional C1H in a chain between the columns of the previous row.
Increase scheme.4th row: INCREASES every 2 rapports
5th row: INCREASES every 4 rapports
6-9 row: knit without increases (same as row 2)
10th row: we knit similarly to the previous row, but at the very end (on the last repeat) we do not close the row into a ring, but we knit a chain of 3 VP and 1 sc (single crochet) into the base of the column of the previous row.
Turn the knitting.
11th row: we rise in half columns along the arch to the column of the previous row, 3 VPs and then standard rapports. At the end of the row (on the last repeat), we do not close the row into a ring, but knit a chain of 3 VP and 1 sc into the base of the column of the previous row.
Turn the knitting.
Thus, a “cutout” will be formed in each row on both sides.
Scheme of formation of the “cutout”. The angle of the cutout is about 45°.12-28 r.: we knit in the same way, forming a “neckline”. Gradually the canvas will shrink.
The end of the resulting “tail” almost reaches the base of the bottle.Tie everything in a circle with sc.
We knit flounces:
1st day: 2 sc in each stitch of the previous row.
2nd row:*1 sc, 2 sc in the loop of the previous row*
Bride's hat:
We close 4 VPs into a ring.
1st day:
2nd row: 16 RLS = (16)
3rd row:
4th row:
5-7 rubles: 1 sc in each loop
8th day:
9th day: 1 sc in each loop
10th day: 2 sc in each stitch of the previous row
11th day: 1 sc in each loop
12th day: knit similarly to the 8th row
13th day: 4 VP lifting, * 1 C1H in the second loop of the previous row (that is, skip 1 loop), 2 VP*
Warp wedding dress the bride is ready.
You can decorate the outfit with ribbons, flowers, bows. There are plenty of options."Roses"
Usually I knit flowers “by inspiration”, without descriptions. And I especially like the fact that as a result all the flowers turn out different.
Approximate pattern: we knit a chain of 40 VPs, then according to the pattern:
We fold the resulting part into a rosette and sew it together. The petals themselves will bend a little.We knit several roses of different colors and sizes (to do this we reduce the number of “petals”).
We sew roses to the “dress” and hat; you can add decorative flowers, lace, and beads. We thread a pink ribbon through the holes in the hat.
If you know what kind of dress the bride will have (primary color, decorative elements), you can play with this in the bottle dress. It will look very impressive! You can sew one large flower or several small ones onto the hat."Groom"
The groom's suit consists of two parts: a main black one and an additional white one.
Black detail:
We knit a chain of 25 VP. Let's NOT lock ourselves in a circle!
1st day: 4 VP lifting, * 1 VP, 1 C1H in the second loop of the chain (that is, we skip 1 loop)*
2nd row: 6 VP, C1H in the base of a chain of 6 chain loops, * 1 VP, 1 C1H in C1H of the previous row*, at the end of the row, knit the last C1H into the side chain of the previous row.
This way the canvas will “grow” from the edges. Gradually the part will become similar to a trapezoid. Don't forget that the bottle is voluminous! Starting from the 3rd row, you need to make internal increases, similar to the increases in the bride’s dress.3rd r.: we knit similarly to the 2nd row, additionally we make internal increases every 3 repeats (see the description of the bride’s dress).
4th r.: we knit similarly to the 2nd row, additionally making internal increases every 2 repeats
5th r.: we knit similarly to the 2nd row, additionally making internal increases every 4 repeats
6-14 r.: we knit similarly to the 2nd row, We do not make internal increases!
At the end of the 14th row we close the knitting into a ring.
Check yourself: the canvas should completely encircle the bottle.15-19 r.(knit in a circle): 3 VP rise, * 1 VP, 1 C1H in C1H of the previous row*
We tie the bottom and neckline with RLS.
White detail:
We knit a chain of 5 VP.
1st r.: С1Н in the first loop of the chain from the beginning
2nd r.: 4 VP lifting, C1H into the arch from VP, 1 VP, C1H into the same arch
3rd r.: 4 VP lifting, *C1H into the arch from VP, 1 VP* - 2 times, at the end C1H into the same arch
A “triangle” begins to form.
4-9 r.: we knit in the same way, the “triangle” grows.
10th r.: 4 VP, C1H at the base of a chain of 4 air loops, * 1 VP, 1 C1H in C1H of the previous row*, at the end of the row, knit the last C1H into the side chain of the previous row (that is, in this row we expand the edges, as in black part)
11th r.: from the edges we make increases similar to the 10th row, and in the middle, on the contrary, we make 1 decrease.
The decreases will form the desired bend, and the part will ultimately fit exactly in the shape of the bottle.12th day: from the edges we make increases similar to the 10th row, and in the middle, on the contrary, we make 2 decreases
13-16th r.: from the edges we make increases similar to the 10th row, and in the middle, on the contrary, we make 1 decrease.
The part is ready.
Sew the white piece to the black piece.
The edges of the parts must match.Groom's hat:
We close 4 VPs into a ring.
1st day: 8 sc (2 sc in each loop) = (8)
2nd row: 16 RLS = (16)
3rd row:*1 sc, 2 sc in each stitch of the previous row* = (24)
4th row:*1 sc, 1 sc, 2 sc in each stitch of the previous row* = (32)
5-7 rubles: 1 sc in each loop
8th day: 3 VP lifting, * 1 VP, 1 C1H (double crochet) in the second loop of the previous row (that is, skip 1 loop)*
9th day: 1 sc in each loop
10th r.: 2 sc in each loop.
The brim of the hat can be made larger if desired.The groom's basic outfit is ready.
The groom also needs decoration. It is advisable that the bride and groom's outfit have some common detail (bow, flower, ribbon).Decoration option:
Sew on a bow tie, several black and white buttons, and a rosette. We thread a thin black ribbon through the holes in the pot.
I didn't have any buttons on hand, so I knitted them.Elegant wedding bottles are ready to decorate festive table!
We will need:
- hook No. 4;
- yarn of different colors: pink, green, yellow, white, red;
- cotton wool;
- needle;
- white and black threads;
- orange beads;
- knitting needles;
- champagne.
How to beautifully decorate a bottle of champagne for the New Year
Let's start knitting our pig, for this we need a hook and pink yarn. We collect five air loops and close them into a ring. We knit in the round, sometimes adding a chain loop to prevent the circle from becoming too tight. You should get eight circular rows. We knit a second similar piece for the head of our pig. When the parts are ready, we are in no hurry to sew the head together.
After that, let's start knitting the ears and snout. For the ears, we also cast on five loops and knit four rows. From the fifth row we add one air loop on each side, so three rows. Next, do the same, only decrease until there is only one loop left. We tie the ears so that they are even.

For the patch, we cast on four loops and close them in a circle. There should be three rows in a circle. From the next row we begin to skip several loops, the part of the patch should look like a hat. We knit another row, guided by the photo. Immediately make dots on the patch with red yarn. We stuff it with cotton wool and sew the patch to the head part.

For the eyes you will need white yarn. We knit according to the same principle as the patch, only smaller in size. Using a needle and black thread we embroider the pupils on the eyes. Sew the eyes over the patch. We sew all the details together, press the ears a little. Fill it with cotton wool and the head is ready!

Let's start with the body, cast on 20 loops. We knit eight rows, and from the next row we decrease two loops on each side. With a decrease you need to knit three rows, we tie the bottom in the same way. The part for the body should be in the form of an oval or circle. We knit another similar piece. For the tail, we cast on 15 air loops and knit a row. Don't forget to follow the photo. Curl the tail like a piglet.

We sew the parts together and fill them with cotton wool.

For the paws, cast on 12 loops and close them in a circle. We knit eight rows in the round, then a second similar piece. We fill the legs with filler and sew them together from the bottom with red threads in the middle.

We will knit the upper ones longer and without filler so that the pig will wrap around the neck of the bottle. The knitting principle is the same, cast on 12 loops and knit 16 rows. We sew all the details to the body and start knitting a dress for our beauty. For this we need yarn yellow. We cast on 60 loops for the hem and knit seven rows. If desired, you can immediately trim it with beads.

We cast on 32 loops and close them in a circle, knitting another row. Sew together the two hem pieces as shown in the photo. Next, right on the hem, we cast on 10 loops and knit eight rows, on the other side the same.

We put the dress on our pig and sew the details on the shoulders with thread. Immediately tie a bow, cast on 12 loops depending on the thickness of the threads. We knit five rows and tie. We wrap it in the middle with threads and sew it to the ear of our pig.

For the collar, cast on 20 loops, knit three rows and on the fourth row, decrease one loop on each side. We trim it with beads and sew it to the dress. Our beauty is ready, you can start knitting the Christmas tree.

We will need knitting needles and green yarn. We cast on 40 loops on the knitting needles and knit an elastic band, two purl stitches and two knit stitches. Next we knit 65 rows with purls, the piece should look like a sleeve. We will crochet the next parts, cast on five loops and close them in a circle. There should be six rows in a circle; we will need this part for the bottom of the bottle. We sew the details and put them on our champagne bottle.

We tighten the neck of the bottle with a thread, using the photo as a guide. Next, we crochet 45 loops and knit two more rows. Let's start knitting the pattern, see the diagram in the photo. We knit six such parts and sew them to the Christmas tree.


We put the pig on the neck and our champagne is ready! You can decorate with such beauty New Year's table or use as a gift.

Option No. 2
We will need everything the same as in the first option. The color of the dress will only be red and we will need tinsel. Red goes well with gold or white, so I chose gold-colored tinsel.
We knit all the details as in the first version, except for the arms, legs and dress. We begin to knit the legs according to the same principle, only after the fourth row we add red yarn. Sew tinsel onto the top of the red yarn.

For the dress, cast on 17 stitches and knit four rows. Next we go to a decrease for the sleeves. One loop on each side and so two rows. After that, we simply knit three rows and tie the part. The back of the dress is ready, let's move on to the front. First we knit the same way, only 10 rows and three rows on each side. We focus on the photo and immediately sew it right on the pig. We knit the hem in the same way as in the first version. We sew it to the top of the dress and trim it with tinsel.

All that remains is to knit the hat, cast on 17 stitches and knit three rows. Next we go to decrease, in total there should be seven rows. We sew the hat and sew on the tinsel. Sleeves are knitted like legs, only the sleeve itself is red. So our second, New Year's pig is ready. Happy New Year everyone!


Give each other gifts!
Ahead awaits everyone magical holiday, which is shrouded in a special atmosphere of joy, kindness, and happiness. All residents of our country are waiting for this day, because it is the New Year. It’s not at all difficult to create an extraordinary fairy tale in your home and decorate the festive table on this day. You just need to decorate the room and set the table. And, of course, complement the decoration with unusual details that will add a special zest to the interior of the room in connection with this holiday. Decorated bottles on a festive table will look very original and unusual.

Decoration with ribbons
It’s hard to imagine the New Year and Christmas holidays without drinks on the festive table. Usually on New Year's Day it is customary to drink champagne, which is opened to the sound of the chimes. Fun is not complete without strong drinks. There will also be a place for non-alcoholic products. You can set the table by placing bottles decorated with your own hands on it. Such decoration will immediately raise Christmas mood, so it’s worth being patient, finding materials in the house or purchasing scrap materials and starting to get creative.

For the New Year, housewives try to decorate the house in an unusual way; they find original recipes for preparing delicious dishes in advance. In preparation for the celebration, you can make many crafts with your own hands. The decor of glass items on the table will look great. To make bottle decorations, you can use various materials. Bottles of wine or champagne decorated with ribbons will look unusually elegant and solemn. It can be either a simple decoration or a rather complex composition.


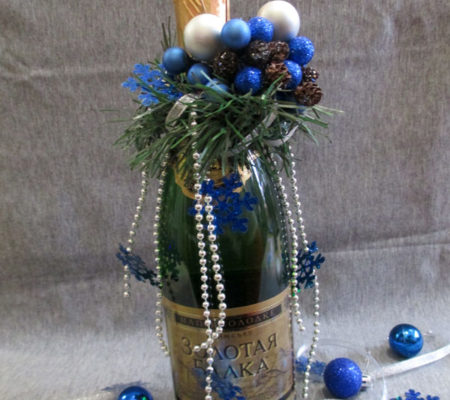
If there is very little time left, you can only take champagne, hang a satin ribbon at the neck and complete the composition fir cones, bunches of rowan, lace or beads.
A more complex design option is to decorate with satin ribbon of different colors and sizes. To do this, take two types of tape of different widths and contrasting colors and wrap them around the bottle in the middle. The bottom layer is decorated with a wide ribbon, and a narrow tape. The composition will look more impressive if you choose ribbons of contrasting colors for decoration, for example, blue and silver or brown and pink ribbons.
Particular attention should be paid to bottle caps. They are tied up satin ribbons, decorated with bows. The lid can be decorated with blue or satin ribbon, New Year's tinsel, rhinestones, beads, seed beads. But in itself it also looks impressive, so if you have very little time for decoration, you should leave it as it is. For those who are not afraid to experiment, you can complicate the task and wrap the entire bottle with satin ribbons. To wrap a glass container completely, you will need a large piece of satin ribbon, about 2.5 cm wide. If you wish, you can take two different shades braid, but such work is carried out if the basic foundations of such work are available.
Begin wrapping from the bottom of the neck. Thread a ribbon around the neck and secure it with a loop. To prevent the satin from slipping on the surface, the tape is glued with glue. Then you should overlap the tape, fixing it about half a centimeter lower each time. Next, you should continue working until the angle of inclination decreases as much as possible. The bottom of the bottle is decorated with a wider ribbon or lace.

In addition to these methods, you can wrap jars or bottles with satin ribbons in a chaotic manner or tie them with bows on a paper or fabric cover. The product will look quite stylish if you put a piece of velvet fabric or fur on the neck and fasten it with a beautiful multi-colored brooch.
Felt decor
New Year decorations made from felt look very stylish and festive. Before starting work, you should take care necessary tools and accessories.
To do original decoration from felt for the New Year and Christmas holidays, you need to take:
- an empty or filled champagne bottle;
- scissors;
- PVA glue or “Moment”;
- glue gun;
- felt, scraps of fabric, matting;
- beads, tinsel and other decorative items;
- red ribbon 2-2.5 cm wide;
- bias tape;
- ruler.

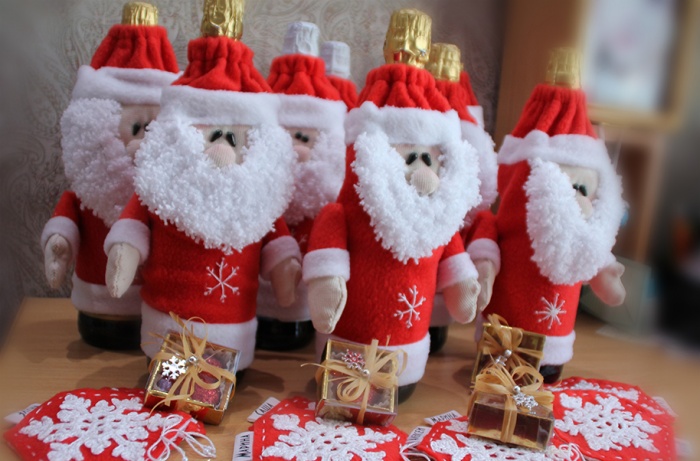
For the holiday, you can sew a cover for bottles, and felt is a very simple and convenient material for a removable cover. This is a soft material, so when working with it, you won’t need to process the edges, and the felt holds the desired shape well. This material is very convenient for work; special cases can be sewn from it to accommodate containers for alcoholic and non-alcoholic drinks. A red caftan for Santa Claus or a cozy white suit for a snowman can be sewn from scraps of felt.


You can come up with many options for decorating holiday packaging. Felt hats and caps, gnome faces or deer antlers will look fun and playful. All these parts can be very simply and quickly cut out according to the drawings and sewn, and then attached to the neck of the bottle. Cute hats made of red felt with white trim, as well as a scarf that matches the color, will decorate the container.


Figures cut out of felt that decorate the bottom of a bottle or jar will look festive; such mini-figures will also decorate the neck of the bottle. For holiday decor It would be useful to decorate with all kinds of tinsel, beads, pearls, and shells.
Knitted jewelry
A cover for glass containers can not only be sewn, but also knitted. You can knit both the case itself and bottle decorations. You can crochet or knit a bottle cover. To do this, you need to take the necessary measurements, make a drawing and knit the part. To make the bottle look more advantageous, it is better to take cotton or acrylic threads. It is better to choose a thread that is green, red, white or blue, depending on what idea is included in the design. When choosing green threads, you can decorate it in the form of a Christmas tree by attaching sparkles to its surface. A white background will be ideal for embroidery. Champagne, dressed in a white case with embroidered patterns, will only emphasize the New Year theme.


Red threads should be chosen to decorate a cover-suit for Santa Claus.
If you don’t have the opportunity or time to knit a bottle case, you can make it from an old one warm sweater. To do this, you need to cut off the sleeves from the sweater and measure the size of the glass container. If desired, you can make a cover for the bottle up to the middle of the product, or leave a few centimeters so that the length of the sleeve is longer than the length of the container. After measurements, the sleeve is cut to the chosen length, the bottle is lowered inside and the case is decorated at your discretion.


Cute knitted amigurumi figures can decorate details, placing emphasis on them. Christmas tree, crocheted, will decorate a bottle of champagne and make the festive table more original. Any container is suitable for decorating amigurumi, it can be plastic bottle or expensive wine or champagne.
Content
It seems to us that we have not yet written everything about crafts for the New Year, although there are a lot of interesting articles and ideas on this topic on our portal. But one topic was only partially covered - a cover for a bottle of champagne for the New Year. It’s easy and quick to make, and as a present or as a table decoration it turns out original and fun. Stock up on felt, fabric, old jeans, beads, buttons and all the related materials and let's create!
At the very end of the article interesting master class using the decoupage technique, but be sure to read and look at all the ideas that we have collected.
We elegantly decorate a bottle of champagne
A bottle cover for the New Year can be made from simple ribbons, thin ribbons, beads or beads and pearls strung on a fishing line. Whatever you have enough imagination for, design it. The basic idea looks like this:

You can take a wider ribbon, then it will be easier and faster to decorate the bottle. You can also stick various beads and any other decor onto the ribbon itself to make the product look more elegant. You can use several ribbons of different colors to create something like a fancy bottle costume, look at the photo:

And here is a girlish version for you. Thus, it is quite possible to decorate a bottle of champagne for a wedding or Valentine’s Day:
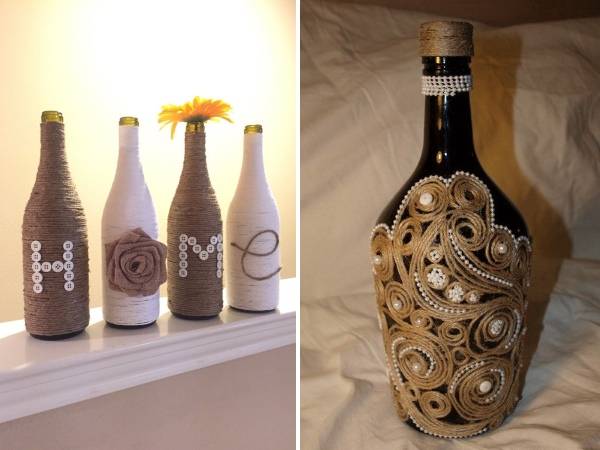
Twine for bottle decoration
You can create country style decor using twine. This is quite painstaking work and you will need glue, but in the end you get very stylish clothes for bottles for the New Year. From the same twine you can twist improvised flowers and decorate the bottle with them. In addition, you can glue acorns, spruce branches, slivers of cones and other natural materials.

By the way, empty bottles can also be decorated and used as a vase or a decorative element for interior decoration. You can put dried flowers, tree branches, and decorative feathers in such vases.

Paper for decorating bottles of alcoholic beverages
Don't underestimate paper. It could be ordinary colored paper, quiet, corrugated paper, thicker color double-sided. You can make a DIY champagne case for the New Year using one of these types of paper:

All you need is a small amount corrugated paper, Christmas tree beads, gift ribbons, New Year's decor and glue.
And for the next option you only need red, black and gold paper and now your bottle of champagne is dressed in a Santa Claus costume.
Also make the hats from thick cardboard and add cotton wool or a special filler for toys.

The exact same option can be made from felt or any suitable fabric:

Well, since we have smoothly moved on to fabric, we suggest looking at a few more interesting options, which can be used as a bottle cover for the New Year:
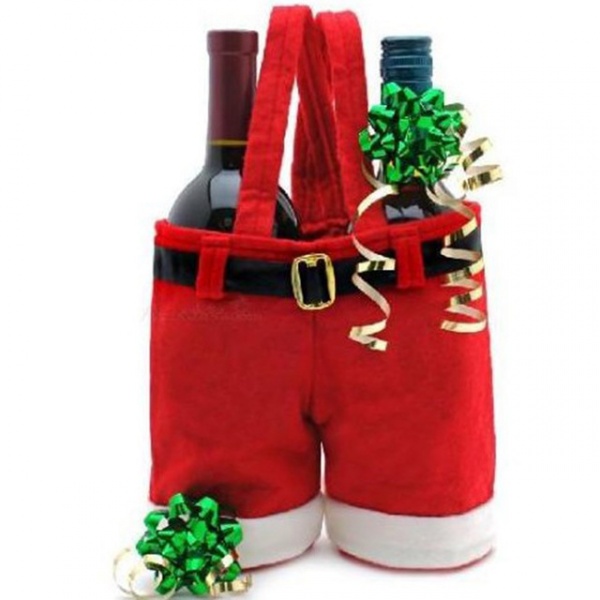
It is most convenient to present a bottle of champagne or wine in a bag as a gift.
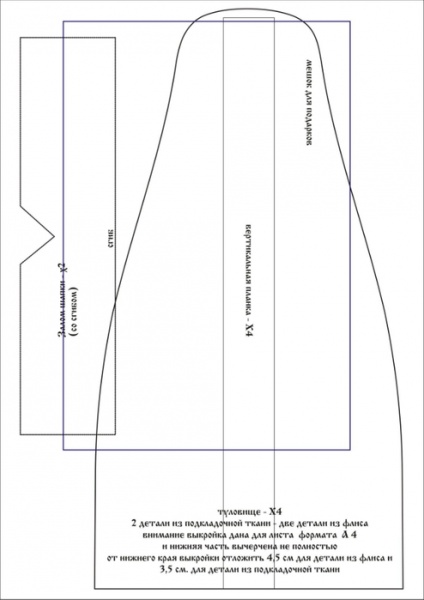
Well, to create a beautiful and more complex case you will need a pattern for a bottle of champagne for the New Year. We offer several options.
Don't forget that a quality product will require seam allowances and good material.

Knitted covers
This is for amateurs and craftsmen! Well, or for those who are not afraid of work, like to try something new and, in general, are a jack of all trades. In the end, everything can be learned. Although there is one trick - the cover can be made from the sleeve of an old sweater or jacket. You just need to cut it carefully required size and hem it well so that the cover does not come undone while you are bringing the gift to a visit.

You can knit a short cover, without a bottom or with one - that’s how it turns out:


Don't forget that next year is the year yellow dog, So knitted clothes for a bottle for the New Year can be made in bright yellow colors. On top, by the way, you can sew or hang a souvenir in the shape of a dog made of felt. In our articles we talked about how to sew such souvenirs, but let’s give another example:

You can go completely in a simple way- knit a thin scarf and a hat specifically for your idea. It looks very elegant and festive! Corresponds to the spirit of the New Year and winter:

A knitted bag will require a little more time and thread, but you can beautifully present some good alcohol in it.

Feel free to use other materials to complement your knitted design. This can be felt, thick suiting fabric, thick colored cardboard, jeans and other materials.

You can always be creative, especially if you're good with crochet or knitting, and knit, let's say, a story cover. Something like this:

Glitter and glitter bottles
New Year is all about radiance, brilliance, fireworks, colorful lights. An excellent option for decorating a bottle of champagne. Use glitter, loose glitter different sizes and colors, as well as glue. Apply it to the entire surface of the glass and while the glue is still wet, carefully apply the glitter so that it is distributed as evenly as possible. You can use the ombre technique so that the bottle has beautiful color transitions:
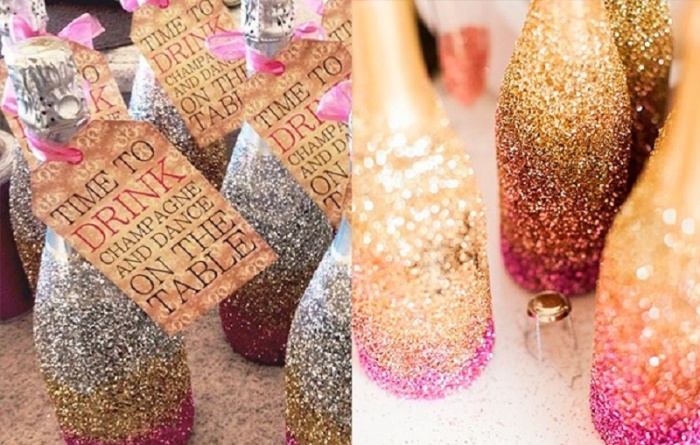
They look beautiful and large sparkles, they can even be mixed with confetti:

Decorative details for decoration
Clothing for a bottle of champagne for the New Year can consist of individual beautiful New Year's details. We suggest you first look at the ideas and then try to make them:
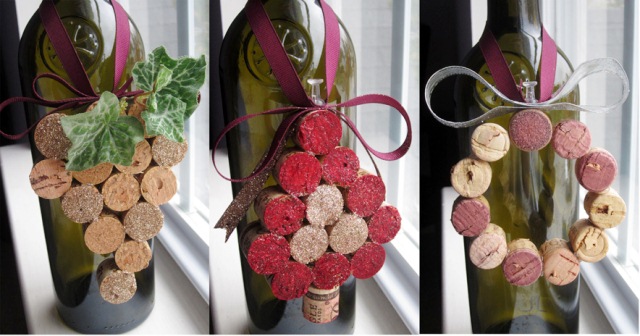
Use regular corks and glue to create a decor that will fit perfectly on the New Year's table.
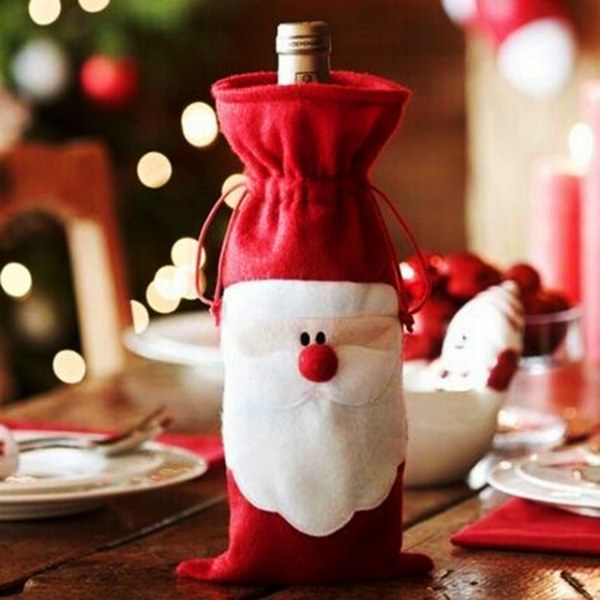
And a hat with a beard will help you dress up the bottle as Santa Claus:
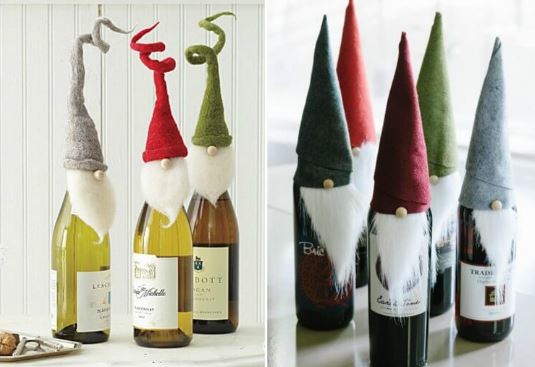
The hat can be made from felt, felted from wool, or any other material. Use cotton wool or special decorative material as a beard.
Ribbon, bow and Christmas decorations and now your New Year's clothes for the bottle are ready.
Remember what New Year's compositions we have already suggested you make using fir branches, beads, pine cones and other decor. It can be used to decorate alcohol:
Decorative pineapple made from candies
Let's call this a conditional case, because in our understanding it is already a whole New Year's compositions. What you need:
- actually, the champagne itself;
- glue;
- candies;
- corrugated paper.
Many needlewomen pre-wrap the bottle with paper, but in principle, this is not so necessary:

Some more very unusual ideas

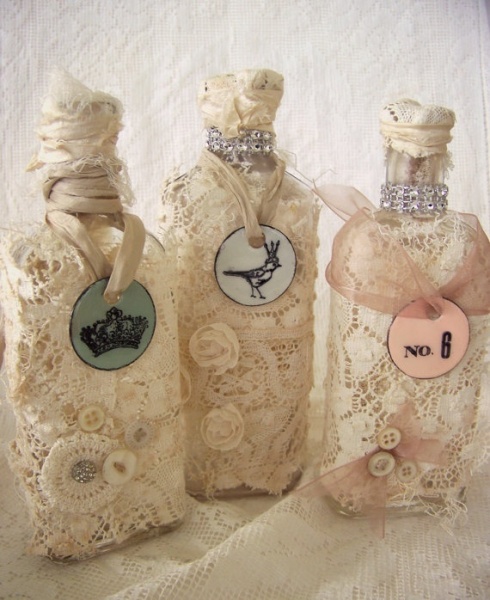
Sequins, twine, stones and the boundless imagination of the needlewoman are used here. And the next option is very gentle and is more suitable for a wedding. But if you choose darker lace inserts, it will also work for the New Year:
How do you like the decoration with pasta? The photo shows empty bottles, but what's stopping you from decorating a bottle of champagne with pasta?

The pasta can be glued in a chaotic order and both the bottle and the decor can be painted over with spray paint, or the decor can be painted separately and only then glued on.
New Year is always a holiday. Children and adults are looking forward to this holiday; they prepare for it in advance: they decorate windows, put up Christmas trees, prepare gifts and think through the holiday menu. I want everything to be magically unusual this night. Therefore, even ordinary things need unusual decoration, and New Year's champagne even more so.
I suggest you decorate champagne on New Year with your own hands, knitting “Christmas tree”.
A banal bottle of champagne in such a case turns into a useful and unusual one. New Year's gift- on the one hand there is a symbol, on the other hand - there is something to fill glasses with when the chimes strike... You can put this on the festive table, and take it with you on a visit as a .
How to knit a Christmas tree for New Year's champagne?
And such a Christmas tree is quite simple to knit. It is better to use hook No. 3-4. One Christmas tree takes a little more than half a skein of yarn.

We start crocheting Christmas trees with a chain of air loops.

We knit a chain of the required length, trying it on a bottle of champagne.

We connect the chain into a ring. Knitting Christmas tree - cover all around single crochet, constantly trying it on the bottle.

Schemes There is no crochet as such. The number of loops and rows depends on the thickness of the yarn and the knitting density. If the cover fits tightly on the bottle, then add the required number of loops in a row, knitting two stitches on one base loop.
I specially knitted a sample from simple threads, to make it clearer, since on "grass" yarn nothing is visible.

If the cover fits too loosely on the bottle, then reduce

Thus, we knit our Christmas tree of the required height, constantly trying on her for a bottle of champagne.

We start closer to the neck diminish the number of loops in a row, knitting stitches through one base loop.

Having tied the entire bottle, we reduce the number of loops to a minimum and close the last loop, pulling the thread through it.
Can top our knitted Christmas tree bend weirdly.
To do this you will need an elastic wire length approximately 10-12 cm. Gradually reduce the number of loops at the top of the tree up to 3-4 loops. Insert the wire into the hole. WITH wrong side Bend one end of the wire with a hook and place a small piece of cotton wool or padding polyester under it.

We bend it 90° so that this hook rests in a half ring on the bottle cap. If you remove the cover, it looks like this:

And here it is from the front side.

We continue to knit the cover, tying the wire, knitting loops on both sides in a circle.


If, due to padding polyester, the top is higher than the cork swells, it can be tightened a little by stitching it through with matching thread in several places.
To our bottle case couldn't fly at the most inopportune moment, and the bottle didn’t hit the floor, it’s better to do it below strings.
In the spaces between the loops we thread it with a hook tape.


We tighten the ribbon and tie it with a double bow. Now a bottle of champagne can't fall out from a knitted cover.

Let's move on to the most interesting and creative process –decoration knitted Christmas tree.
The Christmas tree can be decorated large beads and small bows tied on a fork.


