There are many different options for how to make pupae from shreds.
But as a game option - I like this one the most.
You will need:
A piece of white thick cotton (about 40 by 30)
Patchwork on the dress (approximately 20 to 20)
Patch for sleeves (approximately 17 by 17)
Threads
Wire
Book or thick cardboard.
Scissors
Pencils (I use watercolors)
In class, I immediately bring a lot of different shreds of all sizes and threads.
The kids choose.
Choosing threads for hair. We wind them on a book or cardboard.
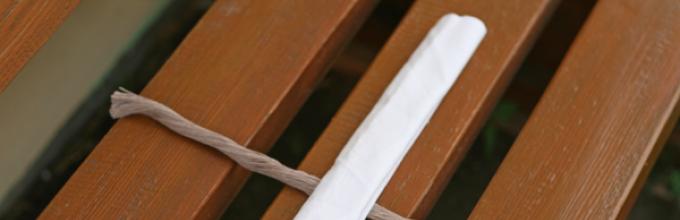
We fold the white patch into a tube.
We cut the hair threads along the edge of the book (cardboard). We fold the threads and the tube as shown in the photo.
Then we cross the threads around the tube.

And fold it in half.
We wind the thread, forming a neck. Already at this stage, the toy comes to life)
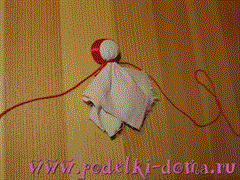
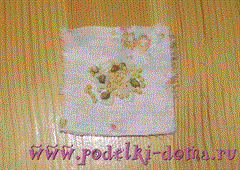
We put a flap for the dress front side up, and put our workpiece on top, as shown in the photo.
We wrap it in a tube and feel for the neck. At this place we wind.
We twist. 
Sleeves. We put the flap wrong side up. Cut the wire to size. We twist it into a tube along with the wire.
We attach the sleeves to the doll and wrap it with thread.
We form the palms by twisting the ends of the sleeves with a thread.
We draw the eyes and mouth of the doll.
Actually, this can already complete the work.
But it’s more interesting for the game if you make legs)
To do this, cut in half two pieces of white fabric. which is under the dress.
Today in the store you can buy any doll. But just not the way we make it. The master class will tell you how to make a doll from scraps with your own hands. This does not require special materials - just shreds of fabric left over from other works.
Tools and materials Time: 24 hours Difficulty: 7/10
- thick cotton fabric - for the body of the doll;
- shreds of bright fabric - for clothes;
- shreds of felt: dark color - for hair, of blue color- for eyes;
- thick woolen threads - for hair;
- filler - batting or synthetic winterizer.

For example, you can sew a boy doll or a girl doll. Make hair from felt - short, from threads - long. And you can dress the doll in completely different ways: in shorts, and in a dress, and in a skirt with a jacket, etc. etc.

Step by step master class
So, let's begin!
Step 1: choose fabric
- for the body of the doll it is better to use a dense cotton fabric(the denser the layers of stuffing material are laid, the stronger the cover should be); advice - when choosing a shade of fabric, you should avoid bright, saturated tones that coarsen the look of the doll;
If there is no fabric for the body of the desired color, you can “boil” it in tea: brew a tea bag in half a liter of water, lower the fabric there for 50-60 seconds, take it out, put it on a film so that the fabric cools down, wring it out and hang it on a rope - then there will be no streaks on the fabric
- for hair, eyes and "boots" it is preferable to use felt;
- for clothes fit absolutely any fabric.
Step 2: Pattern
First, let's deal with the pattern: with copy the photo to your computer, print it, cut out the patterns.
By enlarging or decreasing the pattern when printing, you will get a small or large doll.


For one doll we need: 2 parts for the head, 2 for the body, 4 for the arms, 4 for the legs, one for the hair.
Step 3: cut the main details
Lay out the patterns on the fabric. At the same time, make sure that the shared thread runs along their central axis (so the parts will not stretch much, and the doll itself will retain its shape). Circle the contours with a pencil or fasten the patterns to the fabric with pins. When cutting out the details, make an allowance for seams 0.5-0.8 cm wide around their entire perimeter.
Step 4: cutting and sewing additional details
If necessary, you can add additional details - we repeat, if necessary - since it is quite possible to do without them. For instance:
- shirt pocket - just cut out a pocket-shaped piece from a piece of fabric (do not forget about the allowance), attach it to the body part (tucking the edges of the pocket - that's why we need an allowance), and then sew along all sides except for the top. Iron from the front and back side;

- sleeves - cut a strip of fabric as wide as the sleeves, adjust the length yourself. Enclose the bottom edge by 0.5 cm, then again by the same 0.5 cm (so that the sleeve protrudes a little), sew the bottom edge. Then cut the strip to the upper edge of the arm piece diagonally, according to its shape. Sew the sleeve to the arm, along both sides. Repeat the same with the other 3 pieces for the arms (the front and back pieces for each piece will be mirror images of each other);

- boots - for this, it is necessary to cut out the detail according to the shape of the lower edge of the leg, put upper edge, and then sew on it each "shoe" to lower part each part for the legs (applies to all four parts).

Versions additional details depend only on the imagination of the craftswoman. Here, for example, what "shoes" can be:

And you can assemble a doll from the following parts:

Or from these:

Step 5: sew on the hair
boy doll
- Attach the hair to the blanks for the head, sew along the contour.
- For a boy doll, sewing on hair was not difficult for us. But the girl will have to tinker.
doll with ponytails
Attach the hair to the blanks for the head, sew along the contour. Attach the threads (hair) on the sides and stitch to the workpiece in the way shown in the photo:
.
When the doll is ready, simply collect the hair with a ribbon.

Doll with long hair
Cut the hair fibers to one length. Place them evenly across the part and sew along the line. parting: to the back of the head - almost over the entire part, to the front - by 1/3. Leave 0.5 cm free from the edge (marked in red in the photo) - so that in the future it will be possible to sew both parts:

Let's jump ahead a little and note that when the doll is ready, you can collect the hair in ponytails or braid it. And so that the hair does not fall apart, wrap each tail with a thread and grab it with several seams to the fabric.

Whether we are sewing a doll-boy or a girl, in the end we should get such a set of blanks:

Step 6: doll face
We need circles for the eyes - 2 pieces.
- Sew them in a circle to the blank for the face. Stitches are minimal (it is more convenient to sew).
- The mouth is embroidered with pink or red threads.

Step 7: Gathering the Parts
Body and head details
we sew them together, the main thing here is not to make a mistake and sew it correctly - the face to the part with a pocket, to the back - the second side of the head. 
Details for the arms (and legs)


- turn the parts out (a pencil will help with this: gently push the part outward);

- hands and feet are filled with padding polyester. Again, a pencil will help us with this - push the filler with it to the end of the part.
Adjust the amount of filler yourself. Just do not overdo it - the doll will turn out to be too stiff
Step 8: Sew on the arms and legs
Namely, to the back of the front. Place your hands 0.5 cm below the seam along which the head is sewn. Position your legs symmetrically to each other.

Now you need to sew the front and back of the doll together. Fold them right sides in. Then sew along the entire outer edge. We start and end the seam at the place where the leg begins.

Make a few cuts along the seam line on both sides of the neck/head (so that the pieces don't bulge).

Turn outside, fill with padding polyester through the bottom hole, sew.

Step 9: Clothes for the doll
We sew shorts for a boy, a skirt for a girl.
From two pieces of fabric, you need to cut out two blanks for future shorts (see the pattern in Step 1), and then it’s a matter of technique - we sew shorts.

It is even easier to sew a skirt: we sew two patches, tuck them from below and from above, lay a seam. Either from above or from below we stretch the elastic band. The skirt is ready.

Well, that's all, the doll is ready! We hope you enjoyed making it, and your child is happy that he has a toy unlike any other in the world. Good luck!

Dolls will always be children's favorite toys, not only because it is easy to create your own fake world with them, but because the variety of dolls is inexhaustible. In the whole world, dolls are made from different materials, colors and sizes, they are mass-produced by large corporations, the authors create single copies of dolls, and simple needlewomen are able to create an unthinkable miracle for their children - to make a doll, putting all the love and care into it. You will learn how to make a rag doll with your own hands using patterns below in the material.
As it turned out, the most in a simple way to make a doll is to sew it. Rag dolls have always been and will always be in fashion. Our grandmothers and great-grandmothers sewed dolls, Russian girls were engaged in needlework, embroidery and decorated doll outfits, and now ladies are very fond of making lovely dolls from a large selection of fabrics and threads.


Making cute rag dolls does not require special craftsmanship or DIY skills, a basic knowledge of sewing and pattern is enough. Materials can also be prepared from the remnants of fabrics, old, but in good condition clothes, pieces faux leather or fur, and even old wigs can come in handy for creating doll hair.
Let's start with a master class on creating a rag doll
Without a doubt, every needlewoman will be able to sew a rag doll with her own hands with patterns, because patterns are the best assistant. Correctly drawn patterns guarantee a beautiful and impeccable result.
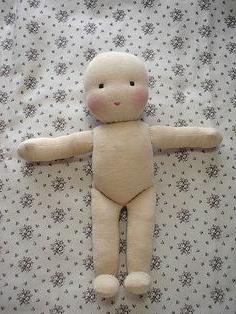
Below is an example of a pattern by which you can sew such a cute baby without any extra effort:

1) Take 2 types of fabric - colored for the body, arms and legs, flesh - for the face.
2) We cut out the required number of parts according to the patterns.

We put the pattern of the head on a light fabric, the rest - on a colored one.
The patterns themselves always indicate the number of necessary parts, so you can either cut the right amount or simply fold the fabric in half, fasten it with needles and the work will be half as much.
3) We sew the patterns together separately - the torso, arms, legs, head, while leaving a place for stuffing the doll with filler (it is better to use a synthetic winterizer).
4) We stuff the doll and sew the parts to each other - the doll is ready!
5) Denote the eyes and cheeks on the face with acrylic paints or cosmetics.
This simple doll is sewn according to the same principles:
As well as many other toys.

By the way, rag dolls they do not have to look like people, figures of animals or fictional characters are also sewn from fabric using the same technique using the necessary patterns.


We make Russian matryas with our own hands according to patterns
Dolls have always been reflected in the era of time. In Russia, dolls were given a magical meaning, according to which she was not only the keeper of the home and family hearth, but could also fulfill conceived desires or protect a person from black forces. Keeping the traditions of our ancestors, we will consider a master class on creating Russian rag dolls, which can also be made from fabric cuts and, of course, red threads. For some dolls, straw or twine is used. According to old beliefs, a doll must be made without the use of scissors and needles, so consider traditional version for the manufacture of a doll-amulet - a plantain, which brings good luck in travelling, and the second way to decorate and decorate the house is to make a simple rag doll-bell according to patterns in a Russian outfit.
- Doll-amulet plantain.
It is better not to cut the scraps of fabric with scissors, but to tear them with your hands into squares of the desired size.

Let's prepare a small square of light fabric, put some cotton wool or rags in it.

This will be the head, we tie it with a red thread, we straighten the remnants of the fabric.

We tie a satin ribbon on the head. If the tape does not hold well, you can fix it around the neck with a thread.
We dress the doll - we tie a sundress from a flap of square colored fabric around the body and also fasten it with threads around the neck.

The main feature of this doll is a knot, which should always be with her. You can put something in it that reminds you of home. Previously, they put a piece of bread or crackers, ashes from a home oven, now you can put a handful of cereals.
We make hands from a piece of white fabric, folding it into a tube.

We tie the resulting part around the neck of the doll.

We tie the bag to the hands with a thread.

With the final touch we tie a scarf on the head of the plantain.
A handmade rag doll is a classic home amulet. Traditional toys made of rags and flaps in our lands began to be made a very long time ago. This is one of the favorite activities of our grandmothers, and it is not surprising, because any crafts that are created at home carry positive energy.
A do-it-yourself rag doll is a classic home amulet
Before making such a doll, you should select materials. The choice of fabric is a very important stage in this work. Depends on its quality appearance products, the manufacture of which will require a lot of time and effort from the master.
Craftsmen prefer a large number different fabrics, but among them there are two materials that are best suited for creating dolls.
- Polartec. This fabric is a knitted fleece.
- Doll jersey. This material is quite dense, it is easy and pleasant to work with it.
There is cotton jersey, it is also perfect for this work.
DIY rag doll (video) mk step by step
What other fabrics can be used?
- Coarse calico. It is an environmentally friendly, cotton material. The advantage of such a fabric is that it practically does not need to be looked after. It also has the advantage of being affordable.
- Linen. Very smooth and pleasant to the touch material. Linen is slightly thicker than cotton and slightly coarser. There are many shades of linen fabric, so the craftswoman will definitely find the one she needs to sew a doll from rags.
- Knitwear. The main disadvantage of this material is that it is quite difficult to work with it. That is why beginners are not recommended to use knitted fabrics.
- Cotton. It is a very dense and easy to work fabric.

Various options are suitable as fabric for tailoring
To figure out which technique you want to make your doll, the pictures in the gallery will help. oh it could be stuffed toy and a twist doll.
Gallery: do-it-yourself rag doll (25 photos)


Russian folk rag doll: master class
Russian folk dolls made of shreds or rags have always been admired by foreigners. Such a national beauty doll, made in folk style, will not leave anyone indifferent.
Master Class:
- You will need white cotton fabric, a skein for twisting the head, as well as materials for a sundress and a scarf.
- Rolling cigarettes must be made for the heads of such works. A piece of white twisted fabric is placed in the center of a white rectangular fabric piece intended to make the torso.
- The edges of the rectangle are bent on both sides. The material is then folded in half.
- The face must be tied with a thread. It is desirable that she be white color.
- Now you need to do the doll's arms. The edges of the fabric are bent, and then it is folded into a tube. Now the ends of the tube must be tied with a thread.
- Hands are placed on the back of the doll. They are tied around the neck, and fastened - on the belt.
- To sew a sarafan, a piece of rectangular-sized material must be folded in half. From the side of the fold, a small incision is made for armholes. The armholes are inserted under the arms of the work, and then tied with a thread.
The last step should be tying a scarf.
How to sew a rag doll amulet?
Such a scarf doll is made without a pattern. After all the materials necessary for work are prepared, you can start working:
- First you need to make the body of the amulet. Take a piece of linen rectangular shape and fold in half. Then the material is twisted, leaving a 2 cm edge.
- Now it is necessary to form the basis of the body, namely, to bandage the resulting cylinder in three places, forming the head, waist and legs. Knots should be tied at the back in the center of the figure.
- Now, with the help of sanitary flax, you need to make the hair of the amulet. Linen should be combed with a brush, so that it fluffs up.
- Then flax is wound on the face of the amulet, that is, on the head. Winding should be clockwise.
- Then a square piece of fabric is taken, then it is folded diagonally and wrapped around the head.
- The twist is tied with a thread in the neck of the pupa. All knots are made from behind.
- The chest of the amulet is formed from the comb.
- A cross is made on the chest of the workpiece with a red thread. According to ancient beliefs, such a symbol serves as protection for the whole family.
- After that, the waist area is tied with an even number of knots.
- In order to make a hand amulet, it is necessary to roll one fabric flap into a tube. The hand is fastened behind the back and bandaged at the level of the wrists.

Charm dolls are quite easy to make.
If desired, you can decorate the work with a sewn sundress or scarf.
Patchwork rag doll
Master Class:
- The details of the doll are drawn on paper. Then the pattern is transferred to the fabric surface and cut out.
- After that, the details are stitched on sewing machine. Alternatively, you can flash them manually.
- If the material used is too loose, the edges should not be processed with an even seam, but with a zigzag.
- The chrysalis is turned inside out and stuffed with cotton. Alternatively, instead of cotton wool, you can use fabric shreds or padding polyester.
- It is worth very carefully sewing arms and legs to the body.
- Small buttons will do for the eyes and nose. You can also just draw them.
- Hair for the doll is made from knitting threads. Also at the end of the work you need to make a scarf. A small square is cut out of red fabric and folded diagonally.
On request, you can sew a sundress.
How to make a rag doll like our grandmothers?
The work consists of the following stages:
- The first step is to draw a pattern. It is applied to the fabric, after which - you need to cut the material.
- Both shreds of fabric, after being applied to each other, are cut off with pins for fastening and sewn together. Do not forget about the hole that needs to be left for stuffing the doll. Approximately 5 cm should be left.
- In places where the material diverges, for example, between the legs, a small incision is made. This is done in order to reduce the stretch at the corners.
- Taking the doll by the stuffing hole, turn it inside out.
- After that, you can stuff it with cotton wool or something else.
- The doll is decorated with buttons and ribbons.
- The dress is sewn from light fabric. After it is put on the toy, you should use a ribbon to tie a bow in the center.

The doll is made very quickly and easily.
If desired, it can be beautifully embroidered with threads.
- Since the master is making such a thing for the first time, he should not deny himself to have a lot of fun. If he likes extravagant and non-standard products, it's time to make a doll in this style. For example, you can sew a punk doll or a rock climber doll.
- What to do to make the work symmetrical? To do this, the pattern made on paper is folded in half, and the model of the doll is cut out on a folded sheet of paper.
- Do not be too sophisticated when working on an outfit for such a toy. An ordinary, hand-made dress will have a very cute and pleasant look. No wonder people say: "Beauty is in simplicity."
- So that there are no traces of sketching on the future toy, tailor's chalk should be used in the work. They are very convenient to markup.
It is impossible to imagine our life without such a toy as a doll. modern doll bright, fashionable, beautiful. Often dolls are accompanied by outfits, houses, cars.
But, despite all this splendor, do-it-yourself rag dolls are becoming increasingly popular. They are used not only for playing, interior dolls, amulets dolls are now in fashion.

Creating dolls, craftswomen invest in their products not only skill, but also their whole soul. A handmade toy will always be a great gift.
How to do beautiful doll by hand, you ask? In our article we will talk about this.

History of dolls
The doll accompanies humanity literally from the beginning of time. Carved from wood or molded from clay, the dolls accompanied the rituals of shamans and sorcerers, they were animated and deified.

The Slavic peoples made bundles from bundles of straw and scraps of cloth, they were mainly talismans for the house from illnesses, evil spirits and misfortunes.
Children's toys, too, of course, have always been. Animal figurines were carved from wood, dolls were sewn from scraps of fabric and stuffed with straw.

Much later, when they began to produce porcelain dolls in luxury clothes, only very wealthy people bought them, the children of ordinary people played with rag toys.
 Mechanical puppets were first made in the 18th century in China and also cost a fortune. Now dolls are sewn not to save money, but to have something original and exclusive.

Charm for home
The most uncomplicated doll in needlework is a knitted amulet, made from bundles of straw, threads and pieces of fabric.
Knitted, because the doll is not sewn with a thread, and its details are interconnected. Ideally, even scissors are not used in the work on the amulet, the necessary pieces of the canvas are torn off by hand, and the details of the doll are tied together with threads.
The product will be an excellent amulet if you sew it from the worn clothes of the owner, worn in the most good moments in life.

The eyes and mouth of the amulet are not drawn. Outwardly, amulets may differ, it depends on who they are made for, newborns for intercession, newlyweds for happiness in family life, for a home of abundance and prosperity. Amulets for wealth and an excellent harvest are decorated with wheat, seeds, nuts. For good health, a herbalist doll is made, filling it with fragrant herbs.

You need to make an amulet in good mood, sing songs, read prayers, talk about pleasant things.

The doll absorbs good emotions and words, and the same good will exude in your house.

Work on the amulet cannot be interrupted, so prepare everything in advance, choose the time so that you are not distracted and finish the job.

To make a knitted doll you will need:
- white patch for making the head
- filler (synthetic winterizer)
- patches of colored fabric (10 * 10 hands, 5 * 8 apron, 9 * 16 skirt)
- floss threads for hairstyles and tying
Wrap the filler with a white cloth and wrap it tightly with a thread, the “tail” of the fabric will be the body.

Note!

Gather a flap of the skirt in folds and tie it to the body, do the same with the apron, without tearing off the thread, wind it up to the doll's head, making a beautiful body.

Gather a piece of fabric for hands with an accordion in length and wrap it with thread. Wrap hands to the body of the doll crosswise - crosswise. You can put a scarf on your head, or you can make hair from threads.

Stitched dolls
The world of sewn dolls is diverse, here are soft cozy toys for children, and sophisticated elegant interior dolls and wonderful options that do not have the right proportions.

The Tilda doll, which appeared not so long ago, has become extremely popular. Such a doll has a disproportionate long legs and hands, on the face depict only eyes and cheeks.
Below is a pattern of a Tilda doll to realize your ideas.

The creative potential of each needlewoman is diverse and each sewn doll is unique.
Note!


A beginner can start by sewing small felt dolls, the clothes of these ladies are embroidered from beads and don't be afraid, such dolls always turn out.

For needlework, prepare:
- felt fabric
- hair yarn
- filler
- kapron threads
- beads

you can use finished pattern you can draw the template yourself, everything is up to you. Transfer the pattern to the felt and cut out the blanks. Embroider or draw a face on one of the blanks.

Now you can embroider, on each of the blanks, a dress with beads. Sew dresses for the doll separately and change outfits regularly. To make a hairstyle, cut the yarn into 15-20 cm pieces and sew on both blanks along the forehead line and the neck line.

Note!


The sewing method presented above allows you to create any dolls, and change the patterns at will.

Nylon dolls
Recently, nylon dolls have become popular, nylon allows you to make any facial expression of the doll.
How to sew such a magnificent doll? Experience is required to create this variety of dolls, and now we will present a simpler version of sewing from kapron.
You will need:
- nylon tights
- filler
- beads
- threads
- floss threads for hair
- safety pins.

You should start by filling and creating a form. After filling, tie or sew up the top tightly. To create a face, use pins, for example, marking the nose, stick the pins in place of the nostrils and sew between them, as shown in the photo.

- Sew the nostrils and wings of the nose with literally two stitches, you need to stitch each new detail of the face with a new thread.
- The cheeks are pierced with a pin from top to bottom and stitched in the same way.
- The line of the mouth is stitched, also after shaping it with pins.
- The doll's navel is marked with pins and stitched; a running stitch is used to create the legs.
- Sew on beads in place of the eyes, do a hairstyle on the head by sewing in floss threads.
- Eyebrows and eyelashes are easy to draw, clothes for the doll can be any, at your discretion.

There are many techniques for sewing dolls and types of toys themselves, do not be afraid to experiment and you will succeed. We present photos of dolls for inspiration.

Photo of do-it-yourself dolls