If you have a plastic cup or some kind of unnecessary jar lying around, do not rush to send them to the trash can. After all, they can be used to make an excellent glass for pencils.
What we need to decorate the cup:
- plastic cup or jar;
- leftover yarn;
- plasticine;
- flour;
- salt;
- water;
- a toothpick;
- glue;
- gouache.
Progress
1. Stick small pieces of plasticine directly onto the glass. At the top, two small balls will be enough, but the bottom should be covered completely.
2. We take the yarn and tightly wrap the cup with it. At the end of the work, the ends of the thread will need to be securely fastened.
3. Despite the fact that at this stage the glass looks quite good and original, we will still decorate it additionally. And for this we need to execute ... from the test. They will decorate our original pencil cup.
Crafts will be made from salted dough, which will have to be specially prepared. For the dough, we need the following ingredients: two glasses of flour, one glass of salt and one glass of water. All this must be thoroughly mixed. Make sure there are no lumps in the dough. In addition, it is very important that it does not dry out prematurely. The easiest way to solve the last problem is to place the dough in a plastic bag.
4. We will sculpt a ladybug from the dough. To do this, take a small piece of dough, roll a ball out of it. We put a toothpick on top of the ball, thereby dividing it into two equal halves. Thus, we will get the general outlines of the ladybug. Then we take another piece of dough, mold a head out of it and connect the two elements. We need to make some ladybirds.
5. At the next stage of work, send the dough to dry in the oven.
6. In the same way we make balls and also dry them in the oven.
7. Then the matter remains small - to attach all our elements to the cup and paint them. For painting ladybirds, ordinary gouache is best suited, which then (when the paint is completely dry) can be additionally covered with one or two layers of varnish.
8. If you have a desire, you can continue decorating the cup. Using the same paint and a brush, apply colored dots on the threads or draw leaves on which our ladybugs will sit.
9. The dough balls prepared in advance can be randomly placed on the surface of the glass. Alternatively, they can act as the core of the flower. In this case, the petals will have to be completed. However, if in the process you have some other original idea, nothing can stop you from realizing it.
It is best to do the cup making with the children. This will allow not only to develop in the baby fine motor skills, but will also bring him a lot of pleasure from co-creation... Experiment and engage with your child as much as possible. He will definitely appreciate it. Only in no case should you lead the process, just push the child in the right direction. And be sure to remember that independent activity is very important for any child.
Suitable for MK:
Marbles - stelyanny balls
To maintain order on your home desktop, you need to purchase, or even better, independently make stands for pencils, pens, scissors and others stationery... The pencil holder allows you to always keep writing objects close at hand, rather than looking for them in the corners of bottomless desk drawers. In addition, children can be attracted to the manufacture of a pencil holder, who will bring something new and interesting to its design. In this review, we will show you various stands for stationery that you can easily make yourself, you just have to choose a suitable idea and bring it to life.
1. Stand for pencils made of saw cut wood.
To implement the idea, it is necessary to prepare a low felling of the tree, then remove its inner part with a chisel, and install pencils inside.

2. Pencil holder from sewer pipes.
We cut sewer pipes of different diameters into small pieces with a jigsaw or a hand saw. We glue each of the segments in a row on a short thin board (previously, the board, as well as all the pipe segments, can be painted from a spray can in shades that match each other).


3. Pencil holder in a vest.
Cut out a triangular piece of "shirt" from white felt, glue it to a can of coffee or canned fruits. Then take the layer gray felt, cut out a rectangle from it along the circumference of the can, in front, cut out a triangle according to the size of the glued white "shirt", bending the edges and stitching with threads to the collar zone. You stick the "vest" on a tin can, draw a tie with a blue marker on a white shirt or cut it out of blue felt.

4. How to make a vintage style pencil holder.
Paste the tin can with a pink cloth, then gird it with a beautiful lace ribbon on top, bottom and center. On the end part, glue the previously purchased accessories in the form of a flower with pearls (sold in sewing centers).

5. How to decorate a pencil holder with buttons.
Method number 1. We take an ordinary small glass jar from under the baby puree, then string red and white buttons on a thin elastic band, tie the ends of the elastic into a knot, and put the resulting composition on the neck of the jar.

Method number 2. Glue buttons of different sizes on a tin can (the color can also be any), then paint the product from the spray can in gold or paint in a brick tone, and set off with gold.

6. DIY pencil holder decorated with twine.
We take a tin can, cover it with a layer of transparent glue, and wrap it, tightly joining the threads to each other. Finally, a bow can be glued to the front of the product. 
7. Pencil holder made of tree bark.
Carefully remove the bark from the dry tree and glue it to a glass or metal jar.

8. How to make toilet paper tube holders for pencils.
We put vertical marks on each tube and cut the fringe along them. We apply PVA glue to each fringe petal, and glue all the tubes to the cardboard layer. Then, with a marker, draw faces on the front of the stand.


9. Pencils with decorative soil.
On a tin can we glue a plain sheet of paper, which we then glue over with decorative stones.

10. Pencil holder in a nautical style.
We take several tubes from paper towels, apply them to the base, cut out of cardboard. We glue each tube with white napkins, forming large folds (you need to glue the napkins on PVA glue). Then we glue the tubes to a cardboard stand, and paint them with water-based blue, yellow and orange paint (you can mix white water-based paint with different gouache colors, in this case you need to mix white with orange, white with blue and white with yellow). Finally, we glue plastic fish, starfish, shells and artificial algae to the stand, all of which can be bought at the pet store.


11. Pencil holder made of pencils.
We cut off the sharpened parts of the pencils, you can cut it with a clerical knife or use a jigsaw. We put the bottom row of pencils on a cardboard tightly to each other, glue each pencil. Then we begin to lay out the walls, we place two pencils on the sides and glue them to the base, in opposite parts we also glue the pencils, so we continue until the height of the pencil holder satisfies its appearance.

12. Pencil case decorated with burlap.
Glue a piece of burlap on a tin can, glue flowers formed from light linen fabric around the perimeter of the neck.
13. Cover the pencil holder with wallpaper or craft paper.
We cut off the part corresponding to the size of the tin can from the wallpaper or craft paper, we simply glue the resulting part to the jar.


14. Pencil holder in a shirt.
From white felt we cut out a rectangle corresponding to the length of the diameter of the tin can, make an incision in the center of about 2 cm, glue the collar to the can, with an incision in the front, join at the back, bend the collar. From unnecessary shirt cut off the rectangle and glue it onto the jar over the collar. Glue the buttons on the front and tie a tiny tie from the matching ribbon. 
15. How to make a pencil holder from floppy disks.
In four floppy disks, it is necessary to melt holes with a hot awl, in each floppy disk there are 4 holes (two on the sides and two on the bottom), in the bottom, fifth floppy disk we make 8 holes, the awl needs to be heated over the candle (be careful). Then we form a cube from floppy disks without an upper part, we connect all parts to each other with a flexible wire, connecting its ends in the inner part of the product.

16. Do-it-yourself pencil holder from a shampoo bottle.
We cut the shampoo bottle in half, but not in the middle, but higher, the cut line can be smooth, rounded or in the form of cones (this will be the hair of the future monster). We cut out the handles from the upper unnecessary part, and glue them in the lower part. From black paper we glue the mouth of the future monster, from the white eyes and teeth. You can glue the Velcro on the back and fix the monster pencil holder on the wall.
 17. Vintage style pencil case with lace.
On a circle made of cardboard we glue a satin fabric, along the edge of the podium we glue lace. In the center of the circle we glue paper towel tubes of different lengths. We decorate them with fabric, lace and artificial pearls... Closer to the edge we install a mannequin cut out of cardboard and also decorated with lace, ribbons and beads. In the center we seat the figurine of a bird, and on the other edge we put a small photo frame made in a suitable style.

18. Pencil holder from the catalog.
We divide the flexible catalog into five identical parts, lay it sideways, bend all five parts to the center, in the form of flower petals, gluing them with transparent glue. We go over the top of the pages with a layer of glue so that the pages do not fall apart. In the end, the product can be painted with spray paint, and the hard-hitting parts can be decorated with beads or lace. 
19. Decor of a pencil holder with ice cream sticks.
We glue ice cream sticks onto two tapes, then glue the resulting picket fence to a tin can. We supplement the product with a wide ribbon tied from the outside.

20. Decor of a pencil holder with a cloth.
Cut out rectangles from dense fabric that correspond to the size of the selected tin can. Then we decorate each piece with a machine stitch with threads contrasting in color. We sew a case along the inside, turn it out and put it on a jar. 
21. Pencil holder from a tree trunk.
Saw off a small part from a dry tree with a saw, then use a drill in the upper part of the hemp to create many holes into which we install pencils. 
Unusual industrial pencil holders.
We also decided to show various factory-made pencil holders, some of which are really impressive. Below you can see what stylish and unusual stands for stationery are, they are available in the form of: camera lenses, monsters, hedgehogs, balls, Rubik's cubes, imitate stacks of folded paper, garbage containers, etc. 


Today we showed you how to make a pencil holder, and not even one! Such beautiful pencil holders will not only bring your workplace in order, as well as significantly embellish it. Try to make them together with the children, we assure the kids will be delighted.
Neither children nor adults usually stay in order for a long time on the desktop. The correct organization of the space and workplace will help to organize the work process for adults more efficiently and teach children to be collected and orderly. A glass for pens and pencils will help you organize your writing materials.
How to store writing utensils
In order for the desk to be in order, it is necessary to purchase or make a glass holder for pens, pencils, scissors and other office supplies. Such a stand allows you to keep the necessary office supplies nearby, and not to search in drawers or on shelves. A self-made glass for pens and pencils will appeal to children and motivate them to keep the work area in order. There are many different ideas how to make such a stand yourself. Parents can only decide on the material and model and bring it to life with the child. By the way, not everyone knows what the glass for pencils and pens is called. Many people call it that - just a "glass", but the name "pencil holder" or "desktop organizer for the office" would be more appropriate.

How to do it yourself
Making a glass for pens and pencils with your own hands is not difficult. For manufacturing, you can use a wide variety of unexpected ideas for decor and materials. Most of these crafts will not take much time and are not financially expensive, because it is interesting to decorate a glass with materials that are almost always available in many homes. A pencil can be made from plastic tubes (plumbing), cans, sleeves from toilet paper, wood, glass jars, flower pots. Of course, the look of a tin can or paper sleeve is not very pretty, the starting materials are just blanks and need to be decorated.
What is needed
To create an organizer glass you will need:
- raw materials (cans, bushings, material chosen for decoration);
- transparent glue;
- scissors;
- glue gun;
- threads, needles;
- ruler.
Some materials may require additional tools as well.

Wooden pencil holder
You can make a glass for pens and pencils yourself from natural wood. To do this, you will need a small wooden frame, in which you should remove the internal wood (with a chisel), giving the appearance of a glass. The workpiece turns out to be interesting and original. It does not need unnecessary decor, since wood itself is an interesting natural finishing material. You can also use the bark of a tree by pasting it over a tin or glass jar. Such a pencil holder will also look very unusual and natural.

Tin can decoration
You can make a glass for pens and pencils yourself using cans from coffee drinks and canning. Such material is tough, durable, and the decor fits on it easily and adheres well.
- Knitted cover- from threads the simplest knitting pattern can be used to make a cover that will perfectly decorate a brutal tin can. For ease of use, so that the bundle does not fidget, it can be glued to the jar.
- Rope (twine) - one more interesting way decorating glasses for writing instruments. To do this, we wind the rope or twine on a can, pre-lubricated with transparent glue (you can use a glue gun). In this case, the threads should be tightly joined so that they adjoin each other without gaps. For a complete look, you can decorate the product with a bow.

- Cloth - a rectangle should be cut out of thick fabric that wraps around the jar in diameter. Then sew the inside and put on the jar. If desired, the decor can be diversified by gluing beads, pebbles, bows. Such pencil holders look very impressive in vintage style, covered with fabric combined with lace and satin ribbon.
- Burlap - a rough material combined with a strip of linen or gingham fabric and lace will make a tin can a lovely decoration for your table and room. In this case, it is better to glue the burlap to the jar. And then decorate.
- Wallpaper, self-adhesive, scrap paper - you can use any piece of wallpaper, self-adhesive film and scrapbooking paper to give the tin can look. If the surface of the jar is corrugated, the pattern may crumple up a little, so it is better to choose smooth cans to make a glass for pencils and pens with your own hands.
Other unusual options
Also interesting ideas are:
- Grommets - Don't rush to throw paper towels and toilet paper tunnels away. They are perfect for storing pencils and pens on your desk. Decorating options can be different: they can be painted, painted or pasted over with corrugated paper.
- PVC pipes - a whole organizer can be made from plumbing pipes by gluing several pre-cut sleeves to the board. Before that, they can be decorated with fabric, beautiful pebbles or spray painted.
- From pencils - interesting idea is the decoration of the can or sleeve with colored pencils. They should all be equal to the height of the jar. Each pencil should be glued vertically to the jar, pressing firmly against the previous one. You can tie a ribbon around.
As you can see, everyone can make a glass for pens and pencils if they wish, and ideas can be very diverse. A DIY stationery glass will save you money and be a cute little thing to help you keep order.
We all want updates from time to time, and updates in almost everything: in clothes, at home and even at work.
An original, creative glass for pens and pencils can easily update the look of your desktop, and, of course, cheer you up. I propose to make this cute and useful little thing, using a minimum of materials that can be found in everyone in the house.
For work, you need to prepare:
1. Cardboard cylinder from foil or film;
2. Peas (split into halves);
3. PVA glue and glue - pencil;
4. Cardboard sheet;
5. Compasses;
6. Simple pencil;
7. Corrugated green paper;
8. Scissors;
9. Yellow acrylic paint;
10. ladybugs for decoration.

First, we cut off a part from the cylinder equal to the desired height of the future glass. This part will be the base of our glass.

In order to make the bottom of the cup, on a small sheet of cardboard using a compass, we draw one circle, the diameter of which is equal to the diameter of the cylinder, and around it we draw another circle, the diameter of which will be 1.5-2 cm larger than the previous one.

We draw the distance between the circles into identical sectors. 
Cut out the circle along the contour and cut the sectors to the beginning of the smaller circle. 
Now you need to bend the resulting segments and glue them to the outside of the glass. 
The bottom of the future corn cup is ready.
It's time to start decorating the cup. Lubricate a small section of the cylinder with PVA glue 
and glue the peas on it in a circle. 
We try to glue the peas of the next row strictly above the peas of the previous row. 
In this sequence, glue the entire surface of the cup with peas. 


When the glue is completely dry, we take a brush and yellow paint and paint over the whole pea cup, 
so that it becomes completely like an ear of corn. 
We make corn leaves for a cup from green corrugated paper or ordinary office double-sided paper. If you used corrugated paper, then we stretch the leaves a little in width.

Glue the finished leaves at the bottom of the cup. 
For gluing corrugated paper, it is best to use glue - a pencil, it does not allow thin paper to get wet and does not deform it. 
Also, on the bottom of the cup, to hide the seams between the leaves, glue a small piece of corrugated paper bent in half. 

This is the kind of glass you should get. 
If you wish, you can slightly decorate our corn cup, stick a couple of bright ladybugs on it. 
Hope you have a lot of fun and Have a good mood in the process of creating this extraordinary cup for pens and pencils. Now your writing and drawing supplies will always be in perfect order. And also such original craft Made with your own hands, you can always give your friends - classmates and even your favorite teachers! Good luck to everyone and success in achieving new creative heights!
A universal selection of gift ideas for any occasion and occasion. Surprise your friends and loved ones! ;)
Greetings, dear friends! Today I am in a hurry to tell you how a pencil holder looks and is made with my own hands. I will show you several master classes and just interesting photo ideas.
A few months ago, my husband had a birthday. In this regard, I decided that in addition to the main gift I want to give him something special, made with my own hands. The choice fell on a pencil holder, since Danil is fond of calligraphy and, accordingly, has a bunch of accessories for this type of creativity.
How to make a pencil holder with your own hands: a master class
I'll show you how to make a pencil holder with cute characters from the cartoon "My Neighbor Totoro". In fact, this technology can be applied to any kind of pencil holder.
To create a pencil holder you will need:
- Tin can (from any canned food)
- Any fabric of your choice for wrapping the can (I took fleece and miki fleece)
- Felt for finishing
- Threads in fabric color
- Scissors
- Thin-nosed glue or glue gun
- Plastic eyes
- Piece of padding polyester
First of all, you will need to measure:
- the circumference of the can,
- can height,
- bottom diameter.

In accordance with the measurements obtained, cut out rectangles from the fabric in 2 parts with the parameters: (can height + seam allowances 0.5 cm) x (circumference + allowance).
For both rectangles, sew the back seam first (with a "back needle" seam or on sewing machine) to create a closed surface. Sew the bottom to the rectangle along the contour. Turn out one part, and leave the other.

Set the resulting cylinders aside. Now, cut out 18 paired parts of the animals from the fabric - in my case, the little ones are being played. I do not give the patterns, since the contour is easy to draw yourself - an oval with ears))
Sew paired parts together, you get 9 animals (do not forget about the holes for turning out).

In the place of the future peephole, draw dots and make cuts crosswise, as in the photo.

Turn the animals out and stuff them with padding polyester.

Now add a little glue along the contour to the holes. Be careful - then you have to insert the eyes into the holes. Insert until the side of the eyes is completely buried in the fur.

Sew the hole at the bottom.

Ooh, eyes


Sheathe the jar with padding polyester details with an over-the-edge seam. This is necessary so that the pencil holder does not knock on the table. This step can be skipped if desired.
First, sew the edges of the padding polyester wrapped around the can. Sew on the bottom as well.

Slide one of the cylinder parts onto the outside of the can. In my case, it does not reach the top edge a little - a special effect.

At the bottom of the pencil holder I also put a synthetic winterizer (glued it so that it would not slide out).

Insert the second (not inverted) cylinder into the stand. If you wish, you can also drip some glue onto the bottom to hold the inside in place.

Blind-stitch one cylinder to the next.

Here is such a pencil case I get)) If you wish, you can stop at this stage or decorate the product as described further.

Glue or sew on all the animals over the entire surface.

Cut a few pieces of felt out of the felt and sew the characteristic lines onto them with a back needle seam. Glue the leaves to the resulting pencil holder. You can also embroider patterns on the bunnies themselves.
Admiring the result


From cans
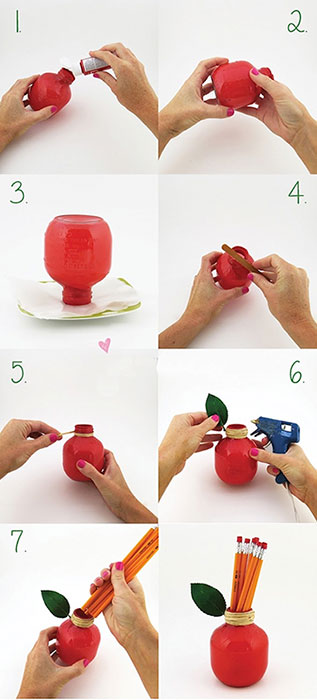
Apple
A very fun way to make a pencil holder is to take a jar, liquid acrylics, paper, a plate, a cord, and a fake petal with a glue gun.
Pour paint into a jar and shake. Drain off any remaining paint and let dry. File the edges as needed. Wrap the thread with a cord and decorate with a leaf - voila
Lego guy
The method is identical to the previous one, only at the end you will need to apply a face with a black permanent marker.

Minion
Favorite of all the kids, welcome!) Here you will need a tin can and colored EVA polymer (foamed rubber, which can be purchased in the form of plastics in creative stores). By the way, the polymer can be replaced with soft felt.
Cut out all the pieces according to the template and wrap the jar in a yellow rectangle. Glue a rectangle from the inside to hide the metal part. Glue the muzzle, pants. Don't forget your mouth.

From plastic bottles
Pears
To make these cute pencil holders, you only need a few oblong bottles, scissors, tape, acrylic paints and a photo frame (optional).
Cut off the threads of the bottle and cut out a part of the top, as in the photo. Tape the center piece on both sides, leaving an empty space in the middle. Paint the empty space and decorate with the remaining caps, also painted. You can stick to the frame, or you can leave it as it is.

Monsters
This is where the shampoo jar comes in handy. Cut off the top with the lid, choosing the shape of your choice. Cut out the handles from the rest of the piece. Glue on funny felt or paper faces.

Made of cardboard and paper
Cylinders
The easiest way to make a pencil holder out of cardboard is to take cylinders from clothes rollers, rolls of paper towels, or toilet paper. Wrap them in newsprint, glue them together if desired. Everything

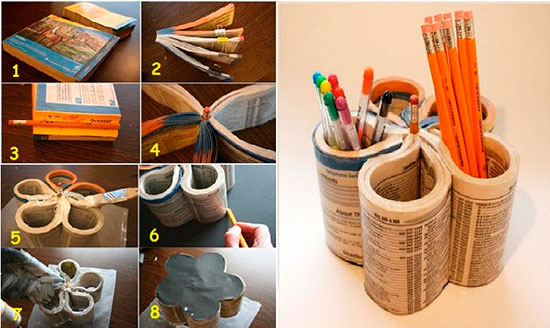
Book flower
Very unusual and bright idea... Take an old thick magazine or reference book. Divide all of its pages into 5 equal parts. Glue the pencil to the side. Wrap a book around a pencil so that it is in the center, glue it.
Prime with white on top acrylic paint... Cut the bottom out of thick cardboard, outlining the pencil holder. Glue the bottom.
Made of wood
Or rather, not even from wood, but from wooden pencils. To do this, you just need to glue several pencils together, forming a wall. Such walls will be required 4. At the bottom, glue the bottom made of thick cardboard.

But I described the 10th pencil holder in an article about New Year's decorations. I strongly advise you to look, there are many interesting ideas.
By the way, the minky fleece, from which the outer green background of the first pencil holder and the white totoryata are made, acquired here... I advise, since it is very, very difficult to find it in our woven fabrics.
Subscribe to updates and share your impressions! See you soon!
Best regards, Anastasia Skoreeva