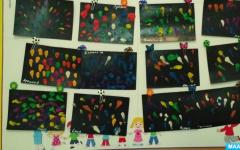
Knitted toys Always enjoyed popular, both in children and in adults. You can create beautiful products with your own hands: Little Pillows, New Year christmas decorations or simple I. funny toys for kids.
From you can connect from yarn (residues) as a gift, or sew, taking any material.
Often the needlewomen combine these two techniques: they knit any product, and then decorate it with felt inserts, for example. We will teach you to knit toys with schemes and descriptions of crochet and knitting needles, provide you with the simplest schemes for beginners and efficient and useful wizards - classes with detailed description. And your child can help in this business - the process will go faster and more fun!
Knitted toys crochet and knitting needles
To do cute gift Its loved ones very simple. Knitted crochet and knitting toys Very common on the Internet, it is very often set to detailed master classes with a description. It is enough to tie them with your own hands any little animal: a mouse, a bear, a kitten using special "patterns" - knitting schemes. If you stick to the tips on how this is done correctly, the process will go very quickly. Today we will analyze two ways: crochet and spokes . There is no easier or hard way here - choose the one that you get more. And if you are new, then you are waiting for understandable and detailed MK with pictures and video - lessons.
Knitted crochet toys with schemes and descriptions for beginners
To begin with, you need to decide what you will be knit. For this you can see different schemes in the Internet or choose one of those that we will provide below. If a lot of various options from which you must choose for yourself. Find them on the Internet just enough, so if you want to find such a partition, it is almost every site about knitting.
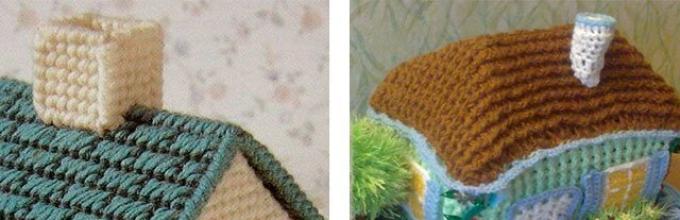
Most often, beginners are offered to tie a toy - house
Since it fit in the easiest way, and to fill the hand before performing difficult work! Need to tie 6 side faces at home
(6 squares of the same size of such a height, as you like), make a roof
and sew all these parts in 1
. Fill with a synthet or filler, then decorated the walls: make a door that can sit guard dogs, flowers in windows, curtains, and so on. Knitted house ready!
Here is such a master class! 


Knit crochet toys: master class step by step with photo
When we knit toys crochet, it is very convenient to work with schemes and simple description. We will tell you how to create a beautiful knitted monkey which in the future can be used as brush or how trinket Or none somewhere. It will take for it: Brown yarn I. beige colors, hook, needle, black thread and peephole beads. If you want to make a brooch from it - then take the mechanism for brooches. This master class on knitting in crochet can interpret in different ways.
Popular articles:

Now let's start stages to the rear workpiece
. It is performed in the same way as the front, but you don't need to change the thread!  To tie the face
- Take a thinner thread and take advantage of a thin crochet so that it will not be cumbersome.
To tie the face
- Take a thinner thread and take advantage of a thin crochet so that it will not be cumbersome.
- 4 V.P., 2 S.B.N. in the 2nd loop, 1 S. B.N., in the last loop 3 S.B.N.
The next step will be the penetration from the reverse side of the chain: 1 S.B.N. + 1 more in the first loop. 

Do not cut the thread because Need to start front design
To which we sew the face itself. Do not forget to fill the toy. Sein eyes, nose, mouth and decorate the flower.
Knit crochet toys for kids
Kids like bright stuffed Toys that can be touched, pull the tail (if any). Good choice will be monkey, lamb or bunny. Also suitable teddy Teddy, Giraffe, Bear, Mouse, Fox and Mom - Fox, Butterfly with Color Wings, Pinocchio, Minion (description below in the article) penguin, Elephant, Kittens - Who just does not knit modern masters! You can come up with small animals on chopsticks for puppet Theater.: light crafts will not leave anyone indifferent . This, by the way, can be smeashariki or popular Luntik.
With the help of such toys, you can teach the baby in various animals, show than they differ, the more and the rapid sensations for children are very good. The child will be able to learn to distinguish the amers much earlier. Also, you can do something like educational games with a child, I use such toys.
And for newborn kids, you can connect the little toys for children mobile . Let the funny hares, puppies and birds help better fall asleep to your child!
Master - class on creating this myilest kitten . It can not only sew on mobile , but also make out of it trinket , Sew on a backpack, create unusual brooches, attach to a cap or sweaters.
It is also possible to associate such a kitty, make the Hallow Kitty hat (or other cool models) for the girl:
Knitted crochet toys with diagrams and descriptions: video
Knitted knitted toys with descriptions and schemes do it yourself
We will connect wonderful Moydodyra
spokes for your child! It will take a acrylic thread in colors: white, Blue, Yellow, Hook, Spokes, Felt For Eye, or already purchased ready, box in the shape of a cube and wire.
It is required to tie one lane persian Facial . Where facial rows are facial hinges, where the outcomes R. - loops are invalid. The second strip will consist of half pouring smooth and the second half - facial. These resulting stripes need to be seen the box around the perimeter, can be inserted wire.
Collect like this: printed eyes, mouth, nose from wire, mouth and sink. To connect such a towel, as in the picture below: 10 loops facial glady Knit to the length you need. If you want, you can do strips and bachrom at the ends.
For pelvis, score 6 V.P. Crochet in the ring. Next: 8 S.B.N. Knit, double off S.B. The next three rows knit smoothly, then double again, then check exactly. Roth is made according to the scheme below.

Toys with knitting: master class in one canvas
Such a knitting technique is considered one of the easiest . For her, in principle, even the scheme and the description are not required. This is the most common option for beginner needlewomen. How to connect such a product, you will tell you the video below. His, if desired, you can download, like a scheme from the Internet. It is not at all difficult to do, you need to spend a little effort. Especially he will like small children!
How to tie a toy knitting needles: the lightest video
Knitted toys knit: photo and knitting ideas
Knitted toys for beginners and professionals
- Most interesting with us! This year is especially popular panda, pigs, easter rabbits, hedgehogs, bees and many other animals.


Miniature toys amiguruchi crochet
Knitted toys amigurumi Crochet is very popular on the Internet, they can easily find schemes and descriptions, and not one master class. Art amigurumi is beautiful and cute animals (for example, pig, cats and cats, fox, miniature dogs, bunny, snake, chicken, monkey, frog and others), endowed with human properties . Also, it may be, for example, ice cream or some sweets in the form of cupcakes. They must have a face / muzzle with shiny eyes and a friendly look! In our article, not one of their photography, so that you will not pass.
Knitted beautiful toys for a gift
A gift can be associated absolutely. any animal
but now very popular use knitted cats
. For him, you will need white, gray threads, filler, gray felt And black threads, you can take Moulin. C. to glue the felt to the cat - use glue, or a glue gun. It can be associated with both crochet and spokes, but already with other schemes and descriptions. White color
dial 6 V.P. Start with the 2nd hinge from the hook, 4 S.B.N. For the rear walls of the loop. 3 S.B.N. In the next S.B. To work further, expand the product and 5 S.B.N. In the front wall of the loops. Below is a photo: it should look like a canvas after the first circle.
White color
dial 6 V.P. Start with the 2nd hinge from the hook, 4 S.B.N. For the rear walls of the loop. 3 S.B.N. In the next S.B. To work further, expand the product and 5 S.B.N. In the front wall of the loops. Below is a photo: it should look like a canvas after the first circle. 

Making paws toy gray
: Ring Amigrumi from 5 V.P., P.R. + 1 S.B. + P.R. + 1 S.B. + P.R. In 3, 4 and 5 R. \u003d 8 S.B.N.  Take white threads
And start knitting from the back of the foot: 4 S.B.N. From the front of + 5 V.P. Further 4 4 S.B. Also on the head. Gets a circular row at 34 loops:
Take white threads
And start knitting from the back of the foot: 4 S.B.N. From the front of + 5 V.P. Further 4 4 S.B. Also on the head. Gets a circular row at 34 loops:

Two ears gray
: 3 S.B.N. In the ring Amigurumi, 2 S.B. In each S.B.N.
The tail is also gray: 5 V.P. In the ring, from 2 to 10 row 5 S.B.
Tie minion crochet: scheme and video
Now you do not need to buy Mignon from Multikov
- can tie it yourself
! In order to do this, take the following materials: thread (yellow, blue, black, white), hook, filler for toys, beads for eyes and any other decoration and accessories (Decor depends on preferences). So, let's start creating the author's gift! 
To begin with, we will connect the foundation, that is, the body and the head of the minion.
- 6 V.P. tie into a single ring
- POSSIBLE 6 times (POSSIVE, NEXT P.R. - Two columns in one looper). Should come out 12 loops
- 1 column without Nakid (hereinafter - S.B.) + p. \u003d 6 times
- 2 S.B., P.R. \u003d. 6 times
- Three S.B., P.R. \u003d. 6 times
- 4 S.B., P.R. \u003d. 6 times
- 5 S.B., P.R., \u003d 6 times. You should have 42 loops on this row!
- 6 S.B., P.R. \u003d. 6 times
- 7 S.B., P.R. \u003d. 6 times
- 8 S.B.N., P.R. also six times.
- With 11 rows of 31 inclusive, check 60 columns.
- 32 row (hereinafter - R.) 8 S.B., Ubaulk (Refailed - Two Stakes Singing together, then -U.B.) 6 times. (hereinafter referred to as 32 to 40 Step All rolling columns are pronounced 6 times.)
- 33 R. - 7 S.B., U.B.
- 34 R. - 6 S.B.N., U.B.
- 35 R. - 5 S.B.N., U.B.
- Do not forget to fill the filler your toy along the knitting!
- 36 R. - 4 S.B.N., U.B.
- 37 R. - 3 S.B.N., U.B.
- 38 R. - 2 S.B.N., U.B.
- 39 R. - 1 S.B.N., U.B.
- 40 R. - U.B. six times . At this stage there should be 6 loops.
Start knitting minion
- this is his head, and end
- It will be located under the overalls that will do now! We take blue yarn. 

- 14 S.B.N.
- 1 V.P., 14 S.B.
- 1 V.P., U.B., 10 S.B., U.B.
- 1 V.P., 12 S.B.
- 1 V.P., U.B., 8 S.B., U.B.
- 1 V.P., 10 S.B. In the end there will remain 10 loops.
Should be tied up the resulting toy shorts
. On the side of the back - down 5 S. B.N., 16 S.B., make a rise from side to 5 S.B.N. + 23 V.P. Next, you need to return to the place from which we came: 22 S.B., on the barrel rising 10 S.B. and 23 V.P.
Again we go back with the help of 22 S.B., down 5 S.B.N., 16 S.B. And climb - 5 S.B. On this thing is finished, you can trim the thread.
You can add from above pocket
, you can not do this. We explain in detail this step, you can skip it! Ring out of 5 V.P., which does not need to close. Further, the binding will go with the help of rotary looping. ETC. 5 times, 10 S.B., 7 connecting columns (hereinafter - S.S.). 
From black threads do footwear
: 6 V.P. In the ring. ETC. 6 times, 12 S.B.N. (All 3 and 4 rows), 4 S.B.N. + U.B. 2 times. From the sixth to the ninth rows of 10 s.bn. Next, straight to the boot, we sew a leg with a blue. We recruit 12 S.B.N. on it, 3 S.B., P.R. 3 times, and 15 S.B. In the last fifth row. 
Cuff and hand
. Hand
consists of a black and yellow thread. Let's start with the first. 6 V.P. In the ring, p.R. 6 times (ranks from 3 to 5) 12 S.B., 5 USB After that, tie the yellow thread: 7 S.B.N. on the back wall, (from 8 to 16 R.) 7 S.B.N., in the last row 2 USB 
To associate cuff
knit two rows: 2 S. B.N., P.R., S.B.N., P.R. and 9 S.B.N.
For eye, knit two white and black thread mug. In the middle we glue or sew a bead. To connect them together, type 45 V.P. and 44 S.B.N. In two R. 
It will be a strap for them! All is ready! Do not forget to sew or glue all parts together! You can make him a hairstyle of black threads.
You can see how it does. talented needlewoman On your channel on YouTube. She is perfect Another approach But the result is also great!
Photos of famous works: ideas for inspiration
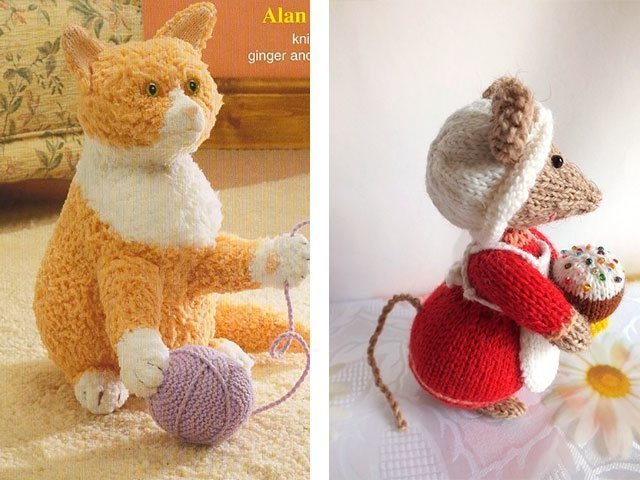
There are many famous handorab , and not only among women who can boast wonderful knitting work . We suggest you evaluate work. Alan Darta, Mary Jane, Susan Hickson, Elena Belova. Beautiful work will help you to inspire and will create forces more. Just need to warn: this is not work for beginners, they are very complex and require a lot of effort and time.
Knitted toys from Alan Darth


Toys with knitting with Susan Hickson


Hello everyone!
All materials collect from different sites, as well as look through a lot of information in newspapers and magazines, and then such a huge selection that contains many interesting ideas appears.
I often visit the groups in contact with knitting and needlework and it is still from there to take all kinds of new items. I remind all those who saw their work and does not want it to spread for free on this site, please inform me, I delete the first request.
Today I will share with you mostly masterpieces that are popular at all times. These are wild and homely animals and animals. Also, many of you have come to publish the workpiece of cartoon characters. Therefore, everything will be completely outlined here. Go.
Do not forget if you like to share it in social networks, as well as with friends and relatives.
By the way, the following issues will be devoted to new Year's toys, Namely, the symbols, so do not skip the necessary information and look at the guests more often. And it is better to add my site soon to the browser bookmarks.
What are all the same well-made needlewomen, which is divided with us completely free master classes and of course detailed instructions. To even a newcomer can master this thing.
Knitted little animals are always popular, because they will certainly love our kids. Every year we make new masterpieces, and we usually fill our shelves with the symbols of the upcoming year. Agree? After all, it is one year personifies this or that animal. Therefore, the next my note will be devoted to such a main character. So that if you are interested in this topic, then leaf and find the right hero
And let's start with banal descriptions, suddenly someone first saw it all and wanted to try himself as craftsmen. The most basic thing is of course the ring (or oval), without it, the toys will not work, this is a kind of aza, here is his visual reproduction of actions.


And now I propose to stop first of all on the easiest and simple products. For example, make a hippo or hippos.


No cartoon, no fairy tale costs without this hero - gray wolf. Agree, and our fortresses love them, and sometimes even afraid.


Take a look, baby raccoon, its description is in PDF format. To whom you need to write, send.

A completely tiny and small toy can also be associated, shown on the example of a unicorn. You can build and keychain on the keys.


And this toy is extremely sweet and pretty, such a cheerful and colored hedgehog.


A cute and charming dog, who has a dress and bezel removable (Anastasia Makeev).


Next work from Yulia Piga. Such a funny and funny giraffic.


The most beloved and popular at all times a little animal is a bunny, hare ... how his kids are not called. I offer such a model that resembles toys with the style of Tilda (Antonina Krykonov).


Here is another free master class from Catherine Construction - Hare Milka, her instagram @ igrushka_1


Either this. By the way, I have an excellent selection of software. And not only, there is a lot of descriptions on Easter toys, such as a cockerel, chicken and chicken.

Either make a product easier. Here are such bright handsome - a boy and a girl.


A funny tiny monkey (Marty), is waiting for his mistress (Natalia Shumova).


I want to still show a bear, or perhaps you are tie to a tremendous bear.


And this bearish is tenderness itself, and the main thing knits easily and quickly.


Rosable red fox or chanterelle, call, as you want.

Well, accordingly, without king, the beasts could not do - this is the lion.
Leggy frog-cuckoo will also please you.


You may also be interested in this work, I can send a power to email, write.

In addition, there is still such a fish, in the form of a shark with illustrations and step-by-step clarifications.

Such a mischievous sheep enjoys you.


Or prefer the lamb. In any case, the choice is yours.


All lovers of horses or pony are dedicated.


Either here is this cat, or rather a cat's cattle from Yulia Queen will raise the mood, you can also tie as a gift.


The kids are very loved by another cartoon - it is about babies or smesharikov. Found the description of the hedgehog.


But also all other participants - Pandicch.


Well, let's start in order, the first will be Krosh.


Now I propose a scheme of the calm hero - Basharyak.

And about the beautiful Nyushenka will not forget.

Character from Soviet cartoon - Cheburashka. Who needs you write, too much instruction, could not put it here.
Now the "three cat" is still popular - it is caramel, corzhik, sarzhik and compote. Also eat, write.
From the barboskins I caught only my friend. Instructions in PDF format on 15 pages, not fit here.
By the way, there is also such a selection, there are also many options in it. Take a look. Unfortunately, I can not fit everything into one article, so I have to publish something here, and something if you wish to send. As you can see this Buba, Lion and a bug of "I'm lying in the sun", Goldi and Mimmichki.
Here are minions (already exist) and fixings will try to still find about supplementing this article, perhaps on this topic publish a separate post to put everything I have.
Knitted amiguri toys. More than 1000 free schemes
For those who do not like to sit and painstaking out something to look online, I have prepared ready-made materials that borrowed from Irina Koreneva, it shares them in social networks, makes a selection. Thank you so much for it! In her collection there are quite many peculiar work. They are just a bunch, not to read. But, before this I will show some more other examples.
Here is such a beautiful doll in the form of an angel, also there is in my collection. Write to whom you need to send.
Pretty original, girls will definitely appreciate - Mermaid.
And this sympathetic will make anyone smile. This is how you could guess the dragon. A song comes to mind immediately, about Toshu, on the channel the carousel is going now.

For boys, there is a plane in the chest.


Well, here, finally, all the developments of Irina, which can be obtained, if you leave your feedback below or comment, I will be very glad.
Well, let's start. Those who love dolls and have many options for you.

Then big collection hares.
Also bears.
The collection of dogs, I repeat.

Kittens and other representatives of the Faby family.
Plus, sea inhabitants, such as whales, turtles and even fish, too, can also be yours soon, if you begin to create right now.
Those who love rodents or their representatives, such as mice, rats or hamsters, are also placed here.
There are also birds and insects, such as bees, butterflies and even penguin.

Of course, predatory animals.

As well as elephants, giraffes, etc.

And in conclusion, the most beloved detailed instruction from LeithyGurumi, you can link any animal for the cat.

If you liked the work, write down at the bottom and I will certainly send it to email schemes and master classes.
In general, of course, the needleworks are creating such masterpieces, they are often just surprised by their fantastic skills and smelts, even the rattles of children do or for newborns over the bed Mobile.

In conclusion, I want to say all more thanks for the time to visit me. Patience, perfection, creative success and of course excellent mood, without him anywhere. Write reviews, wishes will be glad. Until! See you.
2809
Amigurumi is a crochet technique of small yasts. Invented him in Japan. Recently, this occupation is very popular. Schemes with a description, how to knit toys with crochet are needed to select threads and creating a quality product.
Scroll:
Scroll:

Start knitting
Start knit crochet toys need from learning descriptions and schemes.
To do this, you need to know the main legend:
- vP - air loop;
- cC - connecting column;
- sBS - a column without Nakid;
- pS - semi-solitary;
- sSN - Column with Nakid;
- cS2N - a column with two nakidami;
- pR - to check 2 failures in one loop, triple - 3 failures;
- uB - Make a closer to the next loop - on the hook 2 threads, once again I will bend in a loop nearby - on the hook 3 threads. We stretch the main thread through 3 loops. Thus, two loops are combined.
- * 2SBN, PR *. Repeat * 2 times (8) - two columns without Caida, in the next column. We repeat twice. It turns out only 8 loops.
Some details
Machinery Amigurum implies knitting for both walls. To give the toy form, the additions and accurates are used. It is impossible to simply skip the loop for the outfit, since the hole is formed on this place. For weighting toys, fine beads are used, which is sewn into the fabric.
Starting to knit crochet toys, with descriptions and schemes need to be found in advance. All abbreviated loops names should be understood.
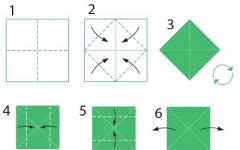
Ring: Scheme and Description of Knitting Amigurumi
Usually most models begin with a circle, inside which hole. Machinery amigurum with a ring will help solve this problem.
Detailed scheme:
- At a distance of 2.5 cm make a loop, the thread is between the index and middle finger;
- Enter the hook in the loop and stretch;
- Capture the working thread, stretch through the loop and tighten;
- Stretch the hook at the same time under both threads (basic and tail);
- Capture a crochet the main thread (on the hook 2 loops) and stretch through the loop. It turned out the first injection rings;
- Put 6-10 failures and tighten the thread left the rings. It turned out a semicircle from the fail;
- Turn the hook to the first loop and check the fail.
Bear - a simple scheme with a description for beginners
The growth of the toy will be 8.5 cm, knit by iris brown and white, hook 1,15 (for beginner 1.0). 
Details knit separately:
- Head
- Nose - white threads
Scheme:
- 2 row - * Pr * Repeat 6 times (12);
- 3 row - * 2 fails, etc., replay 4 times (16);
- 4 row - * 3 fails, etc., Repeat 4 (20);
- 5 - 7 rows as 4th (20), a failover;
- 8 row - 20 ss to lish loops not tight.
- Take a brown thread. 9 row - 2 fails, PR, 1 fail, pr, 1 fail-test, 3 increases, 2 failures, 3 increases, 1 fail, etc., 1 fails, 2 fails (30);
- 10 - 12 row - * 4 fails, etc., replay * 6 times (36);
- 13 - 15 row - * 5 fails, etc., repeat * 6 times (42);
- 16 - 17 row - * 5 fails, UB *, repeating * 6 times (36);
- 18 row - * 4 fails, UB *, repeat * 6 times (30), UBF to displace knitting;
- 19 row - * 3 fails, UB *, Repeat * 6 times (24), UBF to displace knitting;
- 20 row - * 2 fails, UB *, repeat * 6 times (18), UBF to displace knitting;
This part fill the syntheps and give a neat head shape.
Morning design:Black threads (Moulin or folded in several rows is a simple thread) embroider the triangle nose, from it on the side two strips in the form of a hook. Send beads - eyes and embroider eyebrows.
- 21 row - * scan, help *, repeat * 6 times (12);
- 22 row - * UB *, repeat 6 times (6). Hole to close, hide the thread and secure.
Ears:Knit ring amigurums of 7 loops. Tighten the thread to close the hole. 6 times PR, 1 SS (13). Leave the thread to attach to the head. Tie 2 ear. Color yarn Choose ourselves (brown or white).
Torchith:
- 1 row - ring amigurums of 6 loops;
- 2 row - * pr *, repeat 6 times (12);
- 3 row - * fail, pr *, repeat 6 times (18);
- 4 row - * 2 fails, pr *, replay 6 times (24);
- 5 row - * 3 fails, etc., repeat 6 times (30);
- 6 - 10 row - * 4 fails, etc., repeated 6 times (36);
- 11.12 row - * 4 fails, UB *, repeat 6 times (30);
- 13.14 row - * 3 fails, UB *, repeat 6 times (24);
- 15,16,17 row - * 2 fails, UB *, repeat 6 times (18);
- 18 row - * fail, UB *, repeat 6 times (12); Fill with synthepship.
- 19 row - * fail, UB *, repeat 6 times (12), 1 ss
Leave thread for sewage.
Lower paws:
- 1 row - 6 VP, 4 fails, start with the second loop, 3 failures in the last loop, 4 fails, and the same loop (13).
- 2 row - pr, 3 fails, 3 add-ons, 4 fails, 2 increases (19).
- 3 row and a half - PR, 5 fails, * PR, 1 fail *. Repeat * 3 times, 5 fails, * PR, 1 fail *. Repeat * 3 times, 7 fails (26). Change the color of the thread.
- 4 row - 26 failures for the rear wall for the stability of the paws.
- 5.6 row - 9 fails, 2 increases, 4 fails, 2 increases, 9 fails (30);
- 7 row - 9 fails, 6 grains, 9 failures (24);
- 8 row - 8 fails, 4 grazing, 8 failures (20), fail to displace;
- 9 - 16 row - * 3 fails, UB *. Repeat * 4 times (16);
- UBB for offset;
- 17 row - * 2 fails, UB *. Repeat * 4 times (12).
- Fill with synthepship.
- 18 row - * 1 scon, UB *. Repeat * 4 times (9).
- 19 row - * 1 fail, UB *. Repeat * 3 times (6). Leave a thread for the sewing of the paws to the body. The top of the paws do not stuff a lot, otherwise the paws will hang around.
Top paws:
- 1 row - to dial 2 VP, 6 fails to the second hook hinge (6);
- 3 - 6 row - * 3 fails, pr *. repeat * 3 times (15);
- 1 failover for knitting;
- 7 - 15 row - 3 slots, 9 failures (12);
- 2 fails to displace knitting.
- 16 row - * 2 fails, UB *. Repeat * 4 times (9);
- 17 row - * 1 scon, UB *. Repeat * 3 times. 1ss (6);
Leave a thread for the sewing of the paws to the body. The top of the paws are hard not to fill.
Tail:
- (6);
- 2 row - * Pr *. Repeat * 6 times (12);
- 3 row - * scan, UB *. Repeat * 4 times. 1SS (8).
- Leave a thread.
Build a bears:Along with the description and schemes, the toys are crocheted, should be carefully assembled. This is a difficult stage and skill comes with experience. Pinch pin lower legs. Save paws to 6-7 row of body. Top paws sew between the last and penultimate nearby. Tailing to sew so that he does not interfere with sit.
Chicken - simple diagram with a description for beginners
Use the hook number 2, yarn of yellow, orange, blue, lilac flowers.
 To tie toys with crochet, you need to follow the description and schemes.
 Head (yellow threads):
- 1 row - ring amigurums of 6 loops;
- 2 row - 6 pr (12);
- 3 row - (1 fail, etc.) * 6 (18);
- 4 row - (2 fails, pr) * 6 (24);
- 5 row - (3 fails, pr) * 6 (30);
- 6 row - (4 fails, pr) * 6 (36);
- 7 row - (5 fails, pr) * 6 (42);
- 8-13 row - 42 fails;
- 14 row - 7 fails, (1 fail, etc.) * 3, 15 fails, (1 fail, etc.) * 3, 8 fails (48);
- 15 row - 7 fails, (2 fails, pr) * 3, 15 fails, (2 fails, etc.) * 3, 8 fails (54);
- 16-18 row - 54 fails;
- The following will be reduced, therefore, between 14 and 15 rows to sew the bugs;
- 19 row - (7 fails, UB) * 6 (48);
- 20 row - (6 fails, UB) * 6 (42);
- 21 row - (5 fails, UB) * 6 (36);
- 22 row - (4 fails, UB) * 6 (30);
- 23 row - (3 fails, UB) * 6 (24);
- 24 row - (2 fails, UB) * 6 (18);
- 25 row - (2 fails, UB) * 6 (12);
- 26 row - 6 UB (6).
Strip the torso holofiber and pull the thread.
Beak - Orange Thread:
- 1 row - 5 failures in the ring amigurum;
- 2 row - (1 fail, etc.) * 2, 1 fail (7);
- 3 row - 7 fails;
- 4 row - (2 fails, pr) * 2, 1 fail (9).
Beak sew between 16 and 20 rows, filling as the sewan. Easy black threads browing, cilia. Further, depending on the fantasy, make a pot, toned cheeks.
Torso - Yellow thread:
- Fill with hollofiber in the course of knitting.
- 2 row - 6 pr (12);
- 3 row - (1 fail, etc.) * 6 (18);
- 4 row - (2 fails, pr) * 6 (24);
- 5 row - (3 fails, pr) * 6 (30);
- 6 row - (4 fails, pr) * 6 (36);
- 7 row - (5 fails, pr) * 6 (42);
- 8 row - (6 fails, pr) * 6 (48);
- 9 row - (7 fails, pr) * 6 (54);
- 10 row - (8 fails, pr) * 6 (60);
- 11-18 row - 60 fails:
- 19 row - (8 fails, UB) * 6 (54)
- 20-21 row - 54 fails;
- 22 row - (7 fails, UB) * 6 (48)
- 23-24 row - 48 fails;
- 25 row - (6 fails, UB) * 6 (42);
- 26 row - (5 fails, UB) * 6 (36);
- 27 row - (4 fails, UB) * 6 (30);
- 28 row - (3 fails, UB) * 6 (24);
- 29 row - (2 fails, UB) * 6 (18);
- 30 row - 18 fails.
Leave a thread and sew your head to the body.
Tail:
- Thicks yellow colornot filled
- 1 row - 4 failures in the ring amigurum;
- 2 row - 4 pr (8);
- 3 row - 8 fails;
- 4 row - (1 fail, etc.) * 4 (12);
- 5 row - 12 fails;
- 6 row - (2 fails, pr) * 4 (16);
Fold and connect the fail. Send to the body at the level of the 8th row.
Wings - Yellow thread, do not fill:
- 1 row - 6 failures in the ring amigurum;
- 2 row - 6 pr (12);
- 3 row - 12 failures;
- 4 row - (1 fail, etc.) * 6 (18);
- 5-16 row - 18 fails.
- Fold and connect the fail. Knit two details. Sew at the level of the 24th row.
Legs - orange thread:
- Feet. Fill along knitting.
- 1 row - 6 fails in K.A.;
- 2-4 row - 6 fails.
- Cut the thread Tie three details. Finger turned out.
- To connect 2 injunction on the first finger, the 3rd of the first finger and the 1st second finger batch in the second finger together (i.e., we make a grade), 1 failure, 3rd column of the second finger and the 1st column The third finger is touched together, 4 fails, the 6th third finger batch and the 4th finger-finger batch together, 1 fail-to-finger, the second finger and the 4th finger 4-finger batch together, 2 fails. Get 14 columns.
- 6 row - (5 fails, UB) * 2 (12);
- 7 row - (2 fails, UB) * 3 (9);
- 8 row - (1 fail, UB) * 3 (6).
- Close hole hide thread. Tie two details.
- 1 row - 6 fails in K.A.;
- 2 row - (1 fail, etc.) * 3 (9);
- 3-14 row - 9 fails.
Fold and connect the edges of the failure. Knit two details. Send foot to the leg. The edge that joined the failure, sew legs to the body.
Easter Egg - Blue Yarn:
- 1 row - 6 fails in K.A.;
- 2 row - 6 pr (12);
- 3 row - (1 fail, etc.) * 6 (18);
- 4 row - (2 fails, pr) * 6 (24);
- 5 row - (3 fails, pr) * 6 (30);
- 6 row - (4 fails, pr) * 6 (36);
- 7 row - (5 fails, pr) * 6 (42);
- 8-16 row - 42 fails;
- 17 row - (5 fails, UB) * 6 (36);
- 18 row - 36 failures;
- 19 row - (4 fails, UB) * 6 (30);
- 20 row - 30 failures;
- 21 row - (3 fails, UB) * 6 (24);
- 22 row - 24 fails;
- 23 row - (2 fails, UB) * 6 (18);
- 24 row - (2 fails, UB) * 6 (12);
- 25 row - 6 UB (6).
Close the hole, hide the thread. Cut the braid, glue it to the egg. Tie a flower. Send to the flower a bead and glue it to the egg.
The dog is a simple diagram with a description for beginners
Hook number 1, acrylic orange yarn, white. 
Head:
- 1 row: in 1 V.P. - 8 fails.
- 2 row: 2 scuns of 1 loop.
- 3 row: scan
- 7 row: scon
- 8 row: 2 scuns of 1 loop, 4 fails
- 9 row: scon
- 10 RUBLINES: 2 ISBI of 1 loop, 5 fails
- 11 row: scan
- 12 row: 2 scuns of 1 loop, 6 fails
- 13,14,15,16,17 rows: scan
- 18 row: from 2 hinges - 1 SBF (UB), 6 fails
- 19,20,21,22,23 rows: scan
- 24 row: UB, 5 fail
- 25,26,27,28,29 rows: scan
- 30 row: UB, 4 fails
- 31,32,33,34 Rows: SBS
- 35 row: UB, 3 fails
- 36 row: UB, 2 fails, insert eyes between 22 and 23 rows, stuffing a package for toys.
- 37 row: UB, 1 UBBB, close knitting, refuel thread inside.
Head is ready.
Nose. Two details:
- 1 row: in 1 V.P. - 8 scuns
- 2 row: 2 scuns of 1 loop.
- 3 row: scan
- 4 row: 2 IBS from 1 loop, 1 fail
- 5 row: 2 IBS from 1 loop, 2 fails
- 6,7,8,9,10,11,12 Rows: scan, crop thread.
- Folding 2 parts of the edge to the edge, to pin 12 loops, connecting 2 rows.
Top of the nose:
- 1.2 rows: ISP, the impunity of the outer edge.
- 3 row: UB, 2 fails
- 4.5 rows: scan
- 6 row: UB, 1 ITB insert the nose on the eyes, fill
- 7 Row: Rubage, tied out of 2 loops of 1 fail-to-end. Send your nose to the head.
White spot on the forehead:
- 1 row: 15 V.P., 1 V.P. We skip, 3 ISBS fails in 1 loop, knit until the last loop, in which 4 fails
- 2 row: on both ends you need to do 4 additives.
- 3 row: where they made an increase, 2 fails in 1 loop, between them - 1 fail
- 4 row: the whole range of PS. Close knitting.
Elets:
- 1 row: in 1 V.P. - 8 scuns
- 2 row: 2 scuns of 1 loop.
- 3 row: scan
- 4 row: 2 IBS from 1 loop, 1 fail
- 5 row: 2 IBS from 1 loop, 2 fails
- 6 row: PS whole range
- 1 row: 8 VP.
- 2 row: 1 V.P. We skip, knit a failure, in extreme hinges we are providing 4 failures (PR).
- The next rows knit, adding there, where the PR in previous ranks is visible. Total 4 adds from each edge. In the last row it should be 9 litter
- Last row: scan without add-ons.
Send your ears to the head so that one ear is raised.
Paws:
- Start knit white.
- 1 row: in 1 V.P. - 8 scuns
- 2 row: 2 scuns of 1 loop.
- 3 row: scan
- 4 row: 2 IBS from 1 loop, 1 fail
- 5 row: 2 IBS from 1 loop, 2 fails
- 6 row: 2 scuns of 1 loop, 3 fails
- Front paws - knit 4 rows
- Rear paws - knit 6 rows
- 1 row: UB, 3 fails
- 2 row: UB, 2 fails
- 3 row: scan
- 4 row: psbn
The pads turned out: more for the rear paws, smaller for the front.
Go to the thread of red-colored. For the front paws: 2 rows of ISP, on the 3rd row - UB, 2 ISP further knit 4 rows of fails. Close knitting. For rear paws: 7 rows of ISP. Fill the paws. Connect 2 rear paws of the connecting loop, make a strapping. 12 rows of ISP. It should be approximately 49 loops.
- 13 row: UB, 5 fail
- 14,15,16,17,18 rows: scan
- 19 Row: UB, 4 SBS
- 20,21,22,23,24 rows: scan
- 25 row: bind the front paws from the bottom side where the armpits.
- 26 row: bind the paws from the top side where the shoulders.
- 27 row: scon. Close knitting. Strip and sew your body torso.
Tail
- 1 row: in 1 V.P. - 8 scuns
- 2 row: 2 scuns of 1 loop.
- 3.4 rows: ISP. Close. Fill and sew.
Easy mustache, eyebrows, cilia. Dog ready!
Kitten - a simple scheme with a description for beginners
Threads are white and gray. 
Head:
- 1 row - ring amigurums of 6 loops;
- 2 row - pr, (12)
- 3 row - scan, pr (18)
- 4 row - 2SBN, pr (24)
- 5 row - 3 fails, pr (30)
- 6 row - 4 fails, pr (36)
- 7 row - 5 fails, pr (42)
- 8 row - 6 fails, pr (48)
- 9 - 14 SBS (48)
- 15 row - 6 fails, UB (42)
- 16 row - 5 fails, UB (36)
- 17 row - 4 fails, UB (30)
- 18 row - 3 fails, UB (24)
- 19 row - 2 fails, UB (18)
- 20 row - scan, UB (12)
- 21 row - 4 UB (6)
- Secure thread.
Torchith:
- 1 row - ring amigurums from 6 loops
- 2 row - pr (12)
- 3 row - scan, pr (18)
- 4 row - 2 fails, pr (24)
- 5 - 8 SBS (24)
- 9 row - UB, 2 fails (18)
- 10 row - UB, UBN (12)
- Secure thread and leave for sewing.
Paw rear (2 pcs.):
- 1 row - ring amigurums from 6 loops
- 2 row - pr (12)
- 3 row - scan, pr (18)
- 4 - 5 row - SBS (18)
- 6 row - scan, UB (12)
- 7 row - 2SBN, UB (9)
- 8-9 row - VTB (9)
Fold in half, fill and sew. Leave a thread for sewing.
Front paw (2 pcs.):
- 1 row - ring amigurums from 6 loops
- 2 row - pr (12)
- 3-4 row - SBS (12)
- 5 row - 6 UB (6)
- 6 - 9 row - 6 fails
Strip and leave a thread for sewing.
Ears:
- 1 row - 5 loops ring amigurumi
- 2 row - 5 fails
- 3 row - pr (10)
- 4 row - 10 failures, pr (15)
- Close and leave a thread for sewing.
Tail:
- 1 row: in 1 V.P. - 6 scuns
- 2 row: 2 scuns of 1 loop.
- 3.4 rows: ISP. Close
The next step: sew all parts, sew beads-eyes, embroider brow, mustache, claw with black threads.
Knit toys crochet is not difficult if you check with a description and scheme. Detailed instructions Help to perform work quickly and efficiently.
Toy Chicken - Knitting and Description
Knitting details:

Knitting begins with the manufacture of head and torso. Details are performed separately: beak, 2 legs and 2 wings. After their assembly, a hokcholok and tail is drawn up. The final stage is decoration. A flower is put on the head chicken, the neck is decorated with a pendant, and the cheeks will become brighter with the help of a blush.
Toy Bunny - Knitting and Description
Knitting details:

Knitting time: about 2-3 hours. Work on the toy must begin with the manufacture of the head. Crochet toys with descriptions and schemes are easy to assemble. To get the finished bunny, the ears are sewed to the head, which are performed separately. Knitting ends with a crosslinking of eyes, cheeks, nose and mouth.
Toy elephant - knitting and description scheme
Knitting details:

The manufacture of the elephant begins with the creation of the head and body. Knit ears, trunk and legs are required separately. All items alternately sewn to the body and head. The final stage of the work on the toy becomes stitching eyes, mouth and bows.
Toy Kolobok - Knitting and Description Scheme
Knitting details:

Start knit kolobkov should be from the torso. When the basis of the toy is ready, eyes, mouth and hair are sewed to it. The décor for the girl will be a bows, and for the boy - blush on the cheeks.
Toy Mouse - Knitting and Description
Knitting details:

Manufacturing a mouse begins with the creation of the head and body. Paws, tail and tongue knit separately and sewed at the end of work. Nose and eyes from buttons are sewn to the head.
Toy pig - knitting diagram and description
Knitting details:

Start knit pigs need from head and body. Paws, ears and heels knit separately. They are sewn to the ready-made toy. The final stage of work is decorating. Harms should appear hair, eyes, fun clothing and slippers.
Cat toy with bunny - knitting and description scheme
Knitting details:

Start the manufacture of toys follows from knitting head and torso. With the description and schemes it is not difficult to assemble toys made by crocheted. Ears, tails, paws, scarves and mittens are created separately, and then sewed to the body and head.
Cat toy - knitting and description scheme
Knitting details:

Creating a toy begins with knitting of individual elements: head, torso, paws, ears and tails. The final stage of knitting is the assembly of finished elements. For decorating to the cat, a bow and wire mustache are sewn.
Toy Snail - Knitting and Description Scheme
Knitting details:
- The sizes of the snail in height correspond to 10 cm, and in a width of 5 cm (7 cm in the body of the body).
- Torchish, head - peach shade yarn.
- Sink - orange yarn.
- Flowers - emerald yarn.
- For the eye, beads are 5 mm in size, and for the decoration of the sink - 15 pearl beads beads.
- Knitting time: does not exceed 3 hours.


Making a snail begins with creating a torso and head. When the basis of the toy is ready, it is sewn-related separate sink. Then the details are added: horns, flowers, beads and eyes.
Toy Elk - Knitting and Description Scheme
Knitting details:

Knitting should be started with creating the basics of toys - heads and torso.
Complete knitting assembly of the finished moose. They are sewed handles and legs, horns and ears associated separately.
Panther Toy - Knitting Scheme and Description
Knitting details:

First of all, the head and torso are created, which will serve as the basis of the future toy. To the finished basis it is necessary to sew alternately rear and front paws, tail. The head is placed on the face and ears. All parts for assembly knit separately. Panther is decorated with sequins, embroidered in the form of a heart.
Toy Lamb - Knitting and Description Scheme
Knitting details:
- Lamb dimensions are 15 cm in height and 5 cm in width (in the volume of the body of 8 cm).
- Head and torso - white yarn.
- Legs, hooves and fur coat - pink yarn.
- Shoes - purple yarn and pink beads.
- For eye, 2 small black beads will be required.
- For the skirt you need a pink polyester.
- Knitting time: no more than 4 hours.


Knitting begins with the formation of the head and body. When the head and torso are connected, extremities are sewn to them. The head is decorated with eyes, nose and mouth. Shoes are decorated with beads. The fur coat is put on the finished toy.
Toy Bear - Knitting and Description
Knitting details:

The basis of the toy will be the head and torso, which fit in the beginning. The handles and legs made separately sewn to the torso. The head is decorated with ears, fruits and eyes.
Dragon Toy - Knitting and Description Scheme
Knitting details:

Knitting begins with head formation. Following it the body is drawn up. The description and schemes will not be difficult to collect the finished toy, hooked, from a variety of details. To the body is joined by a rope handle and legs, a comb, wings. The head is drawn up with nostrils, eyes and ears.
Pony toy - knitting and description scheme
Knitting details:
- The pony size is in a height of 33 cm, and in a width of 11 cm (in the volume of the body 14 cm).
- The base from the head and torso, ears and legs - purple yarn.
- Hooves, Khokholok, tail - lilac yarn.
- Forellochka - pink yarn.
- For eyes need black, white and blue yarn.
- Knitting time: no more than 4 - 5 hours.


Start knitting with the creation of the head and neck. Then the body is formed, as well as the legs alternately. Completes knitting assembly. The head is issued by ears, eyes, nostrils and mouth. It joins the body with a neck filled with filler. Seed legs and decorative elements: mane and tail.
Doll Toy - Knitting and Description Scheme
Knitting details:

Knitting begins with creating a basis for future toys: heads, torso and legs. The handles knit separately and are attached to the filament. Final stage - decoration doll with hair, dress and shoes.
Toy kitten amigurumi - scheme and knitting description
Knitting details:

Start knitting needed from head and neck. Then the toy is created. Ends the assembly of small details: legs, tail and ears. The finished kitten can be decorated with a bow.
Toy duckling - scheme and knitting description
Knitting details:

Knitting begins with the creation of the head and torso with the tail. Wings, paws, straps and beaks are sewed to the finished toy. Finishes the decoration of stray buttons. When knitting toys, crochet is important to rely on the schemes. With their help, the toy will accurately comply with the description.
Want to please your baby with a unique gift? And what if you link toys with a crochet, spending quite a bit of time and materials on it. Let's create exclusive things together that bring you and your loved ones incredible amount of warm and gentle emotions. We will show you simple and affordable knitting toys schemes with their own hands, We will tell about the unique technique of the Umigurumius and open the secrets of wonderful art called Hand Maid.
You probably know that toys created by your own hands is much better than the shopping lots. When you create any thing, you fill it with your love and positive energy, which is very important when creating children's toys. Children love to feel sulky, sniff and taste all the surrounding items, so the toys are better to give soft, natural, and most importantly - completely safe kid health. So that thoughtful mothers And grandmothers are happy to take care, creating knitted crochet toys.
We have prepared this wonderful master class, in the course of which we will tell in detail how to tie a little funny chicken in the Japanese technology Amigurumi. This knitting for beginners is the easiest, since the chicken is completely tiny. But he is so charming - let's rather begin to knitting.
First stage: knit head 

- The first row: Knit 6 columns without Nakid into the ring amigurum.
- Second row: add another 6 tbsp. without a nakid.
- Third row: add another 6 tbsp. without a nakid.
- Fourth row: add 2 tbsp. Without nakid in one loop x 6 times.
- Fifth row: + 3 tbsp. Without nakid in one loop x 6 times.
- Sixth row: + 4 tbsp. Without nakid in 1 loop x 6 times.
- Seventh row: + 5 tbsp. Without nakid in 1 loop x 6 times.
- From the eighth of the fifteenth row, knit 42 columns without Nakid.
- From the sixteenth, a nineteenth row of a row we reduce the loop in the same order, in which added.
- The ends of the threads are filling and fill with the product by Sinyprun.
Second Stage: Knit Torchish

- For the first row, we make a ring amigurum from 6 columns without Nakid.
- From the third on the fifth row, we make the addition, as when knitting your head.
- From the sixth to the eleventh row knit for 30 columns without Nakid.
- The twelfth and thirteenth rod knitting with reduction.
Ending knitting by the connecting column, leaving the long edge of the thread, with which we will connect your head and torso. Fill the head of the syntheps and link the details.
Third stage: knit wings

- Knit ring amigurums from 6 columns without Nakid.
- I add 6 columns without Nakid.
- We make another addition.
At the end of the connecting column. Leave a long thread and fold the circle in half.
Fourth stage: knit beak

- The first row is a standard ring of 6 columns.
- The second row is the addition of 3 columns.
- The third row - knit 9 columns without Nakid.
Fifth stage: knit legs
- Ring.
- Adjusted from 6 columns.
Slip 2 details. Send your paws and beak to the body. We make eyes.
Sixth Stage: Knit Flower

- First row: knit chain out of 39 air loops And closer ring with a connecting column.
- The second row: knit 39 columns without Nakid.
- The third row: a column without a nakid, we skip 1 column without a nakida from the previous row and knit 5 columns with an attachment from one loop and again we miss the column without a preceding row. We make 10 such repetitions.
Seventh Stage: Knit Pot

- From the first on the sixth row, knit is similar to how we did the torso and head.
- The seventh row - we make 36 columns without a nakid for the rear wall of the loop.
- The eighth row: add 11 columns without nakid in one loop 3 times.
- From the ninth to the twelfth row knit 39 columns without Nakid.
- The thirteenth row: knit 39 columns without Nakid for the front wall of the loop.
- Knit 39 columns without Nakid.
Complete knitting with a connecting column. The bottom of the pot can be strengthened by planing the circle of cardboard.
Eighth Stage: Knit Grass 
Tit the green threads we will be to the pot, for the rear walls of the thirteenth row.
- We make 5 air loops.
- In the second loop from the hook we make a connecting column.
- We make a column without a Nakid, and then a semi-solube with 1 nakid.
- Knit a column with Nakid.
- To the completion of the triangle, we make a connecting column in 3 weighing.
- Knit the following 5 air loops and repeat the whole process.
- Slip 13 triangles around the entire pot.


All elements of our amazing toys are ready.
In order to better work out and independently make knitted crochet toys, we suggest you to see several video instructions with detailed step by step description.
Knitted crochet toys with schemes and descriptions
Product handmade Always look exquisitely and exclusively. That is why they are so fond of both kids and parents. We already told a little about the preferences of the kids, it remains to add that adults are also not averse to get a unique toy created as a gift. Small product can be worn as a key fob or talismanBut a moonloggy cat or a middle-sized hare is better to sat down in front of the computer monitor or on the shelf near the books. Let him please the heart, eyes and soul. And in order to be happy with your hands, we have collected for you knitted toys crochet with schemes and descriptions, with detailed photos and video instructions. All of these knowledge you will receive completely free on our page, and can very quickly embody them into reality. Learn to make unique things and please your loved ones with unique gifts!

For example, such small pumpkins can become a unique decor or serve as symbolic gifts For Halloween holiday. Please read the instructions and start doing right now.


If you don't have enough bright colors in life, rainbow elephant will come to the rescue. Try to tie a unique gift with your own hands.


And with this detailed master class You will learn to knit a pretty raccoon.


And for all the cats - an exclusive MK on knitting murdes of playful kittens.
Crochet toys for beginners: the simplest schemes
And we want to present you the simplest crochet toys: Schemes and descriptions for them you will also find in this section. Enjoy the process and result.


If you do not work large and complex products with many items, try to make such cute emoticons. They will definitely raise your mood.


This cute Penguin with big eyes to tie is completely easy, but it looks great.
 Do you often visit cartoon characters? Try to link the funny character named Krosh, and your child will have a new wonderful friend.


Crochet toy knitting: Ideas for needlewomen
Knitting toys crochet - it is fascinating occupationwhich can "tighten" into your networks a whole family. After all, looking at these wonderful pictures so I want to make it all right away. We are confident that your baby will be very rejected when in mom skillful handles Start a born charming dolls, funny trolls and good fairies, furious cats and cats are coared and exclusive dolls will appear, which will not find in any store. We present you an exclusive collection of crochet toys, with schemes and descriptions. Learn, create, play with your kids!