In autumn, when the trees change their color in the fall and the landscapes are pleasing to the eye, you want to capture in your memory the beauty of nature during this season for as long as possible. Multi-colored fallen leaves are an incredibly beautiful material that is suitable not only for a herbarium. You can decorate your interior, refresh everyday things, or simply make interesting crafts from dry leaves with your children.
Replacement for paints and plasticine
Young mothers who are tired of looking for ways to interest their child can breathe easy in the autumn season. It often happens that the usual drawing of pictures or plasticine is no longer interesting to the baby. What if we offer to master some kind of new way creativity?
On a walk, collect a large pile of leaves from different trees, and then come home together to come up with different compositions. Bright colors autumn will not go unnoticed by the child and it will be much more interesting to fantasize.
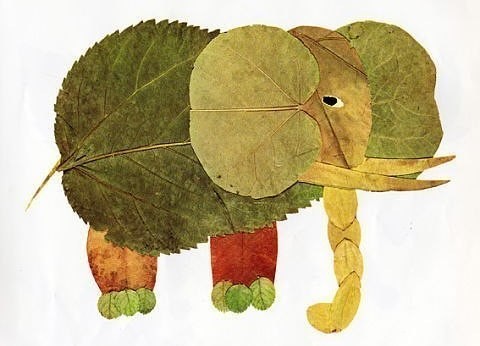
After all, from this waste material you can do a lot of interesting things, for example, animal figurines:
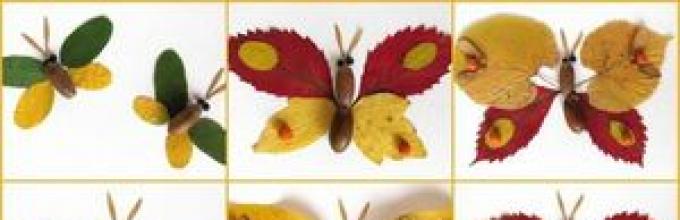
- butterfly;
- deer;
- squirrel.
Making crafts from leaves on the theme “Autumn” or decorating vases, various candlesticks, or even the interior of the house - all this will develop the child’s imagination, will bring his creativity into reality. After all, you don’t have to be a master to create a collage or panel from pine cones, acorns, dried grass and leaves.
You can make a house, and above it a sun cut out of a bright green leaf. A schoolchild can completely cope with such a task and surprise his class.
When preparing a composition, you can show your child what can be made from this or that plant, teach accuracy, and develop fine motor skills.
Procurement of material
To make applications from autumn leaves, you need to properly prepare all the materials.
For such crafts, only well-dried material is needed. Green, still living leaves will not work, even if they have a good pattern.
The collected raw materials must be dry, but they also need additional preparation for crafts in order to stand for a long time and not begin to rot.
Here are some ways to prepare the material:

Dry and transparent
The so-called “skeletons” of leaves look incredibly beautiful thanks to their thin veins. In the interior, decor made from such transparent accessories looks extremely impressive.
For that to make the leaves transparent you will need:
- fresh leaves collected from different trees;
- baking soda;
- food coloring;
- hollow-ware;
- soft brush (you can use an old toothbrush);
- napkins.
It is necessary to prepare a solution of water and soda (4/1). You need to put the leaves in this solution so that the solution completely covers them. Then all this needs to be put to boil; the material can be removed only after half an hour.
After removing the pan from the heat, place the leaves on napkins to remove excess moisture.
You need to remove the pulp as carefully as possible (the leaves will be very fragile) using a prepared brush. Then rinse with water and apply the desired color with dye.
After drying for a short time, the material will be ready for use.

Craft options
After preparing the materials, it's time to learn how to make a craft from leaves. Here you need to show all your imagination so that it turns out both beautiful and original.
Applications will become the most in a simple way captivate the child. You can use your imagination, or you can choose samples for crafts on the Internet.
Autumn bouquet
A bouquet is the simplest solution for creating an autumn composition. If the child has not previously engaged in this type of creativity, you can clearly show him what and how to do. The best thing is to study with him. After all, a child’s hand is not yet as dexterous as an adult’s.
For such a bouquet it is not at all necessary to use real flowers, since you can twist the leaves like flower buds.
For this craft you will need fresh maple leaves and strong threads.
To make a bud from leaves, you need:
- fold the sheet in half with the matte side facing inward;
- twist it;
- bend the next one in half and wrap it around the resulting tube;
- repeat the action until the bud is the desired size;
- After this, carefully wrap one end with thread so that the bud holds its shape.
This way you can make an unlimited number of buds, put them on skewers and place them in a vase as a bouquet, for decoration you can use corrugated paper.
Funny hedgehog
 To make an applique with a hedgehog, you need not only leaves, but also cardboard, prepared cuttings, paper glue, and ash seeds.
The base of the hedgehog should be cut out of paper, draw a nose and mouth for it and glue it to a cardboard sheet. Instead of needles, you can use ash seeds, and if they are not available, roll small leaves, for example, birch leaves, into a tube and decorate the back of the animal with such “needles”.
If the collection of collected leaves contains red maple leaves, then an apple should be cut out of them, and a suitable background should be created. Here you can give free rein to your imagination using small pebbles, pieces of bark, moss, etc. Then simple craft It will look not only beautiful, but also original.
Fire peacock
Another original craft will be a peacock with a fiery red tail.
Arranging the composition will be quite simple. The peacock has a large, luxurious tail, so any leaves of the same tree will do (for a luxurious tail, you can use maple, and for a smaller tail, birch). You need to glue the leaves in a semicircle, placing them on top of each other, alternating colors. Then cut out the peacock's head from colored or plain paper, glue on the eyes and beak. The comb can also be made voluminous from small leaves.
plant vase
Beautiful leaves can be used as interior decoration, for example, to make a vase out of them.
What you need:
- PVA glue, scissors;
- ball;
- petrolatum;
- maple leaves.
The process of making crafts looks like this:
- It is necessary to inflate the balloon, then smear it with Vaseline so that the leaves do not stick tightly.
- Glue leaves coated on one side with glue to the ball (birch leaves can be used to make unique patterns).
- After laying, coat the entire surface well with glue and leave to dry for two to three days.
- Pop the balloon. The result is a hollow container made from natural materials.
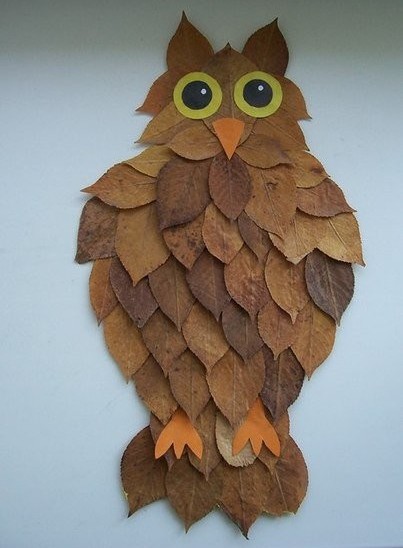
Firebird and owl
 For such an application you will need cardboard, leaves of various trees (mostly small ones), plant seeds (pumpkin, ash).
An oblong leaf needs to be glued together to form a body (linden leaves work well), and a head will come out of a birch leaf. For the tail, crest and wings, it is advisable to choose small leaves, for example, rose hips. You need to separate them from the core and stick them on individually.
You can make eyes from the seeds of the plant, and also decorate the tail or wings with them.
For the owl you will need small leaves, not too bright. Leaves of oak, birch, willow, and rowan are suitable. You will also need colored paper, colored cardboard, glue.
To make it easier to make a shape from the leaves later, you need to cut out the silhouette of an owl with eyes and beak from paper. Then create plumage, for example, from rowan leaves. Birch leaves can be used as ears or paws.
Tree and topiary
For topiary, you can use autumn colorful leaves.
To create you will need:
- small pot;
- stick for the trunk;
- a foam ball as the base of the tree;
- dye;
- hot glue;
- elements for decoration;
- gypsum.
You can attach the trunk of the future tree to the pot using plaster. The main thing is that it stands level, otherwise the tree will turn out crooked. Then you need to paint the stick in suitable color and secure the ball to the tree crown.
After this, you need to secure the leaves to the crown of the resulting tree with hot glue. For decoration, you can choose decorative berries.

Garland and wreath
The garland can be made as for home decor, and for gardening. To do this, you need to cover the leaves with colorless varnish, and then hang them on threads. You can use several types of leaves on one garland at once - this will make it even more beautiful and original.
Wreaths look incredibly beautiful, especially under themed holidays. They can be hung on the door, wall or windows. In an autumn interior, such a wreath will look incredibly gentle.
In order to make a wreath, you will need:
- willow branches;
- leaves;
- strong glue;
- strong threads;
- bird figurines (for decoration).
Wreath weaving technique:
- Willow branches will become the frame of the future wreath; they need to be bent either into a round or oval shape.
- To prevent the wreath from falling apart, it is advisable to secure the structure with threads in some places.
- After this you need to glue the leaves onto the branches. We must not forget that wreaths look better with different types leaves (for example, the first row of maple leaves, further from oak, birch, rowan leaves).
- For decoration you can use decorative birds, various berries, twigs, and nuts.
Photo frame
Children love to decorate their room, especially when instead of regular wallpaper they see a variety of posters with their favorite cartoon characters. Surely a child will be happy to put such a frame on the table.
To decorate a photo frame, you need cardboard, glue, leaves, and scissors.
You need to cut a frame out of cardboard the right size. To decorate the frame frame, you need to wrap it with leaves, completely covering the cardboard.
Other leaf decoration ideas
 Vertical garlands will look not only original, but also beautiful. They can decorate a place above a table, hang over a child’s bed, or use as a curtain on the balcony. This garland can also be decorated with dry flower buds.
If you wrap an ordinary candlestick beautiful leaf, then it will become the “highlight” of the autumn table. And if you leave the edges of the leaves sticking out on all sides, then thanks to this the candle will cast beautiful shadows.
Crafts made from leaves look much better if you use backlighting. In order to make such a craft, you need to take any jar and cover it with leaves on the inside. And then just put a candle there.
Connoisseurs of minimalism will certainly be impressed by a maple leaf on a white background in a white or black frame. It can be either regular or skeletonized.
In a portrait craft, you can decorate your hair with leaves. To do this, you can take a template - for example, the silhouette of a girl’s head in profile, with long flowing hair. The leaves need to be glued tastefully so that each one is in its place, otherwise the picture can easily be ruined. After all, from bad taste to an original masterpiece that you won’t be ashamed to decorate your interior with, it’s just one step.
Autumn leaves are perfect for decorating the dining table at this time of year. Even professional decorators use such techniques, because it looks simple but tasteful.
The choice of themes for compositions is incredibly large. And with the help of crafts made from leaves, you can turn even the coldest and most unprepossessing room into a cozy place for family gatherings.
Autumn evokes the desire to capture the play of colors not only in memory, but also in the house, where on long winter evenings you can see, touch, and breathe in the charm of autumn, so beautiful with a slight touch of bitterness.

Decorate your home, giving in to the impulse inspired by autumn landscapes, you can simply and unpretentiously collect multi-colored maple leaves from the nearest park and place them throughout the apartment one by one (using tall narrow glasses or vases) or in armfuls, like flaming bouquets.

But with a small amount of time and a minimum of effort, you can build real works of art from them, which will still for a long time will please the eye and serve as a real decoration for your home.


Other crafts from autumn gifts of nature:
— Crafts from chestnuts, spikelets and other gifts of nature
— Crafts from acorns
— Pumpkin crafts
— Crafts from pine cones
— Crafts from twigs and twigs
— Crafts from dried flowers
Pendants and garlands made of maple leaves
You need to take two or three leaves, preferably different sizes, cover them with transparent varnish or dip them in paraffin melted in a water bath, and then tie them together with a thread that can be decorated with beads to match the leaves and, making a loop out of it, hang it, for example, under the ceiling of a children's room.

You can complicate the task by collecting leaves treated in this way into a garland. From which it is easy to create an intricate pattern, fixing it on the wall, or around a picturesque branch placed in a vase, or placing it in a high-hanging pot of flowers and simply letting it hang freely along the wall. If you combine several of these garlands, you will get a bright curtain for the window.


Maple leaf wreaths
Another popular fall craft is maple leaf wreaths. You can either simply weave a wreath of leaves, just as you did with flowers in the summer, or you can do something more intricate. In this case, the wreath is made from birch or other branches, and leaves, acorns, ribbons, cones and other gifts of nature are used for its decoration.
Read also:
What else can be made from cones.


Decorate candles and candlesticks with leaves
Leaves dried under a press or iron can be glued over a glass jar, coated with clear varnish for decoupage, and a candle can be placed inside. The result is an original lamp that can decorate any romantic evening. Thick candles are decorated in the same way - the leaves are simply glued or tied to their surface. It looks very unusual, especially if you use candles of light, dim colors.


Roses and bouquets of maple leaves
Roses made from maple leaves deserve a separate theme, from which you can collect not only bouquets, but also tie them into wreaths, decorate wickerwork with them, and lovers of vintage style can easily fit such decorations into their interior by covering flowers made from maple leaves with gold or silver paint.

It is very easy to make roses from maple leaves, which you can then collect into one large bouquet. These flowers will delight you all winter. Plus this interesting idea For little surprise girl from guy. These roses are made in an easy way - just fold maple leaves and wrap them around the workpiece. Don't forget to bend the edges like real rose. Here's the detailed one step by step wizard class on making roses from maple leaves and a bouquet of them:


And here are some more craft ideas made from these roses. You can use them to make a topiary, which you read about below, a wreath, decorate paintings and much more, and even bouquets of dry leaves can be quite varied:


Autumn, fallen leaves crunch underfoot... What a pity for this yellow-red fading beauty, crumbling and trampled into the mud. Here is a birch leaf - gently yellow, jagged, here is an alder - ribbed, and here is a mountain ash - a family of long leaves on a thin stalk. Let's take them home and make beautiful autumn crafts and appliques. We will also need a piece of colored cardboard for the background and glue to glue the leaves.
How to make an applique of autumn leaves
Autumn leaves dried outside are not even and quite fragile, so first we’ll dry the leaves ourselves. We find freshly fallen, bright and beautiful, undamaged leaves, and put them between the sheets of some thick book. We put the book under a press (under something heavy). In a week or even earlier, the smooth autumn leaves for applique are ready; they can be easily glued to paper or cardboard with PVA glue.
Sequence of actions
A true artist sees living images in nature, so we can dream up our imaginations. Let’s lay out all our collected and dried wealth in front of us and see what it’s like. Take suitable leaves and place them on cardboard until you get a picture. You don't need to glue it yet, just lay it out first until you're happy with everything.
When the picture is perfect, you can glue it. We take one leaf at a time, remembering where it was, smear it on the back side, and glue it in place. If the application is multi-layered, first glue the lower leaves, then the top layer. The craft is ready! You can admire it!
But what if appliqué ideas just don’t come to mind, and the leaves only look like leaves, and not at all like bunnies and chanterelles? Then take advantage of our ideas.
Leaf craft ideas
Applications with animals
Owl made of leaves:


Red cat


Bird with chicks:


And even an eagle:

Landscapes of leaves
For a landscape, the background can be painted with watercolors.


Still lifes

Portraits


The finished application (if it is not voluminous) can be placed under a press so that after drying it remains flat. Store in a dry place, perhaps in a frame under glass.
Master class Maria“how to make a cute arrangement for your home” Bouquet of flowers from dry leaves". This craft can be done together with your child.
Decorating rooms with natural materials is no longer an innovation in interior design. Anyone can decorate walls and furniture using panels of dry leaves, topiary or other crafts. Handmade decorative elements perform important functions. First of all, they carry positive energy and pleasant memories. And, of course, they enliven the interior.
We offer the idea of creating a bouquet of dried leaves. The samples for the herbarium were collected in the fall thanks to the biology teacher. The kids at school did homework according to educational program. I stayed after the lesson beautiful collection and a lot of extra leaves. By the way, some of them fell from the house plant. Ficus Benjamin was accidentally flooded with water. The flower dropped its leaves in protest.
So, let’s put the album with neatly decorated herbarium specimens aside, and let’s get to the rest. The quantity and color allow you to make a bouquet with yellow flowers.
For the craft you will need:
- colorful leaves,
- thin tree branches,
- petals of any flowers (if there are none, no problem),
- PVA glue,
- gouache or watercolor paints with a brush.
Additionally, the following will be useful for decorating the vase:
- glass jar,
- piece of fabric
- rubber,
- satin ribbon.
To create a flower, prepare a dense base, for example, a piece of cardboard. Apply PVA glue to it and apply the selected leaves in a circle. First we work with large specimens.

We make the next tier in the same way, only we place smaller petals between the leaves of the first row.

We again treat the middle with a brush with PVA and glue real flower petals. yellow. This move will immediately color the craft and make it bright. If there are no such petals, it doesn’t matter, without them the finished flower will look no worse.


It's time to tackle the middle. There are several options for its design. You can glue a piece of black leather in the center or sprinkle semolina in the middle, and then paint it yellow with gouache. We decided to cut the center circle out of fabric.
It turned out like this.

Let the flower dry for 30 minutes. We immediately set about creating two more similar samples.
Now let's think about how to make a stem with leaves. Let's select suitable tree branches and work on them with a brush with green gouache.

Place the finished stems on the windowsill. The bright sun will quickly dry out the water. After 10-15 minutes, you can continue working with the workpiece. Using PVA glue, attach the green leaves to the branches.

The output is approximately the following.

Now you need to glue the dried ones to the finished stems. How do you like this beauty?

Oh yes! Forgot about the vase. We will also make it ourselves. It was not for nothing that they collected jars, rubber bands and rags from around the kitchen. A glass jar of baby puree is quite stable. It will hold the bouquet perfectly and will not tip over.
We place the jar in the center of the piece of fabric. We wrap the ends of the satin flap in it.

Use a thin elastic band to press the fabric to the neckline. Not very tight.

We hide the ugly elastic band behind a yellow ribbon. The bow can be left on the front of the vase, but we were afraid of making the craft too clumsy.

I wanted to capture the flowers against the background of the finished vase.

In principle, the work is finished. Carefully place the flowers from the leaves into the jar, look for a place where we will leave this floral arrangement. 
It turned out very beautifully. The photograph does not convey the naturalness of the materials. I think this is just the beginning of experiments with herbarium specimens.

Did you like the product and want to order the same from the author? Write to us.
More interesting:
See also:
Beaded tree "Birch"
New addition to our collection of beaded trees! Now together with a palm tree, cherry blossoms, bonsai, with...
Autumn! There is so much warmth and beauty in this wonderful time of year! Countless variegated colors playing with magical shades in the sun, a variety of unique shapes and structures of fruits, grass, as well as tree leaves fluttering in the wind. Every day we look at this splendor and are inspired, enriched with magical energy, which further encourages us to do our own work. Someone paints pictures, someone composes poetry and stories, and someone does homework. From properly selected and careful natural materials you can create beautiful DIY crafts for the New Year 2018 and other holidays, decorations for room interiors in the form of vases, flowers, baskets, topiary, panels, boxes, etc. Also, children's works for a thematic exhibition in kindergarten and school in the form of various animals, birds, fairy tale characters, wreaths, autumn-themed applications and much more. Schoolchildren in grades 1–4 are especially interested in such skills. After all, kids of this age They look at the world completely differently, they notice all the subtleties of the luxury of natural decoration, which adults, in turn, do not always pay attention to. So, let's plunge at least a little into the world of art and grace through our prepared article. In it you will find 9 ideas for easy and beautiful DIY leaf crafts. Informative master classes with photos and video lessons will guide you towards your own correct ideas and creations.
Bouquet of roses from maple leaves
Can be made from leaves beautiful bouquet roses that can be given to family and friends. Such an autumn bouquet will delight and surprise them, because it looks very impressive, and most importantly, it is made by hand. To make it easier for you to understand how to make such a bouquet, we described the craft in our master class with step by step instructions.
You will need:
- Maple leaves of various sizes (one flower takes 7 - 10 pieces),
- Thread.
Work progress:
- Let's take it natural material and bend it in half so that the sharp ends do not interfere with us.
- We twist the leaf into a tube with our own hands, perpendicular to the tail.
- We wrap the resulting tube in a similar way 3 - 4 more times. This will give us the base of a rosebud.
- Next, we form a bud by applying new sheets to the workpiece larger size, not forgetting to hide their sharp edges by folding it in half.
- After you have attached a sufficient number of elements, straighten the petals of our rose so that it becomes more voluminous.
- We secure our structure with a rope from below, where we still have the tails of the natural material used.
- So we make 3 - 5 roses and begin to collect the bouquet.
- We fasten all the roses together with a rope so that they create a harmonious composition made by ourselves.
- We attach maple leaves around the roses so that they seem to hug the flowers from the outside.
- You can also add various other decorations to our bouquet - twigs with berries, or some green twigs to add brightness and contrast. In general, the idea of a craft is quite interesting and simple, be sure to try to reproduce it at home.
Video: master class on creating a rose from maple leaves
Wall wreath made of autumn leaves
To decorate your home, you can make a very beautiful wreath of leaves with your own hands. This craft can be done even with a child of 3, 4, 5 years old. You can see how to create such a wreath in the description below with step-by-step instructions and a photo idea.

You will need:
- maple leaves,
- Plastic plate,
- Stationery knife,
- Orange ribbon, 2 cm wide,
- Burlap ribbon,
- Stapler.
Work progress:
- In order to make a craft from leaves with your own hands quickly and beautifully, we need to take a plate and cut the bottom out of it with a knife. We now have the base for the wreath.
- We tear off the tails of the natural material used.
- We hold them with their sharp corners up and begin to fold the edges towards the center in the form of tubes, and secure them in this position with a stapler.
- We make about 23 such blanks.
- Using a stapler, we fasten the blanks to the rim of the plate; the leaves should be positioned evenly in a circle. We make 2 rows of these so that there are no gaps.
- We attach even elements on top small size to close the corners.
- When all the component parts are attached, use a stapler to attach a burlap ribbon so that we get a beautiful spiral.
- On the reverse side, we cut off the extra corners so that the handmade craft has a neat appearance.
- To decorate, make a bow from an orange ribbon and attach it to the wreath in the part where you like it best. And we make a loop from the same ribbon on which we can hang our wreath.
Video: master class on making a wreath from autumn leaves
Application “Autumn tree”
You can make it from leaves various applications with your own hands. In order to do autumn tree, we did a master class with detailed instructions. Even a 1st grade student can easily cope with such creative work. Let's see how to do it beautiful craft from bright natural material yourself.
You will need:
- snow-white paper,
- dry leaves,
- PVA glue,
- brown felt-tip pen.
Work progress:
- According to the photo idea we provided, you need to fold the paper material in half and draw the outline of the tree with a felt-tip pen.
- Then you will need to make a crown from dry autumn leaves with your own hands, gluing them with PVA glue. The crown should be made both from whole small elements and using the tear-off technique, i.e. from fragments of large natural material.
- Next, using a brown felt-tip pen, you can color the tree trunk, and you can also make it using paints. Like this original craft will perfectly transform a child's room or become a worthy exhibit of a themed autumn exhibition at a school or kindergarten.
Video: master class on making your own applique
Autumn leaves beaten with a hammer
You can invite your child to make an original autumn craft. With his own hands he will be able to create an imprint of various plants on fabric, their leaves and flowers. This creative work is perfect for children 3, 4, 5, 6 years old. You can see how to make such a creative creation below in the description with detailed instructions.

You will need:
- light cotton fabric;
- plastic bag;
- small kitchen hammer.
Work progress:
- To make this craft, you need to place the fabric on a flat and hard surface, and then make a composition of leaves and flowers on it.
- Cover the fabric with polyethylene.
- In order for the autumn plants to release their juice and color the fabric with it, you need to lightly beat your composition onto the polyethylene with a hammer.
- This printed fabric can be used to decorate napkins and also works as a DIY card design.
Leaf Lotto
Autumn is a time for exciting herbarium compilation. This is also a great way to introduce your child to the plant world. A leaf lotto can be an alternative to a regular herbarium, and your child can help you make such a craft with your own hands. This is a very educational game for children that will give them maximum pleasure and benefit.

You will need:
- thin cardboard, A4 format - 6 pieces,
- dry leaves of various trees and shrubs, dried flowers and herbs,
- fruits of trees and shrubs (optional),
- scissors,
- pencil.
Work progress:
- Initially, you need to draw the cardboard, A4 format, into 6 identical parts.
- 3 lined parts will make up the lotto panel. It is on them that the child will place the cards. We will dedicate one panel to trees, the second to bushes, and the third to flowers and grass. Now glue the appropriate material to each segment of the panel.
- The remaining 3 pieces of cardboard should be cut into sections. There will be 18 of them, these will be cards for future crafts created by yourself.
- Glue one leaf, flower or blade of grass from each plant to each card. Our educational game is ready, and you can already get carried away with it with your child.
You can collect dried fruits and other natural materials in a small box. Alternatively, you can simply draw them on cards, but using natural material will probably be more interesting for the child. While playing, the child’s task will be to arrange cards with flowers, foliage, and fruits into certain sections that correspond to plants.
Autumn crown of leaves
Autumn foliage is very beautiful and colorful. You can use it to make a charming crown for your princess. And the main thing is that you can make such a craft with your own hands together with your child, because it is designed for ages 4, 5, 6, 7 years. Let's watch our master class with step by step description and photo idea.

You will need:
- colorful autumn leaves,
- scissors,
- glue.
Work progress:
- While walking in a park or square, collect the most beautiful autumn foliage. The more varied their colors and sizes, the more beautiful our crown will turn out.
- Cut off the edge of the stem and fold each natural element in half.
- Leg of one material through the second element.
- Continue attaching the remaining leaves in this manner until the size is large enough for the crown to be placed on your head.
- Fasten the edges of the crown and glue in front a decoration you created with your own hands from the same natural material as the craft itself.
Video: home decoration ideas, DIY hair from leaves
Maple leaf topiary
Despite the fact that topiary trees have recently become fashionable, they have managed to quickly gain popularity. You can make this tree with your own hands from various available materials: flowers, leaves, fruits, coffee beans, ribbons, paper. In order to make it, you will need very little free time, in addition, you will not need any special skills at all. It is worth noting that this charming craft can be a great gift for any holiday, as it brings joy and prosperity.

You will need:
- small flower pot,
- floral sponge (ordinary foam rubber can be used as an alternative),
- wooden stick,
- yellow leaves,
- rowan and other elements for wood decoration.
Work progress:
- First of all, you need to secure the wooden stick in the pot with your own hands as firmly as possible, otherwise the tree will tilt or even fall along with the pot.
- At the very top of the stick, attach a ball made of sponge or foam rubber. All prepared elements should be evenly stuck into this ball: leaves, branches, rowan bunches.
- The soil and trunk of the tree can be decorated with grass, beads or artificial flowers and vegetation. An excellent addition would be a small twig that will represent a small bush. You can complement the decoration with ribbons, beads, artificial branches and flowers for decoration. Our DIY craft is ready! It will transform any corner in your home.
Craft “Owl” from leaves

To make a quick and beautiful children's craft from leaves with your own hands for school or kindergarten, you need to take a closer look at our idea provided by the photo. It is simple in its execution and does not require expensive supernatural material, great skills and craftsmanship. Even a child of 1st - 4th grade can easily cope with the creative task assigned to him. So, an owl in elementary reproduction.
To work you will need:
- bright yellow, red, orange and green leaves;
- office glue;
- scissors;
- snow-white album paper;
- colored paper;
- foil.
Manufacturing process:
- For our craft, you will need to take paper and make a rough sketch of a bird on it with a simple pencil.
- After this, you need to select the most suitable and unusual leaves from different trees that fit into the image of the owl presented by us. We lay out our natural material along the outlined lines with our own hands so that all the outlines and details are similar to the real thing. If necessary, use scissors to trim the edges of some of the component elements and secure everything with office glue.
- We cut out the owl's eyes and beak from foil and colored paper and attach it to the face, as in the photo. So simple and at the same time interesting craft We succeeded, dear friends. Using this simple technique, you can create with your own hands many other animals, birds and even people; you just need to choose beautiful leaves.
Vase of autumn maple leaves


