V step by step master class you will see how to make beautiful wool beads using the wet felting technique with your own hands.
This handicraft is simple and exciting, having learned how to play on simple things, you can create beautiful designer items and souvenirs. Felted woolen beads perfectly complement knitted clothes - they are soft and cozy, lightweight and do not leave puffs. Such an ornament can be worn with an open collar or with collars under the throat. If you like bulky jewelry, increase the diameter of the beads.
Preparation of materials for felting
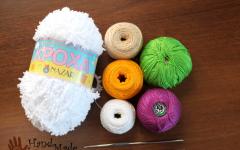
To bend wool beads, buy materials and tools at a craft store:
- wool of two colors (in the master class, black and white are taken as the basis, but you can stop at your favorites);
- floss threads to match the wool;
- black satin narrow ribbon;
- black braid;
- gypsy igloo;
- beads (white mother-of-pearl, black);
- glass beads (white, black).

How to make wool beads
Start making beads with your own hands by felting wool beads. To do this, pour warm water into a bowl, make several taps on the liquid soap dispenser to obtain a soap solution.
Lay on a towel and start preparing the wool. Divide the wool into nine parts, because there will be nine balls. Make four white pieces, two black pieces, and three mixed colors.

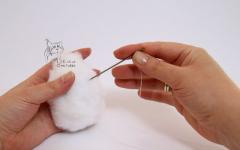
To fold the bead, roll the woolen strand into a ball and dip it completely in soapy water. Next, start rolling on your hand, gently doing circular motion, without pressure. As soon as you feel that the ball is taking shape and rising, you can roll it more intensively until the desired density is obtained.

Then rinse the workpiece under clean cold water, squeeze it lightly in your hand and lay it on the battery to dry. Make all the details for the beads in the same way. Mixed-color blanks are also easy to make. Roll a white ball and add a black transparent strand on top. Roll in your hands and dry.

Bead decoration and assembly
After all the details for the beads are completely dry, start decorating with embroidery, beads and braid. There are four beads to decorate in total.
Bead No. 1
Take the white ball. Apply a pattern on both sides of it as in the photo - a cross.

Place a large bead or bead in the center; a thread can be inserted under the bottom for beauty.

Secure with thread and lay out black and white beaded strips on four sides of the cross.

Then embroider the outlines of the cross with a chain stitch with a black floss thread.

Taking some space back, use regular embroidery stitches to frame the cross. Sew the white beads into empty places between the legs of the cross.


Bead No. 2
On a DIY dark wool bead, embroider the flowers with white thread. Tie a French knot in the center of the flower. To do this, wind the thread around the needle itself four times and stick it near where the thread exits the ball.

Pull the thread gently, the structure will be secured and a French knot will form.

Place the petals around the knot. Form a curl from the thread and hook it with another stitch on top.


In this way, embroider six petals. In this bead felting workshop, there were three flowers.
Bead No. 3
You will need a white bead. Draw exactly two horizontal lines on the ball with a simple pencil. Sew these lines with black thread.

Fill in the inner part between the lines with crosses.

Embroider a small cross in the center of the crosses with white thread. Sew beads (white mother-of-pearl) between the crosses. Tie French knots at the top and bottom of the embroidery.

Bead No. 4
This ball white decorate with decorative braid. Sew on top.

From above, create, as it were, arcs of black thread, in the center, fasten them so that they do not disintegrate.

Decorate the braid with white beads.

Assembling the decoration
Collect the felted beads on a thin satin ribbon... Measure the required length of the tape, try on so that the jewelry can easily pass over the head, since there will be no fasteners.
Refuel satin ribbon into a gypsy needle and string wool beads, alternating them in color. Insert glass elements between them and be sure to make knots on the tape to fix it.

Once you've finished stringing, tie or glue the ends of the tape. Original felted wool beads are ready to decorate a fashionable outfit!


We also have stylish, and many other decorations in. Wear it with pleasure and boldly tell everyone that you are the author of designer jewelry.
Natalia Napolova prepared a master class on felting wool beads for needlewomen of the site "Women's Hobbies", photo by the author. Join us at in social networks to keep abreast of new lessons coming out.
Now it is fashionable to make wool jewelry on your own at home. A stylish necklace or necklace made of soft beads is original and comfortable, especially in winter time of the year. In addition, wool is a natural material, so such beads can rightfully be called environmentally friendly. I must say that it is easier to felle blanks for beads using the wet felting method than using the dry felting technique. Today we will learn how to create beads using wet felting. And for this we will definitely need:
- Wool (beige, chocolate, cream)
- Soapy water solution
- Beads (beige, light beige)
- Mouline thread (thread color dark brown, dark yellow, turquoise)
- Brown satin ribbon
- Decorative clips
- Waxed tourniquet
- Turquoise beads
We roll wool beads
The first step is to bead the wool beads. Prepare a soapy solution ( liquid soap+ water). Pull the wool into pieces. 
I made nine beads. Therefore, you need nine parts of wool. Plan in advance what color the beads will be. Be sure to make a few beads of mixed colors, they will decorate the accessory. In order to make such a three-color bead, take three parts of a different color of wool and, forming a lump from this mass, dip it into soapy water. Start rolling the ball between your palms. Do this very carefully at a slow pace. 
After a series of several movements, the mass will begin to take on the shape of a ball and gradually thicken. Get the right density, volume and finish felting. The bead should be pretty hard, preferably free from defects and holes. If everything suits you, rinse the bead under cold water, squeeze and put to dry. Perform nine beads in a similar manner and leave to dry on the battery. 
We decorate beads with embroidery
You can, of course, leave the beads as they are after drying, but we will try to decorate them additionally with beads and embroidery. It's easy to do, even fun. 
Let's take a bead beige colour and embroider two horizontal headbands with blue thread. 
Now we will sew around these rims with satin stitch. 
In the circle we embroider the net with dark yellow thread. And on top we will complement the embroidery with brown thread. 
Here's what we managed to do. 
Next, we will embroider crosses in the net with blue thread. Place dark beige beads in the spaces between the crosses. 

Be sure to make the same pattern on the back of the bead, because it will spin randomly on the cord.
The next bead we will decorate will be a chocolate colored bead. We also embroider two rims with a blue thread, but already horizontally along the entire bead. We fill the void with crosses. 
We embroider French knots at the top and bottom of the picture. It's easy. Twist the thread around the needle four times and stick it next to where the thread exits. 

In the center of the crosses, place small crosses with yellow thread. Complete the pattern with beads. 

Now let's decorate the cream colored bead with embroidery. Embroider "psaltery" with a tambour stitch with brown thread. 

Inside, repeat the pattern with blue thread. Sew in the beads. Repeat the pattern inside with dark yellow thread. 
Decorate one more bead with a flower embroidery. Embroider a French knot in the center of the flower, and decorate with petals around the edges. Make flowers evenly all over the bead. 


Here are the beads we got. 
We collect beads on a tourniquet
It was the turn of the string to string the beads. Do not forget that there should be a distance between the elements on the tourniquet so that the beads are not squeezed tightly, resembling a bunch of sausages. Tie strong knots at both ends of the tourniquet and thread a satin ribbon into them, the size of which you must measure in advance. 

Place decorative clips over the knots and use pliers to secure the clips. 

Glue or knot the ends of the tape. That's it, our unusual accessory is completely made. It remains only to try on the beads. 


Svetlana Bolshakova
A few months ago, here on Maam, I came across a publication by a teacher from Moscow, Lola Dzhalalova, on how each child made one wool bead. Then I caught fire to try to make such felt beads, but the time was found only yesterday. The rain was drumming outside the window and this music was very conducive to the next creativity.
Master Class Lola was very conveniently designed for children's creativity... This is how we acted. Took colored wool for felting, containers from kinder surprises, poured water with liquid soap, napkins for wiping hands.

Already this morning, in response to my request for felting beads, the computer produced a lot of such beauty - round beads, square, cubed, flat, like tablets, etc.!
And I learned that the water should be hot, and we had room temperature. But it seems to me that this did not play a negative role.
So our Master Class... They took a small strand of wool - 15 cm long and 1 cm wide. Smoothed out by hands

Although it is written on the Internet that you need to ruffle the wool and roll a ball out of it, securing it with a needle for dry felting... But you won't give such a needle to children for safety reasons, but for myself I decided that next time I would do such beads according to all the rules.
Well, we rolled a ball, dipped it in soapy water, squeezed it out, put it in a container and started shaking it


Lola says that shaking the container takes about 5 minutes. But, in my opinion, it takes too long. By the end of the work, the muscles in our arms were already aching.
After the ball has been taken out, we begin to roll it carefully between the palms, gradually increasing the force of the pressure of the palms on the ball. We roll the ball to a dense state

And now the first beads

I tried to make the beads not the same color, I inserted wool of a different color into them

It took us a little over an hour to roll enough of the beads.

True, then I rolled the girls' beads to the proper elasticity, probably for another hour. We left the beads to dry on the table, arranging them in size - after all, they did not turn out to be the same size for us. But they had to be rinsed in clean water, and we didn't. In general, today I read that beads you can even wash at t up to 40 degrees
In the morning, the beads dried up and I gathered them on a thin elastic band, inserting small multi-colored plastic beads between them

These are the beads

The girls' joy knew no bounds

Related publications:
"Easter souvenir" - dry felting from wool. Dry felting from wool, a technique that allows you to create unusual souvenirs. They possess.
"Feed the birds in winter!" Yesterday we with children from gr. "Buratino" held an action "Feed the birds in winter!" First, we had a conversation on the topic "Wintering.
Dear colleagues! In this master class, I want to bring to your attention one of the many ways to make beads (necklaces) from fabric.
Not glass or crystal, But it shines like steel. You will bring it into the warmth, home. It will immediately become water. The cold comes from him. Of course it is (.
Master class "Shiny beads for a Christmas tree" Fluffy Christmas tree Came to visit us. Beads are golden Braided in the branches. Dear colleagues.
Beads for your beloved mom. In order to make such beads for your mother, you will need: a white sheet of cardboard, any woolen thread.
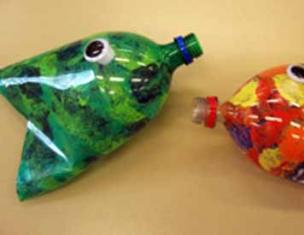
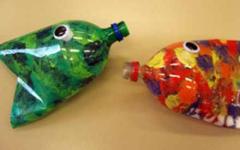
Another product made from natural material - felted beads do it yourself from wool. You can roll bead balls of the same color or with the addition of a different color, as in the picture.
Choose the colors that suit you best for the clothes with which you are going to wear them. Beads made of wool felted balls will turn out to be bright, but if they do not match the color of your wardrobe, they will spend most of the time in a drawer.
Materials for felted wool beads
- Wool for felting
- About 175 - 180 cm of jewelery rope
- Clasp
- Bead clips (quantity depending on the number of beads, two on each side of the bead)
- Felting needle
- Felting brush (I did not use)
- Soap solution (for wet felting or felting)
- Awl for piercing holes in felted balls

First, you need to roll the balls with your hands and start felting with a felting needle, I do this on a regular dishwashing sponge, on its foam-rubber side.
Details on how to dry and then wet felting wool balls can be found in another article:

It is very easy to roll such balls of wool; every beginner, even a child, can do it. First, using the dry felting method, poke the wool ball with a felting needle, and then you can continue felting the balls in the washing machine.
To do this, I put them one at a time through a knot in the legs of old tights and in this form I put them together with other things intended for washing into the drum. washing machine... Anyone who is interested in all the small details of making balls for beads or other jewelry (for example, earrings) - welcome to the link.
In total, you need to make 9 pieces of felted beads of each size - 2.5 cm, 2 cm, 1.5 cm.
Assembling felted wool beads
When the beads felted from wool are ready, you first need to divide the jewelry cable into three parts, one will be slightly larger than the rest - about 65-67 centimeters, the other (middle) - 58-60 centimeters, the third, the shortest - 52-54 centimeters.
Try it on yourself - you might want to make the beads shorter or, on the contrary, longer. If you make long beads and the head will pass freely, then you can save on the fastener.
Felted beads made of non-spun wool are very dense and cannot even be pierced with a needle, so we will use an awl to string them onto the rope at intervals of a few centimeters.
Leave the very beginning of the cable (on both sides of the fastener) free, the distance for large beads is less - about 9 centimeters, for medium - 20 centimeters, and for the smallest - 23 centimeters.
But these are approximate sizes, and you can make your own, original and completely different from these felted beads from non-spun multi-colored wool. It all depends on your imagination. You can make wool beads not round, but oval. I personally like absolutely round ones more.
Between the felted beads, you can add plastic or metal beads, crochet beads, bugles, beads. Felted beads can be embroidered very beautifully the simplest embroidery- stars, snowflakes, make appliques on them from fabrics with a small printed pattern, embroider with beads.
It remains to collect all the beads into three parts of the cable, secure them (so that they do not move) with clamps and attach a clasp to the ends. Clips are such small metal beads, they should fit freely into the jewelry cable, and to fix the felted beads, they must be clamped in the right place, for example, with pliers.
That's all, your DIY colored wool beads are ready!
You may be interested in:
This is a classic necklace made of multi-colored mukaite and amber with some glass beads added in some places between large flat beads.
The beads are quite massive, but they look very impressive, especially when set with massive amber earrings.
I also have a matching mukait wrist bracelet. The vibrant autumn colors of this stone are eye-catching.

In a set for felted beads, you can make earrings from the same felted balls, from one or more balls each. Or such as in the photo - felted balls in a sphere of metal wire, each. They turn out to be quite large, but weightless, because felted wool weighs quite a bit.

By felting non-spun wool, you can make not only felted beads or earrings, brooches are excellent. Try to make small round toy beads in the shape of funny animals, such as the one in the picture. It is they who serve as the basis for our decoration on a pin-clasp.
I present to you a master class for felting wool beads. I think that this lesson will appeal to beginner fellers who are just getting acquainted with felting. Therefore, manual execution the best way understanding what wool is, the process of creating felted woolen beads.
For felting beads, we need:
1. Non-spun wool. For felting and your own development, absolutely any non-spun wool is suitable. If from different types wool you will make different beads, you yourself will feel what wool is, wool shrinkage and you will see the result of your labor.
2. Plant or silk fibers.
3. An ordinary dish washing sponge or a piece of foam rubber or a felting brush.
4. Serrated felting needle.
5. Water.
6. A bar of soap or liquid soap.
7. Bubble plastic wrap.
8. A sharp metal object like a gypsy needle or knitting needle.
We go directly to the master class of felting beads
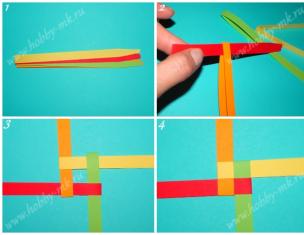
We take the prepared wool and draw out small strands from it. Wool is usually sold as a combed ribbon, in which long fibers are arranged in strands, or a carded bundle similar to cotton wool. I tend to use fine strands, two for each bead.
Take one strand by the edge and wind it to the other edge, folding the strand into a bun, like a snowball. Then we take another strand and wrap it over the resulting kolobok. The process of forming a kolobok can be simplified, for this you will initially choose at your discretion the thickest and largest strand, depending on what kind of bead you want to get.

You should end up with a soft, loose wool ball. Next, we carry out similar operations for the following beads.
Now we need a sponge and a needle or knitting needle. We take a bun and lightly bait the future bead. We make punctures with a needle slowly, constantly scrolling the bun, evenly from all sides. Continue this way until the shape of the bead locks in place.
Next step- ball decoration. You can decorate the ball according to your desire and imagination - with fibers of wool of different colors, silk or fibers of banana, soy, viscose, bamboo and so on. It is not recommended to use acrylic fibers because it is intended for dry felting. You can use roving or other natural yarn. Or, at this stage, you can not decorate the bun at all.
My beads are decorated with viscose fibers of black color, yellow and blue silk. Viscose and silk fibers are slightly pinned to the bead.

We performed operations with a needle to give a spherical shape to our bead and fix the constituent elements for further actions with it. If you do not have a needle or knitting needle at hand, you do not need to perform piercing manipulations, just after winding the koloboks, you need to take care of them.
Next step- make a soapy solution. To do this, rub the soap into water or dissolve a bar of soap in water, you can dissolve liquid soap or shampoo in water. In extreme cases, you can use dishwashing liquid and dilute it in water, most importantly, when performing work, monitor the condition of your hands. For soapy water, it is advisable to use hot or warm water. If warm or hot water is not available, you can make a solution with cold water.
Spread the woolen balls on the bubble wrap and pour over them with soapy water. Then, very smoothly, slowly, so as not to spoil the shape, we begin to roll the balls over the surface. The balls can be rolled, if possible, all at once or one at a time.
Slowly, gradually tightening the ball, we increase the pressure, but without using special force, since it is not yet ready for this. In addition, it is convenient to roll the ball neatly between your palms, while you must be careful not to get an oval ball.
Watch a useful video: Master class for felting wool beads
At this stage, the under-melted balls are not so important, you just need to increase the pressure on the more convex places of the lumps. In general, we roll the balls further and bring them to the form of beads.
If you need the same beads, then at the very first stage, when preparing the strand, you need to take strands of the same size and thickness.
After the beads acquire a charming smooth and dense surface, from which they do not separate when plucking the fibers, we dip them in clean water and wash off soap. Then we pour over them with a shower of hot and cold water for a better seal.
Ultimately, the beads turn out to be fluffy with protruding hairs. If you wish, you can make the beads smooth - cut the hairs with scissors or gently shave off with a blade, without removing the layer from the bun.
In order for the balls to turn into beads, you need to make holes in them. Make holes in damp balls, as wet wool balls pierce more easily. You can do this with any tool, the main thing is that it is made of stainless steel. You can leave the beads on the needle to dry.
I used to make holes in the balls with a carpet sewing needle, then put them on toothpicks to dry.
The penultimate step is drying the beads. We place the beads on a piece of paper or cloth under the sun's rays or on a heating radiator. If the balls are left unsupported, they will take longer to dry.
If you made beads without decorations or patterns, you can decorate them at this stage. Use a needle to pin a pattern or embroider with beads, sequins, or other embellishments.
And the last thing. At your request, you can add the same beads to the beads or hang them on your phone or keys. You can also see the section