Crochet beret for girls a good replacement for classic hats. Such a beret must be lined for autumn weather, or used, for example, in the summer, as a headdress to protect from the sun's rays. For hats, wool-free yarn or merino yarn is often used, since it does not cause irritation, which is very important for children! Suitable for head circumference 47 cm and age approximately 4 years.
To work you will need:
- One skein of yarn (55% cotton - 45% polyacrylic; 600m - 100g);
- Hook 2.5 mm.
Description of the process of crocheting a beret for a girl:
You start knitting from the bottom of the beret; to do this, cast on five air loops, close them in a ring and then knit according to the pattern. Or, instead of air loops, you make an amigurumi ring.
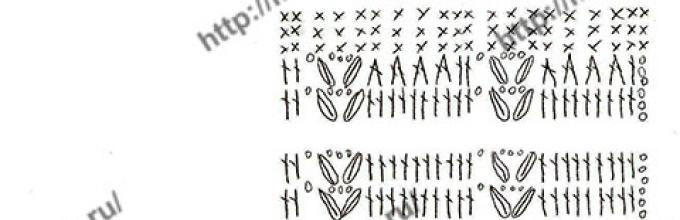
Crochet pattern for a beret for a 4 year old girl:
 Knit nine rows - this will be our beret bottom (if needed larger size, then knit the tenth row, with the same additions as in the ninth row, and if more is needed, then the eleventh).
Next, you knit without any additions - this will be the side of the beret, you determine the size of the side yourself by trying it on the child’s head, but do not forget that we will also have an elastic band that finishes knitting the beret.
When you have knitted the border according to the pattern, start the elastic band 1*1, in the example presented - 8 rows, and tie the last row with a single crochet with a thread of a slightly darker color.
Crochet pattern for an elastic band for a beret:

Using the same dark thread, knit a flower and sew it on. You can also link others from our site.
Crochet pattern for a flower for a beret:

Wash and dry on a horizontal surface. We steam it a little with an iron, and everything is ready to wear!
Look amazing on baby's head. Many models only vaguely resemble the famous knitted “pills” that were popular during the youth of our grandmothers. Soft and warm berets, crocheted from thick woolen threads, perfectly cover the baby's head and ears. winter time year. And elegant lightweight berets made of cotton threads perfectly protect your head small child from the scorching rays of the sun in summer.
Using a crochet hook you can knit the most different options berets for children, choosing yarn with thick or thin threads. A beret for a girl can be decorated with an openwork bow, mother-of-pearl buttons or lace. A beret for a boy will look stylish with a sewn airplane or car.
In this material you will find visual master classes with photos and video lessons, with the help of which even a novice needlewoman can knit beautiful berets for her child with her own hands. You will also learn how to choose the right yarn for summer knitting crochet and for knitting warm children's berets for the winter.
Tips for beginning needlewomen on choosing yarn for crocheting berets for children:
quality. if the child is very small, then be sure to buy a special one
hypoallergenic yarn intended for knitting children's clothing. In any case, carefully study its composition.
Choice color palette. for knitting berets for children under 2-3 years old, it is better to choose nuanced, not very bright yarn, and for older children you can knit berets from bright, cheerful yarn
If you want to tie a child warm beret IR for the winter, then a very good option is alpaca wool threads with the addition of a small amount of synthetic threads to improve the wearability of the headdress. Cotton yarn is suitable for crocheting light summer versions.
Natural fibers must be present in yarn for knitting children's clothing (viscose, cotton, acrylic).
2. HOW TO KNIT QUALITY BERETS FOR CHILDREN USING A HOOK
√
Choosing the right crochet hook.
Suitable for No. 3 - No. 3.5 wool threads medium thickness. But if the canvas turns out to be too loose during work, then change the tool to a thinner one, and if the canvas becomes overtightened and stiff, then take a thicker hook with a higher number.
√ Yarn. For knitting summer berets, you can choose linen or cotton yarn. A thread that is too thin can be used to work in two folds. For the winter, you can knit a warm children's beret made of wool or wool mixture. Headdress made of high-quality fluffy wool yarn It will fit perfectly on a child's head and gently hold its shape.
√
Start of crocheting. We start knitting the beret from the center, casting on 4-8 chain stitches. We close the air loops into a ring, knit 8 single crochets. If the thread is thin, then it can be knitted through a chain, or in loops.
√
We continue to form a circle. We make increases in each row - when knitting with double crochet, 12 loops, and when knitting with single crochets - 6. It is important that there are equal spaces between the added loops in the row.
√
As you work, evaluate the degree of uniform formation of the fabric, since the number of increases may decrease or increase depending on the crochet technique. If you get waves at the edges of the circle, then make fewer increases, and if the circle tightens around the edges, then make more.
√ Knitting methods:
- when knitting openwork or intricate relief patterns, start each row for single crochets with one chain loop, and for two half double crochets with two. For double crochets, start each row with three chain stitches. Carefully study the description and knitting patterns of the beret as you work.
You can knit the fabric in a spiral without starting each row with an air loop. If you knit single crochets using this method, the knitting will be uniform and even. Stick a pin into the fabric at one edge to make it easier to count the increments. Consider the loops knitted from the mark side to be the beginning of the next row.
3. MASTER CLASSES ON CROCHETING BABY BERETIKS FOR BEGINNERS
Master class 1
Master class 1.1
Master class 2
STEP-BY-STEP DESCRIPTION WITH PHOTO ON KNITTING A VERY BEAUTIFUL BERETIK FOR A GIRL. YOU CAN TAKE ANY NAPKIN KNITTING PATTERN FOR WORK.
Master class 3
WE KNIT A VERY ELEGANT THIN BERET FOR A BOY WITH A VISOR FOR THE SUMMER. DESCRIPTION OF STEPS OF WORK WITH PHOTO AND PRODUCT DIAGRAM.
Master class 4
CROCHETING BABY
Crochet is almost like lace. This tool is used by needlewomen when they need to knit a beautiful thing for the home: a napkin for a table, a tablecloth, a bedspread. Even curtains are crocheted when there is enough time, patience and desire.
It’s easy to make a beautiful beret with your own hands. The main thing is to be good at crocheting. If you have started to master the tool, do not deny yourself the pleasure of tying the first thing - a beret.
The first beret is difficult to knit openwork, but dense, warm and elegant - certainly. Leave some more thread for a scarf, mitts, and mittens to complete your look. When you get a warm beret, you should take on the openwork version.


Crochet hats are usually crocheted from the top of the head. You need to pick up two or three loops, close them in a circle and knit in a spiral. In each loop, five single crochets are knitted. The new row is knitted like this: in each loop, after 1 - 2 single crochets. It all depends on the threads: sometimes you start to get something like a shuttlecock. Then the number of columns needs to be reduced. Does the knit tighten? Enlarge! You need to get an even circle. Keep it even as you knit and add 6 to 8 stitches on each row. Continue knitting several rows without increments. Then start rows with decreases of 6–8 stitches. You need to try on the beret to understand when to stop decreasing. Having reached the desired parameter, knit the band in simple rows without decreases.


The simplest beret is a summer version of the mesh type. You can knit it like a cobweb consisting of chains. Knitting begins from the middle: a chain of air loops is knitted. We make three to five loops and close the circle. Next, from each loop, knit several stitches, between which make an air loop. In the next row, knit a chain - seven loops, attaching to the resulting circle through three loops. A row is knitted with such chains, after which you need to knit chains of greater length, for example, from eleven chain stitches, attached with a single crochet to the middle of the chains of the previous row. This is how the circle should be connected. After this, we do not increase the chains, but knit them to the same length.


If you are good at crocheting, then it will not be difficult for you to find beautiful openwork patterns for knitting a beret. For example, a fan pattern. Beginners can take more simple diagram. Cast on 5 chain stitches, from them we knit 2 chain stitches for lifting, and then alternate 3 chain loops and a double crochet from the base of the row - five times. The series closes. The next row again begins with two lifting loops and consists of repetitions of three chain loops and two double crochets. You need to do 11 repetitions, after which – 2 air loops. The third row is done in the same way, only 1 single crochet is performed. Next, the beret is knitted in the same way, only you need to add a column in each of the forming petals. Try on the job. When you realize that there is no need to increase the size, knit the petals straight and try them on again. Then you need to knit 7 rows in each petal with decreasing stitches. The bottom edge of the beret is knitted from two rows of single crochets.


Crochet beret for autumn for women - diagrams and description
Autumn berets should not be airy, like lace, because their task is to warm. Such a product needs to be made from thick threads, but it is not necessary to use wool and, especially, down yarn, because these are options for winter. For September and early October, you should choose acrylic yarn.
Crocheted berets - options in pictures
Look at the pictures to see what crocheted berets look like. Openwork knitting used for summer clothes, and thicker for winter ones.


Knitting patterns
Crochet products are sometimes easier to understand if you see a diagram in front of you rather than a row-by-row description. After all, most of the work is knitted in a spiral, so it is not always possible to understand where the row ends and the next one begins.


How to knit a warm beret for the winter
It is better to knit warm berets for winter from down threads. This will give them a stunning look and make them as warm as fur hat. In addition, when knitting a beret, not a single animal will be harmed, since the yarn is made from sheared wool from goats or sheep of specially bred breeds. This type of wool is found under the name “Angorka” (more often referred to as goat wool) or “Mohair” (this name refers to sheep or even camel wool, which does not exclude its advantages). You can knit a beret from wool both by knitting and crocheting. A seamless product comes out either by crocheting or using circular knitting needles.
Winter beret “Snowball”: diagram and description

1.) Make 1 loop.
2.) We knit 12 single crochets from it.
4.) Again 24 stitches - one from the loop. We get a “snail”.
5.) We begin to knit this row differently: 1 tbsp. single crochet from the loop, from the next one - 2 similar stitches, 1 chain stitch and so on until the end of the row.
6.) 1 single crochet - from 2 loops, 2 tbsp. single crochet - from 1 loop, chain stitch - and continue until the end of the row.
7.) Next, make single crochets from each loop 3 times, 2 tbsp. – knit from 1 loop, knit air loop and continue like this until the row is completed. At first, the work will turn into a flounce, but do not worry, because the tails are included in the style of this beret. In addition, after this row you have to make decreases through the row. As a result, the resulting wedges will begin to wrap.
8.) So, we knit 2 single crochet stitches together, knit 1 stitch twice from a loop, and from the next stitch – 2 stitches, a chain loop and continue until the end of this row.
9.) 1 tbsp. Single crochet is performed 4 times, then 2 of the same stitches and an air loop. We do this until the row is completed.
10.) We knit 2 single crochets together, perform 1 such stitch three times, then 2 single crochets and a chain stitch until the row is completed.
Reductions are made until the work reaches the desired diameter.
The last two rows must be knitted with columns in each loop. The third row is special: you need to put an elastic band and tie it.


Today, berets and hats with braids are gaining popularity. Sometimes even an ordinary felt beret is found with braid-type clips. Such patterns are very good to make on knitting needles using a special pin. If it is not in your toolkit, then you should use a regular hairpin, extra knitting needle or any other wire product that has a smooth surface from which the loops will not come off. Such a device allows you to overlap loops, which allows you to get the structure of a rope or braid.
If in your arsenal - exclusively crochet hook, you should act smarter and make your work profitable at the expense of yarn. Learn to crochet with bouclé yarn. Even if you perform the beret using ordinary single crochets, the knitting will not look smooth precisely due to the special texture of the thread. In addition, the beret hat will be warm. You should initially make a pattern for the beret so that you can check your work against it. But if you knit without a pattern, then you need to make an even circle of at least 30 cm in diameter, and then think about decreasing. A simple fitting will show when to stop making them. Don’t forget to tie a band: it will allow the beret to fit well to your head and not stretch from wear. When the product has stretched, it is worth saving the work by knitting a row on the band, where to pass the elastic.
If you want to practice knitting berets with different schemes, then you won’t find a better model than a child. The greatest number of options can be selected for girls, since boys are unlikely to wear elaborate openwork headdresses. While a girl—sister, daughter, niece or granddaughter—grows, both the size of the product and the style change. What a little girl can wear is not always appropriate for a younger “lady” school age, and even more so for a teenage girl. While you practice - your model small child. In addition, a small item can be knitted very quickly.

More suitable for little fashionistas openwork berets crocheted, as they are not very rigid. If you are knitting tightly, it is better to do it on knitting needles.

For an older child, it is good to knit a “Snowball” beret, because it looks great on both adults and children. Beginning knitters should make the petal beret described in the “Summer beret” section. You can also find many patterns on the Internet and create an original work of art based on them, if you are fluent in crocheting.
How to choose the right beret pattern and knitting method
You need to knit a beret not only as an abstract product, but as a wearable item. You must initially take the choice of pattern seriously. Do you prefer a solid color? Select relief pattern, capable of decorating your beret! If you are a minimalist by nature, then make do with plain knitting. Fans of African motifs should take a closer look at Kenyan berets. They usually follow the colors of the African country's flag. You can search for a pattern of the product on the Internet using the query “Bob Marley Beret.”
Openwork berets suit sophisticated natures summer version. Do you want something airy in winter? It is worth choosing the “Snowball” beret pattern described above. It fits well on the head. Tie a beret from threads pastel colors why exactly will you win? It is worth knitting a tight pattern if the beret is knitted for the winter. The work is done both with crochet and knitting.
In addition to the pattern, it is important to know what color beret to choose. The color of the threads should be in harmony with your clothes, complexion and eyes. And you don’t have to think that green eyes Only orange or green. Everything is decided near the mirror.
Crocheting a beret is an excellent practice for beginning needlewomen, especially since the product turns out incredibly beautiful and is ideal even for summer. An openwork beret looks especially stylish on little fashionistas. If desired, you can complement the product with accessories, for example, gloves or mittens, scarves or light capes. The summer beret is very convenient to crochet; it takes little time to make - no more than 3 hours; the process itself is simple.
Crochet beret: diagram and description for beginners
Summer versions of berets are weightless and delicate. Warm hats for adults and children have a denser pattern and are made from thicker threads. If desired, a lining is sewn on if the product is planned to be used in early or mid-autumn and spring.

One of the most simple options for beginners - knitting a beret in the following way:
- You need to start making it from the very top: cast on two loops and connect the chain into a ring.
- The first loop implies five columns without a crochet. In each subsequent row, two columns must be knitted in a loop.
- The whole process should be circular, with a uniform addition of at least 6 columns. It is worth considering that you need to monitor the plane of the circle; if the shape changes in a smaller direction, then there should be more increases, if the opposite is true, then there should be less.
- The process continues until the diameter exceeds 30 cm (how many rows you get depends on the density and thickness of the threads).
- The next step is to tie about another 20 mm, at the same time you need to reduce the number of posts, otherwise the beret will not accept correct form. It is best to subtract 8 columns.
- After more than 8 rows have been completed, you need to try on the product. If everything fits perfectly, then the job is finished. You can tie the final couple of centimeters with any pattern or ornament.

At the end, you should cut off the excess threads and tighten the tip passed through the outer loop. The work is finished, and the product turns out simply stunning in appearance.
Crochet baby beret with pattern
Tie a beret child size designed for summer, you can have yarn of your favorite color and a hook on hand. The latter must be chosen correctly. For thin threads best option- number 3, 4 or 5.

When working with the product, you should pay attention to the result: if the fabric is too tight, you need to replace the tool with a thicker one, otherwise - with a thinner one.

Openwork fashionable berets for summer are well made from linen-based fabrics. You can also choose cotton material. Insulated options should be made from wool blend materials or completely wool.

The beginning of making a beautiful children's beret should start from the center. You need to cast on about 6 chain stitches, close them in a ring and knit eight columns. It is imperative to monitor the formation of the circle, do not forget about increments; if you work without a double crochet, then there should be at least six increments, if with it - at least 12.
It is important to pay attention to the uniformity of the spaces between all the loops. If during the process it was noticed that waves are formed along the edges of a rounded product, then the number of increments must be reduced and vice versa.
How to crochet a beret: knitting methods

Over time, each needlewoman not only accumulates knitting experience, but also forms her own individual style making things. At the beginning, it is recommended to adhere to several standard techniques that will allow you to avoid mistakes and shortcomings during work.

If you plan to make an openwork summer beret with a relief pattern, then you need to start work (and then each row) with one air loop for single crochets. If the situation is the opposite, then the number of loops should be three. During the manufacturing process, you should focus on the selected diagram or description.
Another method is knitting using the spiral method, which involves starting each row without an air loop. The product will turn out even if the columns are made without a crochet. It is easy to count all the increases by sticking a regular pin on one side of the canvas. Drawings and ornaments can be made in different ways: it all depends on imagination or search suitable option from any relevant source.
How to crochet a beret?
With the arrival of autumn, we all remember the need to wear warm and comfortable hats, and with the arrival of spring we want bright and beautiful new clothes. One of these hats is the beret. You can wear it at any age. I suggest you crochet a cute one lilac beret for your daughter, granddaughter or sister. The description and diagrams were prepared by Maria Nikitina.
For the beret you will need a size 3 hook, a skein of Alize Cotton Gold yarn (shade 616), and some light pink yarn for finishing.

Dial a chain of 3 VPs.
1st row: in the 3rd loop from the hook, knit 8 sc.
2nd row: 2 PP, knit 2 sc from each even column of the first row and 1 from the odd one. There will be 12 loops in total.
3rd row: 2 PP, then knit a row according to pattern 1.

Using the same pattern, you need to knit all rows up to the 10th.

Knit rows from 10 to 17 according to pattern 2.

Number of loops
3rd r. – 26 p.
4th r. – 36 p.
5th r. – 54 p.
6th r. – 72 p.
7th r. – 90 p.
8th r. – 108 p.
9th r. – 126 p.
10th r. – 135 p.
11th r. – 153 p.
12th r. – 171 p.
13th – 17 r. – 225 p.

In rows 18 to 31, work sc.
On rows 18 to 21, shorten every fifth stitch.
18th r. – 180 p.
19th r. – 144 p.
20th r. – 116 p.
21st r. – 93 p.
22nd r. – 75 p.
23rd – 30th r. – 75 p.


Knit the 31st row pink threads 75 loops.

All that remains is to finish the beret. To do this, tie pink thread around all the rows of stitches tied behind the front wall, which you started knitting from the 3rd row. Tie sc on the 2nd row.


You have a beret for a girl with a head circumference of about 48 cm ( 2 – 3 years).
To knit such a headdress for a child with a smaller head circumference, it is enough to reduce the number of rows and add loops.
Adding and decreasing beret loops for a one-year-old child:
9th r. – 126 p.
10th r. – add 54 loops as in row 13 in diagram 2. We get 180 stitches.
11th – 14th rr. – 180 p.
15th r. – 144 p.
16th r. – 116 p.
17th r. – 93 p.
18th r. – 75 p.
In the 19th row, decrease 5 stitches evenly. You will have 70 stitches left.
20th – 28th rows – 70 p.
As a result, you will get a beret for a one-year-old child with a head circumference of 45 cm.
Adding and decreasing stitches for a model for 4 years:
In rows 18 to 22 you need to decrease 29 stitches each
18th r. – 196 p.
19th r. – 167 p.
20th r. – 138 p.
21st r. – 109 p.
22nd r. – 77 p. (reduce 32 loops).
23rd – 33rd rr. – 75 p.
As a result, you will get a beret for a four-year-old child with a head circumference of 49.4 cm.


