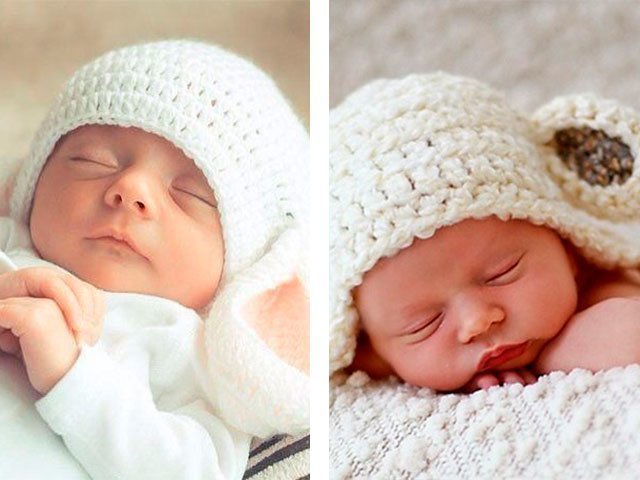
Set for girls - hat and scarf

Size:
head volume 53-56 cm
cap length 26 cm
Used for this model:
yarn Alize Lana Gold-150-200 gr (depending on the length of the scarf)
circular knitting needles No. 3.5 and No. 4, knitting needles No. 4.5.
Patterns:
Honey comb (even number of loops)
1st row (persons): s2inc (= remove 1 loop on the auxiliary knitting needle at work, 1 person., 1 person. from the auxiliary needle), s2vl (= remove 1 loop on the auxiliary needle before work, 1 person. ,1 persons with auxiliary spokes)
2nd row: 4 out.
3rd row: s2vl, s2pr.
4th row: 4 out.
Repeat 1-4 p. pattern.
2. Large braid (even number of loops)
1st row: 12 persons.
2-6th rows: according to the pattern, how the loops look.
7th row: s6vl (= remove 3 loops on the auxiliary knitting needle before work, knit 3, knit 3 from the auxiliary knitting needle), knit 6.
8-14th rows: according to the pattern, how the loops look
Repeat 1-14 p. pattern.
If desired, you can change the number of loops in the braid, respectively, the number of rows in the rapport.
Beanie
On circular knitting needles No. 3.5, cast on 80 loops (stitch set Italian loop set 1 p, 2nd row, 3rd row, 4th row), 5th row - * 1 knit, interchange the next two loops, 1 persons., 2 out. *. Simply put, you should get a cut 2/2. Repeat from * to *. We finish row 2 out. We knit an elastic band 6 cm.
In the next row, we make increases as follows: * 1 persons from a broach, 2 persons, 1 persons from a broach (a chain of 4 loops is formed), 2 out., 2 persons., 2 out., 1 persons from a broach, 2 persons, 1 persons from broaches, 2 out., 2 persons., 2 out. * (a braid is formed). Repeat from * to * 4 more times. It turns out 100 loops.
Next, go to needles No. 4 and knit as follows: * 4 loops of the Honeycomb pattern, 2 out, 12 loops of the Large braid pattern, 2 out. * Repeat from * to * 4 more times. It turns out 5 braids and 5 honeycombs and between they are paths from 2 out.. The rapport consists of 20 loops and 14 rows of the pattern. We repeat the pattern to the desired length of the product. In this case, the cap model is similar to a stocking cap, I knit the pattern 12 cm. After crossing the braid, I knit 3 more rows according to the pattern and begin to form the crown. We knit as follows:
4 loops of the Honeycomb pattern, purl 2, knit 2 together, knit 8, knit 2 together, purl 2, so knit to the end of the row (i.e., reductions are made on both sides of a large braid). 90 loops. Next row and all even ones in the pattern, how the loops look.
4 loops of the Honeycomb pattern, purl 2, knit 2 together, knit 6, knit 2 together, purl 2, so knit to the end of the row. Total 80 loops.
4 loops of the Honeycomb pattern, purl 2, knit 2 together, knit 4, knit 2 together, purl 2, so knit to the end of the row. Total 70 loops.
4 loops of the Honeycomb pattern, purl 2, knit 2 together, knit 2, knit 2 together, purl 2, so knit to the end of the row. total 60 loops.
4 loops of the Honeycomb pattern, purl 2, knit 2 together, knit 2 together, purl 2, so knit to the end of the row. Total 50 loops.
4 loops of the Honeycomb pattern, purl 2, knit 2 together, purl 2, so knit to the end of the row. Total 45 loops.
4 loops of the Honeycomb pattern, 2 vm.izn., 1 persons. , 2 in. out. hide .., so knit to the end of the row. Total 35 loops.
4 loops of the Honeycomb pattern, 3 knit. (swap the 1st and 2nd loop so that the front loop is in the center and knit 3 loops in the front). So knit to the end of the row. Total 25 loops.
2vm.persons.1 out. so knit to the end of the row. Total 20 loops ..
2 vm.persons.
Pull yarn through remaining 10 sts.
If you wish, you can sew on a pom-pom or a brush. If the child is small, you can make the cap shorter, since it is difficult for the child to lay out the stocking cap on his own. in this description. You can change the pattern of honeycombs and the pattern of large braids. You can take thinner knitting needles, the hat will be tighter.
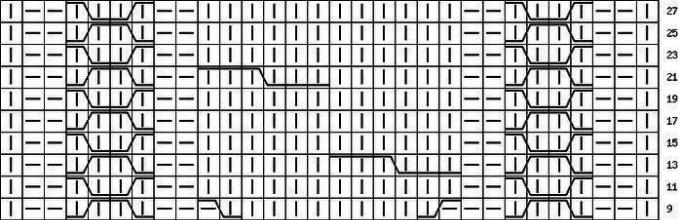
Description of the scarf from the kit (diagram).
Cast on 32 loops on needles No. 4.5 and knit according to the pattern (repeat from the 13th to the 27th row) The pattern corresponds to the pattern on the cap and the designations are indicated in the description of the cap (honeycomb, large braid) Knit to the desired length. In this model, the length of the scarf is 175 cm. Finish the braid in a scarf in the same way as the beginning of the scheme, only do the crossings in the opposite direction.
Walking for a child is very important not only in summer, but also in the cold season. To do this, many parents do not just buy hats for their children, but also knit them with their own hands with knitting needles or crochet. Today we will talk about knitting hats for newborn babies, because for them it is warm - the most important thing when walking.
How to knit a hat with knitting needles? Which material to choose? Where can I find the right scheme, find out the dimensions and read the detailed description of the work? We will try to answer these and many other questions in our knitting section.
Knit a hat for a newborn with knitting needles
Hat for a newborn with knitting needles knits very quickly and easily. New models And scheme knitted products for a girl, a boy with a detailed description are waiting for you below in the article. Also, you will know how to crochet a baby hat for beginners . The most important thing here is the freedom of creativity. Can be crafted a hat with a pompon, a hat - a helmet, with braids, ruffles, a hat - earflaps, a cap, like Pinocchio's, and so on. In any case, the child will be delighted.
How to start knitting a beautiful openwork hat with patterns? For starters, decide on color and the material of the future headdress, pick up density mating. This product is designed for a child 2 – 6 months. Choose yarn 50 gr of the desired color, and we will take pink (Baby Cotton), straight and stocking needles. Choose threads of the same thickness you need. Now let's go through the patterns - there are only 7 of them, some knit in circular rows.
- Front surface. Here L.R. knits L.P., and I.R. – I.P.
- Garter stitch. L. and I.R. - L.P., in circular R. - knit loops alternately, then one R. - L.P., 1 R. - I.P.
- Openwork pattern No. 1. 1 R.: L.P., 2 and 4 R.: all P. and crochets - I.P., 3 R.: 1 yarn over to make 2 P. together L.P., repeat to the end of R.
- Openwork pattern No. 2. We knit according to the scheme.
- Hole Pattern #1. 1 R.: 2 L.P., 2 P. together L.P., 1 yarn. = repeat to the end of R. 2 R.: all knit I.P.
- Hole Pattern #2. 1 K.R.: 1 yarn over with 2 P. together L.P. \u003d to the end of R. 2 K.R.: all P. and nakida - L.P.
- Relief pattern: 6 R. garter stitch, 4 R. - openwork No. 1, and so on until the end.

Detailed description:
Popular articles:
So we are recruiting 90 P. Between chrome. knit 6 R. garter stitch
, the next 4 R. - openwork pattern No. 1
. 2 R. - garter stitch
, 4 R. - openwork №1
, 6 R. - shawl. Between chrome. - openwork №2
. Close the knitting process after 12 cm on both sides 1 * 11 P. + 2 * 12 P. in every second R. The remaining 20 P. - L. smooth surface (in each 8 R. remove 4 * 1 P.). make another 25 cm of the canvas and close the product.
back seam
perform very carefully, along the bottom edge with the help of 72 P., knit between chrome. \u003d 2 R. garter stitch, 2 R. hole pattern, 2 R. again garter stitch. This completes the master class - the loops can be closed. To make beautiful strings
- 15 V.P. + 1 V.P. lifting, 1 R. \u003d S.S.
Knitting hats for a newborn with a description and patterns
Hats for newborns from 0 to 3 months are the easiest to knit with knitting needles . "Knitted" video tutorials on creating such hats for beginners and not only.
Hat for a newborn girl with knitting needles
This hat, unlike those presented above in the video tutorials, is designed for babies from 8 to 12 months. We chose white as the main color, and took the rest of the pinkish tint. Knitting tools: hook and knitting needles No. 2.5. Yarn is better than cotton.
- Facial surface. Here L.R. knits L.P., and I.R. – I.P.
- L.P. always when knitting in a circle.
- Wrong side performed simply - with circular knitting - I.P.
A hat with knitted ears begins with these “ears”. We start from the right ear: 3 P. knit with front stitch (in each 2 R. + 1 P.). follow the pattern until there are 21 sts on the needles. Make the left eye in the same way. - For the back of the head you will need: 14 P., which must be knitted in P. of the right, then the left ear. You should get 84 loops in total.
Now we will use immediately 4 spokes: you need to place all the loops on them and start working in a circle (4 R. L. G. and I. G.). At 9 R.: 5 and 6 P. together. Do the reduction 3 more times. In I.R. in each R. - 2 P. together I.P. every 3 P. In order to make a bottom - L.P., where in each R. 2 L.P. together through 2 P. Continue to work up to 12 loops. 
To edge headgear turned out beautiful — take the pink color yarn and tie it with S.B.N. What is a hat for a newborn without ties? Twist two strings of white and pink thread together!
Cap for a newborn boy with knitting needles with a description
To tie knitted winter hat for a child with an interesting and stylish application with your own hands is very easy! Our detailed master class and step by step instructions We'll help you get the job done in a matter of hours! The color that will go well with our headdress - white (50 percent wool - winter all the same). You will also need some threads in the following shades: brown, orange, yellow.
- All loops at facial surface in circular knitting, perform L.P.
- Rubber : alternation 1 L.P. and 1 I.P.
- First we will use orange a thread with which you need to dial 76 P. (19 P. for each of the knitting needles). bind rubber band 3 cm. After this step, the thread must be changed to white (you can choose acrylic) and run 11 centimeters L.G.
- Next you need to use another color(orange thread) 1 R. + close the loops step by step. Sew the detail along the edge of S.B.N. using an orange tint, pre-fold the canvas in half.
- crochet we recruit 30 V.P. + 3 C.S.N. in each P. is the basis of the spiral. Make 4 of these: two orange and two brown. If you are satisfied with our option, then feel free to sew them to the finished product, as shown in the photo below.

Of course, you can not decorate a hat for a newborn. lion cub applique , but we will still tell you how to do it. According to C / X 1, knit a small head orange yarn, the last R. of which is brown. yellow color make the ear right and left (C / X 2). Head almost ready - it remains to attach the muzzle. It is easy to knit according to scheme 3. Connect all parts in one pattern, you can adjust the size yourself. For babies- the best option with an elastic band and a funny character. Your child will love this hat! You can also crochet a hat for a newborn, but with knitting needles it will turn out to be denser and warmer.
Booties and cap for newborns
Tie with your own hands cap and knitted booties for newborns with knitting needles with description - the best solution for your kids. Such a simple set can be created both for your child (up to a year: 6-9 months), and presented to present. You can choose colors and material to your taste - any method is good. Our choice fell on white threads - universal for a future boy or girl. If you are making a thing for a boy, replace the beads with blue ones, we took pink ones. We suggest taking a ribbon of the same color, or a ribbon of about 1 meter.
- Front surface performed as standard. L.R. – L.P., I.R. – I.P.
- Garter stitch– all R.L.P.
- Openwork pattern No. 1 according to S / X1 (L.R.), openwork pattern No. 2 according to S / X 3 (L. and I.R.).
- Large puffs according to scheme 2, small ones - according to scheme 4. All L.R.
- In schemes 2 and 4, all P. according to the figure. In C / X 3 - I.P.
Knitted booties for newborns with knitting needles with a description, let's start with knitting a hat. Openwork pattern No. 1 knit 87 P.L.G. - 2.5 centimeters. We close: in each 2 R. - 1 * 9 P., 1 * 10 P., 1 * 14 P. All other loops - close in one R. This is the front of the cap. Rear completely according to C / X 2.
Putting our pieces together
: behind the caps - puffs according to C / X 2.  To hide those places where the loops are pulled together - mask them with beads. Connect the front and back parts with S.B.N. + 1 R. "PIKO" (1 S.B.N., 3 V.P. in this S.B.N., 1 S.B.N.) = to the end of R. For the lower edge of the product - 70 P .=3 R.L.G. + 1 openwork R., 3 R. L.G. Close the work - bend the bar inside out. Sew on, then insert the ribbon/ribbon for the ties into it.
Now let's make knitted booties. If you do not succeed the first time - do not be discouraged, dissolve the knitting and start again. This is more difficult and meticulous work. 46 P. knit L.G. 4 cm
- Openwork R .: 1 L.P., 2 P. together L. + nakid - repeat to the end of R., close it L.P.
- I.R. with the help of I.P.
- The first 17 P. and the last 17 P. - postpone.
- Working with the middle: openwork pattern №2.
- The first 17 P. -L.P., after each 3 P. + 5 times 1 P.
- On the right and left, dial 16 P. with a garter stitch, along the short edge - 12. Those delayed 17 P. - L.P. + 5 times 1 P. after every third. I.R. – I.P. and according to S / X 4.
- 1 L.R. L.P. (3 and 4 P. - together). Close the rest of the P. In the place connected by C / X 4 - make small puffs. Hide the loops again with beads.

Let's move on to the design of the main part - sole. 6 P. + garter stitch. In each 2 R. + 3 * 1 P. on the left and right. straight drawing- 8 centimeters. Close product.
We collect with the help of S.B.N. according to the scheme + "crustaceous step". They can also decorate the toe of booties. Top the product as follows: 1 R.: S.B.N., 2 R.: S.B.N., 1 S.B.N. with "PIKO" from 3 V.P. - until the end of R. Don't forget the braid or string to decorate our brand new stylish booties!
Hat for a newborn with knitting needles: video
Knitting hats with knitting needles: patterns and descriptions 2018
Knit a hat for a woman, child, newborn - new models of such hats with descriptions and diagrams for free on our website
. Prepare yourself and your loved ones for the winter and autumn cold very simple
if properly taken care of now. can link a men's hat - a helmet or a men's hat - earflaps with knitting needles or crochet, for girls - with cat ears, fashionable berets from video tutorials (in Russian) for themselves, dolls, even dogs. For beginners, the article contains excellent patterns and a description of the knitting process. 

Knitted hats for babies
- Knitted hat with knitting needles for a newborn baby or a two-month-old baby: a hat as from the picture - a berry! The main color of the product is orange. You will need a little more green or light green for the "handle".
To begin, dial 72 P. in orange, perform L.G. three circular R. 28 next R. knit pattern " BLACKPINK" according to the scheme. After that - again L.G., where 1 R.: 5 P. orange, 1 P. - green. And so until the end of R. try to find green loops and place them between the removed P. from the pattern " BLACKPINK". In R. below - repeat the color pattern. The next two R.: 4 P. orange, 2 P. green.
Next R.: 3 P. green (the last orange P. and the first green - together). It remains 3 green and 2 orange loops according to the scheme. Continue to decrease the orange color until it completely disappears from the canvas. Remove 12 P., next. R. - 6 P. knit in a circular row for another 2 centimeters. On this, tighten the thread, and postpone the work.

- Knitted hat for a newborn with knitting needles with a description and a diagram with your own hands. A must have for this winter! For work, we recommend using a twin thread. We take three colors: green, light green and grey.
gray - 72 P. - 20 R. L.G. (all I. and L.R. - L.P.). the next 20 R. - a pattern with "bumps" green shade . 3 R.L.G. the lightest yarn . In each 2 R., we evenly remove 8 P. In the next 2 R. - 2 P. Knit the fabric for another 2 cm, after which the thread can be cut. Knitted hats and knitted things are good, but we can not always find the exact size of the product. In this case, it is better to crochet - there you can try on clothes during the work itself in the process. We will not offer such an option in this article, but an alternative should always be considered!

Knit a cap for a newborn - for the winter for boys
Baby hat for a boy for the winter
You can learn to knit in a few hours. This requires a good clear diagram and a clear description of the process itself. If you want, you can tie in the kit: cap and scarves, booties, mittens
- anything to dress your baby!
Watch a few videos on knitting a cap for a newborn.
And we will provide you with another model - knitted baby hat for a newborn with funny ears - pom-poms . Threads of two colors: blue and mint.
- All rows knit with a thread in two layers.
- Elastic band: 2 L.P. alternate 2 I.P.
- L.G. = L.R. – L.P., I.R. – I.P.
- Garter Stitch: All L.P.
blue tint 70 P. \u003d 8 R. with an elastic band. Alternating 2 blue R. and two mint - L.G.
When there are 3 mint strips - 2 R. blue thread L.G.
canvas, which turned out, fold in half and make a seam from the center by 8 centimeters. Fold the free sides again - sew up. Make pom poms with blue yarn. 
Elf hat: knitting for children - video instruction
Also on our website you can find articles "".
Fly in, take it apart, knit hats online ... (owl-hat, strawberry hat, hats with ears, a hat with a pampon, cat-shapksha, etc.) (source Strana Mom)
Fly in, take it apart, knit hats online... (owl hat, strawberry hat, hats with ears, hat with pompom, cat hat, etc.)
Ears.
Cast on 24 stitches (or another number, depending on how thick your yarn is to get the desired width), close in a circle.
1p: 3 air loops, 2 tbsp. s / n together, 7 tbsp. s / n, 2 tbsp. s / n together, 1 tbsp. s / n, 2 tbsp. s / n together, 7 tbsp. s / n, 2 tbsp. s / n together.
2p: 3 air loops, 2 tbsp. s / n together, 5 tbsp. s / n, 2 tbsp. s / n together, 1 tbsp. s / n, 2 tbsp. s / n together, 5 tbsp. s / n, 2 tbsp. s / n together.
3p: 3 air loops, 2 tbsp. s / n together, 3 tbsp. s / n, 2 tbsp. s / n together, 1 tbsp. s / n, 2 tbsp. s / n together, 3 tbsp. s / n, 2 tbsp. s / n together.
4p: 3 air loops, 2 tbsp. s / n together., 1 tbsp. s / n, 2 tbsp. s / n together, 1 tbsp. s / n, 2 tbsp. s / n together, 1 tbsp. s / n, 2 tbsp. s / n together.
5r: 2 tbsp. s / n together to the end of the row.
In the same way, thread the threads, only immediately behind 4 arcs of opposite columns so that there is no hole to form a brush.
Pigtails are made very simply, take the desired length of the thread in 3-6 additions (depending on how thick the pigtails you want to achieve) 3 colors, thread the threads of each color for both arcs of the 3rd middle strapping columns, bend in half, and simply braid the usual pigtail .
Here is a small collage collected from the Internet for your inspiration. But you can also fantasize better yourself. That's more interesting 
Cap with a lily girls knitted on Osinka. http://club.osinka.ru/topic-82075?&start=8430 and our country moms also knitted it recently...
Here's Lily's hat. here is the diagram of the lily petal: 
Hat - strawberry knitting.
Here is a great MK 


In the 14th row I aligned the pattern 
Next, I knitted 3 rows of double crochets with green thread 
4th row of single crochets, every 9 loops I gained 8 VP, hooked with a column (indicated in red for green in the diagram), then again 8 VP and continued along the row. Having knitted the row in this way to the end, she made a connecting loop, turned the hat over, and in the opposite direction she tied these arches from the VP with columns with 2 crochets according to the scheme 
At the top, there is such a kind of pico, the central VP hooked on the top row (it turns out differently, where in the loop, where in the column), and starting each new leaf after 3 columns with 2 crochets, hooked the loop to the previous leaf . 
Next, 4 rows of single crochets, and in the same rows we knit ears according to the scheme 
Here is the MK on knitting berries-strawberries http://muravka.blogspot.com/2010/11/blog-post_15.html
flowers 
leaflets 
Here's another cat. But here, who has enough imagination for what ...
AND HERE IS MY CAT HAT WITH MK 

CAT HAT - EARS:
To begin with, I marked the middle (crown) of our hat with a marking ring. Then, starting from the edge of the cap, I picked up two loops from each side (edge) loop: I pulled one over the back wall of the loop, and the second over the front wall of the side loop. I got 78 loops in the work. These are loops for elastic on the ears. I knitted an elastic band 2 out to 2 faces ....
In the 5th and 9th rows at the crown, I added one loop each = 80 loops in work. We also knit a 2x2 elastic band. Then she knitted without increments until the 13th (front) row. Starting from the 14th row, I knitted short rows. I want to immediately warn that I did this for the first time and for my own reasons, since I am self-taught. And yet, when we unfold the shortened rows, we start a new row with the first untied loop (as if edging). So:
14th row: do not knit to the end of the row 19 loops (if you count together with the edge loop of the original knitting), leave the marking ring in the last loop. We unfold the knitting and knit to the end of the 15th front row.
16th row: do not knit to the end of the row of 23 loops (if you count together with the edge loop of the initial knitting), leave the marker in the last loop. We unfold the knitting and knit to the end of the 17th front row.
18th row: do not knit to the end of the row of 27 loops (if you count together with the edge loop of the initial knitting), leave the marker in the last loop. We unfold the knitting and knit to the end of the 19th front row.
20th row: do not knit 31 loops to the end of the row (if you count together with the edge loop of the initial knitting), leave the marker in the last loop. We unfold the knitting and knit to the end of the 21st front row.
22nd row: do not knit to the end of the row 34 loops (if you count together with the edge loop of the initial knitting), leave the marker in the last loop. We unfold the knitting and knit to the end of the 23rd front row. And leave a marking ring in the last loop of this row. 
TOTAL SHOULD BE FIVE SHORT ROWS. From the 24th purl row, we begin to gradually return to the beginning of knitting.
24th row: we knit 47 loops (if you count along with the edge). We turn the knitting again and knit the 25th front row.
26th row: we knit 51 loops (if you count together with the edge). We turn the knitting again and knit the 26th front row.
28th row: we knit 55 loops (if you count together with the edge). We turn the knitting again and knit the 29th front row.
30th row: we knit 59 loops (if you count together with the edge). Turn the knitting again and knit the 31st front row.
32nd row: knit the row to the end.
Then we knit the ear symmetrically. And the marking ring at the end of the 23rd row will help us with this. We also do not forget where you need to gradually cut two loops from the edge of the eyelet at the crown, so that 78 loops remain in work again.
In a cold winter, one cannot do without such an attribute of outerwear as hats for girls. A hat can become not only an item that keeps you warm and protects your head from snow and piercing wind, but also a part of your child's image. On sale there is a huge number of the most diverse in color and style of hats, but it is not difficult to knit them yourself - both crocheted and knitting.
Knitting a hat for a girl with knitting needles is not difficult. There are many types of knitting that are easy to perform even for beginner needlewomen. If you have some experience, you can choose a more complex pattern.
What hat for a girl with knitting needles to choose?
If you are a fan of “rustic” knitting, you can knit a hat with knitting needles of yarn of different colors (“patchwork” option), in this case you don’t need to buy threads on purpose - use the remnants of the skeins that you purchased earlier. Natural wool warms better, although for a girl it is better to take a wool mixture. But do not forget that wool can shrink, so be careful when choosing a combination of skeins: it may happen that after washing the product is deformed.
Flight of fancy is not limited. A knitted hat for a girl with knitting needles can imitate the heads of fabulous and real animals (if you add ears and “wool” on top). Instead of eyes, sew on buttons, for the "muzzle" add yarn in a contrasting color. Such hats are worn with pleasure not only by children and girls, but even by men who are not devoid of a sense of humor. The original piece of clothing invariably attracts attention.
Hats for girls are knitted both in a circle (in this case, you can not sharply decrease the loops in the last rows, but simply pull them together with a thread), and with a straight fabric - then at the end of the knitting you will need to sew the fabric vertically, the seam will remain behind.
Below you can read how hats for girls are knitted: the description will allow you to avoid mistakes when knitting. It will only be necessary to calculate the consumption of yarn (in the event that its parameters - composition, number of meters per skein - do not match those proposed in the text) and knit a control sample to calculate the loops.
Hat for girls knitting. Interesting works from the Internet
Knitted hat for a girl - raspberry
In such a cute “delicious” hat, your baby will not go unnoticed. A raspberry hat is what you need to dilute the colors of a dull autumn.
Hat size: head circumference 50-52 cm.

Knitted hat for girls “Sweet”
To knit a hat, you will need: yarn Lion Brand Modern Baby (acrylic / nylon, 158m / 75g) on a skein of such colors as: pink (A), white B), yellow (C) and blue (D). Also some green and red thread. Knitting needles 3.5 and 4 mm and a hook 4 mm.
Knitting density: 20 stitches + 28r = 10 × 10 cm face stitch.
Sizes S. M. L for head circumference 43 (48, 53.5 cm).

Knitted hat for girls “Foliage”
Written by Anastasia Warkentin. Yarn ONline Line 165 Sandy 100% mercerized cotton 120m/50g, consumption about 80 grams. Circular knitting needles No. 2.5 for elastic and No. 3.5 for the main pattern. The hat is knitted in the round.
Size 3-5 years (head circumference 51-54 cm). Hat height 20 cm.


Hat - a cat for a girl with knitting needles

Knitted hat for girls “Snowball”
Hat for head circumference: 42 cm. You will need: 90 g of Merino de luxe yarn (280 m / 100 g), double knitting needles No. 3 and No. 3.5

Hat for girls knitting Owl
The cap is knitted for a head circumference of 36 cm.
Needles number 2. Threads 100% wool, 50 g - 135 m.

Knitted hat for a girl with ponytails

There is no description of the hat, but there are knitting patterns:
Knitted hat for a girl
The hat must be knitted from the bottom up, from the strap to the crown. Hat size for head circumference 51 (55) 60 cm.
Height: 23.5 (24.5) 25.5 cm. The photo shows the average size for a 4 year old child.

Knitted hat for a girl - design Elena Podel
This hat is one of the designs from the series of Fair Isle knitted clothes. Fair Isle design gives you many possibilities for different color combinations, this version is just one of them. You can use just one contrasting color, or as many as you like. You can also use any DK sectional yarn, or you can knit a hat in solid or semi-solid yarn for a more classic look. The hat is knitted completely in a circle from the bottom up.
 interesting selection on the site 22 models for girls only
Hat for a girl with knitting needles and a scarf
Cap sizes: for exhaust gas 40/43/46/49 cm.
Hat height: 17/17/23/23.
For knitting you will need: 3/4/4/5 skeins of phildar castel (132 m / 50 gr; 65% acrylic, 25% wool, 10% others) or any yarn of suitable density.
- 3.5 mm (40 cm) circular
- 3.5 mm (80 cm) circular needles.
- 3 mm (80 cm) circles, knitting needles.
- a set of 3.5 mm straight needles or a size that will allow you to get the indicated density
- marker for the beginning of the row
- sewing needle
- 5 buttons 1.5cm diameter

Hat for girls knitting. The work of our needlewomen
Scarf and hat for girls knitting. Works by Tamara Matus

Hat for girls knitting with chanterelles. The work of Marina Stoyakina

Set Pink bubbles - hat and snood. The work of Tamara Matus

Children's hat baa ble hat. The work of Marina Stoyakina

Scarf and hat knitting. Tatiana's works

Knitted hat for girls. Anastasia's work

Scarf and hat knitting. Works by Tamara Matus

Hat and scarf knitting Chocolate. Works by Marina Stoyakina

Knitted cardigan and hat. Works by Marina Stoyakina

Knitted hat. Valeria's work

Knitted hat. The work of Olga Yaroslavskaya

hat for girls knitting. Valeria's work

Knitted hat for girls. The work of Svetlana Shevchenko

Pullover and hat with pompom. Works by Svetlana Shevchenko (Sova Fotina)

Knitted hat for girls. Valeria's work

Knitted hats for girls. Types, features, diagrams and descriptions.
The period of motherhood is a responsible and amazing time when a young mother discovers or returns to forgotten hobbies and hobbies. One of them is knitting for their children.
With the approach of cold weather, I especially want to create a warm and cute hat for my daughter with my own hands.
And how not to drown in all the variety of models and patterns for the future headdress for your princess? Let us consider in more detail the nuances in the continuation of the topic about for
How to knit a hat with ears for a girl for beginners?
ready-made knitted winter hat with ears for a girl with snowflakesBeginning needlewomen worry before the first step and are afraid of complex descriptions of knitted hats. Once you decide to pick up the knitting needles and have already bought a beautiful yarn, get down to work boldly.
First, pay attention to the preparatory stage:
- tie a sample of the canvas with the pattern that you have chosen. Cast on 30 stitches and work 20-25 rows
- try not to over-tighten the loops,
- using a ruler, measure the density and height of knitting, that is, the number of loops / rows in 10 cm of fabric
- stretch the bound work slightly before measuring,
- determine the volume of the daughter’s head in centimeters by changing it with a soft meter or thread, which you then attach to the ruler,
- write on the sheet the required number of loops for the future hat, based on one part for the ears and the back of the head and two for the forehead. If you have an odd number of stitches, round them up. For example, instead of 17 loops, dial 20,
- choose knitting needles equal in thickness to the threads of yarn.
Consider the workflow for knitting a double hat with ears. This method will be most understandable for beginner craftswomen. It consists in knitting two hats that differ in size. That is, the inner one lies well on the girl’s head, and the outer one is 2-3 more loops.
Operating procedure:
- Cast on 7 sts on 2 needles and work in garter st, inc 2 sts on both sides in each RS row. Continue until you reach the desired number of loops, equal to 1 part that you counted on a sheet of paper, and cut the thread,
- repeat the same steps with the other eye, but do not reverse the thread, but pick up air loops in the amount of 1 part and connect to the finished eye. You got the back of the head and sides of the future hat,
- knit further all together for another 8-10 rows, depending on the size of the girl's head. Continue to add a loop on both sides in the front rows for rounding,
- get the right number of loops for the frontal part of the cap, taking into account the loops added for rounding,
- knit the whole fabric at least 10 cm up on circular needles,
- divide all loops into 7 wedges and at the beginning of each surprise with one loop in each row,
- pull the final 7 loops together with a thread.
Repeat all the steps for knitting the outer hat, only increase the number of loops in each part.
Sew both hats by folding the inner one face down, crochet all around the edges.
On top of the hole on the headdress, either crochet or attach a pompom.
Hat cat with ears for girls knitting

 cute cat hat with ears on a girl
 Depending on the skill and individual preferences of needlewomen, a cat-hat for a girl can be knitted in several ways:
- hat with ears plus cat ears sewn to it
- canvas sewn along one or two seams or knitted in a circle with highlighting / pulling the ears with bobbin threads
- hat-cap with cat ears sewn on top
Let's consider the first option. The basic work on knitting a hat is similar to that discussed in the previous section.
The only difference is that form not 7, but 6 wedges to decrease at the crown. Then it will be easier for you to mark places for sewing on cat ears.
Bind the cat attribute like this:
- cast on 17 stitches and knit 4 rows with knit and purl rows alternately
- decrease on both sides one loop through the row
- shape the sharpness of the ears to your taste. If you like protruding corners, cut the loops until one remains, if softer lines - up to 5-7
Sew on the ears on the top of the hat with a hook and process their edges over the entire surface.
How to knit a fashionable beautiful hat with knitting needles for a girl: new models, patterns

 beautiful knitted hat with a flower on a girl
 In fashion for girls there will always be classic models of knitted hats:
- berets
- hats with and without ears
- earflaps
However, their attractiveness and practicality were also proved by:
- hoods
- helmets
- hoods
All of them have common features:
- plain canvas or with an embroidered / knitted pattern
- jewelry in the form of beads, beads, ribbons, patterns
- additions in the form of mittens, scarves, snoods
Below we insert several examples of descriptions and diagrams of new models of knitted hats for girls.

 fashionable knitted hat for girls, example 1
 fashionable knitted hat for a girl, example 2 fashionable knitted hat for a girl, example 3
  fashionable knitted hat for a girl, example 4 fashionable knitted hat for a girl, example 5
Warm knitted children's knitted hats for girls winter: diagrams and description

 warm yellow knitted hat on a girl
 In winter, it is important for you to keep your child warm, so choose a knitting hat model wisely.
Pay attention to a number of points that affect the preservation of heat inside the headgear:
- yarn - natural threads protect the head from the penetration of cold
- the thickness of the thread - the larger it is, the warmer the head
- lining, or inner layer - can be fleece or a second hat sewn on
- extensions in the form of ears, lapels on the neck
- pattern - for example, multiple weaves of braids always remain in the trend of winter hats
Below are a few drawings describing knitting winter hats for girls.
 warm knitted hat for girls, description 1
  warm knitted hat for girls, description 2 warm knitted hat for girls, description 3
 warm knitted hat for girls, description 4
 warm knitted hat for girls, description 5
  warm knitted hat for girls, description 6
  warm knitted hat for girls, description 7
Beautiful fashionable hat for a girl with knitting needles for autumn and spring: diagram and description
 pink knitted hat with a flower on a little girl
 For cool, but not frosty weather, put on a thinner hat for the girl. Tie it from a thread in one addition and without lining.
From the patterns, select any, except for the openwork. For example, a simple 2x2 or 3x3 elastic band with a cute decor of flowers and leaves crocheted beautifully rally on the girl's head.
To knit it, prepare:
- knitting needles and yarn of the same thickness
- hook
- flexible meter
- scissors
Operating procedure:
- having measured the circumference of the head and tying the control sample of the fabric with an elastic band, dial the required number of loops,
- tie the first row with facial loops, then with an elastic band,
- at a height of 10 cm, depending on the size of the head, start decreasing the loops at the beginning of the wedges,
- determine the number of wedges yourself. It is convenient if there are 5 or 7 of them,
- pull the last loops in an amount equal to 5 or 7 with a thread. The hat is ready.
- Next, crochet 30 air loops. The second row is single crochet, the next is double crochet, the last is double crochet.
- Roll the finished openwork cord into a spiral and lay it out in the form of a flower.
- Attach it with a hook or a needle and thread.
- Repeat the steps for crocheting openwork laces and shaping flowers/leaves.
An alternative version of a knitted spring / autumn headdress for girls, see the picture below.
 diagram and description of a knitted spring hat for a girl
Knitting beautiful fashionable hats for teenage girls
 fashionable knitted hat for a teenage girl
 Teenage girls are especially picky about headwear. They like original and beautiful things, and mothers are worried about warmth and convenience. Knit a headdress for your daughter that she will wear with pleasure.
In fashion for teenagers hats:
- with ears and long ties, at the ends of which pom-poms are attached
- fur
- from thick threads
- fishnet berets and with a lot of pigtails
- hoods
- helmets
- hoods
- in the form of a cap, for example, like Little Red Riding Hood
- open-top hair sock
- with oblique fields, the widest part of which is decorated with a large original button
- cap-shaped
- with visors
- with a simple pattern of thick threads and with fur pom-poms on top
We will consider knitting features of almost all of them below.
Beanie hat for girls knitting

 the girl is wearing a gray fashionable knitted beanie hat
 Beanie won the love of girls for its convenience and the ability to wear it with almost any outfit.
If you have good knitting skills, then creating it yourself will not cause difficulties. Novice needlewomen should carefully read the description of the work a couple of times and carefully follow each item.
Features of knitting beanie hats:
- it is longer than normal
- consists of wedges that are knitted alternately without breaking the thread
- the first two rows are carried out on an additional thread, which, upon completion of work, dissolves
Operating procedure:
- dial loops with an auxiliary thread along the length of the cap, for example, 50 pieces
- Knit 2 rows in garter st and cut yarn.
- go to the main thread and also work 2 rows of facial / purl loops
- knit the next row according to the pattern, but leave the extreme 6 loops on the left knitting needle
- thread through the sixth loop and turn the work to continue knitting
- go to the end of the row, tighten the edge tighter
- turn work and leave 5 sts loose
- repeat the steps until you get the thread over the last loop
- knit a row. You get a wedge with a tapered side. She will be the crown
We continue to knit a new wedge from the front side according to the scheme described above. In total, you need to form 12 wedges.
Unravel the auxiliary thread and connect the edges of the product using the loop-in-loop method. If you feel more comfortable crocheting or needle and see the seam, bind off all stitches before joining the hat fabrics.
Decorate with a pom-pom, large button or brooch if desired.
How to knit a hat for a girl with knitting needles?

 finished original hat-helmet, knitted
 We suggest using the “heel” technique for knitting a hat-helmet for a girl.
The order of work is this:
- dial loops in the amount of a quarter of the volume of the girl's head and knit facial in the front rows and purl in the purl,
- at the level of the crown on both sides along the finished fabric, lift the edge loops and go to three knitting needles,
- continue knitting the same patterns to the level of the chin,
- on the fourth knitting needle, dial as many loops as at the beginning of knitting a hat,
- continue working in a circle with an elastic band 1x1 or 2x2 to the height of the neck,
- for a shirtfront, expand the canvas by adding a loop to each purl,
- then 4-6 rows, knit in a circle,
- close all loops.
To decorate the helmet, use:
- beads
- brooches
- threads with lurex
- beadwork
- pompom from a knitted fabric 7 cm high, collected in a rosette at the crown
- a braided braid of yarn in a contrasting color or under the shade of the girl's hair
An alternative version of a knitted hat-helmet, see the figure below.
 knitted hat-helmet for girls, description
Beautiful hat and snood for a girl with knitting needles: scheme

 smiling girl in a knitted hat and snood
 Snoods are more comfortable to wear than a classic scarf due to their ability to stay in place and cover the neck. This is extremely important for girls.
Knit a beautiful set of hat and snood for your daughter using the same technique and patterns as suggested in the pictures below.

 pattern for knitting a hat and snood for a girl
 description of knitting hats and snood for girls
 Warm double knitting hat for girls

 beautiful white double knitted hat for girls
 After completing the preparatory steps that are listed in the first section, and choosing the yarn for the future hat, get to work.
We propose to knit a double warm hat with a braid pattern with a cross on its front part. If the thread of yarn is thin, fold it in two before creating a headdress.
To calculate the number of loops, knit a sample of elastic and a pattern. For this:
- cast on 20 sts on auxiliary yarn
- 1 row - knit 1, 1 yarn over - repeat to the end of the row, but do not knit yarn before the edge,
- 2 row - remove the hem and purl without binding, 1 front, purl remove - repeat until the end of the row
- 3-12 row - repeat 2 rows
- 13 row - remove the edge, two together, two together, purl, front - so repeat until the end of the row
- 15 row - edge, 7 purl each, between which 12 facial
- 16 row and all further even ones - according to the figure
- 17-21 rows - according to the drawing
- 23 row - on the front loops, cross 2 in different directions
- 25-31 rows - according to the drawing. Next, knit repeats of the pattern
- dissolve the auxiliary thread from the sample and determine the knitting density of the cap on the elastic and pattern
The order of knitting the outer layer of the hat on 2 knitting needles:
- cast on and knit a double rib as in the sample
- remove the auxiliary thread and proceed to the drawing
- for a girl of 5 years old you will get 5 rapports
- at a height equal to 4 crossings and 3 rows, begin to reduce the canvas, closing the loop on both sides of each braid
- repeat decreasing stitches after 4 rows, continuing to follow the pattern
- keep doing this for 2 more braids
- decrease the number of loops after the edge 2 front, 2 together, 4 front, 2 together, 2 front and then repeat to the end of the row
- decrease in every second row until the front inserts are rounded
- last row - three loops together
- pull the loops with thread
Do the following for the inner lining:
- pick up the loops from the top row of elastic
- first row - purl, then alternately front and back
- knit a straight fabric, applying to the main
- repeat dec sts on inner lining in mirror image
- pull the final loops with a thread
- connect both parts of the cap
The decor elements of a warm hat will be ears connected by raised loops of the upper row of elastic on the inside. For this:
- 14 stitches, work 12 rows in a straight piece
- decrease in every second row on both sides of the loop
- crochet laces on the final 2 loops, 15 cm long
Attach a ready-made or custom-made pompom to the top of your head.
Hat knitting for girls 2 - 3 years two-color

 two-color knitted hats for girls 2-3 years
 Universal and feminine colors for a hat for the cold season are white and pink. The little princess will especially love the headpiece with tie-down ears, on the front of which you can embroider a snowflake, for example.
In this case, the ears that knit first, knit on 11 loops. Make them in white and pink stripes through 2 rows.
Leave the rest of the hat white and the snowflake pink. Instead of drawing, make a pom-pom from both colors so that they occupy half of its circumference.
See the diagram of the "snowflake" pattern below in the picture.

 snowflake pattern for knitting on a children's hat for a girl
 The knitting process was presented in detail in the first section of the article.
Let us dwell only on the estimated number of loops for a guideline.
- ears start knitting on 11 loops, reaching 21,
- go to the main knitting - cast on 17 loops, add one eyelet, cast on 44 loops, add the second eyelet, dial 17 loops again and close the edges in a circle. Total 120 loops.
Make ties from 3 threads a little more than half a meter long, threaded in the middle of each ear at the bottom. Fold the threads in half and braid the pigtails along the entire length.
Hat with earflaps knitting for girls

 cute knitted earflaps on a little girl
 According to the knitting technique, a hat with earflaps is similar to a hat with ears. The difference is in a few points:
- ears - knit them initially wider and add loops for expansion in 3-4 facial rows. Above, knit a straight fabric of the desired height,
- the back of the head is higher, therefore, after collecting the ears and lifting the loops for the back of the head between them, perform at least 10 rows,
- insulation is a must. And not only inside the cap, but often outside on the forehead. Fleece and artificial fur have warming properties,
- ties - they are thinner and longer.
Examples of a knitted earflap for a girl are below.

 description of knitting hats with earflaps for girls, example 1
  honeycomb pattern description
 If you like the absence of seams, knit a hat with garter needles. If it is important for you to have identification details in the form of a seam, - on two.
Please note that the pattern attracts attention with its originality, so do not decorate the hat with it with anything.
Hat bonnet for girls knitting

 knitted bonnet with ears on a girl
 The order of knitting the hood is as follows:
- first make a strip framing the face. Usually this is a garter stitch on 11-17 loops 120-150 rows long,
- knit the main part on the number of loops equal to the length from one earlobe to the other. In the crown area, divide the fabric into 3 parts and knit only the central one, picking up alternately one loop in each row of the other two. According to the technique, the work is similar to knitting heels,
- form a strip on the neck from the loops of the main and first part of the cap. Some craftswomen lengthen this strip by 15 cm on each side. These will be the ties on the hood.
Knit a hood for the cold season with patterns:
- corn
- braids with garter stitch inserts
Decorate the seam of the main cap above the face and at the crown with knitted ruffles. To do this, lift the loops in the designated places, knitting from one to two. Work 9 rows in stockinette stitch and bind off all stitches, pulling them together tightly to keep the ruffles in shape.
We knit a hat hood for a girl with knitting needles

 bright hood-hat for girls
 Features of this type of hats:
- their width at the bottom of the neck is half that at the top of the head,
- the area of the cap on the neck can be solid or separate, connected to buttons or a brooch,
- space that is suitable for lush hairstyles,
- comfort when the hat falls on the shoulders.
Interesting models of hoods:
- two-tone, when a lighter tone is present at the end around the face,
- with weaves of braids, zigzags, rhombuses, cones,
- made with three-dimensional patterns, for example, pearl.
Start knitting a hat-hood from the narrow part, gradually adding loops according to the previously selected pattern.
- In the peak position, continue knitting and decrease the number of loops in a mirror sequence.
- Sew the hat along the back of the head.
- Either knit the neck part of the hood separately from the main fabric, and then sew it on. Or think of loops along its entire length and knit on circular needles.
We add that this attribute is appropriate to add for any model. Ties serve as both a fixer on the head and a decorative element. In the second case, their ends are decorated with pompoms made of yarn or natural / artificial fur.
For clarity, see the order and pattern of knitting a hat with ties below.

 knitting pattern for a hat with ties for a girl
So, we examined the features of knitting various models of warm hats for girls. It's getting colder outside, which means it's time to do needlework.
Inspiration for you and original hats for daughters!
Video: knitted warm double hat for a girl


