Toys are something that attracts both adults and children; they are completely different and serve different purposes.
Fabric or textile toys making your own is one of the safest and most attractive types of toys for children. Children can play with them from early childhood, but also during adult life soft toys do not lose their relevance. For example, it has now become fashionable to give and decorate home comfort with homemade interior toys. As a rule, such toys are not cheap, so many consider them a sign of luxury and prosperity.
Even the most simple toy made with high quality and with love can become very valuable and necessary in someone’s family!
For example, my daughter’s favorite toy is the owl Angela, which I made for her a couple of years ago, now she won’t part with it and takes it to bed with her on walks, to the store, to the dacha (well, at least they bathe separately)) In general, she liked it. I think most children either have a favorite toy or really want to have one.
Therefore, today I propose to make a beautiful toy as a gift, and only you will decide for whom it will be!
Below I have collected templates with patterns for toys, as well as a step-by-step master class on making them.
How to easily sew a soft toy. Soft toys DIY for beginners with templates
For beginning craftswomen, it will be easiest to sew from a simple pattern.
For example, take a bear template and print it on a printer, increasing it to required sizes, but you can also redraw it on paper, to do this, enlarge the template you like to suitable sizes on a computer monitor, attach a white sheet of paper to the screen and carefully trace all the contours of the pattern with a pencil.

Then cut out the paper template along the contours.
Choose a beautiful fabric for the toy.
If this is not a complex toy, for example, like the bear in the photo, then you will need to fold the fabric in two with the right side inward, you can secure it with pins for convenience so that it does not slip, then attach a paper template to the fabric and trace the contours along the fabric with soap or chalk.
We cut out the fabric blanks, leaving allowances for the seams.
We machine sew it with a regular straight stitch, leaving a small hole so that we can then turn the toy right side out.
You need to make notches along the folds so that the fabric does not pull in these places.

Now the toy is turned right side out and stuffed with padding polyester, padding polyester or other similar fillings.
You should not fill it too tightly, but so that there are no empty areas left, the filler must be distributed evenly.
The hole through which it was stuffed is finally sewn up with a hidden stitch.
We glue or embroider the toy's eyes, mouth, and nose.
Add beautiful details, for example: a bow, a flower, a scarf, buttons, or in general you can sew clothes. There is a huge field for creative experiments here.

Realize your idea!
A simple cat pattern made from fabric.
Another easy-to-sew pattern is the cat pattern.
It is sewn and cut according to the same principle as a bear, only here two parts are cut out.
This is the cat itself in two parts and the tail, also in two parts.
They are sewn together separately, small holes are also left for turning them inside out and for stuffing with stuffing, then the tail is sewn to the base of the cat.
You can decorate it however you like.

This is the cat I got.
Gave it to my sister for home comfort)

How to sew a complex toy? DIY fabric ball, interesting idea
I think a toy that is more difficult to make is one that contains many parts and is assembled in a certain order.
One night an idea came to my mind, why don’t I sew a ball out of fabric, it seemed so simple in my head, but when the idea came to fruition, without an example it was difficult to understand what to cut, how much to cut and how to do it all correctly later sew.
Therefore, I am sharing an example that I used.
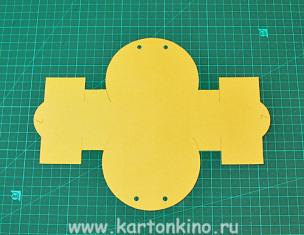
You will need two templates, a hexagon and a pentagon. We transfer them to paper, or better yet, to cardboard.

We need to cut 20 hexagons and 12 pentagons from the fabric. I used two colors of fabric, but this is not necessary, you can make it completely monochromatic or, on the contrary, colored, it’s at your discretion.
How they cut it required quantity polyhedrons, it is better to lay them out so that you can visually understand how you will sew them together.
This is what the ball layout looks like. 
Another layout option

This version of the ball is made of felt, it is easier to sew.
I chose to sew from calico and on sewing machine, so you still need to leave seam allowances on the fabric. And iron the seams. There is no need to do this on felt.
Simply sew all the parts into two halves, and then these two halves are joined together. You need to connect with wrong side, and then leave a small hole unstitched and turn it out through it.
Fill tightly with synthetic padding and sew up the hole with a hidden stitch.

This is the ball I got - it turned out beautiful!


See also - article felt toys
Fabric toys step by step master classes with patterns.
I offer a few more ideas interesting toys With step by step wizard classes.

Rainbow fabric fish


A ship made of fabric.


Today, many people are interested in handicrafts - they make crafts from beads, sculpt toys from salt dough, sew from felt, practice quilling, decoupage and other types of art. In this section I would like to talk in more detail about how to make fabric toys with your own hands.
Fabric toy patterns: cats


Cute bunnies


Baby Bears Mice

Sheep

Cows

To sew such unusual toys, you just need to print out the patterns on a sheet of paper, pin them on the fabric and cut out the fabric pieces that will be used to make a toy in the future.

Such a funny octopus can be made without a pattern at all. Let's try together to create such a wonderful toy for your child.
DIY octopus

To prepare this toy you will need a ball of cotton wool, fleece or jeans, eyes with moving pupils, threads, ribbons, and a handkerchief. The octopus can be made from either fleece or denim.
The stages of work are quite simple, no patterns are needed, you don’t even need to sew anything. Take a cotton or foam ball and wrap it in a square piece of fabric so that there is enough loose fabric left for the legs.


We tighten the fabric wrapped around the ball with floss threads of the same color as the fabric, weave a braid from the cut strips, and tie it with a ribbon of a contrasting color.

The strips at the end of the braids must be cut so that they are the same length.

All that remains is to design the octopus's face. We glue the eyes with glue and embroider a smiling mouth with threads, this is the only moment when we had to sew. And at the end we will tie a scarf on the head of the toy. The octopus is ready!
Patterns of fabric toys for the New Year
Now let's look at some patterns New Year's toys made of fabric.
Christmas toys

Herringbone

Father Frost

Deer

Here's a Christmas reindeer:

You can independently download for free from the Internet patterns of original toys: devils, penguins, giraffes, kittens and dogs, bunnies and bear cubs, and even stars.
Flat toys
The child can be asked to choose one of the patterns of flat toys. They are the easiest to sew; this work is already accessible to children as young as 3 years old. The main thing is to teach the child to hold the needle correctly and control it. If you are still afraid to trust your baby with a needle, then you can use another method. The needle and thread can be replaced with regular glue, and the patterns can be printed from the Internet.

Tilda dolls
If you have a professional approach to the issue of creating a toy with your own hands from fabric, then I bring to your attention Tilda dolls. For example, a sheep

It is better to sew it from terry cloth, it will be curly.
Angel girl, made in vintage style:

A bee and a flower, in love with each other.:

Original and funny goat pillows with a pattern:


And the pattern for it:

Goats as pendant toys:

DIY toys: simple master classes, best patterns, interesting ideas.
As the great Coco Chanel said, “Handmade things are luxury. It is not necessary for everyone to have them. Anyone who wants to have them makes them himself or pays a master for his work.”
Soft toy - the first plush association children's bear. But the concept of a soft toy includes much more. This is an interior toy Tilda, and funny toys in the car, and much more. This article contains various types soft toys, as well as techniques for making them and step-by-step master classes.


Types of soft toys with your own hands
Such toys can be divided into several subtypes: for children and adults, interior, with practical use (for example, pincushions).

Also, toys can be divided according to the type of material used: fur, cotton or linen fabrics, felt, fancy fabrics.


Today they have regained particular popularity folk toys, as well as soft toys made using national handicraft techniques.
DIY soft fur toy
Fur toy created with my own hands especially warm and beautiful. To sew it, you can use both natural and faux fur. It is, of course, much easier to work with artificial, but if you decide to sew a toy with natural fur you will receive a unique designer toy! First you need to decide on the pattern of the toy, the more finished product, the easier it will be to work. Small details are especially difficult for beginners.

Trace the details and cut out with a margin of 0.5 cm for the seam. Unlike fabric, it is best not to use scissors when working with fur. If you don't have a special tailor's knife, use a sharp utility knife. Cut with sharp short movements, do not move the knife deep so as not to cut off the fur.


To sew fur, it is necessary to apply two front sides and straightening the fur outward. After sewing the toy, you need to leave a small hole through which the toy is turned inside out and stuffed with filler. Previously, toys were stuffed with cotton wool and pieces of leftover fabric.
But such stuffing takes a very long time to dry when washed, and often after cleaning the toy was thrown away only because the stuffing wasn’t dry enough and mold appeared inside. Modern fillers are made of synthetic materials (sintepon and others), which dry quickly and well, do not bunch up and retain their shape. Having stuffed, all that remains is to sew it with a hidden seam.


The final touch is the eyes, nose and mouth. You can embroider it yourself, or you can buy ready-made accessories in the store.


Video: OFFENSED CAT / DIY SOFT TOY
Video: Warm cats toy, master class soft toy
DIY felt soft toy
Today felt toys the most popular at children's master classes and handicraft clubs. But they appeared not so long ago, and there is even an exact date for their appearance.
 Margaret Steiff and her first dolls
 An enterprising German woman, Margarete Steiff, submitted an idea in a magazine for housewives to sew a soft toy with her own hands from felt. Margaret published a pattern and a detailed master class in the magazine absolutely free of charge. But in the note she said where exactly you can buy felt for such toys.
This move in 1879 made it possible to establish a toy empire in just a few years. The nuance was that the toys were both sewn at the factory and they sold blanks for toys that you could sew yourself. She left an empire to her children and grandchildren, and gave the world the fashion for soft toys.

Master class felt dog


To work you will need: brown, white and black felt, scissors, a needle and thread, beads or eyes for toys and a hot glue gun.

We print out the pattern, cut out and sew each detail step by step.

Depending on the type of seam, you can create completely different textures toys.

If the parts are connected with glue, the toy can only be cleaned dry. When wet, the parts will separate.


DIY soft toys made of fabric
Fabric toys appeared much earlier than felt ones. But with the advent of fur and plush toys, they were unfairly forgotten for some time. With the advent of plastic, even children's toys made of fabric went out of use. But today, with a new wave of popularity on handmade again revived the popularity of fabric toys. The most popular interior toy today is Tilda.


When looking at the Tilda doll, you get the feeling that the roots of this toy go back to the Middle Ages. Not at all. The appearance of Tilda was in the 90s of the last century by the young designer Toni Finnanger. The girl was full of ideas and Tilda turned out to be one of the many ideas. Today it is impossible to imagine tender, home interior. And craftswomen all over the world are simply in love with Tony’s idea and create prototypes to suit their tastes.
 Tilda Angels
 Video: Tilda's master class
DIY soft animal toys: chicken, fox, horse, penguin, pig and others
With the arrival of the baby, I want to change the world for the better and create a special atmosphere at home. And the child is perfection itself, and you really want him to play with unique toys filled with his mother’s love.
DIY toys - simple. We have collected master classes on a variety of animal toys from the most various materials. Note that children under 2 years old put everything in their mouth. Therefore, the material must be natural, preferably lint-free. Wonderful fur toys are best given in the third year of life.


Chicken pattern, you can sew it like for a baby and put in toys-eggs. Or you can create a miracle basket for Easter.
Video: Learning to sew a designer soft textile toy Baby Elephant


Video: How to Sew a Penguin Finger Toy
Aleftinka pig pattern.

Pattern of a giraffe and his company.

 Pattern Cheerful Giraffe
  Flower Elephant Pattern


Since the release of Despicable Me, the world of toys has changed forever. Yes, everyone still loves bears, but when they see the cute minions, children and adults are delighted. Minion toys are the first to sell out at exhibitions. Do you want to sew it yourself for your child? It couldn't be easier! All you have to do is choose your baby’s favorite character.
Video: Master class on sewing a minion
DIY simple soft toys


For beginners, a lot of details may seem too complicated and the desire to create will gradually disappear. For beginners we have selected simple patterns, which even children can handle connecting. These patterns are especially relevant in creativity classes in schools.


DIY bouquets of soft toys photo

 Bouquets of soft toys Teddy bears
 Conservationists fought for a long time against the sale of fresh flowers, until someone introduced bouquets of sweets or toys into fashion. Now this global trend is so popular that in some countries the sale of fresh flowers has halved.
 Bouquets of soft Kitty toys
 Are you going to celebrate? Make a bouquet of soft toys yourself! This is a unique gift that will take pride of place in the birthday girl’s bedroom for a long time.
Video: Bouquet of toys. Master class for beginners
DIY soft toys pillows

 Garfield pillow toy
 Well, having touched on the world of toys, it is impossible not to remember about the pillow toys that fill the sofas of all needlewomen. These are favorite things for both family and guests. Please note that sitting down on the sofa, few people can resist reaching out and touching the half-toy. And children happily travel with their favorite soft toys, falling asleep to the sound of the roads.

Video: Toy pillow owl
Video: Patchwork “Toy-Pillow”


Flat toys are the easiest to make and are most often made with felt. But there is various variations. Such toys attract with their simplicity and laconic design, interesting textures and the ability to take them with you everywhere.
Video: DIY soft toys. Master class, sewing cats
DIY soft toys patterns for beginners
Beginning needlewomen do not have to spend a lot of money on scraps and tools. Sometimes simple tights or socks are enough to create beauty.
We have also collected simple patterns for beginners.
 The simplest toy patterns for beginners Kitten

Monkey Pattern Smeshariki Video: Soft toy “Sock Bunny”
Many people consider childhood the happiest period of their life. And the symbol of this carefree period are toys. This is probably why many adults take such pleasure in sewing funny animals from felt, fleece and even chintz. But in order for the product to turn out neat, you must first learn how to build simple patterns for toys from fabric with your own hands.
Dolls with soul
Rag toys perform several tasks at once. First of all, their texture is beneficial for development fine motor skills at the toddler's. And besides, they:
- safe (there are no sharp or too small parts in the crafts);
- durable (they do not contain elements that will break);
- interesting (there are many options for playing with a felt toy).
Fabric selection
The most important stage of work is the choice of material for sewing. Warm, soft, short-pile felt as if created for cute and original animals. This fabric is not capricious in operation, because:
- practically does not fray;
- does not twist or move;
- keeps its shape - in general, exactly what beginners need.
In addition to felt, textile toys - tildes - are also very popular. They appeared relatively recently, in the 90s, but have already won the hearts of millions. For their manufacture, linen, calico, cotton, etc. are used. As for patterns, the main principle of their construction is simplicity. Let's see this in practice!
6 elementary patterns
A paper pattern helps you make things “just like in the picture.” Simple toy patterns are suitable for beginners, although they look so unique that they may also appeal to more experienced needlewomen.
Little girl in a pink dress

Materials:
- a sheet of paper (tracing paper or wallpaper);
- scissors;
- tailor's chalk;
- pencil;
- eraser.
Instructions:
- We draw an oval of the head, make marks for the eyes (they are closed on the doll), cheeks and mouth.
- Draw the hairstyle. It consists of two parts - bangs parted at the front and loose curls at the back.
- We make markings for the dress in the form of a trapezoid.
- Let's move on to the body. We draw spread arms and legs.
- The final stage of creating a pattern is shoes in the form of a semicircle with a fastener bar.
- Cut out the details.
- We transfer the outlines onto the felt, cut them out and sew them together using an overcast stitch.
Please note that all parts are both simple and complex patterns Felt toys are cut out with your own hands without allowances.
Funny puppy
All details of this model have clear outlines without ornate lines.

Materials:
- pattern paper;
- pencil;
- compass;
- scissors;
- tailor's chalk;
- felt 3 colors;
- filler.
Instructions:
- Draw a torso with three protrusions-legs.
- Using a compass, we outline two almost identical circles intersecting in the center. We erase the extra lines - a figure resembling a figure eight should remain.
- Draw elongated ears, circles of spots (3 circles different sizes), oval nose and hook of tail.
- We cut out the parts, pin them onto the fabric and outline them with chalk.
- We sew all the elements together using an overlock stitch, adding a little filler.
Elegant cat
A distinctive feature of tilde toy patterns is that only the outlines of the figure are drawn on paper, without precise detailing.

Materials:
- sheet A4;
- simple pencil;
- chalk for drawing on fabric or a piece of soap;
- scissors;
- filler;
- beads for eyes;
- textile.
Instructions:
- On paper we draw the outlines of a sitting cat.
- Separately, draw the 2 front paws - elongated ovals with three toes on one narrow side.
- We make a tail - a voluminous hook.
- Cut out the details.
- We transfer the elements of the cat’s figure onto the fabric, making an allowance of 1-1.5 cm.
- Cut out and sew along the wrong side.
- Turn inside out, stuff and sew with a blind stitch.
Cute hare

Materials:
- sheet of paper;
- pencil;
- scissors;
- textile;
- filler;
- 2 beads.
Instructions:
- In one detail we show the entire figure of the hare with ears and front paws.
- Separately, draw a template for the back leg, similar to a bell with 3 petals.
- Cut out the elements.
- We transfer the details to the fabric folded in half. Don't forget about allowances (1.5-2 cm).
- Cut from paper pattern hands and head - we get a suit pattern.
- We draw 2 such details on the fabric.
- We sew, fill, and then, after sewing along the side seams, we put on the dress.
Good turtle
The kind, slow Tortilla will not only become your child’s favorite playmate, but will also perfectly cope with the function of a soft pillow.

Materials:
- a piece of wallpaper or tracing paper;
- pencil;
- compass;
- scissors;
- fabric of two colors;
- filler.
Instructions:

Cheerful teddy bear
Bears are the most favorite toys of more than one generation of children. Every adult in early age there was definitely a bear. Don’t go away from tradition - make “his” teddy bear for the little one.


Materials:
- paper;
- pencil;
- scissors;
- textile;
- filler.
Instructions:
- On paper we draw the outlines of the bear: body, head, ears, front and hind legs.
- Separately, draw 2 circles of different diameters: a larger one for the muzzle, a smaller one for the nose.
- Cut out the details.
- We transfer them to the fabric, sew them, fill them, detail the mouth and eyes with stitches.
Considering the popularity and demand for hand-made goods, a toy sewn with your own hands will become a great gift not only for a child, but also for an adult of any age: it can be presented as a souvenir or interior decoration. Making such a thing is not difficult. The main thing is to choose according to your experience.
Popular product options
It can be made in the form of a textile doll or animal, and both products made solely for decoration and those that also have a utilitarian function look good. You can choose the option that suits you from the following list:
- very gentle and romantic tilde dolls;
- cute and funny coffee toys;
- functional and funny pillows in the shape of cats and owls.
In fact, there are many types of toys, including specifically textile dolls. Listed above are the most popular ones and those that are easiest to make.

Materials and tools
To make a beautiful and neat toy, sewn with your own hands, stock up on the following tools and materials:
- template, blank, sample (can be printed on a printer);
- pattern paper;
- pencil, eraser;
- scissors;
- textile;
- pins;
- needle and thread;
- filler (sintepon, holofiber);
- sewing machine;
- decorative elements (beads, buttons, ready-made plastic eyes and nose (for animals), satin ribbons etc.
As you can see, nothing complicated or expensive is required (except maybe a machine). Most likely, even a novice needlewoman already has everything listed.
How to sew a soft toy with your own hands: work sequence
Whichever sample or you choose, the execution steps will be as follows:

So, you have learned how to sew a soft toy. With your own hands simple products easy to make. Of course, the manufacture of each item will have its own nuances; for example, it may be necessary to dye white fabric in the desired color for the face, arms, legs, and torso. When making coffee, or as they are also called, this operation is mandatory. You can dye the fabric both before cutting and after. It depends on the number of elements being prepared for painting and the convenience of working in one way or another specifically in your case. In addition, you can make hair for dolls, say, from yarn. The design of the face is a completely separate conversation.
Textile dolls
If you decide to sew soft toys with your own hands, you should choose the simplest patterns (of course, if you don’t have enough experience). Textile dolls are very popular now. They are made both in the form of realistic people and humanized animals. Some products may consist of only two parts - the front and back halves of the body, in which the head, arms and legs are made as one whole. Clothes are sewn separately or made permanent, even without a pattern. If experience and time allow, it is better to choose options consisting of individual elements, that is, all parts of the body are performed autonomously, and then the character is assembled from them. Such toys look more realistic and neat.
Animals
Everything that was said in previous section, also applies to making animals. To sew soft toys with your own hands, you can create patterns yourself. If you don’t draw very well, but don’t want to use a ready-made template, try creating a simplified animal pattern, and it’s better that all the elements are cut out in one piece with the body.

Coffee toys
Do you want to learn how to sew toys with your own hands (there is nothing difficult here for beginners, so don’t be scared), which will also be scented? Then this section is for you. The patterns for these products are the simplest. Funny and cute things usually consist of two parts. The base material is white cotton fabric. They are also called attic ones, as they resemble souvenirs found in an old chest, darkened by time. In order to give the fabric the appropriate brownish tint, the material or cut parts are kept in a decoction of coffee or tea. This, in addition to color, also gives pleasant aroma product. Often these toys are painted acrylic paints with preliminary priming of the dyed fabric, for example, PVA glue. Using a thin brush, the expression of the face is drawn (as a rule, animals are made using this technique), and you can also apply various funny inscriptions.