Lesson on manual labor for making a bookmark "Pencil"
Purpose: Make a bookmark "Pencil" using origami technique.
Tasks:
Educational:
To form the ability to follow the oral instructions of the teacher;
Teach paper handling techniques;
Broaden your horizons;
Correctional and developmental:
Develop attention, memory,
Develop fine motor skills hands and eye;
To develop in children the ability to work with their hands, teach them precise finger movements;
Develop Creative skills and aesthetic taste.
Educational:
- cultivate respect for the book.
Develop independence in completing the assignment.
Continue to develop students' personal qualities: patience, accuracy, hard work.
Materials and equipment : multimedia projector, presentation about the variety of bookmarks, sample bookmark, blank paper, glue stick.
Stages of the lesson.
1. Organizational stage.
2. Communication of the topic of the lesson.
3. Introductory conversation, viewing the presentation.
4. Orientation in the task.
5. Practical work.
6. Report on the work done.
7. Assessment of the quality of the work performed.
8. Summing up the results of the lesson. Reflection.
Course of the lesson:
1. Organizational moment:
Good afternoon, we are glad to see you in our class!
2. Communication of the topic of the lesson.
Today in the lesson we will learn a lot of new things, and will make a very necessary thing at school.
3. Introductory conversation of the teacher. View presentation.
Teacher:
What do you like to do in your free time?
Estimated children's answers: Walking, watching TV, chatting with friends, playing computer games, drawing, reading.
Now we have information technology time, which means that people prefer to spend their free time on communication in social networks, using a computer, phone, tablet.Unfortunately, both adults and children read much less.But despite this. The book still occupies an important place in our life. Especially at school. You need textbooks for learning. Nowadays, many people use an e-book. But many adults prefer regular books. It's so nice to sit in the evenings with a cup of tea and read an interesting book.
The book has not left our lives, it remains and requires careful treatment.How to handle a book or a textbook with care?
Estimated children's answers: Take it with clean hands, do not throw it, store it on a shelf, there should be a cover on the textbook, use a bookmark.
Educator : It is correct that the book would serve us for a long time, people came up with a bookmark
Tab for books - a device that allows you to quickly find the desired page from multi-page .
Let's run an experiment: Two pupils in different books will search for the desired page. One has a bookmark on the desired page, while the other does not. Who will find it faster?
Output: If there is a bookmark in the book, then the desired page can be found very quickly, without spoiling the pages.
As you may have guessed, we will bookmark,
Teacher: Of course, you can take a regular sheet of paper and put it on the page where you finished reading. But after all, how nice, looking back into the book, to see a neat bookmark with pictures, made with your own hands.
But first, we'll see what kind of bookmarks there are.
View the presentation "These Different Bookmarks"
Dynamic pause"Butterflies"
Children are invited to collect butterflies, which are "scattered" around the class.
(collect on magnetic board)
4. Orientation in the task.
And now we will start the work, we will swami make a bookmark using origami technique, the "Pencil" bookmark
Listen carefully to the explanation and get the job done.
6. Independent practical work.
Step-by-step explanation of the teacher.
(each step of the work is performed along with an explanation)
1. Take a rectangle of any color (Fig. 1a)
2. Bend the rectangle in half lengthwise and unfold (fig.1b)
3. Fold back the top strip (Fig. 1c, d).
4. Turn the workpiece over to the opposite side and bend the upper side corners to the middle line (Fig. 1e)
5. Bend again along the outlined fold lines (Fig. 1e, g)
6. Turn the workpiece over to the reverse side and bend the rectangle as shown in the diagram (Fig. 1h, i). The height and width of the pencil will depend on how high you fold the rectangle.
7. Turn the workpiece over to the reverse side again and bend the sides, focusing on the fold lines passing through points A and B (Fig. 1k)
8. Insert one side part into the other's pocket (fig. 1l). The top edge can be glued.
9. Bookmark is ready (fig.1m)
7. Report on the work done.
Questions for children:
What did we do in class today? (children's answers )
What is a bookmark for?
What material was the bookmark made of?
What geometric shape was there a blank for the bookmark?
Did you enjoy doing the job?
8. Summing up. Reflection.
Teacher:
Let's see your bookmarks. What are they like?
( discussion with children )
All of them have neat and beautiful bookmarks. Well done!
To all many thanks for the work done.
Parents instill in their children a love of reading different ways... Some are forced to open the book, promising them candy for it, others say that if the child does not study, he can only work as a janitor. The methods are different and each has its own pros and cons. But what all children love to do is cover up the thick Talmud that they have read. In order for the child to fall in love with opening a book, you can invite him to make a beautiful pencil bookmark from colored paper. Or any other option, for example a bookmark in the form of a cartoon character. Read below how to do this.
Pencil
Such a craft is assembled according to the origami principle. A pencil bookmark made of colored paper can be folded with skill in just 10 minutes. To make it you will need colored paper... Moreover, you need to take a sheet that is tinted only on one side, and the other side should be white. A template for a pencil bookmark made of colored paper can be viewed above. Actions need to be performed alternately, in strict accordance with the scheme.
You should take the prepared paper, bend it 1 cm. Now we turn the sheet over and bend its upper corners to the center. We repeat the last action one more time. Turn the workpiece over, raise the bottom edge up. Turn the work over again. Now bend the right and left edges towards the center. We put the right corner in the pocket that formed on the left side. The pencil bookmark from colored paper is ready.
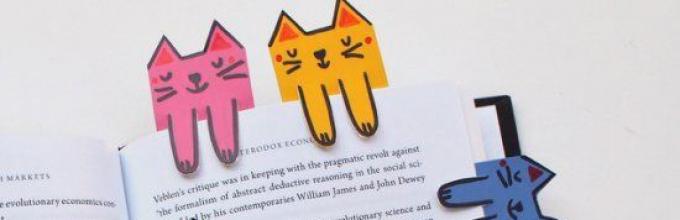
Cats

Even a child can create such a craft. If children could have difficulties with making a pencil bookmark from colored paper, then even a baby can create a cat, and without the participation of adults. To make a craft, you will need a rectangle cut out of colored paper. Cut a zigzag on the upper edge of the workpiece. These will be the ears. Now draw two ovals in the middle of the rectangle. Follow them along the contour with a black marker. With a thick felt-tip pen, you need to draw a cheerful face for the cat. The ears can be painted over with any other color. The bookmark is almost ready. With a clerical knife or thin manicure scissors, you need to make cuts along the contour of the paws.
Funny monster

This origami craft will bring a smile not only to the child, but also to his parents. How to make a funny monster? To do this, you need to take a square cut out of colored paper. In this case, the workpiece must be tinted on both sides. Let's get started. The first action is to fold the square diagonally. Now we bend the right and left corners downward. The next step is to bend the corners to the center to create a kind of pocket. Now, a square should be cut out of any other sheet that is different in color from the workpiece. You need to insert it into the resulting pocket - this will be the tongue. A strip of triangles should be cut out of white paper - these are the teeth. It remains to glue the eyes to the blank, and the monster is ready.
Toothless

How to make a bookmark for books in the form of your favorite cartoon character out of paper? Very simple. We will make the basis for the bookmark according to the same principle that we used to fold the pocket in the paragraph above. It is advisable to use black paper for this purpose. When the base is ready, a decorative overlay should be cut, which will consist of the following parts: big circle, two semicircles, two large ovals, 4 smaller ovals and 2 small horns. We collect Toothless in the desired sequence, focusing on the picture. If you want your bookmark to have the same gray border, then all the details will need to be duplicated twice, glue them on top of each other. It remains to make Toothless a muzzle and claws. To do this, you need to cut out two circles from yellow and black paper, and 8 ovals from white paper. We glue the eyes and claws in place. The bookmark is ready, enjoy your reading.
The pencil bookmark is one of the easiest origami crafts for kids. It is also a useful hand-made item.
For work you will need:
- Single-sided colored paper. That is, on the one hand, it is in a very different color, and on the other, it is white;
- Glue stick, scissors.
How to make a pencil bookmark?
Prepare a rectangular piece of paper. The size depends on how large you need the tab. But the most acceptable option is the length of the strip - 21 cm, and the width - 8.5 - 9 cm.

Fold in half with the white side on the inside.

Open the paper, put the white side towards you and fold the fold on top, no more than 1 cm.

Turn the paper over with the color facing you. Fold the right corner to align with the center fold.

Then the left one.

And immediately fold the right side again, aligning it with the center fold.

Then the left one.

Turn the paper over with the white side facing you, the pencil shaft is already visible from above. Fold the bottom of the paper up, roughly defining the height of the white part of the origami pencil.

Turn the paper over again and fold the sides, right first.

Then the left slightly overlaps the right.

To keep the sides well, open the left side a little and place the right side of the paper in the pocket inside.

The lower part is fixed well, attach the upper corner of the side with a glue stick.

Turn over, the origami pencil bookmark is ready.

How many variations of bookmarks can be made with children using origami technique! Needless to say, the child does not open the book at all and does not read anything. It is worth stocking up on a few wonderful bookmarks and putting them one by one in your favorite book or school textbook. Believe me, it will always be interesting for a child to open and see what is inside. And at the same time, he will quickly find the desired page (the one on which he finished reading the last time) and be sure to read something. In general, we assure you that a paper bookmark is not only interesting to make, but also a useful craft.
This workshop will show you how to make a popular origami pencil paper figurine that works great as a bookmark. Use any bright colors and experiment.
What you need to create an origami pencil bookmark:
- a strip of colored paper (cut along a sheet of A4 or other format);
- maybe a little glue to hold the ends together after folding, or you can do without it.
How to make an origami pencil:
If you cut a sheet of A4 paper along and take one half, then you get a strip of the right size for creating a craft. It is imperative that the leaf on the back must be white, that is, the paper must be one-sided.
 With the white side facing you, fold the paper across, about 1 cm or so away from the edge. This will show the reverse yellow side of the paper.
 Turn the workpiece again with the yellow side towards you. In the place where the fold was, find the middle and, leaning on this point, fold the upper corners with a house, as you can see in the photo. You should see a yellow stripe in the middle.
 Next, relying on the same midpoint, fold the upper (already beveled) corners again to select a sharper spire, the tip of which will be colored. This will be the future lead of our pencil. And it will be the same color as the paper we have chosen.
 Turn the workpiece with the white side towards you.
 Fold the paper in the middle, lifting the bottom end of the sheet up to reveal the colored side. Do not bring the edge of the paper to the sharp tip of the pencil by 1 to 2 cm.
 Rotate the workpiece again. Fold along the right and left side.
 The pencil-bookmark is ready. All that remains is to properly iron (smooth out) the folded sides, or even glue them neatly if the paper is thick and diverges.
8 179 797
When reading a book, it is important to remember and fix the page you left off, in this case a bookmark will help. It is not at all necessary to go to a stationery store to purchase this simple accessory, we recommend making bookmarks for books with your own hands. Trust me, it's very simple! We offer you to make several original bookmarks for books from colored paper, felt, threads and paper clips. Take note of the ideas below.
So, first, let's look at a few simple ways and make a bookmark for the book with our own hands, using the materials at hand.
From paper
Bright and very beautiful crafts from paper can be made with children. Implement unusual ideas in life.Option number 1 - Worm
You will need:- Template;
- Strips of colored paper;
- Colored cardboard sheet;
- Glue stick;
- Scissors;
- Tape;
- Hole puncher.

Option number 2 - Heart
If you are looking for unusual ways creating bookmarks for books from colored paper, then this option is just for you. You will need a minimum of time to work.You will need:
- Template;
- Scissors;
- Glue stick;
- A sheet of colored paper.


Option number 3 - origami hedgehog
Let's start creating origami from paper, we get wonderful bookmarks for books. So, let's begin.You will need:
- A sheet of brown and light brown origami paper;
- White paper;
- Black marker;
- Scissors;
- Glue.
- Fold the light brown paper diagonally in both directions.
- Bend the sheet to form a triangle, upper part fold the sheet in half.
- Now fold the right side of the triangle in the middle and then the left side.
- Next, we unbend the edges, the left side of the triangle must be folded parallel to the central vertical line of the figure.
- Repeat the same for the second side.
- After that, you need to bend both ends into the pockets formed.
- Insert a sheet of dark brown paper into the corner of the bookmark, draw thorns on the brown sheet with a regular pencil, cut and glue.
- Make eyes, draw a nose. This completes the creation of origami bookmarks for your books.
Option number 4 - Origami Christmas tree
See a few more cool ideas that will come in handy when creating bookmarks for a book, check out the proposed master class. You will definitely delight children with such origami bookmarks for books.
You will need:
- Green origami paper;
- Brown paper;
- Glue;
- Scissors;
- Sequins.

Option number 5 - Bookmark with weaving "tie"

You will need:
- 4 strips of paper in two colors;
- Scissors;
- Double-sided tape.

Option number 6 - Bookmark - mouse

You will need:
- Simple pencil;
- Colored paper;
- Lace;
- Scissors;
- Stationery glue.

From felt
Quite interesting are not only paper bookmarks, but also felt. Let's try to make them together.Owl

You will need:
- Template;
- Pieces of felt purple, pink and white;
- Threads;
- Needle;
- Glue gun.

Dress
You will need:
Execution technique:

- Transfer the outline of the pattern to the fabric and piece of felt.
- Cut out these parts, glue them together, then you need to sew everything along the contours.
- Glue the dress to the elastic and you're done. Such a bookmark handmade will be a real decoration for your book.
From threads
Make an original thread bookmark using simple scheme manufacturing. It’s very simple.Pompon
You will need:- Knitting;
- Scissors.
- Wind the threads around your fingers as shown in the photo.
- Tie the resulting thread in the middle, leaving a hanging edge.
- Then cut the tied skein at the sides to make a pompom.
- Shape the pompom into a ball using scissors. You can make such bookmarks from threads of various colors according to your own taste.
From paper clips
Even ordinary paper clips can be the basis for a unique bookmark. It is enough to decorate this stationery with a bow, buttons or thread and you will get a fun bookmark. Another idea is to straighten a paperclip, bend it in the form of a heart, an asterisk, or a musical key. Isn't it original?
Try to make an exclusive bookmark yourself, it's very easy. Imagine and admire the results of your own work!


Use a variety of cool scrapbooking ideas, experiment and get creative.


Some more interesting ideas and master classes