Tatyana Gudkova
For making Christmas ball will be required:
Foam sphere (I have a diameter of 14 cm);
Short stud pins (about 350 pieces);
2 squares satin ribbon 5x5cm;
Green satin ribbon 25 mm wide, length 5 m;
White satin ribbon 25 mm wide, length 5 m;
2 beads or sequins to decorate the middle;
- satin ribbon for making a bow.
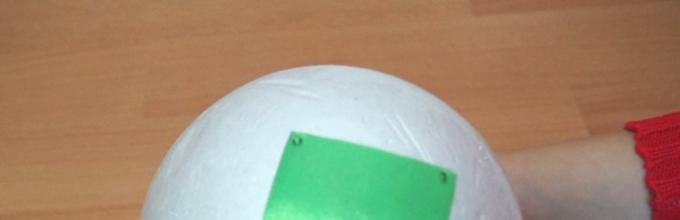
First, attach a square to the foam sphere satin ribbon.

Then cut satin ribbon in strips of 6 cm. We begin to make from white stripes. Make a triangle out of each rectangle by folding the top right and left corners toward the center of the bottom side. We fix the resulting triangles at the corners of the square, as shown in the photo.

Attach one more between these triangles, maintaining the same distance between the vertices.

Now let's take the strips green. We make the same triangles from them and attach them between the triangles of the previous row.


Now let's change the color again tapes. From this row we fasten the corners not only between the corners of the previous row, but also under them, as shown in the photo.

Continue until half of the ball is covered.
We do the second half in the same way.

Now let's move on to the design. We close the joint between the extreme rows of triangles satin ribbon. You can secure it with hot glue (hot glue). Glue a bead or sequin in the center of the starting square. Tie a bow at the top of the ball and glue it ribbon, for which you can hang the ball on the Christmas tree.

I wish you patience and creativity in production!
Publications on the topic:
"Bows from satin ribbons» Bows made from satin ribbons look very impressive on any work done. The first photos show specially made bows.
I made such a beautiful swan from satin ribbons. I used this craft as visual material in the literary quiz..
Kanzashi flowers look great not only on hairpins, headbands or elastic bands, but also on bracelets, necklaces, earrings, brooches.
I did a “miracle”, I can’t call it anything else. I worked for a long time, burned my fingers with glue, but it’s worth it, I just can’t stop looking at it, I think.
Master class on the topic: "A heart for loved ones." The holiday is coming soon - Valentine's Day. On this day I want to deliver to my loved ones.
I have already talked about how you can make a Christmas ball with your own hands, today I will continue my story and share how I made another one.
New Year is a holiday that every child looks forward to with delight, and every adult wants to please both themselves and their children with skillful crafts.
Things made using the kanzashi technique will be an excellent holiday decoration. Master classes on making Christmas tree decorations with your own hands have been popular for a long time, but using this technique you can also make other new items: hair decorations, toys, crafts. Ideas and MK of crafts are now also actively published in magazines.
Traditionally, using the kanzashi (or kanzashi) technique, geishas made decorations for hair accessories - combs, hairpins, hairpins - from multi-colored ribbons. During their existence, so many different subspecies were born that it makes no sense to list them all. We’d better tell you how and from what to make a New Year’s decoration in the Japanese style.
New Year's kanzashi balls: step-by-step production
Creating a toy using the kanzashi technique is quite easy. Different forms of execution give room for imagination: from standard balls to original cones, flowers or snowflakes (they can then be used as decorations, brooches or additions to hairpins).
An undoubted advantage of crafts in the kanzashi style is the ease of their manufacture. As soon as you learn how to make the main element, everything will immediately become clear, and the work will begin to boil, and original patterns will not be a difficult task for you. There are many master classes in which the author easily and simply makes a craft in 5 minutes, but know that not everything is so simple, and at first this technique requires perseverance and patience.
Balls can be made from different materials. We suggest you make jewelry from satin ribbons.

To make toys with your own hands, you need to stock up on the following tools:
- a wooden or plastic board to make it convenient to place and sort the main elements of the ball;
- well-sharpened scissors for cutting ribbons;
- a candle, soldering iron or lighter to process the edges of the cut ribbon so that it does not unravel;
- actually, ribbons. This can be a skein of satin ribbons or organza of any colors that you like;
- fastening for a toy. Regular wire will suffice, but there are also special fastenings for Christmas tree decorations - you can also use them;
- glue. You can take “Moment” or 88, theoretically a glue gun, but you need to work with it with extreme caution;
- instead of glue, you can use thin safety pins without heads;
- thin tweezers with a comfortable grip;
- the main element is a ball on which you will form your toy from ribbons. To do this, you can take a regular tennis ball or a special round foam mold.

For a Christmas tree decoration, cut off pieces of ribbon rectangular shape(as opposed to squares for hair decoration). The quantity depends on how big ball you took as a basis. To ensure that the blanks are the same size, use a template or simply make markings on the tape itself.
- First determine the middle of the ball. Secure the backing there - a square piece of tape large size, from which the decoration will go further.
- You need to make triangles from rectangles. Fold the sides towards the middle and smooth the edges a little so that the workpiece does not straighten out.
- Each triangle is attached to the ball so that its vertex is directed towards the center of the ball and the backing that you have secured there.
- Secure 4 triangles along all sides of the square backing. The edges of the workpieces should not touch; leave a little space between them.
- The next layer is applied in the gaps that you left between the parts of the previous one.
- After all the triangles are secured to the middle, start doing the same on the other side. Don't forget the square backing.
- When the toy is ready, you will probably have a seam in the middle where the fasteners will be visible. It can be closed with a ribbon secured around the ball.
- Attach a mount, hang the beauty on the Christmas tree.
To make it easier to understand, we have prepared a graphical diagram for you.

Kanzashi crown for the New Year: how to please the little princess and the big queen
Any decoration has magical power for a girl, girl or woman. To create festive mood A New Year's tiara or kokoshnik will do - whichever you like best.
As a basis for the crown, you can take a wide or narrow hoop, or even an ordinary, unremarkable crown from any toy store. It is better to choose two types of ribbons for decoration - satin and organza. This way the crown will look truly royal.
Here we will use a different technique. For a beautiful crown, you will have to cut the ribbon into squares. Therefore, it is better if the tape is wide. The only thing that this technology has in common with the previous one is that the blanks also need to be folded into triangles. But their “production” does not end there - now the corners need to be pulled together and secured.

To make the decoration even more beautiful, try placing satin and organza triangles on top of each other, and only then connecting the ends. You can also attach a bead in the middle of the resulting petal.
Connect the petals together with glue to form a crown. How to do this? Look at the petals - they look like a diamond. Keeping this association in your head, glue the side tops of the blanks together.
Decoration is not should be flat, it should be voluminous so that such a “crown” can be placed on table, and she stood without any problems the tops would be up.
Having completed the first circle, fasten the last petals together and place the workpiece on a felt round base. Now begin to create the second circle: apply glue to the lower top of the diamond and attach it between the two petals of the first circle.
Glue the finished crown to the rim. Original decoration ready!
And this is how you can make a kokoshnik-kanzashi:

New Year's toys Kanzashi
New Year's decorations for the Kanzashi-style Christmas tree made of satin ribbons are not only balls. Flowers, butterflies or pine cones will look very beautiful.
Something more abstract should not be done; it may not fit with other toys, rain or garlands. It will take the most time to create butterflies, but the work will be rewarded as soon as the product takes its rightful place on the tree.
But making a cone will not take much time. We fold the already familiar rectangular pieces of tape into a triangle, but do not fasten it immediately, but fold it in half in half, and only after that fasten it. For this toy it is better to use a thin ribbon.

Such petals are attached to an elongated cone-shaped blank. A light bulb or a cosmetic sponge will do, where one end is sharp and the other is wide, rounded.
New Year's decorations Kanzashi
The kanzashi technique can be used to create hair jewelry. Pleasant additions for headbands, headbands, elastic bands, and hairpins can be changed at least every day. Using this technique you can create beautiful bows or large bows, brooches, New Year's masks and even full sets for girls or school ties for boys.
To make a decoration, for example, for a hairpin, you need to roll up petals from squares, glue them onto a felt blank, but do not glue them together. That is, smear the bottom top of the diamond and immediately glue it to the felt, then take the second petal, also glue it to the felt, and so on.
You can glue the second row directly inside, or you can use a trick: make three blanks different sizes. When you're done with the larger one, glue a square of foamiran or other foam material in the center, and a felt circle on top of it. This will make the decoration look more voluminous. Glue a bead or rhinestone to the center of the top flower. And of course, glue all this splendor onto a hairpin.
New Year's crafts from Kanzashi

In the kanzashi style, you can make not only jewelry or toys, but also souvenirs. Christmas trees and small souvenir trees, snowflakes, door wreaths, decorating a bottle of champagne, decorating gifts, cards and pots (as an original bow), as well as creating small pigs, magnets, panels, stars - will not only be fun for the whole family, but also will delight the guests. But you shouldn’t limit yourself to just this list. Flowers, bells, lanterns and other souvenirs will definitely delight you and your loved ones.
Main photo: pikabu.ru
There is snow all around. Frost draws on the glass. The garlands are hung. The Christmas tree is already decorating the house, but something is missing, some zest. It's New Year's balls self made will make your forest beauty irresistible, give it shine and sophistication. Our author of master classes in Svetlana Sorokina has prepared three master classes for youby beautiful Christmas balls from tapes.
In this master class I would like to invite you to make a New Year's ball. Its uniqueness lies in the fact that it combines a satin ribbon with gold lurex and foamiran with gold plating.
For New Year's ball we need:
- Styrofoam ball with a diameter of 7 cm;
- Yellow satin ribbon with gold lurex 0.5 cm thick;
- Satin ribbon purple with gold lurex 0.5 cm thick;
- Gold brocade 6 mm thick;
- Gold-colored hugger with a diameter of 2 cm;
- Cutting flowers from gold glitter foamiran 1.6 cm;
- 22 half beads pearl color diameter 6 mm;
- Golden glitter foamiran;
- Lilac foamiran 1 mm thick.
Of course, the composition of materials, their colors and shades may be different for you. These master classes are step by step description work in which you will learn how to make your own unique Christmas tree balls from ribbons.
Step by step description:
1. First, let's prepare a ball in order to decorate it later. We will need a foam base, narrow tape with lurex in two colors and gold brocade (Photo 1).
 2. We need to divide the ball into 4 equal sectors. To do this, take two pins, determine the top and bottom of the ball and insert the pins. Now we wind the thread, dividing it into sectors (Photo 2).
 3. We draw along the line of the thread with a pen, pressing lightly. It is better not to use a felt-tip pen for such purposes (Photo 3).
 4. First, wrap the ball with purple ribbon. Apply glue on top and bottom with each turn (Photo 4).
 5. Then change the tape to yellow (Photo 5).
 6. We glue the junction of the yellow and purple tape with gold brocade on all sides. We also glue the brocade around the circle of our ball. We make a rope from a narrow yellow ribbon (photo 6).
 7. To decorate the ball we will use flowers made from glitter foamiran. The flower size is 1.6 cm. I made them myself using a hole punch, but you can cut them out or buy ready-made ones (Photo 7).

8. To give them shape, you need to apply them with the shiny side to the iron for a couple of seconds. Glue a half-bead into the center of each flower (Photo 8).

9. Glue the flowers in a circle onto the gold brocade. I used 17 flowers (Photo 9).

10. Now let's start with the bow. I found the templates on the Internet, printed them out and transferred them to cardboard for future use. I indicated the dimensions on the blanks (Photo 10).

11. Transfer the parts to foamiran using a toothpick or a Chinese stick. We cut out blanks from glitter gold foamiran and lilac thin foamiran (Photo 11).

12. Glue the parts together. Cut out a thin strip of lilac fom 1*4 cm and glue it in the center of the bow (Photo 12).
 13. I decided to decorate the bow with flowers. First I glued one flower in the center, and then two flowers on one side and the other (Photo 13).
 14. Our ball and bow are ready (Photo 14).
 15. Glue the bow at an angle. Hold it with your fingers for a few seconds (wait for the glue to set). Glue a gold hugger to the bottom of the ball. Our New Year's decoration is ready.


Christmas ball using kanzashi technique
An excellent gift and decor for a New Year's room is a shiny, original handmade ball. Combination bright colors in the New Year's ball will be remembered by every guest. Even a beginner can create such a decoration. In this master class I will write in detail all the materials used and a description of the work.

For the original New Year's ball we will need:
Styrofoam ball with a diameter of 10 cm;
White satin ribbon with gold lurex – 1.2 cm* 7 m;
Gold brocade – 4 pieces 0.5*15 cm;
Gold brocade – 1 piece 0.5*20 cm (for a rope);
44 mother-of-pearl half-beads with a diameter of 6 mm;
Gold tire – 4 stripes;
A gold-colored hug (at the bottom of the ball) with a diameter of 2 cm.
For the flower arrangement we will need:
23 pieces of red satin ribbon – 2.5*2.5 cm;
23 pieces of satin ribbon white– 2.5*2.5 cm;
13 pieces of green satin ribbon – 2.5*2.5 cm;
White felt base with a diameter of 2 cm (under the central flower);
3 gold huggers with a diameter of 2 cm;
2 yellow dew half-buins with a diameter of 1 cm;
1 yellow half bead with a diameter of 1.4 cm;
6 double-sided stamens, white with sparkles.
For the bow on the balloon we will need:
4 pieces of red satin ribbon – 5*10 cm;
4 pieces of gold brocade – 4*10 cm;
4 pieces of New Year's tartan - 2.5*10 cm;
4 pieces of red satin ribbon – 5*11 cm;
4 pieces of gold brocade – 4*11 cm;
4 pieces of New Year's tartan - 2.5 * 11 cm;
2 pieces of red satin ribbon - 1.2*12 cm;
Gold colored rhinestone tire.
Step-by-step description of the work.
1. First we need to prepare the New Year's ball itself. We will need a foam blank in the form of a ball with a diameter of 10 cm and a satin ribbon (Photo 1).

2. Using a pen, mark the top and bottom of the ball. We begin to wrap it in a circle clockwise. We fasten the tape with hot glue on both sides of the ball (Photo 2).

3. Mentally divide the ball into four sectors. And glue on narrow gold brocade (Photo 3).

4. Now we begin to glue the mother-of-pearl half-beads onto the gold brocade. I got 11 pieces on each strip (Photo 4).

5. Let's start with the bow. On one side the bow will be full of six petals, on the other - two. We cut the red ribbon, gold brocade and tartan into pieces of 10 and 11 cm (4 pieces each). We connect the three ribbons together and solder the ends with fire (Photo 5).

6. Fold the pieces in half and make a fold on one side and the other (Photo 6).

7. Glue the small petals together in twos. One blank will go on a large bow, and the second on the back side of the ball. We glue the remaining 4 large blanks together in the shape of a bow (Photo 7).

8. Glue the two blanks together. Then we wrap a red ribbon around the bow and glue a gold tire of two stripes (Photo 8).

9. Glue a narrow piece of gold brocade on top of the ball (Photo 9).

10. Glue a large bow at an angle with front side and a small one on the reverse side (Photo 10).

11. Let's take care of the green leaves. We will need 13 of them, two branches of 5 petals and single ones. Making a simple sharp petal. We fold a piece of 2.5 * 2.5 cm twice diagonally, connect the ends together and solder it with fire. We trim the bottom of the petal a little and also treat it with fire (Photo 11).
12. Glue the petals into branches with hot glue (Photo 12).

13. Now let's move on to the flowers. There will be 3 of them: one of 9 petals and 2 of 7 petals. The flowers consist of double sharp petals. You will need a ribbon of two flowers: red and white. The petal is made like a simple sharp petal, but we fold two triangles together (Photo 13).

14. Cut out a circle with a diameter of 2 cm from felt and glue 9 petals onto it. We glue the half-bead with the hugger and connect it with the flower (Photo 14).

15. Glue a flower to the center under the bow. We collect the remaining petals on a thread, 7 pieces each, and glue the centers (Photos 15 and 16).
 16. Glue the other two flowers and green twigs (Photo 17).
 17. Glue single green petals and 4 bunches of stamens, 3 each. And the final touch, glue a golden tire in the middle of the sectors. Our New Year's decoration is ready.
Christmas ball made from bias tape
This lesson shows one of the options for decorating a Christmas tree - elegantball. It will turn out colorful and light, and will not break if it falls on the floor. You can rightfully consider it a creative handmade product that you can repeat and decorate your Christmas tree or give to friends.
The ball is made without a base. If you prepare fittings of the same size, you will get a product about 5-6 cm in size. So the decoration will be quite noticeable.
So, for work you will need:
- 8 pieces of red bias tape - 1.5*7 cm;
- 8 pieces of pink bias tape - 1.5*6 cm;
- 8 pieces of bias tape yellow- 1.5*5 cm;
- 8 pieces of gold bias tape - 1.5*4 cm;
- 8 pieces of white bias tape - 1.5*3cm;
- golden tire;
- half (longitudinal) lace Track - 2*20 cm;
- gold huggers: round and bell – 1 pc. each;
- crimson half bead with a diameter of 8 mm – 1 pc.;
- gold cord.
As you can see, what is used here for working in the kanzashi technique is not a standard satin ribbon, but a denser, elastic bias tape. The width of the segments is the same, they differ only in length, the stripes are gradually shortened, since the rings of the New Year's ball will be created from the parts. If you don’t have bias tape, then choose some other dense material; if you use satin or brocade ribbon, you will have to use a base - for example, a tennis ball.
New Year's kanzashi ball step by step
1. Cut the bias tape into lengths, guided by colors. The lengths are indicated in the list: 7 cm, 6 cm, 5 cm, 4 cm, 3 cm. Assemble the parts in pairs. You don’t have to singe the strips right away; it’s rational to do this at the second stage.

2. Fold the pieces in half lengthwise and solder the ends using a lighter. Thus, the dense material will be doubled, and the ends will be singed and will not crumble.

3. Next, glue the bent pieces of the same length together in pairs. You need to get rings; to do this, connect each end to the other end at an angle of 90 degrees. The result will be rings - three-dimensional parts of the same shape, but decreasing in size and of different colors. These will be the starting layers for the interesting petals.

4. Then glue the resulting droplet rings into each other. The result is a convex petal. Assemble the parts like a pyramid.

5. The last white ring will be the smallest. It is difficult to model due to the short length of the segments. Glue it in carefully last. There will be a hole in the center of the five-layer petal. In total you will need 4 identical five-layer petals.

6. Glue the individual parts (these will be quarters of a volumetric ball) together. Make smooth and clear joints. Prepare a gold splint to mask the seams, apply it to the parts from top to bottom to measure the length.

7. Glue the ball together and glue pieces of the tire crosswise to enhance the decoration. In this case, you need to use a minimal amount of glue; you can only drop it into the upper and lower poles of the ball, then press down the ends of the segments.

8. Decorate the bottom of the toy with a gold hugger and a pink half-bead (they will not only decorate the product as a whole, but will also hide the joints that will remain in the glue). Press with your finger exactly at the center point.

9. For the top of the decoration you need lace and a bell hug with a cord. Thread the lace onto a thread, pull it off, and glue the resulting fluffy cloud to the bell (insert the assembled tip into the small hole). But first insert a loop of gold cord into the hole of the bell.

10. Glue the top to the ball. Christmas tree decoration It’s ready, its shape is standard, it’s easy to hang the product on a green thorny branch.

This beautiful handmade ball is unique and has no repetitions. You can make a whole set of similar products different shapes and size.
Artichoke ball
Balls made using the artichoke technique look no less interesting; they are made very simply.

Prepare:
- foam ball,
- satin ribbons,
- thin pins or glue gun.
First, we will glue a thin ribbon or cord from which the ball will be suspended. This will be the top of the ball, from which we will start laying out the pattern.
Then we will cut the satin ribbon into rectangles, which we will fold into a corner.


We begin to attach the triangles from the top of the ball, attaching with glue or two pins to the lower corners.


See the detailed master class.
When the entire surface of the ball is filled, cover the joints of the triangles from below with a strip of tape:


Similarly, using the artichoke technique, you can make, for example, a bell:

We all love the New Year for the constant fragrant Christmas tree, a lot of all kinds of Christmas tree decorations, cheerful lights and, of course, gifts! These are all nice things, but to make them even more festive and even more enjoyable, let’s complicate the task: instead of buying it all in the store, we’ll make Christmas tree decorations! Let’s suffer a little through the pangs of creativity, dream, and then go ahead and CREATE something “like that,” for example, a pine cone for a Christmas tree in the Japanese kanzashi style!

The kanzashi technique came to us from ancient Japan, where it appeared more than 400 years ago! Beautiful Japanese women wore all kinds of pins and hairpins made from silk ribbons using this technique! Time passed, European beauties appreciated the jewelry and craftsmen appeared, ready to fulfill any whim... and learn new things.

Once you learn how to perform the basic element, you will also be able to create a wide variety of things, but for now, let’s get started.

To make such a beautiful cone with your own hands, you should stock up not only with patience, but also with some specific tools and materials, namely:
- Dostochka;
- Sharp scissors;
- Soldering iron or lighter;
- Bright satin ribbons, or strips of silk or organza in blue and silver colors, 2.5 cm wide;
- A small piece of white tape 5 cm wide;
- Mount for Christmas tree toy;
- Moment-gel glue or glue gun (hot);
- Special tweezers;
- Monofilament;
- Thin long needle;
- Table tennis ball;
- Thin silver cord for loop;
- Simple pencil;
- Thin tape or a small jar of cream;
- Ruler.
We will carry out all manipulations on a regular kitchen board - so as not to damage the surface.
- We cut our ribbons into squares, use a ruler so that the squares are really square and not rectangular!

To free up your second hand a little and make the process as convenient as possible, come up with a stand for your ball: a jar of cream, even simple tape is ideal as a stand.
- Now we need to wrap all the squares into triangles. We do this using tweezers. Using a soldering iron or a regular lighter, we melt the edges of the triangles, thereby securing the desired shape and preventing the threads from unraveling:

For those who don’t know or have forgotten: triangles are made like this: the ribbon square is bent in half diagonally, and then bent in half again:

- We make the first row of silver triangles, gluing them using Moment Gel or a glue gun directly onto the blue square. The sharp corners should “look” inside the blue square, and the distance between the triangles should be about 2 cm:

- The second row will be made from the same silver triangles. They need to be glued in a checkerboard pattern between the already glued triangles.

- The third row is performed in a similar way - with silver triangles glued into the spaces of the triangles of the previous row:

- The next two rows are made with blue triangles. The principle of their arrangement is the same as that of silver blanks.


- We continue row by row to make our bump, alternating colors through 2 rows:

- Having reached the penultimate rows, we again glue the blue square onto the tennis ball:


- Decorating our cone. To do this, take a small piece (10-15 cm) of white satin ribbon, fuse it with the edges to make a ring and stitch it on one side with a basting stitch.

- And now we need to glue (or sew) a real mount for the new bump!

- Now we take a thin silver cord and thread it through the fastening loop. We tie a strong knot and New Year's toy“bump” in Japanese kanzashi style is ready:

Working with this technique is very interesting and exciting. Therefore, if you want to create some other Christmas tree “miracle”, then we will be happy to help you with this!

To make this wreath, you will need the same tools, golden beads and two types of ribbons: wide green (5 cm wide) and thin bright red (0.5 cm wide).
This Christmas tree toy is made from the same triangles, but they need to be “improved” a little, look at the photo instructions:\


4. Now carefully glue all 10 fragments on top of each other, while turning them a little in a circle, so that we can easily form a Christmas wreath from the resulting semicircular blank:

5. We connect the edges of the workpiece together and we get a wreath of ribbons in the kanzashi style. But for this wreath to become Christmas, you need to decorate it properly! To do this, we take beads, in this case golden in color, and glue or sew them to the wreath. Then a thin scarlet ribbon finally caught our attention, from which we will tie beautiful bow and sew (or glue) it to the wreath!
In the kanzashi style you can make a lot of different toys, you are already convinced of this!
Christmas tree - kanzashi pendant
To make a Christmas tree like this, you will need a wide green ribbon, a thin one - red, a wide one - brown and a clamp!
Here, sharp and round petals are made from green tape (to be precise: 3 round and 5 sharp), these leaves are glued together in a certain order. The brown ribbon is twisted into a tube and glued as a tree trunk. A scarlet ribbon sits like a beautiful bright bow at the very top of the Christmas tree!

All creative work is completed by gluing the workpiece to the mount! Now hang the toy-decoration wherever you want: not on the Christmas tree, on a curtain, on a blouse, or right in your hair!
It has become very fashionable to invent Christmas tree decorations with your own hands, especially if they are crafts made from satin ribbons using the kanzashi technique. This style allows you to make truly unique decorations for the New Year.
Crafts such as a Christmas tree look great in home interior on New Year. It can be hung on spruce branches or made the central link in New Year's compositions. As a gift for your friends, such a toy will become a memorable souvenir for the new year. A master class with step-by-step photos will teach you to invent bright and beautiful Christmas tree toys, such as a Christmas tree, a ball and a snowflake.


Holiday tree
Such a miniature Christmas tree can decorate workplace or find a worthy place on a shelf in your apartment for the New Year.
We will begin our master class by making a sample, according to which we will make a small Christmas tree in the kanzashi style. This is not at all difficult to do. We cut out two blanks from thick cardboard, as shown in the photo. From the first we make something like a cone with our own hands, and glue the round product to its lower part. You can look at photos and video material about how a Christmas tree is made if you have any difficulties. 


Next, this master class moves on to the production of kanzashi-style petals, which will become an integral part of the tree.
In order to create a craft for the New Year, we need to purchase accessories, namely:
- pieces of fabric made from satin ribbons;
- scissors with tweezers;
- matches or lighter.
The most important thing that a Christmas tree consists of are petals made of satin ribbons. Large petals will be located at the bottom of the cone. Take some ribbon and cut it into several squares. Then, we fold each element obliquely. We get a triangle, which we put together again. The ends of the ribbons must be scorched with fire to prevent the threads from unraveling. 


Now, let's move on to creating petals of a different shape. Take a square of ribbon and fold it in half. Turn the edges of the workpiece in other directions. The ends of the tape are scorched with fire. 


After you have done everything completely, we begin to collect crafts that will bring good luck in the new year. Step by step, we begin to glue the petals using the kanzashi technique onto the cone shape. 


At the very top of the head, the Christmas tree will consist of small petals using the kanzashi technique. 

This is a fairly simple master class, even for beginners. The result obtained, namely christmas tree, your children will especially like it, as they can play with it or decorate their room with it.
Video: Making a Christmas tree with your own hands
Beautiful ball for the Christmas tree
The New Year's ball is also an integral attribute winter holidays. It is its symbol, since such decorations are first hung on the Christmas tree. Making a ball with your own hands is not difficult and will not take much time. 
In order for our master class to work, we need to decide on the material:
- a round plastic ball with a circumference of five centimeters;
- pieces of satin ribbons of several colors;
- iron socket;
- wire;
- scissors;
- matches or lighter;
- glue.
If you don't have access to a plastic ball, you can make a homemade version from old newspaper. Take it and form it into a ball, wrapping it all with thread. The main thing is that you succeed round shape. As a result, you will get an excellent shape to make a New Year's ball in the kanzashi style.
Bend a thin wire and stick it into the future New Year's ball. 
Using multi-colored satin ribbons, make small squares. Fold each one in half diagonally. You have a triangle. Fold in two again and again in the same way. Scorch the edges of the fabric with fire so that the threads do not fray. Don't forget to press the melted ends to glue them together. Such step by step photos, you can watch it on our portal or study the video. 
On a round ball, glue eight kanzashi petals. 
Next, take the iron rosette and stretch it over the petals. 
Next comes a large white bead, which is placed on a metal rosette. 
We also glue the second tier in the amount of eight pieces. 
The next tier, consisting of 16 petals, going beyond the next row, will consist of 8 elements. 


After the last petal is glued to the New Year's ball, we can consider that the master class is completed and the decorations for beginners are completely ready.
Video: Making a kanzashi ball
Blue snowflake
There is hardly a person who has never cut out a snowflake from paper to decorate something. But not everyone knows that you can make kanzashi snowflakes to decorate a Christmas tree with your own hands. Craftswomen have long appreciated this method of needlework and are carefully preparing for the New Year holidays.
Kanzashi snowflakes are made in one color or in different colors. What makes them even more elegant look. Don't be afraid to experiment and combine different shades of ribbons to decorate your New Year's interior. 
For this work, we need the following materials:
- white and blue ribbons;
- simple scissors and clip;
- matches or candle fire;
- small light beads;
- a piece of thick fabric;
- textile glue.
Cut the white ribbons into squares with a diameter of 5 cm. From them we make round petals, in the amount of 12 pieces. The technology for their creation can be seen in the video. 
We make pointed-shaped petals from blue ribbon; you will see the working technology above in the text or in the video, which is located on our website. We will need 30 pieces of these petals. 
Take a piece of thick fabric and cut out a circle with a diameter of three centimeters. Glue six white petals onto it. 
Further steps are that we need to create six elements, which consist of one round petal and two pointed ones. Glue them together as shown in the photo and leave to dry. 
After that, glue them to the white petals between two separate pairs of elements. Apply a little glue to the end of the craft and insert it into the middle of the flower, holding it with your fingers. 
The craft requires time for it to dry completely. During this period, it is necessary to prepare 6 elements consisting of blue pointed petals. 
We attach these crafts to the base in exactly the same way as we did the previous kanzashi petals. 

Our New Year's master class, which we made entirely with our own hands, is almost finished. All that remains is to decorate the decorations using beads. Glue a large white pearl in the middle, and insert small beads along the edges. Just don't overdo it when decorating the decoration. The main emphasis is on kanzashi-style petals.
Look at the wonderful New Year decorations and crafts we made with our own hands, because the most long-awaited holiday is just around the corner.
Video: New Year's snowflake
Comments
Related posts:
 Kanzashi marshmallows master class from satin ribbons (photo)


