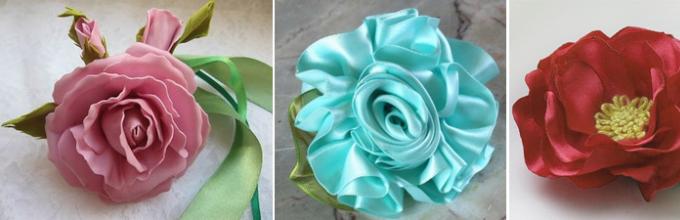
What do you imagine when you hear or read about beautiful flowers from satin ribbons? Some people imagine simple gerberas collected from a crossed narrow ribbon, while others imagine an imitation of living roses, which is made by hand and collected by petals. As always, the truth is somewhere nearby - few people make a completely realistic copy of real flowers, there are still artificial ready-made floral compositions for this, but even very simple daisies do not need to be learned - they can be collected simply by inspiration.
Making flowers from ribbons is an interesting process. It attracts me because, despite the apparent complexity, in half an hour you will definitely have a flower. Yes, perhaps a little ridiculous (you won’t look at my first roses without pity). But it will work out. This is not knitting, which will kill you for a couple of days, and not miniature painting, which clearly requires talent; here, just watch a master class on creating flowers from ribbons with your own hands and you will get a finished flower.
Almost all flowers from silk ribbons are made in such a way that they are durable. Of course, if you are planning to make simply decorative bouquets, then you don’t need special strength, but if you suddenly want to make a beautiful headband as a gift for your child, on which fabric flowers act as decor, then I advise you to make every effort to ensure that the flowers do not got disheveled in the first couple of days.


How to do it
I'll tell you several ways to make flowers. I’ll say right away that the methods are basic, based on them you can make any other flowers that are visually similar to those described by me. By the way, I advise you to try to make fantasy compositions without trying to embody any living flowers - this way you can better feel the technique and its features.
Preparation for production
So where do we start preparing? What will you need for the job? Write down:
- tapes of different widths and different colors, I prefer satin ones, they look very elegant;
- good sharp scissors (I use regular tailor's scissors);
- needles and threads of different thicknesses;
- glue gun and several sticks of clear glue;
- a pair of tweezers (those for eyebrows will do, but it’s better to get a good one if you’re going to seriously make flowers).
In addition to this, you will also need beads and centers for flowers, sequins and fishing line, a floral sleeve and much more that you have lying around in your craft basket.
I prefer to work at a clean table under a desk lamp, and I advise you to prepare your workplace— remove everything unnecessary, adjust the light.
Kanzashi
My first acquaintance with flowers took place just when I came to the Kanzashi master class. This mk became my starting point, and I am grateful to the girls who literally in a few hours taught me and a bunch of other girls to make stunning kanzashi flowers from a narrow ribbon, chic kanzashi flowers from satin ribbons of greater width, and gave deep ideas about this technique and its capabilities.
What is kanzashi? This is the art of decorating hairpins, which came to us from Japan. Pieces of fabric were folded into the shape of flower petals, and amazing flowers bloomed on the stiletto heels, which could decorate any hairstyle. Now kanzashi are in fashion, so it is not surprising that many girls have mastered this technique.
To work in the kanzashi technique, in addition to the previously described tools, you will also need a ruler, a chalk pencil for cutting (can be replaced with a simple pencil or a sharpened piece of dry soap) and a candle for scorching.
Some girls use a lighter, but it seems to me that a candle gives a more even flame, and you can fold the fabric much more neatly when your hands are free.
In total, three types of petals are used in the kanzashi technique:

A kanzashi flower made from a 5 cm wide ribbon will be of medium size - you can use it to decorate clothes or a hairpin, decorate a headband, or make a beautiful home decor.
How to make different petals:
And how to make kanzashi leaves:
Let's start production
- To make a kanzashi flower from a 5 cm wide ribbon, cut the ribbon into equal squares.

- Then each square needs to be folded diagonally (as in the photo), and the side corners lowered towards the central one.

- For the resulting diamond, you need to bring the side corners back and firmly grasp the cut from below with tweezers.

- The uneven medium is trimmed with scissors and then melted on a candle.

- You have a round petal, you need to make a few more using the same principle - fold, clamp, trim and melt.

- Next, the petals need to be collected on a thread, rolled into a flower and glued to the base, and the middle for the kanzashi should be glued on top (in extreme cases, a regular button covered in satin will do).


- Your first kanzashi flower from a 5 cm wide ribbon is ready!
How to make a kanzashi flower from a 5 cm wide ribbon? The wider the ribbon, the larger the diameter of your flower.
If you want to make a lush flower from ribbons, then I advise you to look at this tutorial:
And these videos show how to combine different shapes petals, making double petals from satin ribbon with your own hands, and how you can collect not only flowers using the kanzashi technique, but also plants, insects and even small animals. By the way, it is kanzashi that is suitable for making snowflakes - watch the video to make sure.
Melted petals
The following method of making flowers from satin ribbons is suitable for those who want to make a large composition at once; for example, I used this technique to make a basket of flowers for my mother’s anniversary. However, there are some nuances:
- melted petals look less neat compared to kanzashi, so you should not use these flowers next to a formal outfit;
- be prepared for the fact that it won’t work out right away;
- Not every ribbon is suitable for making these colors; this can only be determined experimentally.
Both satin ribbons and ordinary nylon ribbons (like children’s bows) are suitable for making.


Step by step instructions
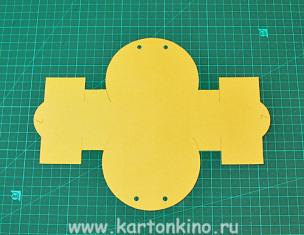
- From cardboard we cut out a pattern in the shape of a plump half-heart (as in the photo below).
- We cut out the petals (you will have to tinker) - at least 6 large ones and the same number of smaller ones and even smaller ones, maybe twice as many of each size.
- Each petal needs to be processed using fire - the edge will bunch up a little, and the petal will become voluminous.
- Then the petals are collected on the central thread, arrange them symmetrically, with a slight overlap, so that the flower looks voluminous, and it is best to collect them in a checkerboard pattern (see photo below).
- Several beads are attached to the center on a string to imitate the middle.
- Your flower is ready.
Simple flowers
Very simple and at the same time expressive flowers can be made from fabric in just a few minutes. If you have never tried to make flowers from ribbons, then you will definitely succeed with this tutorial.
How to make flowers in five minutes?
- Cut the tape into pieces of 5-10 centimeters. You can take identical pieces, or you can use segments different lengths, then the flowers will be more natural.
- We carefully melt the sections on a candle so as not to fray. Make sure that you don’t get dark, sloppy sagging.
- Along the bottom part we make a loose stitch with a strong thread (it is better to use a medium-sized needle so as not to make too large holes.
- We tighten each segment to get a petal.
- We collect the resulting petals using color - we use small pieces in the middle, larger ones closer to the edges.
- Glue the middle into the center.
- You can decorate flowers with narrow white ribbons - for example, make stamens or centers.
- We put the collected flowers into a composition and glue them to the base.
A few words about embroidery
Since we are talking about ribbon crafts, it is worth mentioning this type of needlework as ribbon embroidery for beginners. To be honest, before I became interested in this type of needlework, I thought that simple patterns were embroidered from a narrow satin ribbon. No matter how it is! Embroidery is done not only using thin ribbons, but very wide ones are also used - they drape beautifully and allow you to get volume.


Why I like this technique:
- easy to achieve desired result thanks to beautiful materials;
- ribbon embroideries are highly valued among admirers;
- 3D embroidery is done very quickly.
How to embroider with ribbons? I found several master classes that I plan to try myself, and I also provide diagrams.
What are the benefits of schemes? Despite the fact that all needlewomen initially embroider the same pictures, the embroidery you make will be unique - firstly, because you choose the colors yourself, and secondly, because the ribbons are the material that needs to be draped. Well, look for yourself - there are more than five shades in each picture, and each will have to be draped in its own way, which means that the volumetric elements will be different. Don’t want to do what someone else has already done before you? Embroider small flowers according to your own sketches.
Extraordinarily delicate and airy ribbon embroidery of wild flowers - I am sure that this best gift for any holiday, especially if you add meadow herbs to the wildflowers.
I really like the ribbon embroidery of wildflowers - the pictures are not too big, smaller than a landscape sheet, but very delicate and expressive. And for the first embroidery, I advise you to take a simple pattern and ribbons less than a centimeter.
Lessons and master classes for inspiration
How to make cute flowers from ribbons: a master class for the little ones - using this master class we made flowers with our daughter, she really liked it.
And a few more simple ones:
Now you know how to make a flower from a ribbon - either for a headband, for a dress, or for gift wrapping. Experiment with different techniques, share the results and collect entire hand-made bouquets!
It’s sad, but fresh flowers cannot please the eye all year round. That is why many needlewomen try to make flowers from satin ribbons. They look excellent and do not lose their original appearance for many years. Such products are used as decoration for many crafts. Entire bouquets are even created from them. You just have to master a few techniques for making them in order to start creating such masterpieces yourself.
It’s sad, but fresh flowers cannot please the eye all year round.
Despite the apparent complexity, the technique of creating flowers from satin or silk ribbons is accessible step by step even for novice needlewomen. Light and beautiful interior flowers will decorate your home; smaller flowers can serve as decoration for jewelry, bags, and clothes. They can be made from both narrow and wide ribbons - large, light and beautiful interior flowers will decorate your home, smaller flowers can serve as decoration for jewelry, bags, and clothes. Schemes and microcontrollers for creation are easy to find on the Internet, for example, see our article.
When starting work, it can be initially difficult to imagine what can be made from this material, how to assemble a whole composition from ribbons. In fact, there can be many options. Craftswomen make roses with open, closed and half-open buds in a matter of minutes. Even lilies, gerberas and asters are made from this material.
You can make not only small flowers, but also entire compositions. The middle of each piece is additionally decorated with beads and beads. They add special sophistication with the help of ordinary fabric, fur and rhinestones.
As a result, such blanks can serve as decoration for a hoop, hairpin, clothing or bag. Even an ordinary knitted headdress with such a decorative element becomes stylish and perfect.
Worthy of special attention are wedding bouquets, which collects the best specimens made. With their help, they decorate a room, a car, and even furniture. The holiday atmosphere is felt to the fullest thanks to this design.
Gallery: flowers made of satin ribbons (25 photos)


Satin ribbon rose (video)
What else can be made from satin ribbons
It is not only a flower that can be assembled from thin ribbons.
Such delightful and fascinating needlework allows you to make many of the most extraordinary crafts, including:
- panel;
- insect figures;
- angels;
- Easter eggs;
- caskets;
- Christmas trees and Christmas tree decorations;
- pendants and brooches;
- keychains.

It’s not just a flower that can be assembled from thin ribbons
No need to search at all step by step description each craft. Having mastered the technique of making at least one flower, creating any other product will no longer seem difficult. You just need to imagine what it should look like in the end result.
Making small flowers from satin ribbons
Small roses with closed buds will become one of the most bright jewelry any outfit. Even the most ordinary, unremarkable hairpin, thanks to this element, will acquire a delightful appearance.
What is needed:
- ribbons;
- threads;
- needle;
- compass;
- pencil;
- scissors;
- linen fabric;
- ruler.

Small roses will be one of the brightest decorations in any outfit.
Work progress:
- Using a compass, draw a circle on the fabric, the diameter of which should be only three centimeters.
- Measure a small area on this circle with a ruler and cut out the workpiece.
- Cut the circle along one side of the marked area.
- Align the cut with the other marked side and sew, thus forming a cone.
- Place the tape on this cone so that its corners do not reach the circle itself.
- Sew the workpiece along the contour of the resulting square.
- After this, bend the ribbon to each of the corners and immediately sew on each of the resulting petals.
- After the four corners are bent, the slope must be increased so that in the future the petals overlap one another.
- Only after the petals have already extended beyond the cone should the tape be cut off and the edges that protrude sewn together. wrong side.
Kanzashi made of thin satin ribbons: master class
For those who have already mastered the origami technique, creating such a flower will be quite easy. Even without possessing these skills, absolutely anyone can understand the manufacturing process.

For those who have already mastered the origami technique, creating such a flower will be quite easy.
Work progress:
- Cut the ribbon into squares and immediately singe all the edges. There should be four such parts in total.
- Fold each element diagonally, thus forming a rectangle.
- Fold each of the triangles one more time, thereby forming petals.
- Secure the petals individually with thread and turn them inside out.
- Gather all the parts onto a string.
- Decorate the flower in the middle with beads.
Peony from satin ribbons: how to make it yourself
With the help of step-by-step instructions, you can easily make simply delightful peonies. These flowers turn out incredibly beautiful and delicate.
What is needed:
- lighter;
- ribbons;
- threads;
- needle;
- scissors.

With the help of step-by-step instructions you can easily make simply delightful peonies
Work progress:
- Cut the ribbons into rectangles of different sizes. Ten pieces each of the following sizes: 5×7 cm, 4×6 cm, 3×5 cm, 2×4 cm.
- Hold each element a little at a short distance from the lighter, constantly rotating it.
- Roll the smallest part into a roll and make a few stitches at the bottom of the workpiece.
- First, attach small petals to this part one by one, then larger ones, and finally the largest ones.
Tip: if desired, the number of petals can be reduced or, on the contrary, increased. It directly depends on them how lush the bud will be as a result. In this case, a slight deviation in size will not affect the appearance of the finished product.
Chrysanthemum made from satin ribbons: step-by-step instructions
Using the kanzashi technique you can make delightful, incredibly beautiful chrysanthemums. It only takes a little time and patience to create such a product with your own hands. In the future, it can be attached to a children's hoop, hairpin or bag, thereby giving a sophisticated look to old things.
What is needed:
- satin ribbons;
- candle;
- a piece of felt;
- glue;
- beads;
- fishing line;
- scissors.
Work progress:
- Cut the tape into forty strips exactly seven centimeters long.
- Then fold each strip lengthwise and cut off the ends lengthwise.
- Then singe the ends, pressing firmly with tweezers.
- Carry out such manipulations with absolutely all prepared parts.
- Cut a circle from felt with a diameter of about three centimeters.
- On the round part that has just been prepared, glue all the elements one by one, arranging them in a checkerboard pattern.
- From the first to the third circular row, fix eight parts each.
- On the fourth and fifth rows, five elements are enough.
- In the sixth row, fix only four petals.
- Cut a small piece of fishing line and glue a bead to its end.
- Secure the fishing line in the center of the flower.
Important! In order for the chrysanthemum to be voluminous and have no gaps in it, it is necessary to carefully ensure that all details are fixed exclusively in a checkerboard pattern.
DIY bracelet for bridesmaids (video)
Making flowers is a special type of handicraft, regardless of what materials are used. After all, by creating such unearthly beauty with her own hands, the needlewoman gains a lot positive emotions. If the main material is satin ribbons, you can be sure that the final result will be amazing decoration, which will certainly be used.

Very beautiful artificial flowers can be made from fabric or ordinary ribbons. Using some tools that are easy to find in any sewing department, you can make beautiful roses and wildflowers.
By following step-by-step instructions, you can make unique artificial flowers with your own hands, which can be used to decorate your interior, gifts, cards, clothes, and even your hairstyle.
Beautiful decoration of flowers made of satin ribbon
1:1333

You will need:
- satin ribbon
- burlap or felt
- scissors
- pencil
- thread and needle
1. First you need to make a round base with which you can twist the flower.


This base can be made from burlap or felt:
- draw a small circle on the burlap (diameter from 6 to 10 cm)
- cut out a circle
- cut out a small segment in a circle
* The larger the segment, the higher the cone will be.
- connect the ends of the circle to form a cone.
2. Start applying the tape to the base. Secure it with thread.


Follow the photo instructions to make a rose.
6:1256 6:1266
7:9


3. Several of these roses can be combined into a bouquet.
10:95 10:105A bouquet needs its own base.
Prepare a handle for a bouquet or any sticks that need to be folded into a bun and secured with tape and then tied with a satin ribbon.
You need to glue a foam ball to the base of the sticks. If you don't have it, you can use crumpled paper wrapped in tape.
Now you can glue roses to the ball.

* The bouquet can be inserted into a pot.
11:1304 11:1314How to make a flower and a wreath from ribbons
11:1394
12:9


15:9 15:19
DIY braid flower
15:99 15:109
You will need:
- braid or narrow satin ribbon
- scissors
- button
- ruler
- lighter or matches
1. Prepare narrow tape and cut it into equal strips.

17:9
*To make one flower you will need about 6-8 strips.
17:123* Petal length = 1/4 strip length.
17:195 17:2052. The edges of each tape must be treated with fire.
17:294 17:304

3. Apply hot glue or superglue to the middle of each strip and attach both ends to it.
19:15084. All ribbon blanks now need to be glued together to make a flower.
19:1515. You can glue a button into the middle of the flower.
19:238 19:248How to make simple flowers from ribbons (master class)
19:353
You will need:
- satin ribbon
- scissors
- lighter or matches
- a simple pencil
- glue gun or superglue
- thread and needle
1. Prepare a satin ribbon and cut it into equal pieces. In this example, 5 strips are used.
* The petal has a length equal to 1/2 the length of the strip.


22:9
2. Use a lighter to trim the edges.
22:693. Using a simple pencil, draw the middle of each strip.
22:1824. Use a thread and a needle to carefully grab two opposite edges (see image).
22:3555. Each strip needs to be folded in half.
22:437 22:447
6. Apply a little glue to the inside back of the piece and glue the stitched area.
23:11257. Start stringing the petals onto the thread and stitching them together.
23:1230*You can decorate your flower with a button.
23:1311 23:1321
24:9


Calico roses - photo master class
26:1117

You will need:
- green felt
- chintz
- thin wire (preferably floral)
- ribbon
- glue gun or superglue
- thread and needle

1. Prepare green felt and cut out a cup for the rose.
28:9642. Prepare chintz and cut out 6 petals for each rose.
28:1086 28:1096
3. Take the wire and wrap it with satin ribbon, securing it with glue.
29:136 29:146
4. Fold each petal in half.
30:7285. Gather the petals on a thread (along the cut).
30:809 30:819
6. Using glue, assemble all the processed petals as shown in the image. Wait for everything to dry.
31:154831:9


7. Making a bud.
33:1072To do this, you need to glue a rose to one end of the wire and then put the lower part of felt through the hole.
33:1280 33:1290
34:9
* You can put together a bouquet from several similar flowers.
34:116 34:126 34:136Simple flowers made of organza or nylon ribbons
34:237

You will need:
- synthetic fabric(organza, rayon)
- thread and needle
- candle (lighter, matches)
- decorations (beads, beads, rhinestones)
- cardboard
- scissors
- pin
- a simple pencil
1. Prepare cardboard and cut out 2 shapes from it as in the image (different sizes).


37:9
2. Place each shape on the fabric and trace with a pencil. You need to cut 6-8 pieces of each size.
37:1963. Use a lighter or candle to carefully trim the edges. Hold the fabric higher to avoid scorching.
37:382 37:392


4. Start collecting petals. Use thread for this. You can stitch 3 petals. Start with the larger petals and then the smaller petals.
41:277 41:287

* Fan all the petals so that the flower is symmetrical and looks natural.
43:1473 43:1483
44:9
5. All that remains is to sew the beads into the center of the flower and fasten the clasp on the back side.
44:163 44:173
Making flowers from ribbons: poppies
45:767

47:9
Satin ribbon pansies
47:87


50:9


Beautiful flower made from ribbons
52:1100
You will need:
- green satin ribbon (width 5 cm, length 10 cm)
- satin ribbon of any color (length 1 meter)
- thread and needle
- scissors
- candle, matches or lighter
- a sheet of paper for a pattern
- pin, hair clip or hair tie

Optional:
54:1038Glue gun
54:1081Small piece of felt
54:1133 54:1155 54:11651. Make a petal pattern. You can see the dimensions from the images (5 cm high, 2.5 cm wide). The width at the base is no more than 2.5 cells.
54:14232. Since the width of the tape is 5 cm, the petal should have a slightly smaller height. Fold in half and cut out the pattern.
54:163454:9


3. Place the pattern on the tape and cut out the shape. Cut off the top edge of the ribbon; you may have to lower the pattern. It is worth noting that the base of the petal has an edging.
56:1345 56:1355

58:9

4. You need to cut out petals from the ribbon. You can fold the ribbon and cut out several petals at once. For convenience, you can fasten the tape with office clips.
59:8095. Reduce the pattern by 0.5 cm on all sides except the base.
59:930*You can make a new pattern.
59:998* You should end up with 3 rows of petals, which means you need to prepare 3 patterns of different sizes.
59:1184 59:1194

61:9

6. Once you have cut out 3 groups of 6 petals, begin to carefully burn the edge of each petal. There is no need to scorch the bottom edge.
62:751 62:761
Flowers made from prefabricated petals
The essence of this technique is simple - cut out the petals and combine them into a flower.
Types of petals
- Petals with scorched edges (the edges are scorched on fire, or by heating a special tool)
- Petals with curled edges (the edges of the workpiece are curled and fixed with glue or thread)
- Petals made from ribbon, with a non-fraying edge (for example, leather braid, does not need edge processing)

Types of petal assembly
- By gluing (the most popular type of assembly, using a glue gun, less commonly PVA glue and super glue)
- By stitching (Sometimes the petals are sewn in several places, or stitched on sewing machine)
- Circumcision with hot scissors

Master class "Peony"
Tools and materials: Red and pink ribbon, 5 cm and 2 cm wide.
Scissors, tweezers, thread and needle, candle.

Tip: You can see what a peony petal looks like on the Internet.

- Cut petals of the same shape from 5cm ribbon. 2 shades – 15 pcs.
- Cut out petals of the same shape from 2cm ribbon in 2 shades – 15 pcs.
- Gently burn the edges of the petals over the candle, allowing them to curl.
- Form a flower, starting with smaller petals, alternating shades, gradually relaxing the tension of the thread.
- Try to fix the thread several times so that the entire flower does not fall apart if you move awkwardly.
- At the finish, you can spray the flower with glitter hairspray, or glue several transparent rhinestones to imitate drops.

Flowers from a single piece of ribbon
Even a beginner can make flowers of this type. The main thing is to find a clear pattern for stitching the ribbons and fold the workpiece correctly.

Types of making flowers from a single piece of ribbon
- “Twisted flower” (this flower looks like a tea rose) Initially, you need to twist the flagellum, secure it, then bend the ribbon along the bias and fix it each time, we form a lush bud. The wider and longer the cut, the larger and fluffier the rose will be.
- “With petals” (Sew a zigzag with medium stitches along the entire length of the ribbon, tighten the thread. Attention, the thread must be thick.)
- “Vintage” (Gather the lace ribbon onto a thread along the edge and add a bead in the middle)
- “Based on” (Cut out a circle from cardboard. Fix the tape with folds to the workpiece with glue, placing each row on top of each other, then decorate)
- “Textured” (Made from wavy, textured, fluffy or other braid that can simply be loosely rolled into a tube)

Kanzashi
There are a huge number of color options in this technique. There are very simple ideas, and multi-layered work, on which craftswomen spend a lot of time. The essence of the technique, Kanzashi, is that segments (rectangles or squares) are folded in a certain way and glued together or stitched.

Master class “Buttercup”
Materials and tools: Satin ribbon 5 cm yellow, glue, tweezers, candle, rhinestone, green feathers.

- Cut 7 squares 5 by 5 cm
- Fold the square diagonally, then gather both edges of the triangle in the middle (2 folds on the top sides), now we pull the side corners back, level them and melt them over the candle, then you need to quickly connect the opened petal. (in the end we get a drop-shaped petal, in the shape of a bowl)
- We connect all the petals together with glue, decorate with a rhinestone in the middle and feathers between the petals.

Areas of application for ribbon flowers
Decor of clothes, bags, shoes
A classic dress with ribbon flower decoration will add femininity and romanticism to your look. The flower can be either huge, for example replacing sleeves, or small in the form of a brooch. And if you make a lot of flowers and decorate the hem of the dress with them, you will get a “flying”, weightless style.

Master class “Air flower”
We decorate the skirt. To do this, you will need at least 100 pieces of flowers using this technology, but the result is worth it. A bright, airy skirt that seems to leave a trail of unprecedented aroma behind it.

Materials and tools: Organza ribbon in 3 sizes (as you can find), the main thing is that the shades are “friendly” with each other. Scissors, candle, beads, monofilament.

- Cut circles into three sizes (evenness is not important)
- Burn the edges over the candle.
- Connect the petals in the middle using a needle and thread, securing them in the middle with a bead. (you can make different flowers, from three components or more)
- Attach along the hem of the skirt.

Decorations
There are a lot of options for making jewelry.
- Brooches and pendants. (such decorations are usually attached to a base, which is previously covered with fabric)
- Rings and earrings. (Miniature textile roses will appeal to all fashionistas)
- Children's jewelry. (All kinds of hoops, hairpins, and elastic bands are decorated with well-fastened flowers so that the decoration does not fall apart during the baby’s vigorous activity).
- Independent flowers and bouquets. (Experienced craftswomen make flowers of intricate shapes, or specimens that look like real ones, like two peas in a pod, which can be placed in a vase separately or formed into a bouquet. Another popular type of decor is topiary, made from ribbon flowers.)

Materials and tools for making flowers from ribbons
- Ribbons. (Ribbons can be completely different: satin, organza, velvet, double, and even leather) The shades of ribbons are just as varied.
- Soldering iron (Soldering iron not only cuts the tape, but also glues it at the same time, this is very convenient in the Kanzashi technique)
- Threads (You should pay attention to fastening the product, because if you use thin, low-quality threads, the work will fall apart)
- Glue (You must choose a transparent glue that will not be noticeable during the work, but will nevertheless firmly hold the product together)
- Scissors. (as with any other creative work, it is recommended to use professional scissors)
- Tweezers. (Safety first. Burn the edges of the petals only with tweezers.)

Ribbon flowers are a simple decoration that will leave an unforgettable impression. And making such a decoration with your own hands turned out to be quite simple. Dear ladies, craftswomen, decorate yourself and others, and the world will become a little more beautiful.
What could be more beautiful than flowers? Only unfading flowers! That is why today in this article we will look at some simple examples that may inspire you to master more complex techniques.
DIY ribbon rose

Small flowers, animals and various fabric figures always look very interesting and unusual. For many girls and women, roses are their favorite flowers. However, you can not only grow them in the garden or buy them in a store, but also make them yourself. Small roses made from braid will look cute, light and elegant, and will also serve as simple, pleasant home decorations that will create a calm, cozy atmosphere. In addition, such cute artificial flowers have another pleasant plus - this is a fairly economical option, since large expenses are not required.
To make a large rose you will need about 50 cm of zig-zag braid, also called snake and bindweed, and for a smaller flower about 45 cm, a thin needle, scissors, matches or a lighter to singe the edges of the braid, and glue, but be sure to check that so that it securely glues the tape. Another important and necessary detail is the threads, which must be the same color as the braid.

So, first, we need to fold the long braid in half.

Then, carefully weave the halves of the braid together (without cutting!). You need to do this from start to finish and try to get it smooth.


Afterwards, both ends of the resulting ribbon must be cut and carefully set on fire so that the edges of the fabric do not crumble or deteriorate.

Now we twist the resulting ribbon into a bud of the future rose and fasten it with a thread from below so that it is not visible from the other side. That's why the threads should be the same color as the braid: then the end result will look neater and more pleasant.


Well finishing touch- straighten the flower petals, slightly bending the very first ones.

That's all: simple, but beautiful rose, made with your own hands, is ready.

Satin ribbon flower
We present a step-by-step instruction-master class for making a flower from a satin ribbon yourself.
To begin with, take a ribbon of any color about 4 cm wide in your hands, and then cut off 5 pieces about 7.5 cm long and 5 pieces 9 cm long from it, while not forgetting to lightly singe the edges.

Now we fold one of the small pieces of tape in half, aligning the edges, and sew small neat stitches along the cuts, leaving a small distance of 2-3 mm. It is advisable to match the thread to the color of the ribbon.

Pull the stitched piece as tightly as possible.


Similarly, we assemble into a five-leaf clover and segments larger size. Now we glue the resulting flowers together, and as the center we sew or glue a beautiful button or bead - whatever you like best.

Sew a small circle of felt on the wrong side. You can also use a circle made of cardboard or plastic bottle, having previously covered it with fabric in color.

A satin ribbon flower can be used to make elastic bands, brooches, headbands and other items of fittings and accessories.

Curly braid flower
In addition to roses, you can make another flower yourself, for example, one that looks like a daisy. It can be attached to hairpins and elastic bands, and then you will get an excellent hair decoration. And, despite the fact that now the store shelves are full various accessories, jewelry is much more pleasant to wear if it is made with soul and love with your own hands.
For this wonderful flower, like for a rose, you will need zigzag braid, a thin needle (it’s even better if it is long - it’s easier to sew with it), good glue or a glue gun, and most importantly, threads that match the color of the braid. Perhaps the last requirement should be memorized, since it is necessary for any needlework, be it sewing a dress or making a small decoration.

Let's start the work by making a circle from the braid of the required length, and carefully sew the ends together with a single-color thread.

Now we work with the inside of the ribbon circle. You need to sew the “hills” of braid (it resembles a wave, so it kind of “hills”) loosely with wide stitches so that you can later, when we return to the beginning, pull them together. 


You will get a kind of round “accordion”.

This “accordion” will need to be glued to the hairpin.

To do this, you will need to first attach a piece of paper to the flat end of the hairpin, and then apply glue to it. In this case, the flower will stick more firmly and will hold on much better.


All that remains is to add a small “core” of the flower on top. This could be a custom-sized button or matching light rhinestones.

Flowers made from ribbons for a hairpin
Hairpins with flowers add tenderness and romance to your look. Such jewelry will be appropriate for both a baby and an adult lady.
Little flowers
You can decorate hairpins and elastic bands, headbands and brooches yourself by making cute small flowers from multi-colored pieces of narrow satin ribbons. Any girl will love such a stylish and original accessory, and, meanwhile, the manufacturing process will not take much time and effort.

In addition to the satin ribbon itself, 5-10 mm wide, you will also need a flower template, a needle and thread in the color of the ribbon, transparent strong glue (for example, moment-gel), the hairpin or elastic band itself that you want to decorate with flowers, any accessories for jewelry, lighter or matches and scissors.
The template will be useful to us for creating a flower. We advise you to cut it out of cardboard or any plastic packaging in the shape of a random polygon. However, take into account the diameter and number of corners, make sure that the purchased ribbon is enough for decoration.
Now you can start the main work on the bow. We pull one end of our ribbon through the hole cut in the center of the template, and begin to braid each corner so that each time the ribbon passes through the center. If you pass the ribbon in a circle in 2-3 layers, the flower will turn out to be very unique and multi-layered. To avoid confusion in the order in which the tape passes through the corners, they can be pre-numbered.

Be sure to make sure that the tip of the tape does not slip into the hole in the template and does not move arbitrarily to the sides. To do this, hold the ribbon while you wrap it around the corner, and then use a needle and thread to make a few stitches at the base. Then, without breaking the thread, carefully remove the flower from the pattern and trim the rest of the ribbon, lightly singeing the ends with fire.

Now it is advisable to add rhinestones, buttons or beads to the center of the resulting decoration - both for beauty and to hide the stitches holding the ribbon together. Don't forget to straighten the petals themselves! The decoration can be of a specific tone or multi-colored, by combining and sewing several bows together. This flower can be glued to any elastic band or hairpin, gift packaging- in a word, wherever you want.

Dahlias made from hair ribbons
It’s no secret that all the girls absolutely love to do a variety of hairstyles for themselves and decorate the resulting “masterpieces” in every possible way. And on the beautiful, shiny and silky hair any length stylish accessory- whether it’s a hairpin with a flower or a headband decorated with beads and rhinestones, it will look incredibly beautiful. And who said that decoration for your braids can only be bought in specialized stores? Make them yourself based on own desires and preferences!

Of course, stores are always filled with shiny and attractive accessories of all kinds that perfectly complement the look, but homemade jewelry will be much more pleasant for you to wear. And if you use your imagination, it will look much more original and certainly unique. A flower can be made from anything - use leftover organza, mesh or satin ribbon, tulle - whatever you have on hand!
IN in this case, you will need a ribbon 2-3 cm wide, scissors, glue (hot glue is also possible), a lighter, matches or a candle to singe the edges, buttons, beads or rhinestones - whatever you want, and a base for decoration - such as a hairpin or an elastic band. Now have a little patience.
Cut the ribbon into several pieces of 5 cm each. There should be at least fifty of them, and the more magnificent you want the flower, the more pieces you will need. Don't forget to cut the top edges into a tapered shape, giving them the appearance of petals. The edges and bottom of the petal must be scorched with fire, but not too strong, so as not to spoil the ribbon.

Wrap the remaining piece of tape around a small circle of cardboard or plastic - this will be the base. Then carefully glue the petals one by one, squeezing them at the base, positioning them from the edge to the middle. The diameter of the flower will depend on the width of the circle you choose.

The core can be decorated with any fittings that you like. At the final stage, attach the resulting dahlia to a hairpin or headband using glue.
So you have a wonderful hair accessory that will decorate any hairstyle and give your image an original touch.
DIY carnation flower
Carnations are a favorite among florists due to their unique sweet scent. The carnation flower has also been and remains one of the most favorite decorations for girls and women of any age. It is quite possible to make such an accessory yourself with just a little diligence and imagination. A flower made from a silk ribbon folded on the bias can easily be given a “live” and natural look using a wide straight stitch. No one argues that a bouquet of live carnations looks wonderful, but what prevents a boutonniere made of ribbons from becoming no less beautiful and stylish decoration for hats, handbags, jackets and hairpins?
As an example, a carnation can be made using a silk ribbon of a light cream shade, 2-3 cm wide and half a meter to a meter long - depending on the intended splendor of the future flower.

First, let's give the edges of the carnation the proper textured look. Gently fluff one of the edges of the ribbon with your fingers or a needle, and on the other side, pass a straight line, stepping back from the edge of the ribbon about 2 mm. Tighten the tape, but not all the way, but so that you get an “accordion” 2-3 cm wide and secure with a knot.
Now we twist the gathered piece of tape inwards like a “snail”. We tighten the base of the assembly tightly with thread and secure it. We straighten the upper edge of the resulting bud, giving it the shape of a carnation with our fingers.
Try dipping the finished flower (only the very edge) into fabric paint or a natural dye such as tea leaves, red wine or onion skins - you will get an uneven color effect typical of garden carnations. Greater waviness and mobility can be given to the petals if the ribbon for the product is cut on the bias.
The next step is to plant the bud on the stem. To do this you will need thick wire - painted or covered with braid or corrugated paper(we place a strip of fabric or paper overlapping in a spiral). The stem is inserted into the stretched base and additionally fixed with a drop of glue. The length of the stem depends on the end goal - longer for a bouquet, shorter for a small boutonniere or threading into a buttonhole.
Perhaps the first flower will take you quite a lot of time, but once you get the hang of it and get the hang of it, you will create exclusive designer jewelry that will attract attention and cause admiration.