
The pre-holiday days are always accompanied by active preparation of gifts for loved ones. The packaging in which the gift is located is also of great importance. Sometimes it is difficult to choose the right packaging among the variety. With a little effort, you can make a paper handbag that will be useful in any situation.
First of all, you need to decide on the size and type of bag. This could be a special gift bag, an original clutch for a gift to a girl, or a small children's handbag for packing a small surprise. When a suitable variety has been selected, we proceed to preparation.
Materials and tools:
- paper (you can use colored paper);
- pencil;
- ruler;
- scissors;
- glue;
- gouache, napkins with ornaments, rhinestone stickers for decoration (other materials are also suitable).
After preparing the necessary material, we proceed to work.
Gift bag
A gift packed in a special bag or bag always leaves more pleasant memories. Especially if the packaging is made by yourself.

To work, you can use the following template. The contours indicate where the bag folds.

Attention! The dimensions of the package can be slightly increased by adding a few centimeters.
Transfer the template to the selected paper. We mark the corners with a pencil, make contours for the bend and slots for the handles. Carefully cut according to the marked marks.
Advice. Instead of holes for handles, you can make a small strap from satin ribbon. In this case, we do not draw holes.
We bend the paper where the contour passes. Special attention pay attention to the marked corners. Using a glue gun, glue the bottom of the package, then the sides. The base of the handbag is completed.
Handles and decor
Cut off for the strap satin ribbon required length. It can be short or long so that the bag can be hung on the shoulder. Glue the ribbon on the inside of the accessory.
The gift bag is ready.
For additional decoration, you can use many options: clippings with bright colors, rhinestones, sequins. For example, a handbag can be covered with gift foil or shiny paper. In the bottom corner place a bouquet cut out of paper or a sticker on New Year theme. Decorate the handle areas or strap with rhinestones.
Making a clutch
Every girl's wardrobe is sure to have several small clutch bags that are easy to choose for any situation and ensemble. A clutch made of paper will serve as an original addition.
You can use a ready-made template as a basis.

We fold the larger part in half along the contour. We fold the side parts like an accordion, adhering to the contour. Then glue the side pieces to the inside of the pocket.
We bend the upper part along the contour and glue it. It should cover both halves of the clutch.
The small bag is ready. In the center of the top with wrong side You can make an additional clasp, decorate the clutch itself with rhinestones and a chain.
How to make a baby handbag
Girls with early age they love beautiful, original things, including accessories. As a gift for a young princess, you can make a small handbag out of paper. It can be used as an addition to a gift. And later store small toys or hair decorations in it.

A ready-made template will serve as a basis.

We transfer the template to cardboard, mark the location of the handles and the contours for folding. Carefully cut out the workpiece. We bend the cardboard at the folds several times to make the gluing process easier.
Let's move on to attaching the parts. We form a stable bottom and walls of the accessory. Being careful, we gradually glue each component. When working, you can use a glue gun or a glue stick.
The final stage is decorating the handbag. For children's version The products are suitable for stickers with your favorite cartoon or fairy tale characters, flowers or animals.
Important! Instead of stickers, they also use cutouts from magazines, which are attached with glue.
Tips for making paper bags
- A hand-made postcard can serve as an addition to a paper gift bag.. It can be attached to a small ribbon and tied to the handle of the bag.
- Be careful when working. Choose scissors with a rounded end and stable rings. This will help avoid possible occurrence injuries
- Fabric textures are suitable for decorating a clutch. For example, a product made from tulle will be particularly original. To do this, the material is glued to the workpiece, and after that the bag can be assembled. The fabric should be distributed more freely so that it does not tear during assembly. A few small folds will look great in the corner area.
- When decorating with shiny paper, it is recommended to first paste over the handbag patterns, and then start assembling. It will be more difficult to unnoticeably glue the corners and folds on the assembled product.
- To decorate children's handbags, use felt animal blanks. For example, ladybug, which children love so much, will be an excellent option.
- Choose paper with a thick texture. An ordinary album sheet will quickly tear and will not please the owner of the original accessory.
- Many needlewomen carefully fold the sides into an accordion when decorating. This makes the product more original. To do this, draw identical lines on the finished parts. vertical stripes and bend along the contour to get an accordion.
A gift helps to express your sympathy and show the most tender feelings towards another person. Handmade surprises are always distinguished by special warmth and care. Using several simple templates and guided by the descriptions, you can make a small handbag for a gift. Such packaging will be especially distinguished by its uniqueness and originality in design, and will also help to please a loved one.
A real needlewoman can make anything. If we consider paper crafts, then the list of all useful things can start with postcards and end with... bags? Is it worth spending time creating such not-so-durable items? Let's look at how to make a paper bag and for what purposes. Information is provided in the form of instructions with photos and diagrams.
Bag. Its purpose depends on the situation
Perhaps there are times when you need to pack something. Moreover, these things are not so voluminous and heavy. First of all, this applies to gifts. How, for example, would you present a box of chocolates? IN plastic bag? This option for a gift is not entirely suitable, is it? What to do if your present is made by yourself? Surely the birthday boy will be pleased to receive a completely homemade creation, including the wrapping bag. Another common situation when you have to think about packaging is an upcoming gift of money. A wonderful homemade envelope will be much more appropriate than a standard white postal envelope. So, how to make a paper bag without worrying too much about its durability? After all, sometimes there is a more important condition - appearance and originality. Let's consider two options, each of which is distinguished by creativity and unusual manufacturing.
What material is better to use?

In the first case, the finished craft turns out to be quite voluminous. Therefore, we can predict that what will be inside will not be a small thing at all. Even if you are packing a plump scarf, you should choose a material of medium density, but not, for example, thin foil or corrugated paper. To make a bag with handles, use thick Whatman paper or other material of appropriate strength. In the second case, the option of using rustling and tearing bases also disappears, since, according to the technology, separately located handles are provided. In addition, it is desirable that the folds on the product, which will be formed thanks to the art of origami, be clearly visible. Stock up on paper and get to work.
How to make a paper bag according to a drawing?
The workpiece presented in the photo in this article clearly demonstrates that cutting requires a whole segment, resembling a square in size and shape. Looking at the drawing, you can easily make your own using a simple pencil and ruler. Draw lines strictly following the directions and curves. Then, to check how symmetrically a paper bag will be made in the future with your own hands, you need to fold the workpiece in four. If all contours match, the pattern is constructed correctly. To somehow strengthen it before cutting out the base for work, you can glue the canvas with fabric. When folding, align the slots and overlap them, and insert improvised handles into the resulting gaps. The small bag is ready!

How to make a paper bag in the shape of an envelope with a mini handle?
Want to quickly make a small wallet? The art of origami will come to the rescue. A paper bag will look most neat when using colored, dense material. Sides of the sheet that differ in color are welcome. After all, when folded at the end of the instructions, a contrasting shade will give the craft a special chic and uniqueness. You can also decorate a homemade handbag with other elements. self made. Small crocheted flowers or an openwork ribbon along the edge will look very stylish on top of the product. Do you want to especially surprise with new ideas? Then try your hand at making creative crafts in scrapbooking style. After all, many seemingly incompatible small things, skillfully arranged in a thoughtful combination, can create a very stylish composition with a chic effect.

Job Description
A paper bag is folded very simply and at the same time unusually. The diagram clearly shows the entire work process. Let's consider all the stages:
- Prepare a square piece of paper. Fold it diagonally and place it horizontally with the fold down.
- Place the upper corner over the canvas, dividing it horizontally into two equal parts.
- Fold two corners from the sides.
- Bring back the previously applied upper corner.
- Fold the workpiece in half vertically.
- Using small scissors, cut along the dotted lines along the two diagonal edges of the top triangle, leaving 2-2.5 cm from the edge.
- Wrap the released two triangles onto the canvas of the bag, thereby securing its somewhat unstable shape. You can use glue to secure the structure.
The two proposed methods will certainly become a lifesaver in cases where you need to present a small gift in a homemade bag. Especially if they are made with love and care. After all, giving gifts is just as pleasant as receiving them, isn’t it?
Hello!
Today, every supermarket or gift shop offers gift bags of the most different forms and models. They are very cute and irreplaceable when you need somewhere to put a small gift or some surprise.
But, as you know, the best is what is made with your own hands, and why not do it with your own hands? gift bag, which will be part of the gift. We will describe in detail the process of how an origami handbag is created, which can be made different sizes and flowers.
So, necessary materials to make a paper bag:
- a sheet of colored paper, preferably as thick as possible;
- hole punch;
- decorative ropes.
As in any case with origami crafts, the list is limited to the minimum number of available materials. Choose your favorite color and let's go!
Step one: fold the sheet from corner to corner to form a triangle. Then we open it and do the same with the other two corners. The sheet should be folded with the white side inward.
Step two: at the intersection of the bending lines we can now see the middle of the sheet, to which we add any two opposite corners of our square blank:

Smooth it well to get a clear crease line. Then we unfold the curved wings and see these resulting lines. They serve as a guide for us to bend larger triangular wings:

We do the same on the second side.
Step three: We turn the folded corners back and, without turning the sheet over, bend it in half diagonally. Here we form the future base of our handbag, bending a narrow strip of the lower part of the resulting triangle:

It should be noted that it is the width of the strip that determines the area of the future bottom of the bag.
Step four: We bend the corners of the base of our triangular blank one after another as shown in the photograph:

Now we unbend everything that was bent, we should get the following traces of folds:

Step five: We completely unfold our sheet, the wrinkles of which serve as template marks for us, and turn it with the white side up.
We see the following picture:

In the photograph, a finger indicates the point of intersection of zigzag and straight lines. A similar “crossroads” is formed on the other side of the workpiece. These points serve as the place with which the vertices of the folded triangles (left and right) should coincide:

Step six: We grab the workpiece by its middle and make a fold like this, bending it upward:

Then we also turn the lower part up and get the following:

Step seven: lift the right and then the left corner up along the vertical fold, as indicated in the photograph:

Then top part We bend the resulting envelope down. Carefully form the bend line. This creates a horizontal fold like this:

Step eight: unfold the paper, leaving only two small corners folded:

The blue stripe marks the fold line, which will serve as a guide for the following manipulation:

We do the same with the right side, and cover the resulting bends with a triangular “valve” like this:

Paper bag as a DIY craft for kids or gift bag
We offer you to make elegant handbags with your own hands from cardboard, foil, velvet paper with three-dimensional flowers from colored paper, colored velvet, foil. Such elegant handbags can be made in no more than thirty minutes.
Paper bags for girls can also be made as children's crafts in kindergarten, both as a bag or gift bag for a gift, and as an independent gift. At the same time, the child will learn the basics of construction.


How to make a paper bag
To make such elegant handbags you will need: cardboard different colors or colored paper, velvet paper, foil, scissors, stapler.


For a handbag with a yellow flower you will need 1 sheet of green cardboard, 1 sheet of yellow velvet paper. Cut the green cardboard in half lengthwise. We twist one half into a cylinder and fasten it with a stapler.


We make the cylinder flat and make internal folds on both sides with a total width of about 2 cm on each side.


Using our green cardstock blank, cut out a rectangle of yellow velvet paper long enough to cover the front, back and bottom.


On the back of the yellow velvet paper we draw a flower. Fold the paper in half and cut out the flower only in the upper part, the lower part of the flower remains untouched and merged with the bottom.


Unfold the paper. Cut out circles for the center of the flower - from foil, white paper or paper of a different color (optional). Let's try a piece of yellow velvet paper on our flattened cylinder of green cardboard.


We attach the center to the flower and at the same time to the inside of the bag made of green cardboard (our flattened cylinder) on one side of the bag and on the other. The handbag is ready. We cut out a strap for a handbag from green cardboard - a strip the length of a sheet of cardboard and a width equal to the width of the inner side fold of the handbag - 2 cm.


We fasten the strap to the sides of the handbag using a stapler.


The handbag is ready. You can put a gift for a holiday or birthday in such an elegant handbag.
Handbag with butterfly
For this we used red foil, dark blue, pink, red and brown velvet paper. Instead of the listed paper, both colored cardboard and colored paper are suitable.
The inside of the handbag is made of red foil, similar to the handbag with a yellow flower. A butterfly-shaped piece is cut out of blue velvet paper, with a red folded cylinder inside. We attach pink and red ovals to the butterfly using a stapler as shown in the photo.


The body of a butterfly with antennae is cut out of brown velvet paper. We fasten this part with a stapler at the bottom. Then we place the red foil piece inside the butterfly and staple the butterfly at the top to the inside.


We cut out a handle for a purse from red velvet and attach it to the purse using a stapler. The handbag is ready.


Handbag with voluminous flower
For this we used cardboard with a metallic tint (gray cardboard would also work), a sheet of pink velvet paper, a sheet of silver and pink foil paper, and some plain white paper. To make the inside of the bag, cut a sheet of cardboard lengthwise in the middle and first twist it into a cylinder and secure it with a stapler. Then we flatten it. We outline the lines of the side folds. Width -1 cm. The total width of one side fold is 2 cm.


Fold the folds inward.


From pink velvet paper, cut out a rectangle measuring twice the height of the cylinder plus a bottom width of about 2 cm.


On the back of the velvet paper we draw a flower on one of the parts. Fold the paper in half to the bottom level and cut out a flower at the top.


To decorate the handbag, cut out two circles with a diameter of 12 cm from pink foil, two circles with a diameter of 10 cm from silver foil, and 4 circles with a diameter of 2 cm from white paper. The circles from white paper are the center of the flower. For the middle, you can also cut out 2 circles from pink velvet paper (as shown in the photo).


We cut the cut out circles into narrow strips, not reaching the middle by 1-1.5 cm. Then we put a silver circle on the pink circle, and two white paper circles on the silver circle (or one pink one if desired). We attach our folded flower to the pink part and the inside of the gray cardboard bag at the same time using a stapler.


We take scissors or a flat stick and curl the petals of our flower. The white center can simply be “ruffled” towards the middle. We do the same on the other side of the bag.
We cut out a strap for our handbag from gray cardboard. We fasten the strap with a stapler to the side parts of the handbag.


Handbag with metallic paper trim
We make the inside of orange cardboard in the same way as other handbags. From metallized paper yellow or use foil to cut out the part as in the photo. The narrow part is equal to the width of the bottom of the handbag.


We collect the upper part on each side into folds and secure it with a stapler. We attach the finishing part made of metallized paper to the inside of the bag using a stapler.


We fold a bow from a thin strip of metallized red paper or foil and secure it with a stapler. Attach the bow to the purse.


Brown handbag with double flower
We cut out six strips of pink velvet paper, 2 cm wide and 10-12 cm long. Cut each strip into thin strips 0.2 mm wide, 1-1.5 cm short of the edge. Curl the strips using scissors or with your hands. We fold them into a flower and fasten them with a stapler.


We cut out six strips from orange velvet that are 1.5-2 cm shorter than the pink ones and do the same with them as with the pink stripes.


We connect the orange flower with the pink one. We make the inside of the handbag from orange cardboard in the same way as a handbag with a yellow flower. Cut from metallized paper brown the top of the bag.


We wrap the inside with metallized paper and secure it with a stapler. We attach the flower to the handbag. Cut out a circle with a diameter of 1 cm from pink velvet paper and glue it to the flower.


The handle for the purse can be made from velvet orange paper and attached using a stapler. You can make an elegant handle for a handbag by weaving a braid from thick wool threads or threads folded in several rows of different colors. In our case, the braid is woven from woolen threads in brown, orange and pink colors. You can put a gift in such an elegant handbag.
 Paper handbag
Blue paper handbag with white flower
The inside of the bag is made of blue cardboard. The upper part of the bag is made of blue foil or metallized paper blue. Cuts about 1 cm long were made along the side edges of the upper part. We fasten the upper part to the inner part, “ruffling” the edges. For the flower, you need to cut strips 0.6 mm wide and the length of an A4 sheet. We bend each strip in half. Then we pull the edges of the strip towards the middle and step 1 cm beyond the middle to secure it. We apply this stripe by stripe (in the photo there is a flower of 9 stripes) and fasten it in the middle with a stapler.


From blue paper we cut out three circles with a diameter of 2 cm for the center of the flower and make cuts along the edges without reaching the middle. We fasten the center to the flower with a stapler and gather the edges of the center towards the center.


We attach a flower to the top of the bag. We cut out a strap for a handbag from blue paper - three layers 3 cm wide. We fold three layers one on top of the other and make cuts along the entire length without reaching the center.


We attach the strap to the sides of the handbag. Lightly rub the sides of the strap together.

Handbag with metallic paper lace
The inside of the bag is made of red cardboard. The upper part of the bag is made of silver cardboard. From red metallized paper or foil, cut out two strips 5 cm wide and a length equal to the length of the upper front and back of the handbag plus the bottom. We fold two strips in several layers and cut them out similarly to New Year's paper snowflakes. We lay out the strips and attach them to the top of the bag on the sides.
Hello. The holidays are coming soon - Valentine's Day, and then March 8th. Have you already figured out what to give as a gift or a small bouquet? I think you'll like the idea of putting a gift in your purse. Topic of the day: DIY paper handbag templates.
Attention! This handbag is not just good thing for gift wrapping, and a great toy in 5 minutes for a little girl. If you are bored at home and you don’t know what to do with your child, then make a handbag and your daughter will come up with a hundred games with it and will be happy and grateful to her mother’s idea! And girls love to change bags so often that if this one suddenly breaks, you can immediately make another one: a different color, with a pattern, with an applique.
I’ll start with master classes for which templates are not needed, and then I’ll show several templates for printing on a printer.
Master class handbag-heart.
Love and heart are inseparable concepts. Love lives in the heart, and it is the repository of the soul. Therefore, it is customary to say about lovers that they have found their soul mate. On Valentine's Day, it is customary to give valentines - small cards with wishes in the shape of hearts. You can deviate a little from the rule and make your Valentine in the form of a handbag. The process of making such a handbag will not take much time, if you follow our master class. 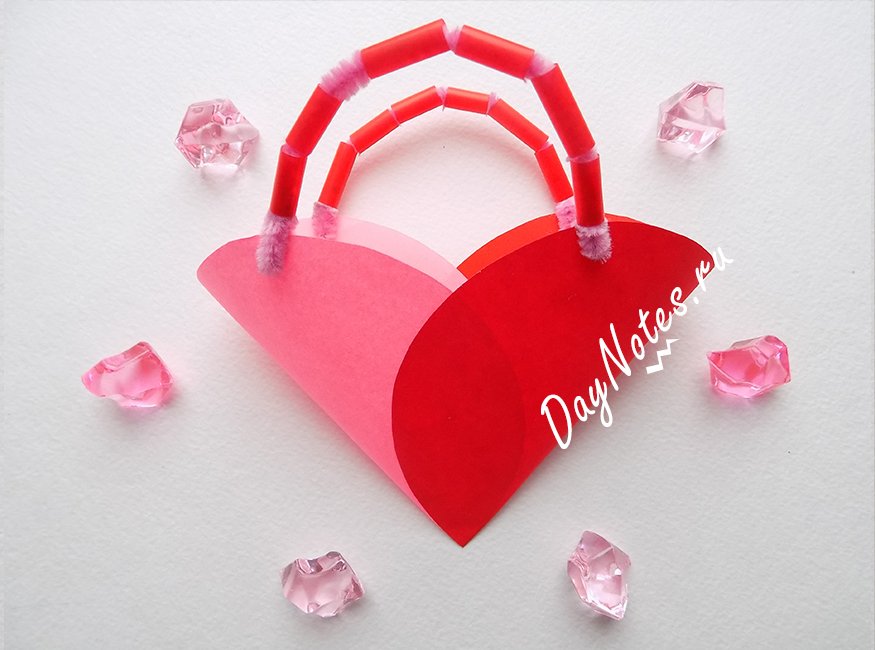
To create a heart-bag we will prepare:
- pink and red paper;
- scissors;
- compass;
- glue;
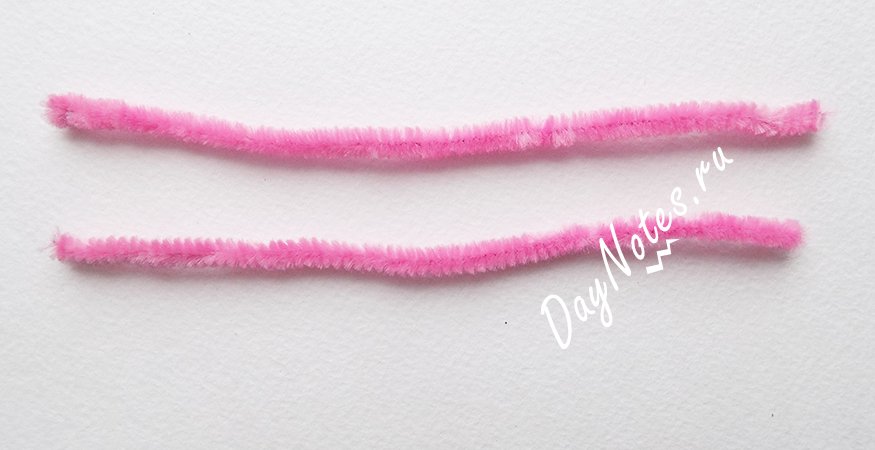
- pink chenille wire;
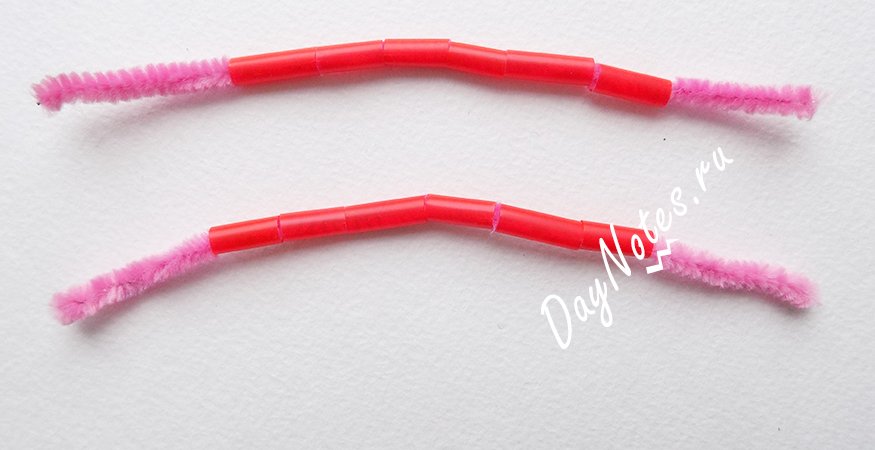
- 2 red cocktail straws.
- Let's prepare materials

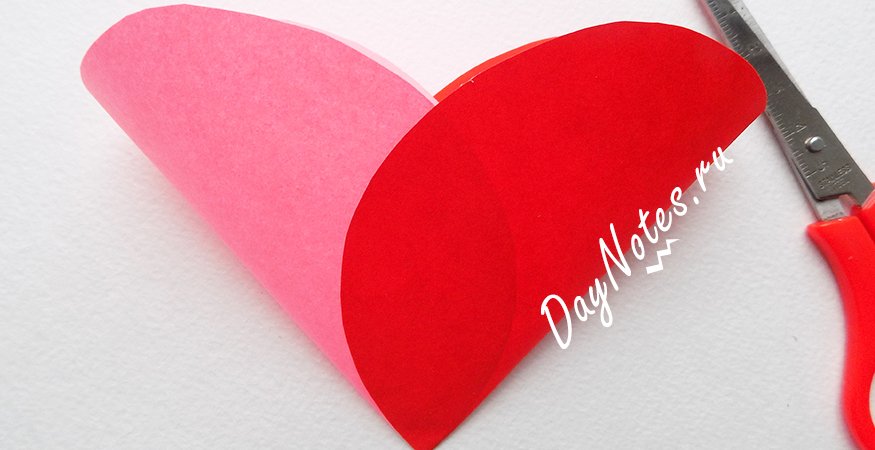
- Our craft will be based on 2 circles. Therefore, to begin with, using a compass, we draw 2 circles of the same size on red and pink paper. After this, carefully cut them out with scissors.
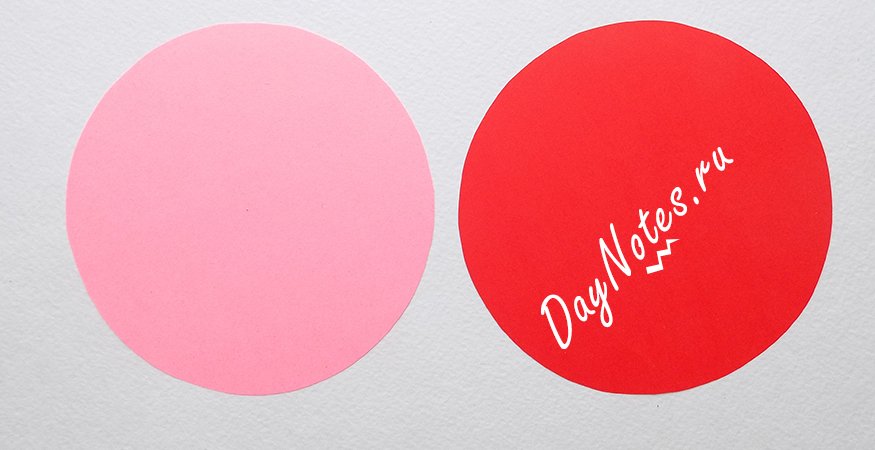
- Now you need to mark the middle of each circle, but this must be done only from the edge.
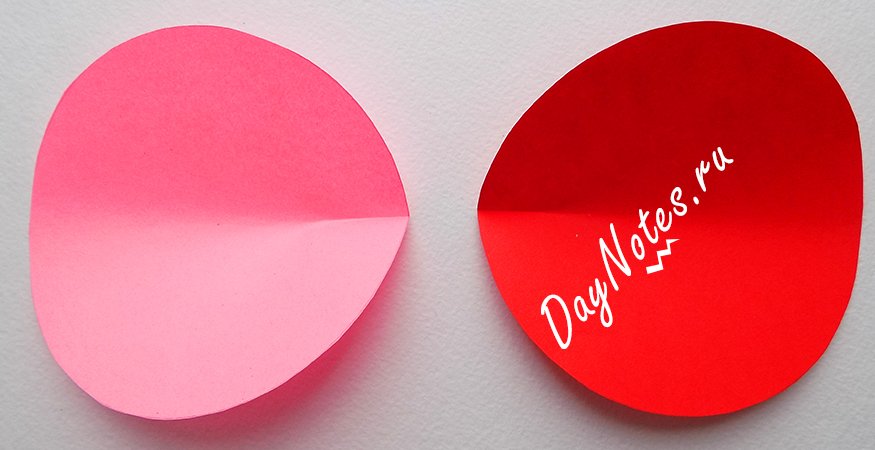
- Two circles (pink and red) need to be aligned with each other at an angle, and then glued.
- Using scissors, we round the sides of the future handbag so that it looks more like a heart.
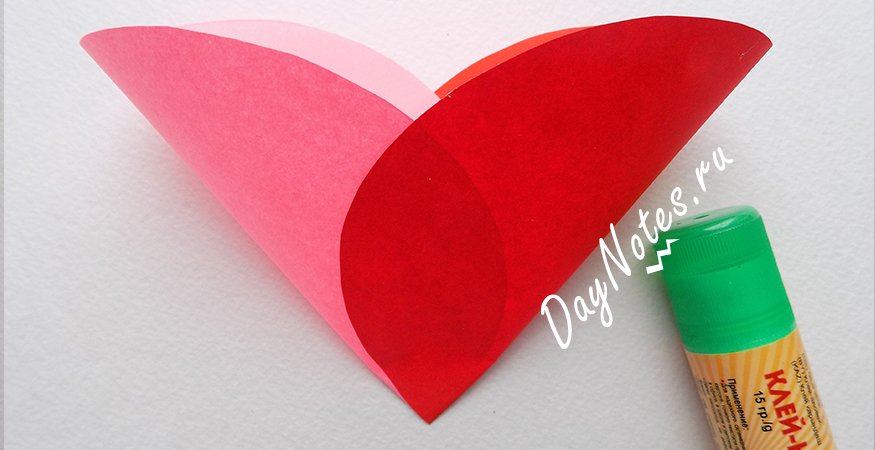
- Now let's make holes for the handles of our handbag.

- We will make handles from pink chenille wire. First, let's cut it in half.
- Cut the cocktail tubes into small pieces (about 1.5 cm long).
- Let's put these pieces of tube on the chenille wire.
- All that remains is to attach the finished handles to the bag. To do this, we thread the ends of the tubes into pre-made holes, and carefully bend the ends of the wire on the reverse side. We secure the second handle in a similar way. Our heart-shaped handbag is ready.
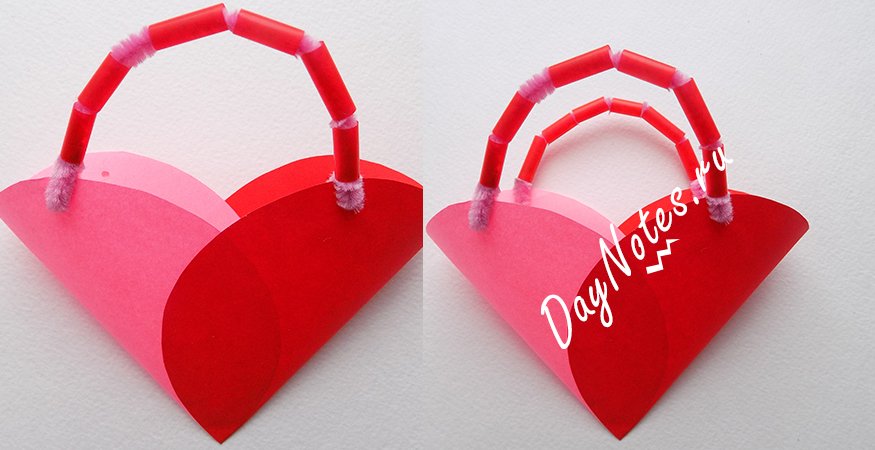
You can put your wishes and a sweet surprise in it.
Basket-shaped handbag: step-by-step photos
This craft is easy to make, but to do this you will need to stock up on measuring instruments. During the work you will need to strictly follow the dimensions given in this master class. You can make a paper basket in any color, and our step-by-step photographs will help you with your work.

You will need to prepare:
- pink paper;
- small pieces of green and yellow;
- glue stick;
- scissors;
- ruler;
- pencil.
- For the basket itself, we need to draw a rectangle with dimensions of 18x15 cm. We do this on pink paper.

- Now, along the long side of the rectangle, divide the figure into 3 equal parts of 6 cm each.

- According to the width of the rectangle, you need to divide the figure into 3 equal parts of 5 cm each.

- We will make markings in the corner rectangles and divide them into strips 2 cm wide.

- In the upper and lower parts we will draw triangles, their vertices should be located at the edges. The shaded areas will need to be cut out later.

- Take scissors and make slits along the marked lines.

- We bend the resulting corners upward.

- Now let's start assembling the basket. To do this, glue the bottom side strip on one side to the triangle.

- We fix another strip symmetrically to it.

- Then we take the strips located above and also glue them to the side triangle.

- Using the same principle, we fix the topmost strips of the basket.

- We repeat the same steps on the other side.

- For the handle of the basket, cut a strip 1.5 cm wide and 20 cm long.

- Let's glue it to the basket.

- Cut out small circles. To draw them, you can use the cap of a glue stick. Glue on the green circles.

- Cut out a couple of small flowers from yellow paper.

- Glue them onto the green circles.

- Our paper basket is ready.

Printable paper handbag templates
As promised, I made a selection of interesting and at the same time simple paper handbag templates. You can simply print them on paper, you can immediately print them on a beautiful designer paper. Or you can simply open the picture on the entire monitor screen, zoom in, attach the paper and circle it directly on the monitor screen. It's very convenient, fast and doesn't require a printer.


