![]()
![]()
It is quite possible that summer will come someday in the middle zone. This means that it still makes sense to supply bread kvass. It will take at least a week to prepare a good starter, and as forecasters promise, by that time the air temperature should rise above 20 C (daytime).
How to prepare sourdough for
homemade bread kvass
Ingredients:
- 2 liters of cold water;
- 0.5 loaves of Borodino bread or 100 grams of rye flour + 100 grams of rye bread;
- 4 tablespoons granulated sugar;
- 3 grams of yeast.
- Preparation time - 5-6 days
How to put kvass:
And insist again for a couple of days.
Drain again, add the remaining crackers (or flour with crackers) and sugar. And fill it with fresh water again.
During this time, the sourdough will lose its insolent yeasty taste and unpleasant bitterness and it will be possible to use it for drinking kvass. To do this, once every 1.5-2 days, you will need to add water, sugar to taste and a large handful of fresh rye crackers to a three-liter jar with the prepared starter, first removing some of the old ones that have become soggy and sank to the bottom. For taste you can add raisins, mint, ginger, honey...
If you pick up an object such as knitting needles, you can knit with your own hands a whole collection of all kinds of patterns, which are then used to create wardrobe items - both for yourself and for loved ones. It is worth knowing that the story goes back centuries. The name of the first person who figured out how to knit fishing nets remains unknown, and the identity of the comrade who was the first to notice that using the same loops you can make clothes for yourself has also sunk into eternity. Unfortunately, the name of this genius was lost, otherwise a well-deserved monument would have been erected to him long ago.
But people very quickly picked up such a wonderful idea. There are a lot of drawings, so anyone can easily choose the one they like best. Having chosen a pattern for knitting, the craftswoman, using only one pattern, but using different threads, can make completely different products. For example, a scarf, and other similar items. However, despite the relative ease of this type of hobby compared to crocheting, needlewomen say that if a person picks up knitting needles for the first time, and has never been able to do this before, has never done this, then he first needs to learn how to properly knit patterns for beginners.
It should be understood that it is too complex pattern You don’t need to start knitting, but start with the simplest ornament.
In addition, there are some drawings that may be included in a group. Let's list these groups in alphabetical order. Among them there are the following types of patterns: openwork, jacquard, Irish, multicolor, patent, relief, fine knitting patterns, patterns with braids, patterns with ornaments.
As the name suggests, these patterns are simple. In order for a beginner to be able to easily knit simple patterns with knitting needles, he needs to master everything, that is, knitting, as well as purling. After all, all other loops are tied from data. Next, you need to understand that basically, all knitting patterns use a combination of stocking stitch and garter stitch.
Stocking stitch is also called stockinette stitch and sometimes stockinette stitch. And some fashion magazines talk about it as jersey. So if you come across a similar designation, you will know what it is, and you will not suffer, not knowing how to knit patterns of this kind.
To create a pattern, alternate rows of purl and knit stitches. If, then all loops are made according to the pattern. In this case, garter stitch should only be knitted with one type of loop. When a person knits a shawl pattern with his own hands, he makes either knit or purl stitches. The craftswoman can choose the type of loop that she does best. When turning the product over, the loops are knitted in reverse, that is, in even rows there will be knit stitches, and in odd rows, on the contrary, purl stitches.
To master the process, try knitting the patterns yourself, the photos below will help you.
Garter stitch - diagram in photo
There are things that can be made and worn during the warmer months or on vacation. How nice it is to walk along the beach in a hand-knitted pareo! Let others suffer from envy, wondering where you got such an exclusive item. What about a scarf or a blouse?

Openwork pattern with knitting needles - example
For airy openwork patterns you will need thin yarn. And in the drawing yarn overs will be used. This will result in a fabric very similar to lace, which allows you to create a very beautiful thing. For greater clarity, we will try to produce a pattern called “Sea Foam”. This is where the DIY knitting instructions will help us.

Openwork pattern scheme
- Next we do the following: we knit the first row with knit stitches.
- In the second row, all loops will be purl.
- 3 consists of knit stitches that have 3 turns. To create them, you need to insert a knitting needle (right) into the loop, wind turns (3 pieces) around it, and then pull them out through this loop.
- Next we knit using rapport: first one purl, then 5 knits knitted together. And our last loop will also be purl.
- The fifth row repeats the first, and the sixth is similar to the second.
- Row 7 repeats 3.
- In the 8th row we will have 3 loops created from 3 knit stitches, and then rapport: 1 knit, purl, then 5 knit stitches together.
- We knit the end of 3 front loops and 1 purl.
So that you can learn how to knit patterns, we suggest that you follow the patterns below, which you can knit yourself.
Craftswomen who have been involved in this type of hobby for a long time advise first making a small sample, not just once, but several times. When you make it yourself, you will be able to implement any idea in knitting patterns.
In order to knit relief patterns, knit stitches are used, as well as purl loops, and they go in a certain alternation. And for drawing, areas on the canvas are used - both convex and concave.
At the same time, you should know that ironing things is strictly not recommended, otherwise the relief may well lose its shape.
When a person creates such patterns when knitting, he must carefully look at the pattern, otherwise he may completely ruin the pattern.
Our first pattern will be called pearl. With its help you can knit a cardigan, a children's item, or a sweater for a man. It knits quite easily.

Relief pattern
The pattern is divided into two types. Large, sometimes called rice or putanka. Well, the second one is small, it differs in that it is easier to knit than the first one. To independently create such a pattern step by step, we first make a front loop, then a purl one, when we turn the fabric over, then we make a purl one over the loop that was the front one, and vice versa. The rice pattern is made in the same way, but it will gradually shift. Therefore, when you knit a rice pattern, pay attention to the pattern.
Rice pearl pattern
To create a rice pearl pattern, we will take a thread, make a knit stitch, then a purl stitch. In row No. 2, the loops change places, purl first, and then knit. The third line is the same again: where the purl is, there is the front one, and where the front is the purl.

Rice pattern diagram
Honeycomb pattern
This pattern really resembles a honeycomb filled with honey created by bees. The product is embossed, delicate, voluminous, and beautiful. Craftswomen are advised to first knit a sample, wash it, measure the density of the fabric, and then create this pattern. This is necessary because it has been repeatedly noted that the fabric can stretch.
To make a honeycomb pattern, we need loops, and their number must be divisible by two. The pattern is quite simple, so even people who have first understood how to knit patterns will be able to knit such delicious honeycombs themselves:
- In the first row we make a knit stitch first, then a purl stitch.
- In the second row we make a purl, one loop with a crochet, we must slip one loop without knitting it.
- In the 3rd row, make a knit stitch, wrap it behind the fabric, remove the yarn over without knitting, and purl it. Next, our master class will help you.
- 4th row - knit a purl loop, remove the yarn over without knitting, then again 1 purl loop.
- In the 5th row we will need to make decreases. To do this, we knit two loops together, knitting them together, and only then purling them.
- In the 6th row we will make one loop with a crochet, remove the untied one, purl one.
- In the seventh row there are two front loops, the thread is wound behind the fabric, the cap loop is taken over.
- In the eighth row we put the thread before knitting, then remove the yarn over, then we need to purl two loops.
- Row 9 - purl 1 first, then knit two stitches together.
- Row 10 - repeat the pattern, starting from row 2.
Star pattern
Asterisks - beautiful pattern in knitting, with which you can create a sweater, hat.
First we need to cast on loops, and their number should be divisible by 4, to this we need to add 2 loops, which will be edge loops.
- In the first row, all stitches will be purl.
- In the second there will first be one knit stitch,
- Now let's do the asterisk. To do this, we knit three loops as a crossed knit stitch, but then we do not remove the loop, but make a yarn over, and from it we make a crossed knit stitch.
- The third row and all subsequent odd rows will be knitted using purl stitches.
- In the fourth row we make 3 knits, then an asterisk, and ending with three knits
- Next, we repeat our knitting, starting from row number 1.
It is worth understanding that the fabric can tighten, so the star is made a little looser than the other loops.
To make such a beautiful pattern yourself, really similar to women's braids, we take, in addition to two knitting needles, one more, which will be auxiliary, but it is slightly curved in the middle. This is done so that the loops do not fall off during knitting. If you don’t have such a knitting needle and you can’t buy it, take a stocking needle.
There are many options for braid patterns, and you can use these patterns not only for women’s and children’s clothes, but also for knitting a sweater for your beloved man.
In order to do knitted braid knitting needles, let's take the classic pattern. In this case, we will need the number of loops that should be divisible by 11, do not forget to add 4 loops, 2 for symmetry, 2 edge loops.

Knitted braids
For the drawing we look at our diagram:
- In the first row we make two purl loops, then 9 whole loops. We repeat, at the end of the row there will be two loops that need to be knitted as purls.
- In the even rows at the beginning there will be two knit stitches, then a report - 9 knit stitches, and then two purl stitches.
- In the third row we do the same as in the first.
- In the fifth row we start making our cute braid. To do this, we knit a report: 2. i.p., take an auxiliary knitting needle, remove three loops on it, then 3 knit loops, after which we knit the loops from the auxiliary knitting needle with knit stitches. We also finish 3 facial loops.
- We do row 7, and then 9, exactly the same as row 1.
- In the 11th row we will need to make a report: two purl loops, then 3 knit stitches, then we throw 3 loops onto the auxiliary needle, then 3 knit stitches, then 3 loops from the auxiliary needle, at the end and the last two purl loops.
Knob pattern
Such an interesting pattern will decorate almost any of your products - blouses, jackets, sweaters, hats, blankets or tablecloths. You can use the cones, so to speak, alone, or in combination with some suitable patterns. It's actually not as difficult as it might seem, and there are several ways to knit it.
For a person to understand how to knit cone patterns, consider the following methods and step-by-step recommendations:
- First, there is a knot. To create such an element, we take a loop, we need to knit as many as five from it, we must throw them onto a knitting needle, and knit a new one together for 5 weeks.
- Next is a bump made of three loops. For this pattern, you need to create 3 pieces from one loop. Moreover, if the loop is knit, then the next three are also knit. And if it is purl, then 3 will be purl. We turn our fabric over, and we must knit all the new loops purlwise. Again we knit the beginning with knit stitches, and then with purl loops. Next, the loops are tied together with the front one loop.
- The next bump is made of 5 loops. It is made in exactly the same way as from three. But 5 loops are used. To understand this process, watch the pine cone knitting videos below.
If you look closely at this pattern, it will remind you of delicious and boiled corn. Moreover, it is a type of cones. And to knit it you need removed loops. It is often used when knitting some kind of outerwear, for example, a coat, cardigan or something else.
To make the pattern, we count the loops, the number of which should be a multiple of three, adding 5 pieces.
- Row No. 1 - we will have facial loops (3 pcs.). Then we make a rapport: we remove one loop, grab the knitting needles on the left, and then on the right, and three loops will follow.
- In the second row there will be 3 knit stitches again, then repeat again: place the thread in front of the work, remove the loop, place the thread behind the fabric, knit 3 knit stitches.
- In the third row there is 1 knit stitch, and then rapport: remove the loop for work, the next 3 loops will be knit stitches. The very last loop is removed, and the last ones are knitted.
- Next, knit 1 loop, then repeat: the thread is placed in front of the fabric, the loop is removed, the thread is back behind the fabric, three knit loops. The penultimate loop is removed, with the thread in front of the fabric, return it, and knit the last knit stitch.
- Repeats for the fifth time, starting from 1.
There is another way to knit corn, the pattern of which is quite simple. In the first row we will do the following: knit 1, purl 1, repeat. The second row is the front stitch. 3 is repeated from the first.

It should be understood that jacquard and multi-color patterns are actually the same, but for jacquard only stockinette stitch is used. And for multi-colored ones, any knitting you like. There are multi-color patterns that are easier to knit than jacquard patterns. And if you apply new color, then the elements turn out to be very advantageous and bright. Watch the video for details.
At the beginning of time, jacquard patterns were connected using only two colors. But now you can use completely different shades for it. Jacquard looks like a beautiful tapestry. Moreover, the Irish pattern is also a jacquard. Stocking stitch is used for it. That is, where the facial loops are - this is the facial row. And, vice versa - where the purl row is, purl loops. With this position of the loops, the design looks very bright, and no additional decorations take your eye off it.
Thin threads are used for jacquard, but now thicker ones can be used for knitting warm things. There is only one difficulty - on wrong side The threads are straightened, which should not be pulled or not reached. You should look at the diagram carefully. Try making a pattern that can be used to decorate a scarf, hat, mittens or even a sweater. We knit a jacquard, adhering to the pattern, while looking at the color of the thread.

Jacquard knitting pattern
Such interesting patterns are most often used for small children, but you can also knit something beautiful for adults, because if you use ornamental patterns, it is very similar to embroidery. The ornament looks beautiful, but for the patterns they take some kind of folk art or you can even take a pattern designed for embroidery.

Pattern Schemes
The basis of patterns - ornaments is stockinet. To knit such a pattern, a thread of two colors is most often used. One makes the main canvas, and the second is the drawing. If a person masters this technique, may later include more colors in his drawing.
How does a patent pattern differ from other types of patterns? Everything is very simple, if you look at the front canvas, turn it over, look at the backside, you will not find any difference. These products are characterized by the fact that they are very elastic.
To give an example, we will take a pearl elastic band. You can knit something using a patent pattern using the diagrams below.

What does knitted item irresistible? Of course, the patterns with the help of which it acquired its appearance. today they number in the hundreds, and thanks to the ability of knitters around the world to exchange new developments with the help of modern technologies, their number is increasing. Depending on its function in the product, it can perform a decorative function, simply serve as a background, or carry a functional load, for example, making the canvas fit tightly around the figure. In our article you will find samples of knitting patterns with knitting patterns used for various needs and different types products. They are all cute and don't require any special knitting skills.
The golden rule when knitting patterns
It is important to remember that, having decided to knit this or that item and selected samples of patterns and knitting patterns on the knitting needles that will be contained in the product, you must then knit a small fragment according to the existing patterns. This golden rule knitter, who, however, is neglected by many. But in vain, since you can determine the exact dimensions of your future product only by first knitting your own knitting patterns - each master knits on knitting needles in his own individual manner, with his own knitting density and size of loops. This is not to mention the features of the yarn.
Therefore, if you do not want your product to end up one size larger or smaller than planned, knit a test sample. By the way, you can also practice knitting a pattern on it. So, we present our samples and knitting patterns below.
Herringbone pattern
We’ll start looking at knitting patterns with the “Herringbone” option. He is very original. The pattern has a dense texture, so it can be used for knitting many warm things: pullovers, sweaters, hats, etc.
Knitting the pattern is absolutely not difficult, and you can cast on an arbitrary number of loops. And, in fact, the whole process comes down to one algorithm: the knitting needle is inserted into two loops at once. A loop is drawn through them. Knit - for odd rows, and purl - for even rows. Then one of the loops knitted in this way (the right one) is transferred to the right knitting needle. The left loop remains on the left one in order to subsequently repeat these actions with it and the next loop. We knit the last unpaired loop in the row itself, according to the current side - front or back.
"Chain mail" pattern
Samples on knitting needles are presented in this article with the “Chainmail” pattern. It is completely simple, but requires freedom for the working thread so that gaps can form in the “chain mail”.

The repeat of the pattern in height is four rows. In the usual way cast on any odd number of stitches on the knitting needles.
- Row 1. All stitches are knitted behind the front wall.
- Row 2. Knit stitch classic, behind the front wall. A loop removed unknitted, thread behind the fabric. We alternate them until the end of the row.
- Row 3. All stitches are knitted behind the front wall.
- Row 4. The loop is removed undone, the thread behind the fabric. The front loop is classic, behind the front wall. We alternate them until the end of the row.
| - | * | - | * | - |
| * | * | * | * | * |
| * | - | * | - | * |
| * | * | * | * | * |
"*" - front loop;
"-" - a loop removed unknitted.
Pattern "Canadian gum"
The elastic band that contains the knitting patterns with the patterns in our article is called Canadian, it looks very impressive and is knitted very simply. To do this, a multiple of three loops and two edge loops are cast on the knitting needles.
- Row 1. Alternate one knit stitch with two purl stitches until the end of the row.
- Row 2. Alternate two knit stitches with one purl stitch until the end of the row.
- Row 3. Knit. Then a front loop from the inter-loop broach, two purl loops. In this way we knit until the very end of the row.
- Row 4. Knit two stitches. Then follow two loops, knitted together one purl. In this way we knit until the end of the row.
We repeat the pattern from the third row.

Pattern “Rug” or “Fur”
The next pattern included in these knitting samples with patterns is called “Fur”. It is also sometimes called “Carpet”. But this applies fluffy pattern maybe not only when knitting carpets. They can be used to successfully decorate almost any product or, for example, use it as the main pattern of a scarf or snood.
We cast on an arbitrary number of loops.
- Row 1. All stitches are knit.
- Row 2. We alternate the knit stitch with the “rug” loop, which is knitted like this. The thread is inserted into the loop as for the front one (grandmother's method). We place the working thread on the right knitting needle. We wrap the working thread around the finger and the knitting needle, and then knit it all with a knit stitch.
- Row 3. All stitches are knit. After knitting the “rug” loop, pull its nap so that it is well secured.
- Row 4. Work a simple knit stitch over the rug stitch. And above the usual front one there is a “mat” loop.
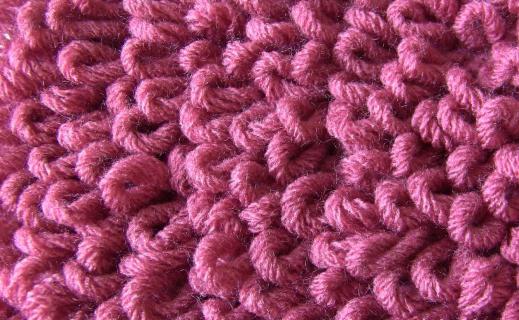
"Boucle"
The next pattern included in our knitting patterns with patterns is called “Boucle” (or “Large Pearl”). It is very simple - to knit it, all you need is the skill of creating knit and purl stitches. Despite the simplicity of execution, the pattern is extremely effective.

Knitting involves repeating two loops in width, three rows in height. It happens as follows:
- Row 1: alternate knit stitch with purl stitch.
- Row 2 (as well as all even ones): we knit “according to the pattern pattern” - a knit stitch is knitted over the front loop, and a purl stitch is knitted over the purl loop, respectively.
- Row 3: alternate purl and knit stitches.
"Honeycomb"
It is worth adding the “Honeycomb” pattern to the knitting patterns with patterns for beginners.

Its loose texture makes it ideal for knitting scarves, sweaters and other items that require a soft fabric. Therefore, if you are planning to knit a scarf or snood, try the honeycomb pattern for it. It fits like this:
- Row 1. To the end of the row, we alternate a knit stitch and one unknitted one with a yarn over made before it.
- Row 2. Knit two stitches together, then yarn over and slip one stitch without knitting it. We repeat this sequence until edge loop row.
- Row 3. Knit a knit stitch, then remove one unknitted one, then another knit stitch. So until the end of the row.
- Row 4. Yarn over, then remove the loop, and then knit two loops together. All this is repeated until the end of the row.
- Row 5. Knit two stitches, then slip one without knitting.
Starting from the sixth row, we knit rows from the second to the fifth in the cycle.
"Buffs"
Our knitting patterns with knitting patterns complete with the relief pattern “Puffs” (aka “Bumps”).

This pattern can be used when knitting hats, or used to decorate a scarf or sweater. However, its use is not limited to such things - your imagination will suggest many options for using the puff pattern. The rapport is twelve rows. For the sample, you need to cast on a multiple of four loops, add three loops for symmetry and, of course, two edge loops.
- Row 1-4. Stocking stitch: we knit all the front loops in odd rows, and purl in even rows.
- Row 5. Knit two knit stitches. Then we repeat the following sequence cyclically: we open the loop 4 rows down, and then we knit it with the front one, we knit three front loops.
- Row 7-10. Stocking stitch: all knit stitches in odd rows, and purl stitches in even rows;
- Row 11. Unravel the loop 4 rows down and knit it, and knit the next three loops with knit stitches until the end of the row. Knit the remaining two stitches.
- Row 12. Purl all stitches.
| * | * | *stocking stitch - knit stitch on front side and purl - on the wrong side; "↓" - a loop lowered into four rows and knitted. ConclusionOf course, only a small fraction of the available knitting options are made up of the above knitting patterns. We tried to make the patterns, descriptions and comments on them as accessible as possible for those who do not have much experience in knitting. So don’t be afraid, get to work, and everything will work out for you! |
If you want to understand the science of knitting, then first of all you should get acquainted with the main types of loops, learn to recognize and knit them. After you have mastered the basics of knitting, you can start making patterns. For beginners learning knitting needles, it is best to take light patterns.
The opinion that simple knitting patterns are boring is wrong; there are a lot of beautiful patterns among them. We will introduce you to the most popular ones in this article; for clarity and ease of learning, we will provide a knitting diagram for each of them.
Unopened simple knitting patterns for beginners
Among the easiest drawings are the following:
"Checkers"
They are small and large. For children it is better to take the first, and for adults the second. Performed according to the following schemes:
small checkers
large checkers
The following conventions are used for these schemes:

Only odd rows are indicated on them, and even rows should be knitted purlwise.
"Lightning"
We read this diagram using the following notation:

“Pearl”, “rice” or “putanka”
Actually, the “pearl” pattern is not so embossed, the protrusions are small, while the “rice” is more convex, it is also called “large pearl” or double.
"Diamonds"
The diagram uses the same symbols as for the “Checkers” pattern.
“Diamonds” will look great on golf or a sweater. It can be knitted in combination with any other simple knitting pattern or even the usual stockinette or garter stitch.
All these patterns are recommended to be used for making warm winter clothes: sweaters, jackets with long sleeve, hats, mittens and scarves. This is due to the fact that for knitting them, knit and purl loops are used, but in different combinations.
Openwork simple knitting patterns with diagrams
Having mastered several openwork patterns, you can begin to openwork ones. To perform them, it is not enough to know knit and purl stitches; you should also become familiar with how to yarn over, draw through, and knit two or three loops simultaneously while bending.
"Simple openwork"
In the knitting pattern, only odd rows are indicated, since all even (purl) rows are made with purl loops.
If it is very small for you, then by adding a few loops you can get a larger pattern.
"Leaves in the Wind"
The diagram shows how to knit odd rows, and even rows should be done according to the pattern, only the yarn overs should be knitted purlwise. The result will be a drawing like this:

"Spikelets"
The broaching indicated in the diagram is performed as follows: remove 1 loop, knit the next one and pull it through the removed loop. In this pattern, as in “Leaves in the Wind,” there are only odd rows in the pattern, so here, too, we knit all the even rows according to the pattern, and purl the yarn overs. The result is a canvas like this:

"Lacy diamonds"
To get the pattern you need to knit 14 rows in height. Odd rows should be knitted according to the pattern, and even rows should be knitted like this: the 2nd, 4th and 6th - completely purl, and the 8th, 10th, 12th and 14th - according to the pattern, and the yarn overs - purl .
Due to the presence of holes in the fabric, such patterns are recommended for use for items intended to be worn indoors or in the warm season. These can be sleeveless blouses, sundresses, dresses, light hats and scarves.
It is recommended to initially knit the pattern on the sample, casting on 16-20 loops; when you have worked it out, you can start knitting the whole product with it. Knitting patterns for beginners are best complicated gradually. Move on to a new one only after you have learned how to knit the first one well (without mistakes).
03.08.2014
Relief patterns with knitting needles are an alternation in knitting of front and back loops, while the fabric turns out to be three-dimensional due to the combination of convex and concave sections, and also quite dense (without gaps). Therefore, such patterns are especially expressive. There are a great variety of relief patterns, they differ in small or large repeat. These patterns are ideal for plain cotton, cotton rayon, silk and linen blends. If the yarn is thick, then the pattern looks especially prominent, and if it is thin, then the result will be an exquisite, noble structure. Relief patterns are quite easy to knit, so they are recommended for beginner knitters, because... help them gain skill and experience. Confident knitters also do not ignore embossed patterns, because they are convenient for combining with openwork and give it a special elegance. To charm relief patterns has not disappeared, you should not iron or steam them, just moisten them and let them dry flat.
We present to your attention large collection simple relief patterns of knit and purl stitches for knitting with visual samples, diagrams, descriptions and symbols. Choose and create with pleasure!
Abbreviations:
n. - loop;
persons - facial;
purl - purl;
chrome - edge;
cross. - crossed.
Attention! In the diagrams, the back rows are shown as they look from the front side.
※ Pattern 100 “Marmalade” (for 10 loops and 20 rows)

※ Pattern 99 "Relief columns" (for 18 loops and 24 rows)

※ Pattern 98 "Cells" (for 6 loops and 20 rows)

※ Pattern 97 “Mermaid’s Cover” (for 8 loops and 16 rows)

※ Pattern 96 “Moon swing” (for 16 loops and 14 rows)

※ Pattern 95 “Soufflé” (for 10 loops and 12 rows)

※ Pattern 94 “Parquet” (for 5 loops and 8 rows)

※ Pattern 93 “Caterpillars” (12 loops and 12 rows)

※ Pattern 92 “Geometric Waltz” (18 stitches and 36 rows)

※ Pattern 91 “Stars” (for 8 loops and 16 rows)

※ Pattern 90 “Birds” (for 14 loops and 12 rows)

※ Pattern 89 “Expression” (for 10 loops and 8 rows)

※ Pattern 88 “Twigs” (for 24 loops and 20 rows)

※ Pattern 87 “Pyramids” (18 stitches and 36 rows)

※ Pattern 86 “Abracadabra” (for 10 loops and 10 rows)

※ Pattern 85 "Relief arches" (for 10 loops and 16 rows)

※ Pattern 84 “Domes” (for 10 loops and 16 rows) reverse side of the "Frogs" pattern

※ Pattern 83 “Frogs” (for 10 loops and 16 rows) reverse side of the "Dome" pattern

※ Pattern 82 “Labyrinth” (for 18 loops and 20 rows)

※ Pattern 81 “Pastila” (for 14 loops and 18 rows)

※ Pattern 80 “Structural relief” (for 14 loops and 16 rows)

※ Pattern 79 “Relief composition” (for 8 loops and 24 rows)

※ Pattern 78 “Traces” (for 13 loops and 24 rows)

※ Pattern 77 "Turkish delight" (for 8 loops and 20 rows)

※ Pattern 76 “Lukum” (for 8 loops and 20 rows)

※ Pattern 75 “Combine” (for 8 loops and 20 rows)

※ Pattern 74 “Crawfish” (for 8 loops and 18 rows)

※ Pattern 73 “Wings” (for 15 loops and 30 rows)

※ Pattern 72 “Bows” (for 10 loops and 18 rows)

※ Pattern 71 “Moths” (for 32 loops and 20 rows)

※ Pattern 70 “Hearts” (for 13 loops and 12 rows)

※ Pattern 69 “Hearts” (for 12 loops and 20 rows)

※ Pattern 68 “Onions” (for 8 loops and 12 rows)

※ Pattern 67 "Lace" (12 loops and 12 rows)

※ Pattern 66 “Pyramid laying” (24 loops and 18 rows)

※ Pattern 65 “Beautiful relief” (for 6 loops and 12 rows)

※ Pattern 64 "Carousel" (for 8 loops and 48 rows)

※ Pattern 63 “Polyanka” (for 8 loops and 48 rows)

※ Pattern 62 “Honeycomb” (for 16 loops and 16 rows)

※ Pattern 61 “Original relief” (for 24 loops and 28 rows)

※ Pattern 60 "Dotted Zigzag" (for 8 loops and 16 rows)

※ Pattern 59 “Fantasy” (for 12 loops and 24 rows)

※ Pattern 58 “Amber Coast” (for 8 loops and 34 rows)

※ Pattern 57 “Coral bracelet” (for 12 loops and 40 rows)

※ Pattern 56 “Bugs” (for 10 loops and 36 rows)

※ Pattern 55 “Sheaves” (for 18 loops and 28 rows)

※ Pattern 54 "Chevrons" (for 14 loops and 32 rows)

※ Pattern 53 “Curly lattice” (for 8 loops and 12 rows)

※ Pattern 52 "Pendants" (for 8 loops and 8 rows)

※ Pattern 51 “Sports” (4 stitches and 28 rows)

※ Pattern 50 “Dates” (for 6 loops and 16 rows)

※ Pattern 49 “Expressive relief” (for 6 loops and 24 rows)

※ Pattern 48 “Chess of rectangles” (for 8 loops and 24 rows)

※ Pattern 47 "Relief columns" (for 6 loops and 20 rows)

※ Pattern 46 “Almond” (for 12 loops and 14 rows)

※ Pattern 45 “Cactus” (for 10 loops and 16 rows)

※ Pattern 44 “Petals” (for 6 loops and 12 rows)

※ Pattern 43 “Leaf Fall” (for 9 loops and 24 rows)

※ Pattern 42 “Flags” (for 18 loops and 12 rows)

※ Pattern 41 “Beads” (for 5 loops and 8 rows)

※ Pattern 40 “Hedge” (for 5 loops and 6 rows)

※ Pattern 39 “Chain” (6 loops and 8 rows)

※ Pattern 38 “Relief combination” (for 6 loops and 10 rows)

※ Pattern 37 “Checks” (for 4 loops and 8 rows)

1 row: facial loops;
2nd row: purl loops;
3rd row
4 row
5 row: facial loops;
6 row: purl loops;
7 row
8 row: * remove 1 p. (thread before work); 3 purl*
Repeat from rows 1 to 8.
※ Pattern 36 "Rows with removed loops" (for 4 loops and 8 rows)

1 row: * 3 persons; remove 1 p. (thread at work)*;
2nd row: * remove 1 p. (thread before work); 3 purl*;
3rd row: * 3 persons; remove 1 p. (thread at work)*;
4 row: facial loops;
5 row: * 1 person; remove 1 p. (thread taken care of); 2 persons*;
6 row: * 2 p.; Remove 1 p. (thread before work); 1 purl*;
7 row: * 1 person; remove 1 p. (thread at work); 2 persons*;
8 row: facial loops.
Repeat from rows 1 to 8.
※ Pattern 35 "Boucle" (for 6 loops and 4 rows)

1 row: * 3 persons; 1 purl; remove 1 p. (thread at work); 1 purl*;
2nd row: * 1 person; Remove 1 p. (thread before work); 1 person; 3 purl*;
3rd row: * 1 purl; remove 1 p. (thread at work); 1 purl; 3 persons*;
4 row: * 3 p.; 1 person; Remove 1 p. (thread before work); 1 person*
Repeat from 1st to 4th row.
※ Pattern 34 "Relief checks" (for 3 loops and 4 rows)

1 row: * remove 1 p. (thread at work); 2 persons*;
2nd row: * 2 p.; Remove 1 p. (thread before work)*;
3rd row: * 1 person; Remove 2 stitches (thread before work)*;
4 row: purl loops.
Repeat from 1st to 4th row.
※ Pattern 33 “Waffles” (for 3 loops and 4 rows)

1 row: facial loops;
2nd row: purl loops;
3rd row: * 2 persons; remove 1 p. (thread at work)*;
4 row: * remove 1 p. (thread before work); 2 persons*;
Repeat from 1st to 4th row.
※ Pattern 32 “Drap” (2 loops and 4 rows)

1 row: * 1 person; remove 1 p. (thread at work)*;
2nd row: * remove 1 p. (thread before work); 1 person*;
3rd row: facial loops;
4 row: purl loops.
Repeat from 1st to 4th row.
※ Pattern 31 “Scales” (for 2 loops and 4 rows)

1 row: facial loops;
2nd row: purl loops;
3rd row: * 1 purl; Remove 1 p. (thread before work)*;
4 row: * remove 1 p. (thread at work); 1 person*
Repeat from 1st to 4th row.
※ Pattern 30 "Chain mail" (for 2 loops and 4 rows)

1 row: * 1 purl; Remove 1 p. (thread before work)*
2nd row: purl loops;
3rd row: * remove 1 p. (thread before work); 1 purl*;
4 row: purl loops.
Repeat from 1st to 4th row.
※ Pattern 29 "Relief texture" (for 4 loops and 8 rows)

※ Pattern 28 “Large reed” (for 3 loops and 4 rows)

※ Pattern 27 “Small reed” (for 2 loops and 4 rows)

※ Pattern 26 “Corners” (for 6 loops and 8 rows)

※ Pattern 25 “Teeths” (for 6 loops and 6 rows)

※ Pattern 24 “Lentils” (for 4 loops and 4 rows)

※ Pattern 23 “Raisins” (for 6 loops and 4 rows)

※ Pattern 22 “Mosaic” (for 8 loops and 8 rows)

※ Pattern 21 “Rose hip” (for 4 loops and 8 rows)

※ Pattern 20 "Moss" (for 2 loops and 4 rows)

※ Pattern 19 “Putanka” or “Large pearls” (for 2 loops and 4 rows)

Knit alternately 1 persons. and purl 1, shifting the pattern after every 2nd row by 1 stitch:
1 row
2nd row: 1 chrome; knit loops according to the pattern (knit stitches - knit stitches, purl stitches - purl stitches); 1 chrome
3rd row
4 row: 1 chrome; knit loops according to the pattern; 1 chrome
Repeat from 1st to 4th row.
※ Pattern 18 “Corn” (for 2 loops and 2 rows)

※ Pattern 17 “Rice” or “Pearl” (for 2 loops and 2 rows)

Knit alternately 1 persons. and purl 1, shifting the pattern in each row by 1 stitch:
1 row: 1 chrome; * 1 person; 1 purl; repeat from * to the end of the row; 1 chrome
2nd row: 1 chrome; * 1 purl; 1 person; repeat from * to the end of the row; 1 chrome
Repeat from 1st to 2nd row.
※ Pattern 16 “Shell” (for 8 loops and 4 rows)

※ Pattern 15 “Algae” (for 4 loops and 8 rows) reverse side of the "Rain" pattern

※ Pattern 14 “Rain” (for 4 loops and 8 rows) reverse side of the "Algae" pattern

※ Pattern 13 “Rime” (for 2 loops and 8 rows)

※ Pattern 12 "Tweed" (for 4 loops and 4 rows)

※ Pattern 11 “Cross stitches” (for 8 loops and 6 rows)

※ Pattern 10 “Toes” (for 6 loops and 8 rows)

※ Pattern 9 "Flakes" (for 8 loops and 8 rows)

※ Pattern 8 “Grains” (for 4 loops and 4 rows)

※ Pattern 7 “Seeds” (for 6 loops and 4 rows)

※ Pattern 6 “Oats” (for 6 loops and 8 rows)

※ Pattern 5 “Poppy dewdrops” (for 2 loops and 4 rows)

※ Pattern 4 "Dots" (for 4 loops and 8 rows)

※ Pattern 3 "Garter stitch" (any number of stitches and 2 rows)

※ Pattern 2 “Purl stitch” (any number of loops and 2 rows)

※ Pattern 1 "Knit stitch" (any number of loops and 2 rows)

All rights reserved. Copying material for publication on other sites is prohibited!


