This card with a heart is very simple and can be made in just a few minutes. And it looks beautiful and original when opened volumetric heart moves forward.
Materials you will need:
- Double-sided colored cardboard;
- Simple pencil;
- Scissors;
- Glue stick;
- Moving eyes. Or homemade from white and black paper.
Postcard with a heart step by step
Making a frame
Prepare two rectangular pieces of cardboard of different colors, one of which is 1-1.5 cm larger and will serve as a cover. Fold the paper in half.

Place the smaller piece folded in half, which we will later place in the middle, with the fold facing you.
In the area of this fold, approximately in the center, draw two parallel lines with a pencil. The width between them is 1.1.5 cm, but it all depends on the size of the postcard. In general, such cards are incredibly attractive in mini versions. This is a pocket version of a surprise.

Cut the drawn lines with scissors.
Fold the resulting double strip up. With this action we outline the correct future fold.

Open the card and redirect the strip to the inside.

Glue the resulting frame to the cover, precisely connecting their folds.

In the center of the postcard you will get a stand like this, on which you can glue everything that your imagination suggests. But in at the moment No special imagination is needed, since we will be gluing a heart, and a very funny one, with moving eyes and arms.
Making a heart
Draw and cut out simple handles, either individually or as a whole, as in the photo. Also cut out a smile from paper; if desired, you can draw it with a felt-tip pen. And, of course, the most important thing is the cardboard heart itself. It can be drawn, redrawn or printed according to a template. Children can easily make a heart as shown in the review.

Glue the handles on the back of the heart and the eyes and smile on the front.

Now glue this funny character to the stand on the inner cardboard.

That's it, the card with a heart is ready. Despite the lengthy description, making it is much faster and easier. See also another master class, but this option is more complicated.
A universal selection of gift ideas for any occasion and occasion. Surprise your friends and loved ones! ;)
Friends, hello everyone! Today I wanted some romance, a beautiful manifestation of feelings. What better way to do this than hearts? That is why I will tell you how to make a heart with your own hands.
Hearts are generally my favorite theme - I often give them to family and friends. They are so versatile that they are suitable for literally any holiday, from the classic (February 14) to the exotic (Halloween, for example). If it weren’t for the time limit, I would have churned out hundreds of these wonderful things and overwhelmed everyone I knew))
The variety today will be terrible - from unusual paper ideas to mind-blowing fantasies made of wire. For every taste and color, so to speak.
How to make a heart with your own hands: amazing... simple
I have prepared as many as three dozen ideas for you, so there will be clearly plenty to choose from.
Heart made of balloons
You can make an amazing heart with your own hands if you prepare two long balls (from which you can also twist different animals), thick threads, scissors and silicate glue (you can try experimenting with other glues, the main thing is that they are transparent).
The process is simple: inflate the balloons as in the photo and wrap them with threads soaked in glue. You can apply several layers to make the structure more weighty. After the glue has dried, the balls need to burst and be removed from the finished frame. The tubes then need to be glued together, slightly cutting one. All that remains is to hang it up.

Paper heart
Gentleman
This is a two-in-one craft: you can make a designer box or leave it as a valentine. Probably, this can even be called an almost three-dimensional postcard due to the presence of an intermediate box between the two halves of the hearts.
You will need cardboard or thick paper, scissors, glue, satin ribbon and decorative elements. Cut out all the parts according to the photo and connect. If you want to make a box, then make this one too (numbers 6-7). Glue everything together.

Envelope
Very simple idea. A heart shape is cut out of paper, the side and then the bottom edges are folded. The corner becomes the closing element. If you loosely fasten the edges, you can write wishes on the heart itself in advance and only then fold it.

Heartbreak
To implement this decorative idea, you will need several dozen hearts, make a cut in the center of each of them and glue them together. Such a composition can be placed not only on the wall, but also on a panel.
Tip: you can decorate a pillow with these hearts if you make them from felt.

Little Mermaid Tail
The unusual shape of this souvenir is achieved by repeatedly folding the cut circle like an accordion. After that, you just need to fold it in half and glue it.
Geometry of love
What better way to help you create this heartfelt card? The most important thing here is not to make mistakes with the folds. Great option for Valentine's Day, by the way.

Do-it-yourself heart for your loved one
Undoubtedly, all previous options fit perfectly into this category. But I want to especially highlight a few romantic models for this occasion.
From felt
A classic, but so cute heart that can become either a separate souvenir or an element of an interesting project. For it you just need to cut out two parts and connect them with a “forward needle” seam. Before finishing, stuff the souvenir with padding polyester and sew it up until the end.
Tip: decorate a heartfelt gift with beads, sequins or buttons - then it will sparkle with new colors.

Clip
And again wire fantasies. This time the heart is intended for the ear. You just need to twist the wire so that it forms a kind of clamp consisting of two hearts.
Finally, I advise you to read articles about homemade gifts for your sister and dad - there are also ideas for homemade hearts.
This is where I end and say goodbye to you until the next article. Tell us about your impressions, share links on social media. networks and subscribe!
Sincerely, Anastasia Skoracheva
A postcard like a heart, made by yourself. Photos of finished postcards.A postcard like a heart, made by yourself. Photos of finished postcards.
Valentine cards in the shape of hearts have become almost the most popular cards that all couples in love exchange with each other on Valentine's Day. But why not present such beauty to your man or woman on any everyday day, showing all your love and warmth of feelings. Such a cute heart-shaped card, presented to your chosen one, can create a wonderful mood in a couple of moments and set you both up for a romantic wave. Making such a heart card is not at all difficult. Today, there are many options for techniques for its implementation, and there are plenty of materials from which this attribute of love can be made. If you decide to look at photographs of this kind of postcards, you will be surprised at how diverse and imaginative such postcards can be.  An easy way to create your own valentine card. In this case, it will be a large heart made of a cardboard base, onto which you glue many small hearts cut from red and burgundy colored paper. These hearts may have different size and differ from each other in their shape, so the postcard will look more original. By the way, you can decorate it like romantic dinner, and use it to create a romantic mood in your bedroom. You can make a cute felt heart, pierced with an arrow. We make the arrow from a cocktail tube. We cut out a triangle from the same material as the heart, which will serve as the arrowhead. We cut one end of the tube in half lengthwise, so that a triangle can be inserted there; it is better to glue it. At the opposite end of the tube we attach feathers. We make neat cuts in the heart and insert an arrow there.
  If it is expected that your beloved will carry your heart with him, the option with yours pasted on the postcard will be suitable. photos together. Photos need to be cut out so that only your faces nearby, possibly kissing, are visible... Due to the fact that the size of the postcard is not big photo They definitely won’t fit there entirely, but you can make a mosaic from fragments of photographs. Inside the card, of course, words of love must be written, otherwise, why give such an intimate gift.
  From two hearts made on cardboard of different colors, for example, red and yellow, and the red heart is larger in size than the yellow one, we make the following card. We glue the yellow heart onto the red one, and in the center of the composition we attach a bow made of golden ribbon, as a symbol of hearts tied forever. You can fantasize and invent new versions of such postcards endlessly. Perhaps after a while your loved one will have a whole collection of such beautiful valentines. Don't stop giving each other your love and care, and your journey together will be long and happy!
Comments
Related posts:
Handmade card for mom. Photos of greeting cards. Handmade postcard for aunt. Photos and ideas for gift cards. A postcard for your loved one that you can make with your own hands. Photos of postcards.
Hi all. Friends, today I will share with you a template of a card with hearts for Valentine’s Day, such a card with moving hearts is not difficult to repeat in my opinion detailed description with photos, I will provide a video at the end. I'm sure you'll want to repeat this idea.
Valentine's Day is coming soon, although not many people celebrate February 14, but Valentine's Day cards have already become a habit. Valentine cards are not difficult to buy in a store or at a newspaper kiosk, but it is best to make them yourself with your own hands, because such original idea like mine, you are unlikely to find it on sale.
My original and voluminous valentine is made of paper; you can give it for Mother’s Day or just for your mom. For work you will need the following materials:
- Sheets of double-sided multi-colored paper.
- Glue pencil.
- Stationery scissors.
- A regular pencil and eraser, just in case.
- Thick sheet of paper.
- Before you start, make sure you have everything in place.
For this Valentine's Day card, it is better to use a double-sided one. colored paper, preferably bright with rich colors. Now there is a huge selection, ranging from regular for 45 rubles to coated for 200 rubles. In my version, I didn’t use regular colored paper and focused on sticky notes for important notes. These leaves are bright, colored on both sides and already have adhesive tape. I decided that this paper is perfect for a postcard with hearts inside, and besides, the price for one pack of multi-colored leaves is no more than 50 rubles.
I'm getting started step by step description with photos, a video awaits you at the end.
How to make a heart card with your own hands
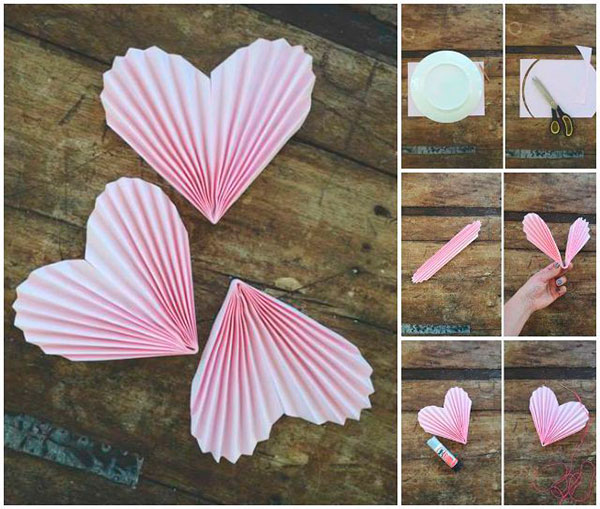
On single sheets you need to cut out a heart. Choose the color of the heart yourself; it will be best if the colors alternate in any order you like. I can offer you this template to help. Downloading the template is not difficult for those who have a printer at home, or are located nearby a place that provides similar paid services. If you don’t have a printer or similar services, use my template, display it on the monitor and trace it carefully, attaching a regular sheet of paper to the screen. Let me remind you that the size of the picture on the computer screen can be reduced. On a smartphone with a large screen, this heart will come in handy.
Then we apply the template to multi-colored sheets, trace it with a simple pencil, and cut it out with stationery scissors. You need to make at least 7 such congratulatory hearts, and if you want to decorate the front part of the Valentine’s card with the same ones, then add three more pieces. A total of 10 hearts are needed. Cut it out and put it aside. Rolling up the sheet white so that its width is equal to the width of the heart, measure with a pencil, draw a line and cut a strip.
Glue one heart to the bottom of the strip, count one centimeter from its edge and so on 6 times, look carefully at the photo. Then we take a piece of paper with the measured strips in our hands and bend each line. Glue a heart to the top of the line. I have a heart volumetric valentine already has a sticky edge, so I just apply it and press it with my fingers. You need to coat the top with glue with a pencil, then glue it.
 We do this work, then turn it over to the other side and glue a paper strip to the edge. Cut it from the remaining white sheet; the length of the strip should be equal to the width of the postcard.
 We apply glue along the edges and lean it against a pre-prepared base.Take a regular cardboard sheet of any color as a basis. I downloaded this template, printed it on photo paper, folded it in half, and ran my hand over the fold to eliminate any unevenness.
 The waterfall of hearts in our moving postcard is almost ready. All that remains is to grease the edges and attach to the card. Hearts can be replaced with circles or ovals.
We pull the edge of the ribbon with our hand, the moving hearts flutter beautifully. At the end, we write a phrase to our beloved boyfriend or girlfriend, and perhaps to our mother, place the waterfall of hearts in place, and close the card. On front side you can glue a few beads, a small flower, or decorate it with the same hearts made of colored paper. To decorate the card for February 14th, I needed three elements. I secured them diagonally.
 Friends, now I provide you with video cards with moving hearts in the form of a waterfall.
Do-it-yourself voluminous Valentine’s card – video
I think that after watching the video, all your questions should disappear and you will have a great desire to repeat the idea step by step and make a postcard for February 14th with your own hands, inside of which there will be moving hearts. Make such a valentine for your mom, boyfriend or girlfriend, surprise them an original gift. Leave comments and share the article on social networks.
I look forward to visiting you again, your Nina Kuzmenko!
If you persistently think about hearts, about love, it means that Valentine's Day is approaching. You can express your love, affection, sympathy in different ways, for example, with a handmade valentine.

First of all, cut out a heart-shaped template: fold a sheet of paper in half, draw half of the part. Cut, straighten - you get a neat, completely symmetrical heart.
Transfer the template to medium-density white cardboard.
Since this heart is a postcard, it is better to immediately write a congratulatory text on a white background. At the end of the work it will be inconvenient to do this.

For the main part of the work you will need colored paper napkins, glue (any), scissors, stapler. Napkins are sold in a wide range, but it is better to choose thin, soft, cheap ones.

Fold one napkin in half twice. Secure the middle with a stapler.

Trim the resulting square around the perimeter. You should get a circle (not necessarily an ideal shape).

Take the top layer of paper and press it to the center.

Apply the second, then the third and subsequent layers of napkin to the first layer. Leave only the bottom two or three layers that will stick to the card.

Make 10-15 such flower blanks, depending on the size of the postcard template.


The flowers are glued to the base heart tightly to each other. Straighten the crumpled core to fluff the flower.

Different ones will look beautiful color combinations elements. To do this, use napkins of different colors.

If you didn’t write a congratulation on a postcard before starting work, then at this stage it’s not very convenient to do so - the flowers will be crushed. Although here you can find a way out: write on a separate piece of paper and stick it to the valentine.

You can fold flowers not only from napkin squares folded in four. If you cut them into four parts and fasten them with a stapler, you will get blanks for even smaller flowers. They can also be used to lay out the surface of the heart, or to fill the empty spaces between large flowers.


