In fact, there are very, very many variations for hats, all of them are limited only by your imagination and needs:
- hat - cap or beanie. It came into fashion not so long ago, but has firmly taken its position. Everyone wears such hats: men, women, children, teenagers and even grandmothers.
- a cap - a beret has been fashionable to wear for decades. But if earlier berets were on a leg with a crown, it wasn’t very large size, now they wear voluminous berets.
- hats with ears on the top, imitating a cat or any other animal.
- hats with ear flaps, for small children.
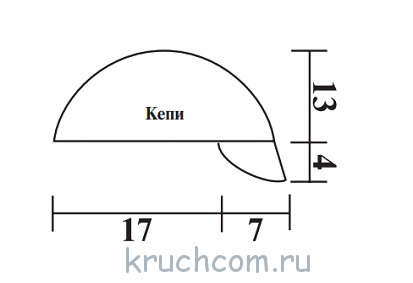
- cap that fits the head.
- hats – hoods, snoods, etc.
Not all of these models are appropriate to knit with openwork patterns, for example, the same hats with earflaps; an openwork pattern will not protect the child from wind and cold.
How to knit an openwork hat?
The hat can be knitted in the round or with a seam, from top to bottom or from bottom to top; the description of each model must indicate which method is preferable to choose for a given pattern.
Pay attention to the elastic; in many models, the elastic and the hat are knitted in one fabric. It looks neater than sewing on elastic. But there is always a chance that such an elastic band will stretch during wear. Therefore, it is recommended to include a hat elastic in the harness. Even if this is not indicated in the description, think about the moment of designing the elastic band in advance.
When to wear a fishnet hat for a girl
Openwork hat for a girl from the Internet
Openwork hats are necessary for girls both in spring and summer. So we've put together a few interesting models and we invite you to knit a baby hat with knitting needles.
interesting selection for the site 20 lungs summer schemes capsHead circumference length 50-52 cm.
Materials:
- Needle size 4mm – US 6 (Circular, Double-pointed |Hosiery|)
- Yarn: 25 grams of yarn white– 50% cotton, 50% acrylic (105 m per 50 grams)
- 25 grams of pink yarn - 50% cotton, 50% acrylic (105 m per 50 grams)
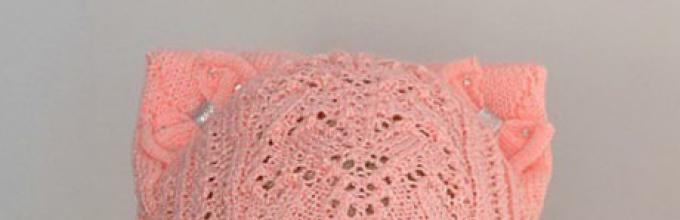
Openwork hat for girls with ears

The original hat is knitted from threads containing cotton + viscose + polyacrylic.
Schemes are given for circular knitting! If you knit with a seam, then the purl rows must be knitted in reverse!!! Attentively!!
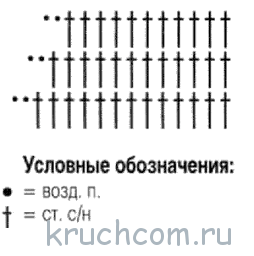
Scheme No. 1 of the central pattern. We knit the first 6 rows according to this pattern. Rapport 25 loops.
empty and filled-in cells - purl
Scheme "2 sides.. Rapport - 10 loops. But in the diagram I drew how to distribute the patterns of the cap on the left and right (the diagram of the left part is a mirror image of the right), the central pattern is highlighted in red..
This hat can be knitted for both girls and boys. For knitting we will need summer yarn (100% cotton, cotton + bamboo, cotton + viscose, microfiber) 150-180 m. in 50 g. Yarn consumption is 20-40 grams, depending on the thickness of the yarn and the size. Stocking needles (sock needles) 5 pcs. and circular 40-50 cm. No. 2.5. Hook No. 2.
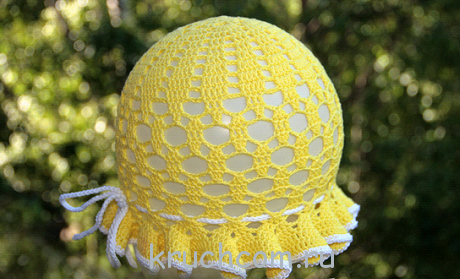
Hat for girls “Kristina” with “openwork umbrellas” pattern
The hat is knitted with the “Lacy Umbrellas” pattern from 100% cotton.
The pattern of the cap is quite “holey”, so it is ideal for both cool summer and early autumn and late spring.
To protect my little one’s ears from the icy wind in relatively warm weather, I knitted a wide, thick elastic band.
However, in my opinion, this pattern would be more advantageous when combined with a narrow elastic band of 2-3 cm or in the shape of a beret.
Materials used:
Yarn ONline Linie 165 Sandy 100% mercerized cotton 120m/50g, consumption about 70 grams.
Circular knitting needles No. 2.5 for the rib and No. 3 for the main pattern.
The hat is knitted in the round.
Size 1-2 years (head circumference 48-50 cm). The height of the cap is about 18 cm.
The hat is knitted very easily and quickly.
Yarnart jeans, knitting needles No. 3.
We knit every second, fourth, sixth and eighth rows completely with purl stitches.
I knitted the last two front rows every 2 adjacent loops together, and through the remaining ones I pulled a thread and tightened it and it turned out to be a hat.
Openwork hat - beret for a girl
In the picture the pattern seemed complex, but in practice it is very simple and quick to knit.
Here is a diagram of the main pattern (I drew the diagram, but the pattern itself is not mine, I spied):
And here is a diagram of how I made the eyes smaller to get a flower on the top of my head:
Explanations for the diagrams:
- vertical line - front loop;
- horizontal line - purl loop;
- arc - yarn over;
- triangle facing to the right - knit two loops together behind the back wall;
- triangle facing left - knit two loops together behind the front wall;
- all lines on the diagrams are only odd (that is, only those on the front side);
- the number of loops must be a multiple of 14, plus 2 edge loops;
- what is shown in red is knitted like this: leave 2 loops on 1 auxiliary knitting needle, and 2 loops on the second auxiliary knitting needle while working, 2 knit stitches, then knit the loops from the second auxiliary knitting needle purlwise and knit the loops from the first auxiliary knitting needle.
How to knit an openwork hat for a girl, models from our website
On our website we also have good models of openwork hats for girls and their mothers.
My little niece really loves hats both in winter and summer. These are the hats I knitted for a fashionista. Size for 2 years. I was knitting melange threads. Valeria's work.
Hat for girls, description
I cast on 70 loops, knitted 10 rows with an elastic band 1*1 and switched to the main pattern.
The main pattern is knitted like this: 1st row – *knit 2 together, yarn over* (repeat from * to * until the end of the row)
Row 2 – knit all stitches.
3rd row – knit, *knit 2 together, yo* (repeat from * to * until the end of the row), 2 together (the second loop of these two is the first loop of the next row, to maintain the pattern).
4th row – all knits. Repeat from rows 1 to 2, maintaining the pattern to the desired height.
Then we decrease the loops evenly. Crochet a thread through the remaining 10 loops, pull it off and disguise it on the wrong side. Wash the hat on the hand wash, dry. All that remains is to choose the decoration to your taste. In one hat, I sewed a large bead onto the top of the head, and left the second hat without decoration.
The hat was knitted for my 1.5 year old daughter for the winter. For knitting, 2 skeins of yarn, 50 g each, were used. Tatiana's work.
I knitted with double thread on knitting needles 5. First, you need to measure the head circumference, we got 47 cm. Determine the knitting density and cast on the appropriate number of loops, I got 70. We knit 5 cm with a 2 by 2 elastic band, go to the faces. stitch, knit another 7 cm.
Then every 10 stitches in k. row knit 2 knits together, purl. row we knit purl. We continue to close the loops, in the last row close three loops at once and stretch the thread, pull it off. Sew. To determine the height of the cap, you need to divide the head circumference by three.
Decorate with beads and knitted flowers.
See how to knit a flower with knitting needles.
Hat with a spider. The yarn is from Moscow region. Knitting needles 3.5 in two threads, the consumption is almost a skein.
Size 50-52, set 60 stitches. Italian method, 4 rows with a handkerchief, then pattern according to the pattern, in places of decreases, English knit, i.e. through 14 loops.
Decrease of four blades: 8 loops are decreased in a row through a row: 2 purl together, 1 knit together, 2 purl together. Work by Svetlana Sofronova.
Knitted hat
Hat for spring! Knitted from 100% acrylic yarn. Light as a feather. Delicate and soft. I took the model of the cap from the internet.
The pattern is very simple and knits up quickly! I have attached a diagram of the hat. The only thing in symbols it is written that on extra knitting needle remove four loops. I started knitting like this, but the pattern didn’t work out! Either I somehow misunderstood, or there was an error in the diagram. I removed three loops on an additional knitting needle, and the rest was everything as in the diagram and description! Try it yourself, maybe you will succeed as written. Work by Valentina Kaldysheva.
The model is designed for a woman's head, but it seems to us that such a hat would be perfect for a girl.
To knit a hat you will need: 80 g of medium thickness yarn (100% cotton) fuchsia color. SPOKES No. 3,5 and 4.
Garter stitch (plate, knitting): all stitches.
Knit stitch (knit stitch): knit. r. – persons p.; purl r. - purl p.
Knit a fantasy pattern using knitting needles according to the pattern.
KNITTING DENSITY OF THE HAT 10 x 10 cm = 20 p. x 26 r.
DESCRIPTION OF THE HAT'S OPERATION
On knitting needles No. 3.5, cast on 107 sts and knit 2 cm of boards. viscous. Continue knitting with needles No. 4 in the pattern according to the pattern for 18 r. and then repeat the 17th and 18th rows. At a height of 15 cm from the boards, knitting, decrease the trace. way: 1st r.: 1 chrome. p., 2 persons. p., 2 p. together persons. with a tilt to the left, *1 purl. p., 2 p. together knit., 3 knit. p., 2 p. together persons. with a tilt to the left*, repeat from * to * 11 more times and finish with 1 purl. p., 2 p. together persons. with a tilt to the left, 2 persons. p. and 1 chrome. p. = 81 p.; 2,
Rows 3 and 4: knit according to pattern; 5th rub.: 1 chrome. p., 1 persons. p., 2 p. together persons. with a tilt to the left, *1 purl. p., 2p. together persons., 1 person. p., 2 p. together persons. with a tilt to the left*, repeat from * to * 11 more times and finish with 1 purl. p., 2 p. together persons. with a tilt to the left, 1 person. p. and 1 chrome. p. = 55 p.; 6th row: according to the drawing; 7th rub.: 1 chrome. p., 2 p. together persons. with a tilt to the left, *1 purl. p., 3 p. together persons. with a tilt to the left*, repeat from * to *11 more times and finish with 1 purl. p., 2 p. together persons. and 1 chrome. p. = 29 p.; 8th row: according to the drawing; 9th row: knit 2 stitches together. along the river = 15 p.; 10th row: knit 2 stitches together purlwise. along the river = 8 sts. Cut a long enough thread and thread it through the open sts of the last p. and pull them off.
Assembling the cap: Make a seam. Finished product moisten and let it dry.


Summer openwork white hat colors will suit to any outfit!
Cap size for OG 48-52 cm
Job Description: cast on 98 sts on stocking needles and knit 30 rows in circular rows with an openwork border according to the pattern.
Openwork border: the number of loops is a multiple of 14 + 1 + 2 chrome. (in circular rows the number of loops is a multiple of 14). Knit according to the pattern, which shows only persons. r. or odd circular rows, purlwise. r. Knit loops and yarn overs purlwise, in even circular rows – knit. Start with 1 chrome. and loops before rapport, repeat repeat loops, end with loops after repeat and 1 chrome. Repeat rapport loops in circular rows. Perform 1 time from 1st to 30th r.
Then knit stockinette stitch, in the 14th row, mark every 14th row. (= 7 p.). 1 time every 25 r., then 8 times every 3 r., 2 times every 2 r. and knit the marked loop with the previous loop together 2 times in each row. After 18.5 cm = 55 r. Pull the remaining 7 stitches from the cast-on edge with a working thread.
Head circumference: 50 cm.
Yarn:"Ivushka" Semenovskaya yarn (50% cotton, 50% viscose, 430 m/100 g).
Hook: No. 2.5 and 1.5
Description:
We start knitting a hat from the top of the head. Hook No. 2.5
To do this, fold the thread into a ring.
1st row: tie a ring of thread. 3 air loops rise, 11 double crochets, connecting loop (we close the knitting in a circle). Tighten the ring by pulling the non-working end of the thread.
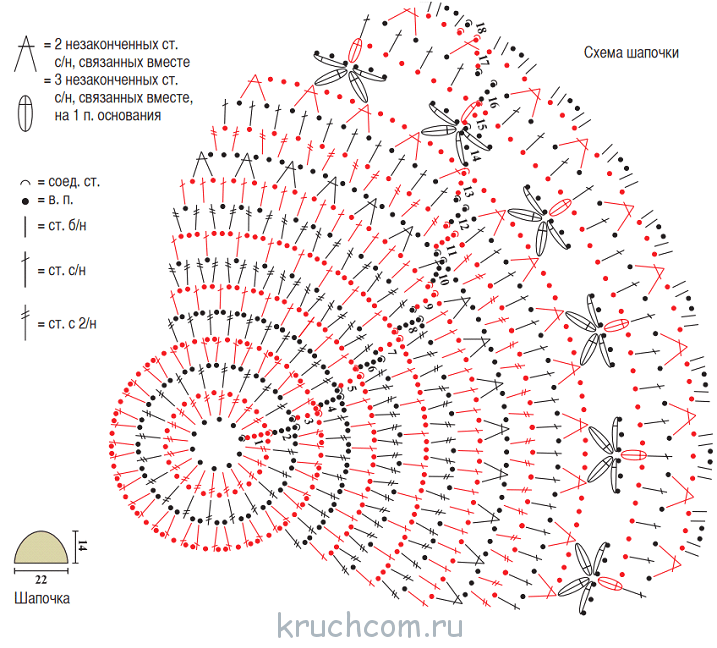
/shapochki/sxemapolos.jpg)
Crochet pattern for a summer hat for a girl.
Repeat the last two rows to the desired depth.
I'm also a schematic draftsman, so some explanations:
3rd row: 4 double crochets under a chain loop.
Row 5: We knit 3 double crochets under a chain loop.
Row 7: We knit 3 double crochets under a chain loop.
Row 9: We knit 2 double crochets under a chain loop.
Row 11: alternate 3 double crochets under a chain loop, 2 double crochets under a chain loop.
Next, we knit odd rows (to the required depth): we knit 2 double crochets under a chain loop.
/shapochki/shapkagolub2.jpg)
Then tie the hat with 5 rows of single crochets with crochet number 1.5 (blue and white flowers).
Tie a flower and sew it to the hat.
/shapochki/shapkagolub3.jpg)
Description of knitting flower:
Crochet a chain of 39 chain stitches.
2nd row: in each chain stitch, knit 2 double crochets.
3rd row: *skip 2 loops of the previous row and knit into the third loop (1 double crochet, chain stitch - repeat 7 times), skip 2 loops of the previous row and knit a single crochet into the 3rd loop* repeat from * to *
4th row: tie with air loops - three air loops between the columns.
A similar flower diagram can be seen here:
Only in this flower an air loop is knitted between the double crochets (3rd row). + 4 row tying with air loops.
Then roll the flower in a spiral and secure with thread on the reverse side.
/shapochki/shapkagolub500.jpg)
Attention! If you liked our model of a crocheted summer hat for a girl and you knitted it for yourself according to its description, and now you want to show your work - you can place it on this page yourself under the description of this model - click on the green button "Add a photo of your work". We would like some brief information from you - what is your name (name or nickname), what city are you from, what materials were used and how the work progressed (was it easy or were there difficulties), wishes and suggestions.
We are waiting for your works!
Even in summer, a child’s delicate body needs protection from hypothermia, so the child must wear a hat when walking. Today I want to tell you how to crochet a summer hat for a girl, decorated with beautiful flower- a child will look adorable in such a hat!
Please note openwork patterns holes were created on the cap - they are enough so that the baby’s skin can breathe and not overheat. At the same time, the hat will be able to protect the child from summer drafts and prevent colds.
It will take a little time to knit, so over the weekend you can crochet more than one summer hat for a girl! I knitted two hats: a light gray hat, which I decorated with a rose, and also a hat for which I chose the most, in my opinion, girly colors - delicate pink and snow-white for the flower. It’s very interesting what color yarn you choose! Please share your feedback and photos when your beanie is ready!

I knitted a hat for a girl with a head circumference of 46-48 cm. You can knit this hat of any size.
For knitting we need Rose yarn from Vita Cotton (100% double mercerized cotton, 50 g/150 m), 1 skein was enough for me, hook number 2.

Knitting pattern for the bottom of the hat:
(can be enlarged)
Pattern diagram:

Legend:

1st row: make a ring of thread (sliding loop) and knit 3 lifting air loops,

we knit 11 double crochets into a ring,

We close the row in the 3rd lifting air loop with a connecting post.

2nd row:

in the next loop we knit 2 double crochets,

in this row we make increases in each loop, i.e. We knit 2 double crochets in each stitch to the end of the row.


3rd row: we knit 3 lifting chain stitches and a double crochet into the same base loop,

in the next loop we knit 1 double crochet,

in this row we make increases through one loop, knit from * to the end of the row, i.e. * in the next loop we knit 2 double crochets, in the next 1 double crochet*.

We close the row with a connecting post into a 3rd lifting air loop.

4th row: we knit 3 lifting chain stitches and a double crochet into the same base loop,

in the next two loops we knit 1 double crochet,

in this row we make increases through two loops, knitting from * to the end of the row, i.e. * in the next loop we knit 2 double crochets, in the next 2 loops we knit 1 double crochet*.


5 row: we knit 3 lifting chain stitches and a double crochet into the same base loop,

in the next 3 loops we knit 1 double crochet,

in this row we make increases through three loops, knitting from * to the end of the row, i.e. * in the next loop we knit 2 double crochets, in the next 3 loops we knit 1 double crochet*.

We close the row with a connecting post into a 3rd lifting air loop.

6th row: we knit 3 air loops of lifting and a double crochet in the same base loop, in the next 4 loops we knit 1 double crochet,

in this row we make increases every 4 loops, knit from * to the end of the row, i.e. * in the next loop we knit 2 double crochets, in the next 4 loops we knit 1 double crochet*.

We close the row with a connecting post into a 3rd lifting air loop.

7th row: we knit 3 air loops of lifting and a double crochet in the same base loop, in the next 5 loops we knit 1 double crochet,

in this row we make increases every 5 loops, knit from * to the end of the row, i.e. * in the next loop we knit 2 double crochets, in the next 5 loops we knit 1 double crochet*.

We close the row in the 3rd air lifting loop, knit a connecting post.

8th row: we knit 3 air loops of lifting and a double crochet in the same base loop, in the next 6 loops we knit 1 double crochet,

in this row we make increases every 6 loops, knit from * to the end of the row, i.e. * in the next loop we knit 2 double crochets, in the next 6 loops we knit 1 double crochet*.

We close the row with a connecting post into a 3rd lifting air loop.

Row 9: we knit 3 air loops of lifting and a double crochet in the same base loop, in the next 7 loops we knit 1 double crochet,

in this row we make increases every 7 loops, knit from * to the end of the row, i.e. * in the next loop we knit 2 double crochets, in the next 7 loops we knit 1 double crochet*.

We close the row with a connecting post into a 3rd lifting air loop.

10th row: we knit 3 air loops of lifting and a double crochet in the same base loop, in the next 8 loops we knit 1 double crochet,

in this row we make increases every 8 loops, knit from * to the end of the row, i.e. * in the next loop we knit 2 double crochets, in the next 8 loops we knit 1 double crochet*.

We close the row with a connecting post into a 3rd lifting air loop.

We knit a circle with uniform increases in this way until we reach the diameter we need, which can be determined from the table:

I knit this hat for a head circumference of 46-48 cm, knitting 10 rows, the diameter of the circle turned out to be 15 cm.

11th row: we knit without increases, 3 air loops of lifting and in each loop we knit 1 double crochet. We close the row with a connecting post into a 3rd lifting air loop.

Row 12: knit 1 chain stitch and 1 single crochet in the same base loop,

we knit 5 air loops and skip 3 base loops into the 4th loop and knit 1 single crochet.

*knit 5 chain stitches again, skip 3 stitches and knit 1 single crochet into the next one*.

We knit from * to the end of the row.

At the end of the row, knitting a single crochet, we knit 2 air loops,

and close the row with a double crochet, tying it into the first single crochet of this row.

Row 13: we knit 1 chain lifting loop and insert the hook under the wall of the double crochet, we knit 1 single crochet,


*again we knit 5 chain loops and a single crochet into the middle loop of the next arch*

We knit from * to the end of the row.

Having knitted a single crochet into the middle loop of the last arch, we knit in the same way as we knitted in the last row, 2 chain loops and 1 double crochet in the first single crochet of this row.

Row 14: knit 1 chain stitch and 1 single crochet,


*again knit 3 chain stitches and 1 single crochet into the middle loop of the next arch*

We knit from * to the end of the row.

At the end of the row we knit 3 chain stitches and close the row with a connecting stitch in the first single crochet of this row.

Row 15: we knit 1 connecting stitch to transition to knitting from an arch, then we knit 3 lifting air loops

and 3 double crochets in the arch,

*in the next arch we knit 4 double crochets*

We continue to knit from * to the end of the row, knitting 4 double crochets into each arch. We close the row with a connecting post into a 3rd lifting air loop.


Row 23: we knit 1 connecting stitch, 3 lifting chain stitches and 3 double crochets in the arch.


*in the next arch we knit 4 double crochets and a picot from 3 air loops*

So we knit from * to the end of the row and close the row with a connecting stitch in a 3-chain lifting loop.

All that remains is to hide the ends of the threads and decorate the hat with any flower of your choice. I decorated the gray hat with a pink one - a flower with white petals.


I also suggest you watch a video on how to crochet this summer hat for a girl.
Complete copying of site materials is prohibited (including personal diaries Li.ru)!
Only partial copying (announcement) with an active link to the site is allowed!
If you want to receive the latest articles, lessons and master classes from the site to your mailbox, then enter your name and e-mail in the form below. As soon as a new post is added to the site, you will be the first to know about it!
In summer, everyone needs a hat - both children and adults. A light openwork hat will not only protect your head from the merciless rays of the sun on a hot day, but will also add an elegant twist to your look. summer look girls, girls, women! An original hat, crocheted by your beloved mother or grandmother, will also appeal to mischievous little boys who prefer to spend most of the day outside.
We agree that today a summer headdress can be easily purchased in a store, however, hand-made items are famous not only for their exclusive design, but also for their ideal fit, because they are knitted according to precise head circumference measurements.
Knitting summer hats is the stage of getting acquainted with crochet that is best suited for beginning knitters. As a rule, the process of crocheting them is quite simple, so we recommend that all beginners practice crocheting on hats.
We have selected for you large collection schemes and detailed descriptions knitting current models children's and women's hats. Let's not languish, let's move on to crochet lessons!
- VP – air loop;
- runway – lift runway;
- RLS or art. b/n – single crochet;
- CCH or Art. s/n – double crochet;
- С2Н – st. with 2 yarn overs;
- С3Н – st. with 3 yarn overs;
- PS – half-column;
- PR – previous row;
- SS – connection column.
Summer openwork hat for your beloved daughter
Little girls are great fashionistas, which means that any little girl will appreciate a stylish patterned hat with bright decor. Children's hats for girls can be knitted in the form of a stocking (this model fits well on any head), a light beret, a loose Panama hat, and even a spectacular hat with a hard brim. You can knit any hat for your daughter for the summer, it all depends on creative imagination and the desires of the needlewoman.

The only thing is that when preparing to knit a baby hat, you need to carefully choose the yarn - it is desirable that it be 100% natural (cotton), it is better to avoid synthetics in the composition. Only natural yarn will provide high-quality natural air exchange and also protect against the harmful effects of ultraviolet rays.
Also, before starting knitting, it is necessary to accurately determine the size of the future product. To do this, measure the circumference of the child’s head and add 1 cm of allowance, divide the result by 3.14 - we get the desired diameter of the “bottom” of the cap. Professional craftswomen try to knit the last four rows of the “bottom”, alternating additions, so that the hat will fit perfectly on the child’s head.
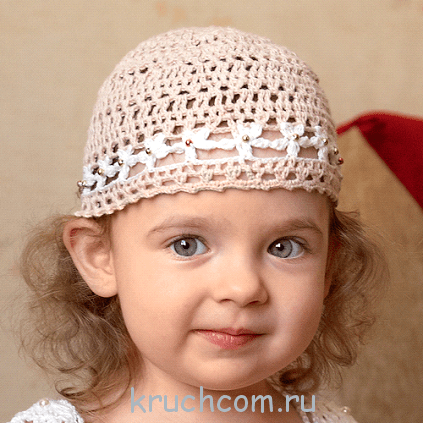
So, let's start knitting our first model - a tight-fitting beige hat with a simple floral motif. This baby hat is very easy to knit; even a beginner in knitting can easily master it. For a hat for a one or two year old child, you will need only 35 grams of cotton yarn (you can use “Iris”), as well as a hook No. 1.5-2.
Hat pattern:
Step-by-step knitting instructions
Yarn beige color We collect a chain of 10 VPs and close the SS into a ring.
Row No. 2: 6 VP (4 VP + 2 VP), continue knitting with rapports (20 r.): 1 C2H in the next. С2Н PR from the hook + 1 VP. SS.
Row No. 3: 5 VP (3 VP + 2 VP), 1 Dc in the arch of 2 VP PR, 1 VP, then again we knit 20 repeating combinations: 1 Dc in the next. arch of 2 VP PR + 2 VP + 1 SSN in the same arch + 1 VP. SS.
Rows No. 4-13 are knitted in circular rows according to the pattern shown above. We finish the rows with SS. Cut off the beige thread.
Rows No. 14-15: knit with white thread floral motifs according to the diagram, we finish with SS. We cut off the thread.
Rows No. 16-18: continue knitting in columns with beige yarn according to the pattern. SS. When the hat is ready, decorate the centers of the flowers as desired - with rhinestones, pearl beads or other suitable decorative elements.
Hip rainbow cap for a naughty boy

Not only girls enjoy stylish hats, boys are also not averse to taking a walk under the scorching sun in a stylish panama hat or cap. We suggest you try knitting a bright cap with a visor for your son, especially since it is absolutely simple to make. For the cap you will need the remains of multi-colored cotton yarn, as well as hook No. 2. The model is knitted with strips of single crochets, the pattern looks like this:
Step by step execution
Thread yellow we collect a base of 3 VPs, close it into a ring using SS.
Row No. 1: 1 runway, 5 sc in the ring. SS.
Row No. 2: 1 RLS, 1 RLS in the first RLS, then knit with repeats (12 rows): 2 RLS in one loop in the first RLS from the hook. SS.
Rows No. 3-4: knit sc in the round, in each row we evenly add 6 sc. SS. Change the color of the thread.
Rows No. 5-8: with red thread we knit rows in a circle with sc, in each row we evenly add 6 sc. SS. Change the color of the thread.
Rows No. 9-11: with beige thread we knit rows in a circle with sc, in each row we evenly add 6 sc. SS. Change the color of the thread.
Rows No. 12-15: using blue thread we knit rows in a circle with sc, in each row we evenly add 6 sc. SS. Change the color of the thread.
Rows Nos. 16-18: Using a dark green thread, we knit in the circle, sc, but without any additions. SS. Change the color of the thread.
Rows No. 19-22: using a mint-colored thread we knit RLS, without increasing. SS. Changes color.
Rows No. 23-25: using a yellow thread we knit RLS, without increasing. SS. Changes color.Rows Nos. 26-29: using red thread we knit RLS, without increasing. SS. Cut the thread.
We knit the top part of the visor
We attach a dark orange thread to the outer part of the 29th row and knit in the forward and reverse directions according to the following pattern:
Rows No. 1-2: 1 runway, 25 sc in 25 sc PR.
Rows No. 3-7: knit RLS and gradually decrease on both sides of each row - decrease 1 RLS. SS. We hide the thread in the loops and cut it off.
Bottom of the visor knit with wrong side on the same principle as upper part. Finally, the entire cap along the free edges, incl. and the visor - we tie it in a circle in a “crawfish step” (1 row), so the upper and lower parts will be connected into a complete visor. Our rainbow cap is ready!
Women's hats - a bright touch of a summer look

If you have already tied up your little ones, it’s time to take care of yourself – our selection of detailed instructions for knitting stylish hats for the summer is waiting for you!
Juicy stocking cap in boho style

One of the most popular is the stocking-shaped hat; this model is suitable for absolutely all representatives of the fair sex! Because fashion style boho is gaining more and more momentum in the fashion industry, we suggest you try to knit a bright multi-colored hat, in which you will definitely not go unnoticed!
For knitting you will need cotton yarn of red, light green and sky blue colors, in total quantity - 100 grams, as well as a hook No. 5-6.
The main pattern of the cap is knitted in half-stitches (PS) in the round, each row ends with a SS, the new one starts with 1 VP.
Knitting steps
We cast on a chain of 4 VPs, close it in a circle with a SS, knit in a circular manner, constantly alternating the colors of the yarn through three rows.
Row No. 1: we knit 11 PS into the ring.
Row No. 2: we knit 2 PS into each PR loop, we get 22 PS.
Row No. 3: knit with repeating combinations: 2 PS, next. loop - 2 PS, in the end we get 29 PS.
Row No. 4: knit with repeating combinations: 2 PS, next. loop - 2 PS, in the end we get 38 PS.
Row No. 5: continue to knit with rapports: 3 PS, next. loop - 2 PS, in the end we get 47 PS.
Row No. 6: knit with rapports again: 3 PS, next. loop - 2 PS, in the end we get 58 PS.
Rows No. 7-25: knit 58 PS each without any additions.
To knit the final, 26th row, turn the hat inside out and knit one row with single crochets. Our bright boho hat is ready!
Snow-white openwork beret

Despite the simplicity of knitting, such a beret conquers many women's hearts– it looks truly feminine and can be appropriate both in a youth casual look and in a romantic evening look.
To knit a beret, you need to take 35 grams of cotton thread of the “Iris” type, as well as a hook No. 1.5-2.
Beret knitting pattern:
The beret is knitted using the circular method, a pattern formed from single crochets and chain stitches. We collect a base of 5 VPs, closing the SS in a circle.
Row No. 1: 2 VP, 5 repeats: 3 VP + 1 DC in the base loop PR, 3 VP, SS.
Row No. 2: 2 VP, 1 SSN, 11 repeats: 3 VP + 2 SSN, finishing with 2 VP + SS.
Row No. 3: 2 RLS in the PR base loop, 11 repeats: 3 VP + 1 RLS, close row 2 VP + SS.
Row No. 4: 2 runways, 3 dc, 2 ch, 11 repeats: 4 dc + 2 ch, completing the sl st row.
Row No. 5: 2 runways, 4 dc, 2 ch, 11 repeating combinations: 5 dc + 2 ch. SS.
We get 12 “petals”, continue to knit, periodically adding 1 DC to each “petal” in each subsequent row. In total, knit ten more rows with such increases. Knit the next row without increasing, 13 dc in each “petal”. We knit the next seven rows with decreases - we remove 1 DC in each petal of each row. We knit the last two rows with regular single crochets. Beretik is ready!
Summer bandana hat made using the fillet technique
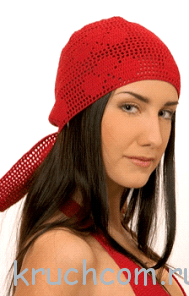
Relevant for summer season and a bandana hat - thanks to the ties, you can experiment with its shape, each adding fresh notes to the image. Advantage fillet pattern not only in the simplicity of knitting, but also in the incredibly airy knitted fabric - the hat turns out to be translucent, allowing air to pass through and at the same time protecting from sunlight.
For summer hat-bandanas will require 150 grams of red cotton yarn, as well as a hook No. 2-2.5.
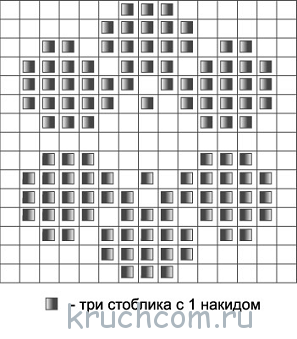
Chart of the fillet pattern for the bandana:
Crocheting is a real art, which not every woman can master. However, if you wish, you can learn this at home on your own.
The simplest product that beginners can quickly knit is a hat. It must meet the following criteria:
- On a baby, the hat should not be puffy or prickly. The girl should feel comfortable in it - so that it does not put pressure and does not slide off her head. Achieving this is quite simple - you need to choose high-quality yarn.
- Threads for knitting should be chosen only natural (they must correspond to the time of year:
- For a spring or summer product, use cotton threads, merino wool, acrylic or alpaca;
- For autumn and winter headwear, it is best to choose wool threads or half-woolen.
Otherwise, the child’s head will sweat, which can provoke many unpleasant dermatological diseases.
We offer you several interesting master classes for beginners, how to tie crochet hat for a girl.
Crochet hat for girls for spring
Spring is the time when everything blooms and comes to life. In accordance with the wonderful changes that occur in nature, you can sew a bright crochet spring hat for girls made of crimson acrylic.
We invite you to make this original and very unusual crochet hat with ears for girls:

To make it work, follow these instructions:
- First, a chain is formed that closes into a ring (the chain requires 6 air loops).
- Next the second row is knitted. It should consist of 12 double crochets.
- The next rads when knitting should be larger. You need to increase each row by 12 double crochets.
- You will get a circle whose diameter should be equal to the circumference of your girl’s head.
- Now we knit the pattern:
- Make 7 double crochets in one loop
- We count out 5 loops
- From the sixth loop we knit 7 double crochets again
- Connect the bunch of posts using a connecting loop
To make it easier for you to navigate, we are attaching crochet hat pattern for girls:

- At this stage, the main part of the headdress is ready. All you have left is crochet hat pattern for girls for spring tie the ears:

In such a headdress, your little princess will be bright and beautiful.
Crochet summer hat for girls
A summer headdress should be light and airy. It performs a decorative function to a greater extent than any other. Based on these considerations, we suggest you make such a beautiful openwork product:

To crochet this hat for a girl, you need to use the instructions below:
- Making the first ring - knitting 6 air loops and knitting the first row into them
- In exactly the same way we continue to knit rows from 2 to 9 scheme summer crochet hat for girls:


- We knit the last 11th row with a “crawfish step” pattern:

- All that remains is to make a flower for the hat according to the diagram below:

- Sew the flower to the headdress using regular threads.
In such a hat, your daughter or granddaughter will look irresistible.
Crochet hat for girls for autumn
On autumn period year we offer you crochet a hat for a girl from yarn of two colors. For example, some threads may be wool blend, while others may be acrylic.
We invite you to make this version of an autumn headdress for a girl:

To avoid any difficulties during the manufacturing process, you can use our knitting instructions crochet hats for girls with description:
- We make a ring of 6 air loops (we start knitting from the crown)
- We knit the next row with double crochets, adding 6 more loops to it (that is, there should be a total of 12 of them)
- Third row - alternating regular double crochets with embossed ones in a checkerboard pattern
In this video you can see how embossed columns are knitted:
- Fourth row - alternating two double crochets with one embossed
- Fifth row – 2 double crochets, one in relief, one chain stitch (we continue this chain to the end of the row)
- Sixth row – 4 double crochets, two in relief, one chain stitch
- Seventh row – 5 double crochets, two raised stitches, one chain stitch
- We continue knitting the seventh row to the end as shown in scheme crochet hats for girls for autumn:

- We knit the ears in single crochets (although such a hat can be worn without ears)
- We knit a flower to decorate the headdress according to the pattern:

Your princess will be very comfortable in this hat in the fall.
Crochet winter hat for girls
Very fashionable in this winter season were related crochet cat hats for girls. Knit such a headdress for your fashionista yourself. In addition to it, you can also make a snood. Externally, this set will look something like this:

We present to you detailed instructions how to knit this crochet hat and snood for a girl.
How to knit a cat hat:
- The main part of the headdress is knitted according to the following pattern:

- In order to connect the ears, eyes and nose of a cat, you can use the following calculations and descriptions:


How to knit a snood under a cat hat:
- According to the usual scheme - first, 6 loops (air) are cast on, which should be closed into a ring using a connecting post.
- We cast on three more air loops so that you have a “window” between the double crochets.
- We knit the next row with a single crochet (in this case, you need to skip the first loop of the previous row).
- We connect the chain with the last air loop, reach the middle of the row and make two air loops.
- In the next rows, double crochets should be where the chain stitches were in the previous row. We continue to knit like this until the end of the entire snood. The diagrams are attached for you below:

Crochet hats for girls: photo


We hope that our master classes will help you master the basics of crochet, and you will make a beautiful headdress for your daughter or granddaughter.
Video: “Crochet hat for a girl”


