Making balls
Indications:- for processing the surgical field
- surgical wounds
- when dressing wounds
Note. Gauze should be white, soft, hygroscopic and fat-free.
Sequence of actions:
Cut the gauze for balls in sizes: 6x7 cm - for small ones, 11x12 cm - for medium ones, 17x 17 cm - for large ones;
- fold the prepared piece of gauze along the length from both sides to the middle
- fold the gauze in half, wrap it around your index finger (forms a ball)
- tuck the free ends into the resulting triangle
- put gauze balls into a prepared gauze bag, 50 pieces each
Note. Make sure that there are no strings of gauze in the prepared balls,
to prevent them from getting into the wound.
Making napkins
Indication: for protection from the external environment of a surgical wound, wound surfaces received outside a medical institution.Equipment: gauze.
Note. The gauze used is soft, hygroscopic, and fat-free.
Sequence of actions:
- cut gauze for napkins in sizes: 20x25 cm - for small ones, 30x40 cm - for medium ones, 60x40 cm - for large ones
- fold the gauze lengthwise from both sides towards the middle (the ends touch in the middle of the napkin)
- fold a napkin folded lengthwise across its width (the ends touch in the middle of the napkin)
- fold the napkin in the middle, where the ends of the napkin touch
- fold the napkins 10 pieces at a time, tying them with strips of gauze
Note. Make sure that the prepared napkins do not contain gauze threads to prevent them from getting into the wound
Making a large tampon

Indication: for protection from the external environment of a surgical wound, wound surfaces received outside a medical institution.
Equipment: gauze.
Note. The gauze used is soft, hygroscopic, and fat-free.
Sequence of actions:
- cut gauze to prepare dressing material
- bend the cut edges of the gauze inward by 5-6 cm and fold in half twice in the same direction
- fold the resulting strip of gauze 60x10 cm in half (the lower half of the napkin should be 5-6 cm longer than the top)
- fold the tampon in half again, wrap the free edge of the bottom layer of gauze over the tampon to grip it during surgery
Note. The middle tampon is prepared in the same way. A small tampon is folded twice in half in the longitudinal and transverse directions, then folded inward by 1-2 cm of one of the short edges of a piece of gauze, the long edges of the gauze are folded overlapping each other
Making turunda
Indication: for draining purulent wounds.Equipment: bandage 5 cm wide.
Sequence of actions:
- cut the bandage into pieces 40-50 cm long
- tuck the ends of the bandage inward on both sides by 1-1.5 cm
- fold a piece of bandage lengthwise on both sides so that the ends meet in the middle of the piece
- fold the piece of bandage again along its length so that the ends, connected in the middle, are inside the piece of bandage
- wrap the prepared turunda around 2-4 fingers of the left hand
- remove from the fingers and thread the remaining part of the turunda into the hole left after removing the turunda from the fingers
Making a tampon
Indication: for tamponade of wounds with bleeding.Equipment: bandage 10 cm wide, 5 m long.
Sequence of actions:
- fold the bandage in small pieces lengthwise so that the ends meet in the middle
- fold the segment again so that the ends, connected in the middle, are hidden inside
- iron a piece of bandage on the edge of the table to secure it
- roll the tampon into a ball
Note. Prepare the tampon in small pieces. The resulting 4 layers of bandage are cut transversely into pieces 20, 30, 50 cm long.
Everyone has long known what children love to do. various crafts with your own hands. In addition, crafts develop imagination and thinking. You can make crafts with children from various materials, today we will look at some interesting, in my opinion, crafts made from cotton balls. Making from cotton balls is very exciting and you and your child will really like it, be sure to try to create something and don’t forget to share with us))).
To make crafts from cotton wool you will need:
Newspaper.
Scotch.
PVA glue.
Various beads, buttons, etc.
Method for making crafts from cotton wool:
Julia Loshek and her son Boris will now show us what beautiful crafts can be made from cotton balls. The first craft was a sheep, and that’s where it all started. For more details on how to make a sheep, watch the video below at the end of the article.

Then Julia and her son decided to do more complex craft made of cotton balls, it was a hare.

We complicated the base for the toy and made it according to the same scheme, only we made a blank from newspapers (already a solid shape with a body, a head and paws... First, all the parts were separate, then they were tightly tied together with a plaster on a fabric basis.) We glued them onto this model cotton balls. The bunny and dog ears were cut out of cardboard and cotton balls were glued onto it. For such a toy you will need quite a lot of glue, so PVA glue 60% + 40% water (you can also use pure form, but then it will be very viscous and difficult to work.)
Yulia and her son make cotton balls themselves; store-bought ones are too big. We take the most ordinary cotton wool, tear off a piece and stuff it into the fist with the index finger until it is full, etc. The balls will not be the same, but that’s okay; in the process you will need both larger and smaller ones. If the toy doesn’t turn out straight right away, it’s also not a problem..... Everything can be easily fixed by adding a couple of soft balls.
Then it’s a matter of imagination, Yulia really loves bows, put a bow on her ear and it turns out to be a girl, put it on her neck and look, it’s already a boy. I spray the finished toy with hairspray to prevent the cotton wool from fluffing up.
And also a little secret on how to make eyelashes without spending money. We cut off a piece of ribbon, cut it in half and unravel the top threads (remember how we used to make fringe) and so on until the desired length of the eyelashes. That's probably all.


You can also make appliqués from cotton balls with your children.
You probably have cotton balls around the house, but you usually use them to remove nail polish or something similar. It turns out that a cotton ball can be much more versatile! Here are a few ways to use it.
Removing water deposits
Plaque often appears on chrome taps and switches. Soaking a ball of cotton wool in a solution of vinegar and water is a great way to get rid of stains on a metal surface.
Air freshening
Take a few cotton balls and apply sweet essential oils, for example, cinnamon or orange. Place in a small bowl and place on a shelf. 
Pain relief after a burn
A cotton ball soaked in a solution of vinegar, baking soda and water will help you get relief from a burn.
Removing marker from skin
If kids get a little carried away with their drawing, you can easily remove the marker from the skin using a cotton ball and milk. 
Disinfection of equipment
If you want to wipe your gadgets with alcohol, but are afraid to spill it, just carefully use a cotton ball and you can clean remote controls, light switches and other hard-to-reach corners.
Insect control
Soak cotton balls in water with boric acid and sugar and place on a plate. This will be a trap that will attract and kill insects. Just keep pets away from the plate, this mixture is also dangerous for them! 
Rodent control
Cotton balls soaked in vinegar can drive away rodents from the garden - your vegetables and flower beds will be safe and sound!
Removing ink from clothing
Soak a cotton swab in rubbing alcohol and wipe away pen stains to restore your favorite shirt to its former glory.
Extending the life of cut flowers
Some flowers need constant moisture, so place cotton balls on the cuttings - while you change the water in the vase, liquid will continue to flow into the stems.
During illness, the doctor often prescribes douching or the use of tampons. With their help, the mucous membranes are treated with medicine, anti-inflammatory and disinfecting treatment occurs. Such tampons can be bought at the pharmacy, but why, if everything you need to create them is in your home medicine cabinet? You will find a description of how tampons are made from bandages in this article.
How to make tampons?
How to make tampons with your own hands?
We need two components: cotton wool, gauze (or bandage).
The first thing you need to do is wash your hands. It is also better to disinfect the scissors that will be used to tear off the bandage. You should cut a strip about 20 centimeters long from the bandage, fold it in half and place a cotton ball in the middle. Should the bandage or gauze be sterile? If this is possible, then yes, they should. Especially considering that the cost of sterile and non-sterile goods is not much different.
A ball of cotton wool with a diameter of 2-3 centimeters is rolled by hand. It should be of medium density so that it does not fall apart, but is easily filled with medicine.
To make a “comet”, you need to secure the head of the structure with thread. It also needs to be pre-treated, for example, dipped in an alcohol solution
How to make tampons with medicine? If the drug is liquid, the mixture is poured into a container and a tampon is dipped into it. Gels or ointments are applied on top of the “head”. Tampons are used in the treatment of cervical erosion and other inflammatory processes in the female genital organs. They treat wounds on the skin, as well as deep injuries.
It would seem that questions about how to make gauze swabs should not arise. But this simple matter also has its secrets.
· It is not recommended to use cotton pads instead of cotton wool. The medicine is less absorbed into the discs;
· and depending on the place of application, the tail of the tampon can be made shorter or longer. Its size is affected by the length of the cut bandage;
· you can bandage the head of the tampon either with thread or with a piece of gauze;
· a large nodule on the dressing will cause inconvenience if you are using a tampon for gynecological purposes.
Such medicinal swabs are only suitable for applying medication to the mucous membrane and disinfecting it. If you have nosebleeds or menstruation, there is no point in learning how to make tampons at home; it is better to buy them at a pharmacy or store. Why? Because homemade tampons will not be able to absorb a lot of constantly released liquid.
Knowing how to make tampons yourself, you can follow all the doctor’s recommendations for local treatment.
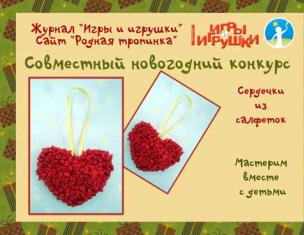
It's starting very soon new year holidays. And it’s time to get ready to decorate the house, take out tinsel, Christmas tree decorations, garlands and other familiar decorative elements. But the same type of compositions created year after year can get boring, so you can try to make original and simple crafts with your own hands from scrap materials.
Cotton balls that resemble real snowballs will look very neat and stylish. These delicate and soft products can be used for play, made into a composition, or, by adding a mount, hung on a Christmas tree.
How to choose a base for blanks
There is cotton wool in every home, so making snowballs from this material will be easy. You can also involve children in making New Year's decorations, turning this activity into an exciting game. There are several ways to make a snowball out of cotton wool. One option: use newspaper as a base or crumpled paper, PVA glue is applied to the surface, the material is wound in several layers. These snowballs will turn out heavy and hard. They are best used for arrangements or as decorations at the bottom of a Christmas tree. Making soft cotton balls requires a little patience and a few readily available materials.

Creating decor from scrap materials
The process of making snowballs from cotton wool with your own hands, step by step instructions which is given below, does not take much time and does not require special preparation. In the central part you can place a padding polyester or a piece of polystyrene foam, an old sock or nylon stocking, or a ball of thread. It doesn’t matter what the base looks like, it still won’t be visible under the cotton wool shell. Therefore, you can use almost any material that is at hand. Of course, it is desirable that the blanks are light or white - then you will not have to worry that the variegated base will begin to show through the top layer. But, if there are no other options, to avoid this, you just need to use more material.

Do-it-yourself cotton wool snowballs: step-by-step instructions
How to make a snowball from cotton wool:
- Cooking necessary tools- scissors, white thread with a needle, an unnecessary stocking and cotton wool.
- Cut the stocking into pieces.
- You can place unnecessary scraps of fabric inside each piece, and then stitch the material so that you get a spherical blank.
- After this, it is enough to decorate the surface with cotton wool or a bandage and stitch it with white threads so that the craft does not fall apart.
If parents are engaged in making jewelry with their child, it is best to entrust the choice of material and surface treatment to the children, and leave the work with the needle to adults, since it is a dangerous tool, children can get hurt. The finished snowball will look more decorative if you add sparkles or regular Christmas tree tinsel to the cotton wool.
A quick way to make cotton balls
When doing needlework with your child, you can use one quick way how to make a snowball from cotton wool. For it you will need PVA glue and hairspray with glitter. The technique for creating such a craft is very simple: just drop glue on a piece of cotton wool, roll it into a ball and cover it with hairspray. From such decorative elements you can create a composition, make a snowman, or make a snow garland by stringing balls on a thread.
If you unroll a skein of cotton wool in the form of a sheet, pour glue on it and roll it into a ball, you get a big snowball. The process of making it is very similar to how real lumps of snow are molded. It is also best to decorate the surface of such a ball with hairspray with glitter. It is advisable to use a strong hold varnish.

How to make a snowball using cotton pads
Cotton pads are an affordable and versatile material from which you can create amazing New Year decorations, including snowmen, Christmas tree decorations, garlands, and the Christmas tree itself too. Using a thread, a needle and a little imagination, needlewomen create angels, flowers and decorative panels from these common household items. For the snowball from cotton pads make special blanks in the form of corners.
Each circle is folded twice and secured with glue. Then glue is applied to the tips of the resulting corners and they are assembled in 4 pieces. The resulting parts are connected to each other to form a hemisphere. By collecting two hemispheres, you can get a finished openwork snowball.
Cold method of making snowballs
There is another one interesting option how to make a snowball from cotton wool. But for it you will need to cook a starch paste. Take 2 teaspoons of starch per glass of cold water and bring to a boil over low heat, stirring constantly to prevent lumps from forming. If this does happen, they can be removed with a fork.
The resulting mass should be cooled so as not to get burned while working. Using a brush, glue is applied to previously prepared cotton balls. It is advisable to spread the glue over their surface in a thin layer, after which the snowball can be dipped in glitter and dried with a hairdryer or on a radiator.

Turning a snowball into a Christmas tree toy
It’s easy enough to turn cotton wool snowballs into Christmas tree decorations if you glue a ribbon or other fastener to them. The surface can also be decorated with bright threads or painted in different colors using ordinary watercolors or gouache. It is enough to dilute the paints of the desired color in water and dip the workpiece in it, then dry it on a sheet of paper.
Cotton pads can also be easily painted with gouache. They can be used to create figures made up of various colored parts. The elements are fastened together using paste, but before painting, it is important to dry all the workpieces thoroughly. This is done so that the paint does not flow.