If you have already tried all the previous options, then it’s time to do unusual craft from old CDs. You probably have a dozen unnecessary disks lying around that you would hate to throw away and no longer need to use. Their finest hour has come! Use your imagination, take note of our master classes and go ahead to create new masterpieces!
Let's start with, perhaps, the simplest thing - decorating an old disk with ordinary stained glass paint. In terms of production, this craft is quite simple, but you can’t tell from the outside. You will need stained glass paints and imagination. You can draw both abstract ornaments or mandalas, and real plot paintings. By the way, if you don’t have stained glass paints, a regular marker will do just fine. You can download templates for drawing mandalas from the link below.
A little more complicated will be a New Year's craft made from disks, decorated with appliqués. The simplest option is an applique made of colored paper.

If your children love the animated film “Smeshariki,” then it’s time to use their old CDs to make their favorite characters. All you need is to find out from your child which character he likes best, cut out Smesharik templates from paper and glue them onto the disk. Smeshariki's New Year's craft is ready! You can draw templates for the application yourself, or you can download them from us for all the cartoon characters.

#4 Christmas tree decoration from old CDs: DIY Christmas crafts from CDs
From an ordinary disk you can make a rather unusual Christmas tree toy that looks like a ball, only this ball is flat. To make this craft you will need: old disk, dark acrylic paint(if not, gouache will do), pencil and fountain pen or a flat screwdriver.

If there are a lot of disks, then you may well think about creating a New Year's garland. With the right lighting, the garland will shimmer with all the colors of the rainbow, reminiscent of snow glistening in the sun. By the way, such a garland makes the house warm and sunny!

Not enough disks for New Year's garland, but did you like the idea? See more ideas:

New Year- the most favorite holiday, associated with miracles and magic. Celebrating the new year is characterized by folk festivals and joyful meetings. It is impossible not to love this time of year, when everything around is transformed, and every house or storefront becomes like the scenery of a fairy tale. Everyone wants to participate in this transformation, and therefore they try to decorate their homes […]
Perfect as could be round shape suitable for snowmen. The technique for making snowmen from disks may be different, but you should be satisfied with the result. By the way, such a craft is quite suitable for a competition for school or kindergarten.

Want to make your own disco ball for decoration? Then you will need a blank for the ball (plastic, glass, foam), an old disk, scissors and glue.

Want more ideas Christmas balls? Then look:

Today you can find a huge number of different Christmas tree decorations on store shelves, so turning an ordinary Christmas tree into a real holiday beauty is not difficult. However, New Year is a special day! The day when old year remains behind, and new adventures, new events, new victories await ahead. But the old year did not pass without a trace, […]
You will need: an old CD, pine cones, glue, an aluminum candle stand, beads, glitter or varnish for decoration.

On a regular disk you can recreate New Year's landscapes using the decoupage technique. The disc decoupage process is standard, the result is amazing!

If, in addition to old disks, there are pieces of felt lying around the house, then you can make these cool snowmen. Well, will any of the guests guess that it is based on an ordinary unnecessary disk?

See more ideas New Year's decorations from felt:

The New Year holidays are approaching, which means that very soon a forest guest will appear in almost every home in our country. Some people prefer to bet artificial Christmas tree, some use a real forest spruce from a Christmas market, while others just limit themselves to pine branches. However, this is not so important, because the most important feature of the New Year tree is the toys. Since ancient times, people in [...]
A great idea for a New Year's craft from old CDs would be to decorate an ordinary mirror or photo frame. The disk needs to be cut into pieces, and then the surface should be decorated with these pieces. You can keep it for yourself, or you can do it original gift someone close to you.

If you were once a big fan of CDs, and everyone was, now is the time to give them a second life. What good are discs that just sit on a shelf collecting dust? You can now find the song or movie you need on the Internet. But to do it unusual Christmas tree only once a year!

Still thinking about what to give your friend for New Year? The best gift one that is made by hand. Give to a loved one bracelet self made, which she will definitely appreciate! Well, if you have already chosen a gift for your friend, you can keep this decoration for yourself!

If you want to shine the most dazzlingly at the New Year's party, then it's time to think about New Year's outfit. You can decorate a regular collar with pieces of an unnecessary disk. Looks very cool!

An owl would be a great idea for a New Year's craft made from old CDs. To create a night guard, you can use pieces of felt, colored paper, several disks and other available materials. Turn on your imagination and start creating.

Remember the days when our shelves were filled with CDs with music, movies, programs and backups of the most important files from the computer? If you still haven't thrown out stacks of these CDs, as well as unnecessary or used DVD discs, the following list of ideas will definitely come in handy!
From unique Christmas ornaments to glamorous bowls and mirrors, this list will show you best ways reusing piles of your old disks.
IMPORTANT: remember that if you try to break the disks with your hands, they will spray fragments in all directions (this has been tested personally). If you cut with scissors as is, you will be able to separate the disks into pieces, but shiny finish may crack or peel off pieces. To get perfectly even pieces, we recommend: a jigsaw; repeated reuse of the cutter until it penetrates deeply into the layers of the disc, and then carefully breaks off along the cut line; Lightly warm the disc (under hot water or at minimum temperature in the oven) before cutting with scissors. You will probably find many more methods on the Internet - just try them one by one and choose yours.
CAREFULLY: When covering any thing with pieces of discs, remember that they are very easy to cut off. Therefore, you should not, for example, attach pieces to a decorative bowl for jewelry or to a guitar without then putting a good layer of one or another transparent coating on top, which will save you from the problem described.
1. Real master artists put together magnificent small sculptures from pieces of disks. As a base, you can take, for example, air-drying plastic or a similar material that does not need to be exposed to high temperatures. And the fragments from the disks themselves are already attached to the base by pressing and at the same time placing them on the glue.


2. “Tiles” cut from disks can be used to lay out a bird bath for a summer cottage. And again, do not forget about the covering so that the birds do not injure their paws. The result is an amazing vintage mosaic, especially if the bath itself is copper or blackened metal.


3. A guitar in the hippie style can be made just as well from broken pieces with additional decorative elements. Here, light exposure to fire was applied to some of the pieces (not for long and at a distance - experiment), as well as a special dyeing technique.

This decoration technique looks no worse on an electric guitar:

4. The mirror frame is lined with fragments of CDs, like shell fragments.

And her " cousin» - photo frame:

5. Using solid disks, artists Alice Morin and Clemens Elyar created a huge installation called “Wastelandscape” - “waves of music”, which, at the suggestion of the authors, became the embodiment of an oil slick. Inside the Centquatre gallery, Paris as part of the green movement.


On topic: George Raidbo makes entire sculptures out of disks...


...or how do you like this sea of discs from Bruce Munro?
.jpg)
Christmas tree on the street...

...her colleague...

...or a lizard laid out on the asphalt on a single base and then suspended from the house by cables and ropes.


Installation-ball for a school/institute library…

...or pavilion-arch.

6. If you lay out at least a simple pattern from pieces of CDs, as here, and not just stick them randomly, you will get an original and very nice jewelry box.

7. This is how you can decorate the most ordinary flower pot with pieces of disks. Black sealant or mastic is placed between the glued “shards”.

8. A coffee table tiled with mosaics looks great. In this case, it is better to place the mosaic under solid impact-resistant glass.


And one more table, which, thanks to its small size and white mastic between the CD pieces, despite its brightness, looks more delicate and appropriate in an apartment with a calm decor.

9. Christmas toys from transparent balls and pieces of CD...


...from whole disks and fabric, beads and wire...

...toys and a candlestick in combination with various accessories.

New Year themed triptych on the wall:

11. Disc holders for the bathroom curtain.

12. The transparent part of the kitchen door or the door to the living room is lined with pieces of discs.

13. Glued to the rims thick paper for scrapbooking, resulting in brightly colored coasters. You won't be able to make hot pads out of discs, because they will start to melt even under the knitted layer.


There is a chance with hot if only with this option:

Or like this: coffee beans are glued onto a disk, resulting in a fragrant stand-plate.
14. Creative idea- glue disc fragments onto leather, suede or nubuck shoes. The main thing is to take a good waterproof glue, put the first layer on the shoes and let it dry, and then glue the pieces on top. And the second key point is not to glue pieces where the leather bunches up or stretches when you put on and wear the shoes. Also, do not glue the pieces onto thin straps, as there is a high chance of scratching your feet later.

Continued in the second part of the article “How to creatively use unnecessary CDs: more than 80 ideas. Part 2.”: the creative component of the following ideas increases exponentially with each step!
Sources including:
www.boredpanda.com/recycled-cd-diy
pinterest.com
The time of CDs has almost passed, many people still have a large number of them - music, films, cartoons, outdated computer programs- with images of characters from fairy tales and films, flowers, graphic pictures.
They sparkle and shimmer with all the colors of the rainbow on the one hand, and on the other they have beautiful designs. You don’t feel like throwing them away - and there’s no need to, you can use them to make a lot of original, beautiful and useful things for your home.

In addition, working with them is very simple - they already have correct form circle, which in some crafts will only need to be slightly changed in order to give the future product or decoration the right type. At the same time, they are easily cut with ordinary office scissors and glued to a surface made of almost any material.
It happens that some home interior items have lost their appearance, it is not possible to replace them with new ones, or it is simply a pity to throw away an old favorite thing that has served faithfully for many years. Discs will help give things a new life.

For example, you can decorate an old mirror with them, making them out of pieces different shapes and the size sparkling and iridescent in the rays sunlight from a window or in the light of an electric lamp in all the colors of the rainbow - an original frame.

You can make a beautiful frame for a photo, decorate the edges of the cabinet drawers with a mosaic of pieces of disks.

Frame for mirror or photo
You will need a lot of disks, scissors, paints, glue, thick cardboard, colorless transparent varnish.

First you need to cut out a frame from cardboard in the shape and size of a mirror or photo. Then cut the disks into pieces of different shapes - squares, irregular quadrangles, rhombuses, triangles.

Take glue and stick the figures onto the frame so that there is a distance of one or two millimeters between them. As a result, the frame will have a mosaic of iridescent geometric shapes.

When the glue has dried and the figures cut out from the disk have stuck well, use black ink or paint to carefully and carefully go over the joints of the figures. After this, the frame is coated with transparent varnish, allowed to dry and mounted on a wall with a mirror or photograph.

Mirror frames made from discs look mysterious and original.

If in an apartment interior doors with glass, the glass can also be laid out with a mosaic of discs. In this case, there is no need to paint the joints between the pieces, but simply cover everything with transparent varnish, then there will be a feeling of light and space.

Clock made from disks
An option is to purchase a clock mechanism with hands or remove it from an old clock, lay clocks of any configuration on the wall with disks, gluing them to the wall, and strengthen the clock mechanism in the middle.
Decorating walls with discs
On the wall in the room or in the kitchen from disks with beautiful pictures, selected by topic, you can lay out an interesting composition. Or you can use them to create your own painting.
To do this, you need to take the disks and paint their shiny side with black ink; when the ink is dry, mark the lines of the future image along it, and then go over them with something sharp - a thick needle, a special scraper or a sharp knife with a thin blade and a sharp tip.

Iridescent lines on a black background will look very beautiful - you can draw anything you like: unusual birds, flowers, an abstract design. And hang the discs on the wall in any order.

Decorating the kitchen with discs
In the kitchen, discs can make an unusual “apron” in the work desk area. It will look extremely original, and in terms of performance properties the discs will not be inferior to tiles - they are just as easy to clean from splashes of fat and juice from vegetables and fruits.

The principle of working with them is the same as with frames for mirrors and photographs - just stick them on the wall.

Whether for a room or a kitchen, you can make a mosaic panel from disks by gluing pieces of the desired shape and color onto cardboard, and then covering the composition with transparent varnish.
Household items made from disks
The discs will make an excellent hot plate. IN in this case– the disc will play the role of a base, you need to put a nice cover made of fabric on it, and the stand is ready.

It would be original to update the tabletop of a coffee table with cut pieces of disks. To do this, cut them, fix them on the tabletop using a plasticizer in any order or by making a pattern out of the pieces, and then fill the tabletop with a thin layer of transparent varnish, making it even.

The coating will be durable. The tabletop will sparkle and shimmer beautifully.

You can make a holder for women's earrings from two disks and a thick tree branch.
The core of the stand is made from a smoothly processed branch, ground to the diameter of the hole in the center of the disks, one disk will be the base, the second shelf, make holes in it and insert the earrings into them.

How to decorate a suburban area with discs
There is room for creativity and imagination. For example, you can make a flower bed out of old car tires and wheels by decorating the outer surface of the tires with a mosaic of shiny pieces.

Or you can cut a peacock out of a rubber tire, and make a tail from whole round disks - to do this, you need to glue them in pairs with their shiny sides facing out, and then make them into a large triangle-tail, gluing the pairs of glued blanks overlapping.

On a country fence made of disks you can depict a huge iridescent caterpillar. You can color the discs ladybug– use red and black paint to make spots and draw a head, and plant them on fruit bushes and trees.

New Year's decorations from disks
Due to the fact that the discs shimmer in the rays of light with all the colors of the rainbow, they will come out beautiful snowflakes To New Year's holiday– they are easy to cut with scissors, you can cut out the most intricate patterns. You can hang snowflakes on the Christmas tree and on the walls.

You can cut the disks into small pieces, thickly cover an ordinary ball with them and hang it from the ceiling on a thread - it will rotate and sparkle, reflecting the lights of New Year's garlands.

The application can be very different. You can use discs to make an interior curtain similar to a bamboo curtain - assemble the discs on long threads. They can make an ultra-modern necklace, a refrigerator magnet, a vase, a candlestick, a stand for ballpoint pens and pencils, a box, you can even decorate a summer bag with them.

Unneeded CDs are an excellent material for creativity, a means of spending leisure time - making certain things from them, and an opportunity to decorate a house or cottage in an original and unusual way without spending a lot of money.

Photos of ideas for fake CDs


Most people have accumulations at home large number unwanted or unusable CDs.
You can simply throw them away. But it’s better to use them to create various crafts and interesting things. In this article we will tell you what fakes you can make from disks with your own hands.
Roof covering
If you have accumulated a lot of CDs, they can be used as an original sparkling roofing covering. To do this, first the disks are attached to plywood sheets, and they, in turn, are attached to the roof. Approximately a hundred discs are needed for 1 m² of coverage.
They need to be attached as follows: 1st row - end-to-end, subsequent ones - in a checkerboard pattern, overlapping the disk holes of the 1st row. Small nails or screws can be used as fasteners.
Come up with a drawing, following which you will begin to make the roof. If you don’t have enough material, then you can only lay out the visor with it.
Fake discs for the garden
British artist B. Monroe, known throughout the world for his light installations, decorated his garden area with stylized water lilies from CDs.
It took him 65 thousand CDs to create this work of art. You can take Monroe's idea as a basis and make these miniature lilies to decorate your own garden.
The discs can be used for the tail of a homemade peacock. They are attached to the metal frame of the tail using wire.
The disks can also make cute fish. To make one piece, you only need a couple of disks and multi-colored cardboard or a sheet of plastic.
The latter are used to make fins, tail and fish mouth. The cut out elements should be placed between the discs and carefully glued.
The disc caterpillar looks unusual and interesting. It will require several disks fastened together with screws. The legs can be made of rubber, plastic, plywood, and threads can be used for the mouth, eyes and hair. This craft is attached to the fence with wire.
Another option for using disks is the creation of street lighting fixtures.
Crafts from disks for children
Interesting ideas for children's crafts from CDs will be useful for educators and teachers primary school, moms and dads.
The disk can be used to create beautiful postcard in the form of a fish. This craft can be done even by three-year-olds. They can easily cope with it under the supervision of their parents. In addition to the disk, you will need PVA glue, scissors, plasticine, markers and multi-colored cardboard.
Fins, a tail, and a mouth cut out of cardboard must be carefully glued onto a CD, onto which plasticine must then be applied using the indentation technique. The next step is to make the eyes.
For this we use cardboard. After you have attached the eyes to the fish, you can make eyelashes from plasticine. The tail and fins are used to write congratulations.
From damaged CDs, using glue, multi-colored cardboard and colored paper, you can make Smeshariki, the popular heroes of the cartoon of the same name.
For beauty, the contours of figures, eyes, and mouth can be outlined with a marker. Such decorations are easily attached to a wall or cabinet using glue or double-sided adhesive tape.
From discs you can create original curtains that do not require washing. Required following materials: disks, paper clips, drill.
Small holes are drilled into the edges of the disks with a drill, and paper clips are used to connect them to each other. The number of discs, size and shape of the curtain depend on your imagination.
Curtain holders in the bathroom made from unnecessary disks will look great.
The discs can also be used to create unusual and interesting kanzashi-shaped curtain ties. And you can secure them with Chinese chopsticks.
To make a pick-up, you need to cut a circle of smaller diameter from the disk. Wrap the resulting ring with satin or silk ribbons. You can use flowers made from ribbons as decoration; below are photos of crafts made from discs.
Disks can be used to make candlesticks, boxes, stands, needle cases and much more. Therefore, you should not rush to get rid of outdated CDs. With their help, you can sometimes create truly unique things.
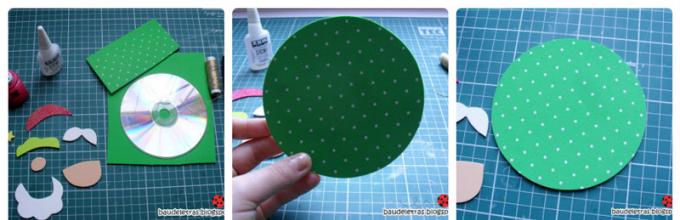
If you have several sheets of colored paper, an old disk and scissors in your house, then you will definitely provide your child with interesting leisure time, without the need to buy an expensive creativity kit, which does not always justify its cost. Damaged computer blanks are an excellent basis for children's crafts, and paper and all sorts of available materials will help supplement them. Even ordinary white paper quite suitable for creating some options.
In this master class we want to introduce you to a simple craft - a bunny made from a disk and paper. According to this scenario, you can create a cute face of any animal familiar to a child by replacing the shape, size and color of the ears, nose, eye shape and others distinctive features. So, let's start imagining with the youngest children. Just cut out the parts for them and help them glue, believe me, the kids’ joy will know no bounds.
1. Take an old disk, paper, scissors and glue to work. If finished paper no, you shouldn’t abandon the idea, because in our craft we will use only small parts, and they can be cut out from any packaging and boxes.
2. Cut out two white circles and two smaller black ovals.

3. Create eyes from the prepared parts and attach just above the hole of the disk.

4. From white or gray paper, cut out a shape whose shape resembles the number 8. These will be the cheeks of our bunny, attach two funny teeth to them.

5. Stick the resulting part onto the disk, placing it just below the hole. Do not glue the teeth themselves.

6. Hide the hole of the disc behind the red nose, add eyelashes to the eyes.

7. Cut out blanks from white and gray leaves for long ears bunny

8. Glue the parts on top of each other and attach to the top of the head.

9. And the final touch is unusual antennae; in order not to cut them out of paper, use a regular nylon mesh.

10. Attach whiskers to the cheeks to complete the bunny look.

The final look of the craft.
This is such a cute craft we made. We hope you will take our advice into account and make something else with your children.


