Easter bunny– an integral part of the wonderful spring holiday of Easter! It just so happened from ancient times that it is he who comes to visit on Easter and brings us good mood. The smiles of our children illuminate everything around, isn’t it happiness when children are happy? So prepare a nest for this eared guest and prepare Easter gifts!
In this master class I will show 10 ways - how to make an Easter bunny with your own hands step by step photos and video. Don't forget, the gift of an Easter Bunny brings good luck all year round!
The most traditional gift and symbol of Easter is Easter Egg. But second place on the list of gifts for Easter is rightfully occupied by the Easter Bunny. Gifts in the form of rabbits and bunnies are very pleasant to receive not only for children, adults are also pleased with such gifts!
In many families, parents tell their children to be obedient, then Christ's Resurrection the wonderful, kind Easter Bunny will bring them painted bright Easter eggs. To do this, in the secluded corners of the house, the kids built cozy nests for him, using their hats, panama hats, and caps for this. What a pleasure it is for the children to find decorated and, in addition, various sweets in this nest.
Where and when was such a wonderful Easter tradition born? In the fifteenth century, the Germans gave the world the Easter Bunny. At first he came only to German children, then he began to delight children in America, after which he began to travel all over the world, bringing joy to families in the world good holiday Easter.
Easter bunny - how to make it yourself
01.Egg basket in the shape of an Easter bunny
On the bright holiday of Easter, it is customary for the whole family to go to church services. The treats are placed in a basket with a beautiful towel and taken to the Temple of God for consecration. To make it interesting for your children to also participate in the Easter service, make for them individual miniature baskets for Easter cakes or paints.
Today we will make a fun paper basket in the shape of a cute Easter bunny.

For work we will collect the following tools and materials:
- two sheets of regular cardboard;
- scissors;
- a piece of blue wrapping paper;
- glue stick;
- heat gun;
- pen or pencil;
- tube with PVA glue;
- cotton pad;
- colored paper;
- eggs;
- thin satin ribbons.
First, we will glue the wrapping paper onto a sheet of cardboard. To do this, use a glue stick. First, generously grease one side of the cardboard, glue the paper and carefully iron it with your hands so that there are no bubbles or creases. Then we will paste the cardboard on the reverse side as well.

The result is a beautiful double-sided blue cardboard. You also need to prepare a stencil in the shape of a rabbit’s head (size 10x15 cm). You can draw it yourself, but it’s easier to find an image on the Internet and print a suitable drawing on a sheet of paper.

Using the stencil, we cut out the following details: 2 rabbit heads, a long strip measuring 2x21 cm, a wide strip measuring 7x18 cm.

We take one “head” piece and glue a wide strip to it in a semicircle. At this stage we use a heat gun and apply glue along the edge of the strip.

Glue the second “head” piece on top. It turns out to be a deep basket.


All that remains is to fix the thin long strip. Glue it on the sides of a wide strip, this will be the handle of the basket.

To make the rabbit's face, we will use colored paper and a cotton pad. Cut out a heart from red paper - this will be the nose, and a semicircle - the mouth. We make eyes and antennae from black paper. And we’ll cut out the cheeks from a cotton pad. We glue all the parts with regular PVA glue.

The result is a magnificent and unusual basket with the Easter bunny.

All that remains is to fill it with beautiful eggs with ornaments and bows made of thin satin ribbons.

This basket holds 2-3 sacred eggs.


Little ones will love holding their own individual Easter treat baskets.


For your daughter you can make a basket in red or pink, but for your son it is better to use blue and green shades.
02. Easter bunny on a skewer
Try decorating your table with this fun craft – a felt rabbit. All you need to know is to hold the needle in your hands and glue the beads with glue. By the way, it is better to use transparent glue, like a gel. Well, you can stuff the toy with either cotton wool or cereal.

For the craft you need to prepare:
- felt and ribbon;
- beads and glue;
- skewer and cotton wool;
- needle and thread.
Cut out bunny figures. To create volumetric figure we need two parts.

We sew both parts together with red thread. We reach the tail and stop.

We fill the space between the two parts with cotton wool.

We insert a skewer in the center and complete the connection of the parts near it.

Glue a bow in the center of the bunny's neck.

Decorate the center of the bow with a red heart.

Add three plastic flowers. We glue them randomly.

The wonderful Easter bunny is ready. All that remains is to find a place for him. This could be an Easter cake, a vase in the center of the table, or a pot of green wheat. Or maybe you have your own version of how to decorate the Easter table using such a bright bunny?

And here is our felt bunny’s friend. A friendly couple of handmade bunnies are ready to take their place on the Easter table.

Kids will love this egg warmer bunny. You can present it for breakfast as a toy, and the baby will see an interesting surprise in it. Or you can hide an Easter egg in such a heating pad and it will become a wonderful gift for loved ones.

To knit a toy you need:
- yarn of white, green, gray colors;
- a couple of beads for the eyes;
- a little cotton wool or padding for paws.
Abbreviations:
VP - air loop;
RLS - single crochet.
So, the bunny consists of 2 main parts - the lower part with legs and tail, the upper part with the head, torso and arms.
We start knitting from the bottom. For this I use yarn gray. We collect 2 VP. 6 RLS should be connected to the far loop.


After this, we knit a circle until it reaches a circumference of 13 cm, this is exactly the measurement of the widest part of the egg. I got 30 loops. We knit 5 rows without changes and cut the thread.

The paws and tail are knitted the same way. Knit the same 2 VPs, then a circle of 6 RLS, 12 RLS, 18 RLS. The next 3 rows are knitted with 18 stitches without increasing or decreasing.


We evenly reduce the loops to 12 loops (knitting 2 loops together through one loop, then reduce to 12 loops and break the thread. Fill the parts with padding polyester and sew the tail at the back and the paws at the front.
Rabbit top
Take green yarn and start knitting in the same way as the bottom part. Due to the fact that the shape of the egg is still different, we make changes.
Row one: 6 sc;
Row two: 12 sc;
Row three: 18 RLS;
Rows from four to six: 24 sc;
Row seven: 30 sc;
From rows 8 to 10, knit without changes. Break the thread.


Paws
We begin to knit the foot traditionally with 2 VP and 6 RLS. In the third row there are also 6 sc. We change the thread to green and 4 rows are knitted without changes.


Now we make a decrease of 1 loop in each row until 2 loops are formed in the row. Break the thread. Knit the 2nd leg in the same way. 
Sew the legs to the body.
Head
Using white yarn, cast on 2 VPs, knit 6 sc, 12 sc, 18 sc in rows.
In 4, 5. 6 rows of 18 RLS. After this, we make a decrease in 6 loops in each row until a closed workpiece is formed.


Ears

Hare assembly
We sew the ears to the head with the same yarn for an inconspicuous attachment.

We sew the head to the body and design the muzzle. 2 beads are sewn on for the eyes, the nose and mouth are embroidered with thread.


Our bunny egg warmer is ready!

04. Craft for children - corrugated paper bunny
The youngest children will be happy to model such a hare; the Easter craft will turn out to be voluminous and catchy. The base will be white corrugated paper - soft sheets of wrinkled texture. Such material is easy to find on sale; rolls cost a penny, so you can make anything else besides a hare. We will now describe in detail the method of making children's crafts.

What you need to prepare to create a bunny:
- Cardboard and scissors for cutting out animal figures;
- Roll of white corrugated paper to create fluffy bunny fur;
- Stapler and glue for attaching all parts, pieces of corrugated paper to the craft;
- 2 blue and 1 black half beads for eyes and nose.
Our bunny will be wearing a white fur coat. White crepe paper is suitable for making it. You can also replace it with cotton wool, polystyrene foam or napkins - whatever you have on hand. But our goal is to create crafts using corrugated paper, so we will focus on its availability.
Eyes and a nose made from ready-made half-beads will add expressiveness to the craft and will sparkle. They can be replaced with pieces of paper of the appropriate color. Scissors are needed for cutting out parts of the figure, as well as for processing paper.

Cut out pieces from cardboard that will become components of the bunny figurine: body, head with ears and paws. The body can be round, the same shape - the head, ears and paws - oblong. These are simple details that our imagination drew for us to create the chosen figure.

Next, you can fasten all the parts together or pre-fill the largest central part with pieces of corrugated paper. Slice white paper small squares. Make so many of them that it will be enough to fill the entire figure later.
Further work will be reminiscent of assembling a mosaic - you will need to fill the entire surface of the cardboard with small fragments.

When you are sure that there are enough squares to fill the circle, coat it generously with glue. Start filling the paper space with soft pieces. Work very quickly before the glue dries. Take each piece individually with your fingers or tweezers and press it onto the cardboard.

Fill the circle with fur. Press not all of the part, but only part of it, onto the surface of the cardboard to create a three-dimensional effect.

Next, using a stapler, press all other parts to the central circle-body. In this case, you will get a secure fastening, but the metal staples will be visible on the paper. In the future, they can be hidden behind a layer of white fur.

Fill the entire surface of the paper bunny with white squares. The three-dimensional figure is ready.

And now all that remains is to design the face. For this we have prepared blue and black half beads. If they are on an adhesive basis, then immediately glue them to the face as sparkling eyes and a nose. Or apply glue first.
You can also replace the half beads with shifting eyes from the set. Glue two lumps of white paper as cheeks.

So the cute white corrugated paper bunny is ready. You can repeat the same procedure on the reverse side to get a double-sided craft.


05. Crochet applique “Easter Bunny”

To knit a bunny we will need hook No. 2, yarn of any color of medium thickness, scissors, a piece of Baby Elise Softy yarn for making eyes, and an iron.
We start knitting the hare from its body. To do this, we cast on 4 air loops, after which we connect the resulting chain into a ring with a connecting post.

We knit three air loops to lift to another row and knit this entire row with single crochet stitches, and when tying a ring, we insert the tool not into the loops of the ring, but into its hole. Using a connecting post, we “fix” the end of the row to its beginning.


Using these chain stitches we knit 4 single crochets.

After this, we knit 8 single crochets along the edge of the knitting, and then we knit air loops again, only in this case there should already be 3 of them. We fasten them to the edge of the knitting with a single crochet in the same loop from where we started knitting the air loops.

The result is the “tail” of a bunny. Next, we again knit 8 single crochets along the edge of the product, after which we begin knitting the hare’s head. To do this, we knit five double crochets into the second loop from the hook, after which we “fasten” the “fan” of loops to the row with a single crochet.

After this, we turn the knitting and knit 3 single crochets along the edge of the hare’s “head”. Then we knit 8 air loops.

The bunny “ears” are knitted as follows: 1 half crochet, 1 single crochet, 1 double crochet, 1 double crochet, 1 double crochet, 1 single crochet, 1 half crochet.

After the first ear is knitted, let's move on to the second. To do this, from the same loop from which we started knitting the first “eye”, we knit a chain of 8 chain loops.


We tear off the yarn and hide the tip on the wrong side of the applique. We’ll make eyes from a piece of Baby Elise Softy yarn: tie a knot at one end, pull the yarn through the place where the hare’s eye should be located, and then tie a knot on the wrong side again.

Application " Easter Bunny"ready. Iron it from the wrong side, special attention paying attention to the “ears”.

06. Easter bunny made of felt
Creativity is of great importance in raising children, because in the process of manual activity, imagination develops and coordination of movements improves. It is especially useful to make crafts for any occasion, then these are not just toys, but also decorative items.
Easter is approaching, while mothers are busy around the house, children can devote time to creativity. The process of making a hare is very simple; you will need a minimum amount of materials. To make a hare, it is better to use thin felt; it is convenient to make crafts from it small size. It’s especially nice that the edges of the material do not fray.
The Easter bunny can be used to decorate a basket with eggs, Easter cake, or simply placed on a holiday table.

Materials:
- Felt for needlework. To make a hare, one sheet of any color is enough. Small pieces of felt of different colors: white for the eyes, red for the heart and nose.
- Needle and thread. You can use thin wool or regular cotton threads.
- Black beads for eyes.
- Sintepon or synthetic padding.
The details of the paper pattern are cut out.

Paper parts are placed on a sheet of felt, and the hare's body is cut out. You should end up with two parts that are cut without allowances. The bottom of the hare is one piece without allowances.

The hare parts are folded and stitched. It is better to use a hand overcast stitch; stitches in the form of loops neatly close the open sections of the parts.

The hare's body is stuffed with synthetic fluff. You can use a long skewer to stuff narrow ears.

The bottom is sewn to the body stuffed with padding. A hand overlock stitch is used.

To make the tail, you can use any thread, preferably the same as for the overlock stitch. The threads are wound onto the cardboard large size or on your fingers.
They are intercepted in the middle with a short thread, the workpiece is carefully removed, the ends are shaped in the form of a circle.

A thread pompom is sewn to the back of the body, the tail is ready. You can highlight the ears and paws; for this, stitches are laid at the base of these parts.

The details of the eyes are cut out from white felt, and black beads are sewn to them. A heart and a nose are cut out of red felt. If desired, you can use a bead for the nose, in which case it will look neater.

Eyes and a nose are sewn to the hare's face, and a heart is sewn to the body. The felt Easter bunny is ready!

07. DIY hare using the amigurumi technique
In this master class we will knit an Easter bunny using the amigurumi technique.
To knit such a bunny we will need:
- light and dark pink yarn;
- 2 black beads;
- hook 1.75 mm;
- padding polyester;
- scissors;
- needle.

We will knit the bunny from the bottom up. The choice of yarn color depends entirely on desire. However, when it comes to yarn thickness, the thinner the thread, the better. But you don’t need to take a very thin thread either. Children's Novelty yarn works well.
We make 2 loops and knit 6 SC in 2. This is the starting ring. Next, we perform 2 SC in each loop. We get 12 loops.
This is the maximum number of loops for our paws. Therefore, we next perform 6 rows of 12 STBN.

We knit 1 more of the same piece. We do not break the thread, but make 3 air loops. We connect 2 parts. Now we knit in a circle. As a result, we will knit 30 STBN.

We perform 1 row without increments. Now we will knit increases in only 4 places. Centered on the front, centered on the back and on the sides. With this increase we knit 3 rows.


We knit 1 row of 1 SC in each loop. Now we will immediately knit the head. Double the number of loops. Next, add through 1 loop. Then through 2 loops.

We knit the next 2 rows without increases or decreases. And then we decrease first after 2 loops, then after 1. And we decrease in each loop until closed.

We knit ears. They will also be pink, just a darker shade. We cast on a chain of 16 loops.
Then we knit 1 SS, into a new loop 2 STBN, then 1 PSTSN, then 2 STSN, 2 STS2N.


Now we will knit the front legs with the same yarn. We form a ring of 6 loops. And then we knit 5 rows of 6 SC.

Let's return to the ears and tie them on one side with yarn of the main color. We insert the hook into only one wall of the loop.

Now we sew the legs on the sides of the body.

Sew on the ears. Let's make a tail from yarn of a darker color. This will be a simple ring of 6 loops.

We embroider the nose and mouth. Let's make the eyes. For this we have 2 small black beads.

This is such a wonderful miniature crochet bunny!

08. Bunny egg for Easter
Do you want to please your baby and present him with an elegant egg for Easter? Try making a bunny egg! Depending on your imagination, instead of a bunny you can make a mouse or a dog, and if you try, even a dragon. It will take you no more than twenty minutes, and the child will be happy for much longer.

To create a bunny-shaped egg box you need to take:
- colored paper;
- scissors;
- simple pencil;
- ruler;
- toothpick;
- ribbon, thread or sewing tape;
- egg;
- glue.
To get started, gather everything you need. As you work, you will have everything at your fingertips, and the surprise for your baby will probably come out quickly.

Measure the width of the egg. This can be done with a thread or a centimeter. IN specific case it was measured with a tape, and the width turned out to be about 15 cm. Cut a strip of cardboard of the required length, and set aside 5 cm in height. Don’t forget to cut out the ears.

Decorate the base with an orange wavy frill and glue the inside of the ears. It should be slightly smaller than the base.

Make the bunny's front and back legs. Place a broken toothpick with a sign on the end into the front

All that remains is to draw or glue on the eyes, nose and mouth. Ready! This is the Easter bunny with a freckled forehead.

When I was little we celebrated everything church holidays both Catholic and Orthodox. The city was on the border and this was normal for most residents, even if there were no Catholics in the family. We had. Then we moved, our daughter was born, she grew up and started asking questions. To be honest, I'm still lost. During our last trip to Europe, there were active preparations for Easter and cute chocolate faces were looking at us from all the shop windows, and we also received chocolate eggs as a gift, which were brought by... the Easter Bunny. I had to look for answers to questions on the Internet)).
The most spring, kindest, brightest holiday is, of course, Easter. Many people associate it with Easter cakes, colorful eggs and even a rabbit. Surprised?
Let's figure out what it has to do with this holiday rabbit, and why does he lay eggs (yes, this is exactly what the Easter bunny does on the eve of the holiday)?
Easter bunny (hare) is symbol of Easter in the West, the same as in Russia and Ukraine - Easter cakes and colored eggs.
Children of Europe and America believe in fairy tale story about what easter bunny hides colorful chocolate eggs in her rabbit's nest. On Easter morning, the kids need to find this nest to get sweets. However, the rabbit brings gifts only to good and well-mannered children, which their parents tell them about all year long.
How the rabbit became a symbol of Easter
Story easter bunny dates back to pre-Christian Germany, when people worshiped pagan gods.
The goddess of spring and fertility, Ostara, was also revered at that time. The onset of spring, namely, the day of the vernal equinox, was its holiday, and the symbol of this holiday was the rabbit as the most fertile animal, symbolizing fertility.
But why did the role of the animal that hides the eggs go to the rabbit? After all, a chicken lays eggs! It turns out that an “ordinary” chicken simply could not lay such beautiful and bright eggs. The Germans needed to come up with another fairy tale character. There were many such characters, but it was the bunny/rabbit that took root in the role of a magical animal that lays magical eggs.
There are several more legends the appearance of the Easter bunny.
One of them says that during the Great Flood, when the ark was floating on the waves, it came across the top of a mountain, and a gap formed at the bottom. And the ark would have sunk into the depths if not for the bunny, who plugged the hole with its tail. And so, in memory of the brave hare, fairy tales were born.
Another legend says that by laying eggs, hares/rabbits seem to atone for their guilt to people for their spring raids on gardens and vegetable plots.
But no one really knows who came up with the custom of hiding colorful eggs. Some history experts claim that it was Goethe himself who came up with such entertainment for his guests. Adults and children looked for eggs in the garden under the bushes, and when a find was discovered under another bush, no one doubted that the eggs were laid not by chickens, but by hares.
They also say that whoever manages to find the egg laid by the Easter Bunny will have a happy whole year.
Popularity of the Magic Bunny
It is believed that easter bunny originally from Germany, because it was there that the first written mentions of him were found. Together with migrants the legend of the easter bunny came to North America, and already there it became the same symbol of Easter as in Germany.
In Munich, a museum was even opened in honor of the rabbit, which was included in the Guinness Book of Records. After all, the museum had more than 1,000 different exhibits: figurines of rabbits made of wood, porcelain, sugar, postcards, molds for making sweet rabbits and much more.
All exhibits corresponded to their time. There were toy bunnies from the early 19th century and bunnies from the First World War dressed in military uniforms.
Unfortunately, in 2005, 5 years after the death of the museum’s founder, Manfred Cloud, the museum was closed and part of the collection was sold.
Easter celebration and Easter bunnies
In many countries Easter celebration accompanied by parades. People dress up as bunnies; stores sell postcards, chocolate bunnies, and soft toys.
In Russia, the rabbit is not a symbol of Easter. In our country, a chicken still sits next to colored eggs, as a prototype of a mother who protects her chicks. She is a symbol of family and love.
Our Easter has its own traditions: Easter cakes, colored eggs, ringing bells and small buns in the shape of birds - larks.
However, whatever the symbol of this holiday, one thing remains unchanged: Easter is the brightest holiday that brings happiness, warmth and kindness to the heart of each of us.
For us Orthodox Christians, in addition to decorating eggs, it is customary to bake Easter cakes. This custom dates back to Slavic tradition spring ritual baking. And for Catholics the main symbol is happy holiday- Easter bunny laying eggs. BigPiccha will now tell you how this animal is connected with the resurrection of Christ.
(Total 5 photos)
The Easter Bunny, so to speak, has its roots in pagan times. In ancient Germanic cults, hares were associated with the goddess of dawn and fertility Ostara (Easter in German - Ostern). Eared animals deservedly symbolized fertility. Among other nationalities, this role was also performed by other animals, for example a rooster. But gradually the hare drove everyone out.

As Christianity spread throughout Europe, missionaries adapted pagan rituals and customs to suit Christian holidays. The same thing happened with Easter. Pagan holiday spring equinox and the honoring of the goddess Ostara was woven into the context of the resurrection of Jesus Christ. They also transferred hares, “dressing” them as domestic rabbits, laying eggs. Eggs, by the way, meant life among the ancient Germans.

For the first time Easter traditions were documented in 1682 by the German professor of medicine Georg Frank von Frankenau. His story was called "About Easter Eggs." He wrote: “In southern Germany, in Alsace, in the Palatinate, as well as in some neighboring regions and in Westphalia, these eggs are called hare eggs. Children are told that the Easter Bunny carries them off and then hides them in the grass and bushes. This makes kids look for them with great zeal for the amusement of adults.” This tradition is observed in Germany to this day.
Greetings. Today I want to give you some interesting ideas on how you can make your own Easter bunny. It can be used as a symbol of Western Easter, as interior decor, or simply as a cute gift for loved ones.
Before moving on to the actual description of the creation process, I would like to explain why I chose the theme of fluffies and what they have to do with Easter. And their connection with this holiday is the most direct - bunnies are symbols of fertility and new life in the West; Germany is considered their homeland. In our country, these meanings are transferred to eggs and Easter cakes.
There are a lot of legends about why the rabbit was chosen as a symbol, but for you and me, I think it’s time to call the kids and start choosing a craft.
As a cute present, I suggest making a wonderful bunny from a terry towel. And inside we will put a Kinder Surprise or a real boiled egg. Can you imagine how happy your baby will be? I am sure that he will definitely remember this holiday.
So this craft can also be used as an egg stand.
I prepared two step by step wizard class. Both of them are easy and quick to do, so I’m just confident that you will succeed.

We will need:
- towel (30*30 cm)
- 2 hair ties
- beads for eyes and nose
- Kinder
- Double sided tape
Since this craft is completely waste-free, we will not use scissors and a knife for it, but we will cut three small pieces of tape in advance and glue the nose and eyes to them.

You can take the towel in other sizes, but then be prepared to get longer ears.

Notice that all the ends matched and the edges were smooth. Still, the child will appreciate neatness.

Instead of an elastic band you can use satin ribbon, but it is not very convenient to tie, so I ask you all to prepare and find or purchase two elastic bands in advance.

Lower the elastic band of the body to better press the kinder, otherwise it may slip out of the towel.

You can also glue carrots or flowers.

Do you think your child will appreciate your idea? I think that such an extraordinary congratulation develops children’s imagination well.
Also look at how you can roll a towel in a different way; everything is shown in order in the picture.
You will need:
- square towel,
- hair elastic.
The first step is to find the middle of the towel. Next, we twist its ends into a tube; here it is important to straighten the corners and edges.

Now fold the workpiece in half and put the elastic band on the towel. You pull the edges as if you want to pull them out, but do not do this, leaving the free ends pressed against the body. This is how we formed the head and ears. All that remains is to move the ears themselves away from each other.
You can, as in the previous version, put the testicles inside, and glue the eyes and nose on the craft itself.
DIY Easter bunny on a postcard
I wrote a little about postcards in the article, but there are a lot of ideas, so let’s make a bright congratulations with a bunny.
The card itself is very joyful, and what inspired me most was the bunny’s tail. It doesn’t have to be made flat out of paper; you can glue a fluffy pompom instead.
You will need:
- scissors,
- glue,
- white sheet of paper,
- thick cardboard for the base,
- about 20 multi-colored stripes, 1 centimeter wide and length corresponding to the width of the base.
My daughter and I cut out these strips from self-adhesive colored paper. It is sold in regular stationery stores and has bright, saturated shades of sheets.
The strips may not be the same length if you don’t have enough of them, but the middle must be even. Because the edges will be covered by the top sheet of paper, but the middle will remain visible.

You can draw a bunny schematically or not like this, but this one has a very cute tail. Cut it along the outline and glue it on top of the side of the base with stripes.

If you are doing a craft with a child, then use PVA glue; it is considered the most harmless and non-toxic.

Still, you need to try making a donut instead of a ponytail! Sign the message and the postcard is ready.
Fabric bunny with patterns
Cute fabric rabbits are very good as decoration. They are easy to sew and look very cute. And if you choose floral fabric, the animal will also become a symbol of spring!
Of course, needlewomen will be happy to start creating, and I offer them diagrams for inspiration.

You will need:
- soft gray fabric
- white fabric for ears,
- scissors,
- threads with a needle,
- any filler (cotton wool, padding polyester).
The details from the diagram above must be transferred to fabric and cut out. Each part needs to be cut out two pieces.
We attach all the suitable parts wrong sides each other and sewing the edges, leaving a little edge free.
For example, we fold the foot in half and sweep the edges, leaving the tip free. We turn the part inside out and fill it with padding polyester, and sew up the edge.

We make the ears from two types of fabric and put two machine stitches in the middle, as in the picture.
Assemble all the parts and use thread knots to make eyes and a nose. You can use beads instead if you have them.
Another interesting option animals. Everything is simple here, transfer the parts to the fabric, fold them front side inside and stitch, also leaving the edge free.
Turn the part inside out and do the stuffing. Then you stitch this edge by hand.
You can decorate with beads and ribbons. If you take a beautiful elegant fabric, then little decor is needed, just to indicate the eyes and neck.

You can use this pattern. Just a reminder that you need to cut out two pieces.

For those who don’t want to make the whole flock according to one pattern, I’ll give you another, very cute one. By the way, it is also perfect for making felt products.

Well, a very simple, but very cute version of bunnies.

It’s not at all a shame to put such textile animals in a basket and give them a treat.
Master class on how to crochet a rabbit with diagram and description
Let's crochet this animal! This is also quite simple. I will provide a drawing that describes the sequence of knitting rows step by step. By repeating the description, it will be easy for you to repeat the entire process from beginning to end on your own.
In the bottom diagram, “sc” means single crochet.

A simple one-sided applique can be made according to the bottom diagram. This shows the sequential arrangement of chain stitches and double crochets in rows.

To make it even clearer for you, I suggest watching a video where a needlewoman shows in detail how to knit a bunny.
The video shows how to assemble single crochets into a ring and how to increase the width correctly. Try this, because crocheting is not difficult, and when you master the above simple circuits, then it will be possible to create very realistic rabbits.

They deserve praise, right?
Felt symbol
Felt is loved by many craftswomen, because it has such a variety of colors, and it’s also a pleasure to work with. You can choose different thicknesses of the sections, but you should not buy fabric for this craft that is more than a millimeter thick; it will be difficult to create with it, because it will not obey your hands and follow the desired curves.

You can use all the patterns given in this article for bunnies, because felt is a very pliable material.

Well, if you don’t want to use seams, then all the parts can simply be glued together.
You just need to choose a colorless glue, otherwise it may seep through the fabric and leave unsightly marks.
Cute bunny made of threads
For the little ones, I suggest making an animal from wool threads. It is made using a pompom and cardboard.
We will need:
- wool threads,
- cardboard,
- scissors,
- felt,
- beads for eyes and nose,
- needle and thread.

To make these bunnies you need 1 large pompom for the body, 1 medium one for the head, 2 small ones for the front legs and 1 small one for the tail.
All pom-poms are made according to the pattern from below. The basis is two cardboard rings of the required diameter, which are wrapped with thread.

Then we cut the thread between the rings with scissors and pass the pre-cut thread between the rings to tighten the pieces. This is shown in detail in the photo.

We will cut out ears from felt and sew them to the head with threads.

All that remains is to fasten the pompoms and glue the eyes and nose with hot glue. You can also make the following craft using a thread base.

Only here the pompoms are not taken out of cardboard rings, which act as the base and body of the craft. The head is a continuation of the pom-poms, so draw the diagram with the head, ears and body on one part.
Easter bunny made of paper
Cute little bunnies can be made from any material, but the most accessible and favorite for most children is paper. You draw what you want on it, and bend it as needed. Check out this cute egg holder you can make.

For this craft, use this template, it can be immediately printed and cut out. Where dotted lines are shown, the paper needs to be folded and glued.
The template consists of two parts that are connected to each other. I think your kids will definitely be delighted with such a funny and cheerful craft.

And another interesting option for you to note: my daughter and I have already tried it - the child was delighted. Of course, I had to cut out all the parts myself, because she still doesn’t know how to cut straight. And everyone likes crafts that are smooth and neat.

We will need:
- album sheet,
- colored cardboard,
- glue,
- scissors,
- markers.
Take this diagram as a basis, simply print it out or attach a sheet of paper to the monitor screen and carefully trace it with a soft pencil.

Fold lines are shown as dotted lines, and straight lines need to be cut. These will be the legs. You can glue them to any sheet of cardboard; we made a clearing in the photo.
The eyes and mouth can be made with a felt-tip pen, or you can use beads.
Important! Tape the fold of the head well because it can peel off easily.
Well, also note for you the idea of crafts from egg trays. The cell is cut off and its bottom is trimmed. And the decor is glued on, so you can, of course, make not only a rabbit, but also a chicken, a bear or a cat.

Any joint creativity develops children's fine motor skills, which contributes to normal speech development. And also the development of imagination, especially when the child chooses the color and decor for a future craft.
Making a bunny using origami technique
Origami is a fairly well-known technique in which a figure is made from paper without the use of glue or scissors. With the correct bending of the lines, the figure folds very easily. There are more complex circuits, which children cannot do, but there are very simple ones, for example, when we folded.
This technique will help us make cute egg cups for Easter. And all you need for this is attentiveness, a sheet of paper and a felt-tip pen.

Below is given step by step instructions by folding with description.
Important! Do not take a thick sheet, it is very difficult to roll the shape.

And one more interesting idea animal using the same technique. Make it a little lighter, and it can also serve as a basket.

To ensure that all the crafts turn out neat, calm down and pay full attention to what you are doing. After all, they say that whoever is given a rabbit for Easter will be happy all year. And, if this gift was made with your own hands, then it was also made by your loved one. Nice, isn't it?
Easter bunny (hare) - holiday decoration for Easter 2019 will delight both adults and children. Easter symbol in the culture of some countries Western Europe and the USA. The symbol has pagan roots, dating back to holidays dedicated to fertility and spring. The Easter Bunny, as a symbol of fertility and wealth, has been a symbol of Easter in Germany since the 16th century and has since spread throughout the world. They make toys and sweets, as well as souvenirs in the shape of bunnies.
Many people associate Easter not only with Easter cakes, colorful eggs, but also with the Easter bunny (hare).
According to legend, this bunny hides colorful chocolate Easter eggs in his bunny nest. On Easter morning, kids try to find this bunny's nest in order to get chocolate sweets in the form of eggs. But according to the legend that parents tell their children, this can only happen to well-mannered, good and obedient children. And most importantly, those who manage to find such an Easter egg will be happy all year.
Easter bunnies or bunnies are a common pastry in some Western European countries, Canada and the USA. They are made sweet and savory, different shapes and with different fillings. I offer this option for Easter baking.
Ingredients:
For the test:
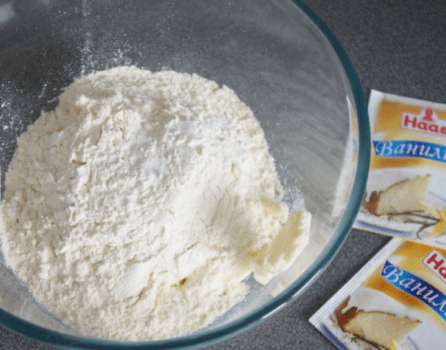
Flour - 280 gr.
Butter at room temperature - 125 gr.
Cottage cheese - 180 gr.
Vanillin - 2 pinches
Salt - 1 pinch
For the filling:
Medium apples - 2 pcs.
Cognac - 1 tbsp. (optional)
Ground cinnamon - 0.5 tsp.
Sugar - 3-5 tbsp.
Chopped nuts - 1 tbsp.
Flour or starch - 0.5 tbsp.
Butter - 0.5 tbsp.
Canned berries (optional) to taste
How to cook Easter bunnies for Easter 2019

For the filling, wash, peel and cut the apples into cubes. Place in a saucepan, add butter, sugar (or honey), cinnamon, cognac, flour. Simmer over low heat until thickened, stirring occasionally. Add nuts and berries. Leave to cool.
For the dough, mix butter, flour, salt, vanillin. Add cottage cheese. You can add 1-2 tablespoons of sugar to taste.

Roll the dough into a ball. If the dough crumbles, you can add a spoonful of sour cream. If it sticks to your hands, add a spoon or two of flour. Wrap in a bag or film and put in the refrigerator for 40-60 minutes.

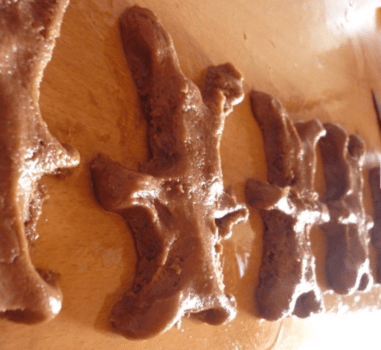
Lightly roll out the dough, fold it, roll it out again. Fold and roll out again. This will add layering to it. Using the template, cut out 10-12 hare figures.

Make holes in half of the pieces to allow steam to escape.
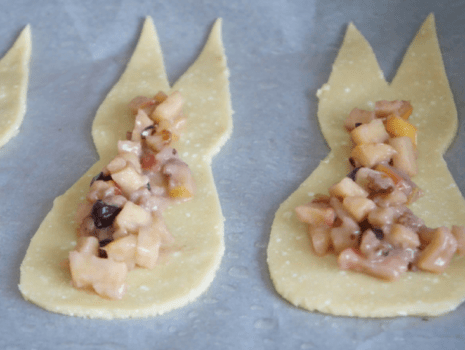
Place the cut out shapes on a baking sheet and add some filling. Brush the edges of the dough with egg or water.

Place the dough pan with holes on top and secure the edges.

Brush the hares with egg and sprinkle with sesame seeds. Make noses and eyes from berries and raisins. Place the tray with the bunnies in the refrigerator while the oven heats up.

Bake at 220 degrees for 10-15 minutes.

Delicious holiday bunnies are ready! You can also make a savory filling (minced meat, or cheese with herbs). You can make regular bagels from leftover dough and filling.
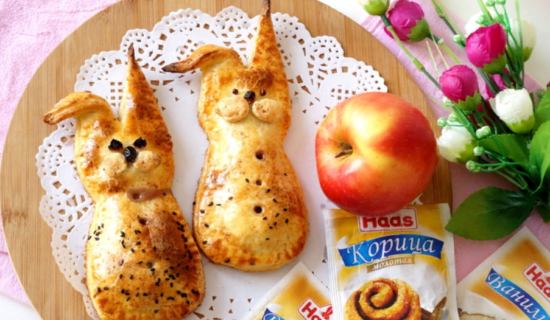
They turned out to be very cute bunnies, the kids will love them. Bon appetit! Happy holiday!
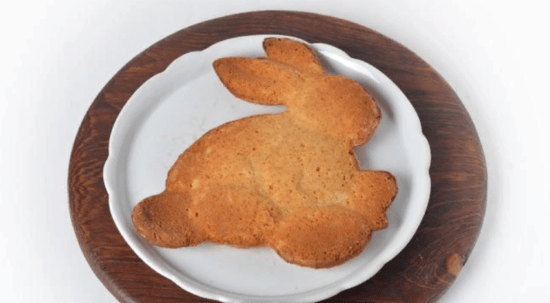
DIY Easter bunny (hare) made from dough
From the suggested amount of dough you will get 3 fairly large rabbits. The finished bunnies can be sprinkled with powdered sugar on top or decorated with icing sugar and colorful sprinkles. If you do not have a special mold, then the dough can be placed in a mold measuring 20x30 centimeters and bake 1 cake. And from it, using a special rabbit cutter, cut out rabbits.
Ingredients:
Dough
Butter - 75 g
Honey – 50 ml
Milk – 50 ml
Wheat flour - 200 g
Baking powder - 1 tsp.
Sugar - 130 g
Chicken eggs - 1 pc.
For greasing the mold
Butter - 1 tbsp. l.
Wheat flour - 1 tbsp. l.
How to make an Easter bunny out of dough

Combine 130 g of sugar, 50 ml of honey, 1 egg and beat for 4-5 minutes until light foam.

Add melted and cooled butter (75 g), milk (50 ml). Beat for another 1 minute.

Add flour (200 g) sifted with baking powder (1 tsp).

Beat on low mixer speed just until ingredients combine.

Grease a special mold with a rabbit-shaped indentation with a thin layer of butter and sprinkle with a thin layer of flour (1 tablespoon each).

Place some of the dough into the cavity so that it is flush with the sides.
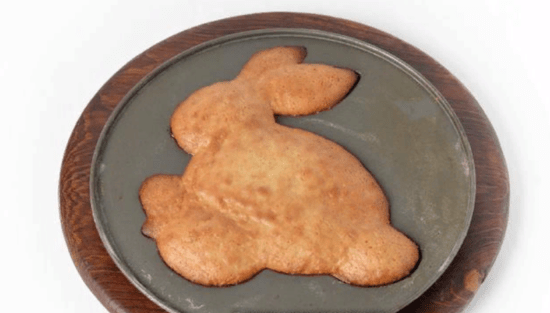
Bake at 180°C for 10-11 minutes until golden brown. Remove from oven and cool.

Remove the rabbit from the mold. This rabbit can be sprinkled with powdered sugar on top or painted with sugar icing. Bon appetit!
Options for brightly decorated baked goods for children

For decoration you will need confectionery icing and decor. So, for the glaze, take 1 egg white and start whisking it by hand using a whisk, gradually adding powdered sugar. Bring to the desired consistency and, at the very end, add lemon juice. Divide the finished glaze into bowls, add 1 drop of coloring and you're done! Place in pastry bags or syringe. Everything is ready for decoration.

First we make the contours of the hares and leave them to dry.

Mix powdered sugar with juice, dilute thick syrup. Brush the round cookies with syrup and leave to harden. Leave a little syrup for gluing the bunnies' ears.

Make ears from mastic or marzipan and glue them with syrup. Ready to draw faces and bunnies. Children will really like these adorable bunnies!
Prepare and decorate Easter baked goods with your children. They will enjoy participating in such an important, responsible holiday creativity together with adults - preparing for Easter. They will have bright memories of such a family Easter celebration for the rest of their lives. Happy holiday!
Note
If you don't have powdered sugar on hand at home, you can quickly make powdered sugar at home using a coffee grinder or a stone mortar.

Appears immediately festive mood from such beauty!
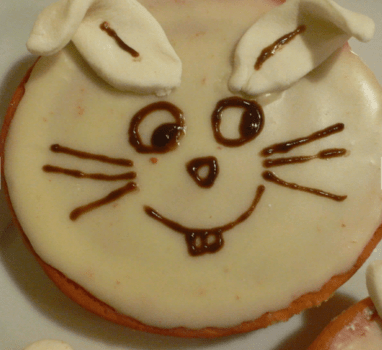
Baking Easter shortbread bunnies
These are shortbread cookies with sour cream in the shape of bunnies without using molds.
For these Easter bunnies cookies, firstly, you do not need to buy special molds. And secondly, the sizes of the products can be any you desire. Molding is elementary!
In addition to Easter, such cookies can also be prepared for New Year, for example, in the year of the Rabbit.
 Ingredients:
Flour - 230-250 g
Sour cream – 100 g
Butter - 100 g
Sugar - up to 100 g
Ground nuts – 0.3-0.5 cups
Baking powder - 0.3 tsp.
Vanilla sugar - 1 tsp. optional
Salt - 1 pinch
Preparation:

Pieces of butter should be ground with sour cream, granulated sugar, a pinch of salt and spices to taste (vanilla, cinnamon).

It is convenient to do this with knives for kneading the dough in a blender bowl, but you can also do it manually - with a fork or spatula.

Add flour with baking powder and mix.

Stir ground nuts into the dough.

Determine what size you want the cookies to be. For small bunnies, strips or ropes of dough about 30 cm long and 7-10 mm in diameter were required.
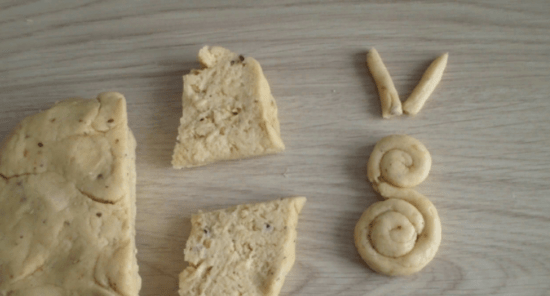
To obtain a figurine, start twisting the workpiece in spirals from the ends to the center so that the head is smaller and the body is larger. Shape the silhouette and attach the ears.

Place the cookie dough on a baking sheet, greased or lined with baking paper. And bake them in a preheated oven at 180-200 degrees until browned, about 20 minutes.

Easter bunnies cookies are ready. Bon appetit!
Advice
Add cocoa to the dough and get bunnies that look brown and taste chocolate.Easter bunnies made from gingerbread dough
Ingredients:
100 ml cream 20%
3 tbsp. l. cocoa
1 egg
180 g brown sugar
3 tbsp. l. honey
100 g butter
2 cups (200 ml volume) flour
2 tsp. baking powder
For the glaze
2 tbsp. l. powdered sugar
2 tbsp. l. lemon juicePreparation:
Pour cocoa powder into the heated cream and mix thoroughly.
Combine (beat with a blender) sugar, honey, egg and butter. Add cocoa and cream to this mass.
Now gradually add the sifted flour with baking powder. Don’t pour it all in at once; you may need less flour.
Knead into a smooth elastic dough, wrap it in cling film and refrigerate for 30 minutes.
After 30 minutes, take it out, roll it into a thick roller, which we cut into pieces 1.5 cm thick. Preheat the oven to 200 C.
We roll each piece with our hands into a flat cake, which we give it the shape of a brother rabbit.
Place the gingerbread cookies on a baking sheet lined with parchment and bake for 15 minutes.
For the glaze, mix the powder with juice and apply the outline of the gingerbread cookies. Or cover the surface of each gingerbread with a thin layer, and make an outline with a gel pencil for cakes.
The result was delicious honey gingerbread in the shape of hares. Bon appetit! Co Happy Easter!Cooking Easter bunnies from very tender yeast dough
Another wonderful recipe for holiday baking in the shape of bunnies that will delight children and adults.
Ingredients:
Flour - 700 g
Chicken eggs - 3 pcs.
Water – 80 ml
Pressed yeast - 30 g
Granulated sugar - 3 tbsp. l.
Salt - 0.5 tsp.
Sour cream – 350 gPreparation:
Heat the water until warm, in the microwave. Crumble the yeast into it and add 1 tsp. sugar, mix. And let stand in a warm place for 10 minutes until a foamy cap forms.
Whisk the eggs and sugar for 5 minutes.
Then add sour cream and mix.
Now add our activated yeast.
And sift the flour on top, be sure to sift, the baked goods will be tender and airy.
Knead soft, plastic dough. You may need a little less or more flour, depending on the moisture content of the flour and the size of the eggs.
Leave the dough in a warm place for 1-1.5 hours, during which time it will triple in size.Forming bunnies from dough
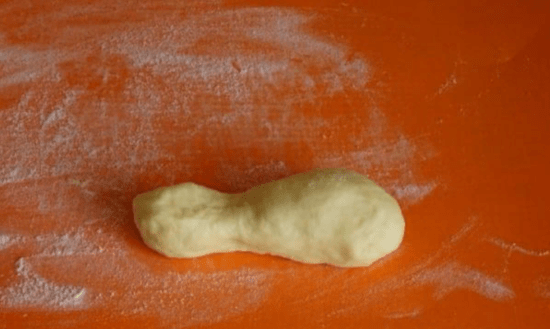
Place the dough on a table lightly sprinkled with flour and knead it lightly. Tear off small pieces of dough and roll into balls.
Then roll each ball into a slightly uneven sausage to form a rabbit.
Make a cut on one side, these will be the ears.
And bend this part back onto the body. From a small piece make a tail of dough.
Make eyes and nose from apple seeds. You can make it from cloves, then the finished rabbits will acquire a pleasant, spicy aroma.
Place the future rabbits on a baking sheet, let them rise for 15-20 minutes, during which time we preheat the oven to 200 degrees.
Before baking, you can brush them with egg or sweet water.
Bake for 20-25 minutes until golden brown.
The result is these funny rabbits (you can also draw antennae to make them look more similar). Have fun baking, make your family happy and bon appetit!Note
The secret to a successful test is that all products should be at room temperature. It’s better to take the sour cream and eggs out of the refrigerator in advance so that they warm up.DIY Easter bunny (hare) - popular crafts for Easter 2019,
I offer beautiful and original options crafts for the holiday.
The Easter bunny can act as an independent gift toy, souvenir, or in the form of a stand for paints, or act as a basket for other holiday paraphernalia, as well as decorate the interior.
Making funny paper rabbits
Invite the children to make cool bunnies together for the holiday. Result joint creativity you will be pleased!
To make this craft you will need: paper, glue, cardboard, scissors.
Detailed instructions for the work process
First, cut thin strips into rectangles.
Then glue the eight-pointed star together, spreading glue down the middle.
Now also glue top part paper to make a ball.
Make another ball in the same way, but just smaller in size. Connect them to each other using glue.
Cut out the ears and glue the pink center.
Cut out the following elements: eyes, muzzle, teeth. Draw a nose. Glue all the elements.
The result was great creative bunnies. Happy holiday!
How to make an adorable rabbit from textiles
Happy holiday!
Crocheted Easter bunny (hare)
Happy holiday!
We make a bunny from salt dough or plasticine
An excellent tool for making any souvenir is plasticine, or salt dough. If you have imagination, you can easily make this furry symbol of Easter. You will need: any material for modeling, stacking.
Simple options for ready-made eared animal crafts
A simple version of a terry towel - interesting gift for kids in a hurry.
“Sleeping” fabric bags are a cute big-eared symbol of the holiday - bunnies.
Original coasters made of salt dough in the shape of a rabbit.
Original bunnies are made from plastic or paper cups, or you can also use a paper roll or egg cup.
This project is made from cardboard and glued a paper cupcake tin to the back. It's simple: prepare templates, then cut and glue.
Happy Easter to everyone! I hope the publication was useful and interesting. I wish everyone to always be positive!
Publications for you festive table: delicious cottage cheese custard Easter
P.S. Very soon the whole country will proudly celebrate Aviation and Cosmonautics Day on April 12. Our courageous cosmonauts invested so much effort in the exploration of outer space. And a musical greeting card on this wonderful holiday awaits you on my blog. For older people, this will be a small journey into the past, the world of childhood - remember the magnificent emotional films “Youths in the Universe”, “Solaris”, “Milky Way”. The red thread running through them is the hope and dream of humanity - the exploration of space, other planets, worlds, knowledge of the Universe. Enjoy watching!
Dear readers, another important and useful news from my blogging mentor Denis Povag. I recommend it to those who want to earn money: