Decoupage translated from French means "cutting". It means a technique that is the cutting of images from leather, wood, fabric, napkins, which are subsequently glued for decoration on dishes, furniture, textiles and any other surface. We have already offered you master classes on, now we propose to decorate the bottle.
One of the favorite items of decoupage masters is a bottle. Absolutely any bottle is suitable for decoration: from olive oil, alcoholic beverages, etc.
Decorating bottles with napkins is a fun process that requires patience and perseverance when gluing a bottle.
What do you need to decoupage a bottle?
To create a masterpiece of "napkin technique" using bottles, you will need to prepare the following materials:
- glass bottle with a smooth surface without bulges;
- special cards for decoupage, magazine clippings, three-layer napkins;
- means for removing fat from a glass surface (solvent, alcohol, acetone);
- acrylic paints for priming and surface painting;
- PVA glue or decoupage glue;
- synthetic brushes of various thicknesses;
- acrylic lacquer;
- additional details for decoration: rhinestones, beads, stickers;
- craquelure varnish - to create an antique effect;
- nail scissors;
- masking tape;
- a small piece of foam rubber;
- disposable plates intended for dilution of paint;
- rags;
- sandpaper.
Before making decoupage on a bottle, you need to prepare not only the necessary material for work, but also workplace so that bottle decoration with napkins can be made for a long time without feeling tired. It is necessary to do decoupage on a large table, on which it will be convenient to place the required tools and items. The room should be well lit and ventilated, since during bottle decoration using decoupage technique, special means, characterized by a pungent odor.
Do-it-yourself decoupage of bottles with napkins: a master class for beginners
After the necessary material is prepared, you can proceed directly to decorating the bottle:

In order to understand how to decorate a bottle with napkins, special skills and abilities are not required. It is enough to be careful when gluing the napkin to the bottle. Such a creative craft can serve as an ornament not only as a decor, but also be a gift for a holiday. In this case, you can decorate the bottle in accordance with the theme of the holiday, for example, on New Year, for Family Day and any other holiday.
 |
 |
The beautiful French word decoupage is today called the technique of decorating various surfaces using drawings cut out of paper. In fact, this is an applique, by the way, and the term decoupage itself is translated as "cutting".
The decoupage technique is quite simple in execution, but it gives an amazing effect - with the help of ordinary drawings, you can transform not only old bottles, various containers, vases or bread bins. Craftswomen decorate even pieces of furniture or wooden doors with decoupage, making them no worse than vintage or antique interior details.
 1
1
The easiest way to learn decoupage is to start small. For the first experiment, you can use empty containers and decoupage on glass or plastic bottles.
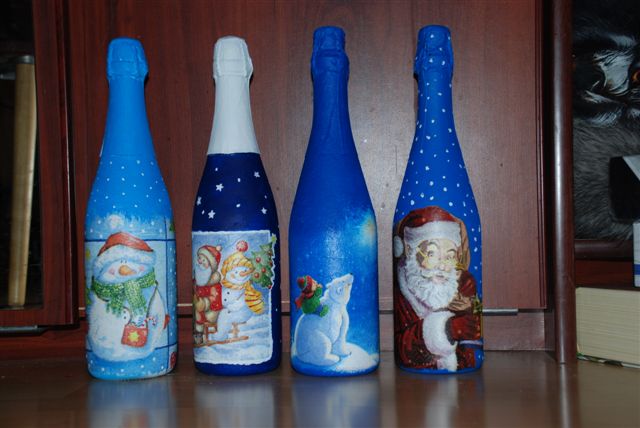
What you need for decoupage
Craftswomen use a variety of elements as a material for decorating the surface. It can be:
- clippings from newspapers or magazines;
- three-layer patterned table napkins;
- special decoupage cards that are sold in handicraft stores;
- thin fabrics with an interesting pattern or texture.

Attention! To transfer a newspaper or magazine clipping to glass, you will need preliminary preparation of the paper and the drawing itself.
To begin with, the picture is cut out, then it is covered with several layers of acrylic varnish. Now the paper needs to be soaked in warm water for 20 minutes. After swelling, the paper backing should peel off easily, and the image itself should remain on the varnish layer. It is in this form that the drawing is glued to the base.
The magazine clippings option is quite difficult to perform; good skills are required for such work. Decoupage cards are not cheap, and handicraft shops are not everywhere. Working with fabric is a priori more difficult than with thin paper, it also requires practice and a certain skill of the master.
That is why it is best to start mastering the decoupage technique with table napkins. For these purposes, the napkins already available in the house are quite suitable, or the hostess can specially buy material with the pattern she likes. The main thing is that the cost of napkins is available to everyone, besides, the remnants of the material after decoupage will definitely come in handy on the farm.
Important! The napkin for decoupage bottles must be multi-layered so that the master can separate upper part paper with a pattern applied to it. The thinner the picture, the easier it is to stick it, and the less noticeable the joints and other flaws of the decoupage work will be.
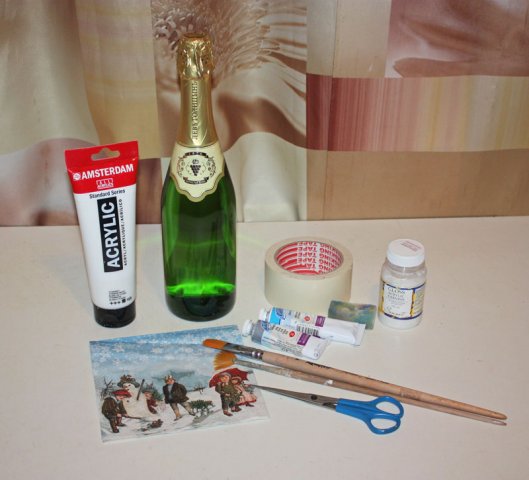
For work, you will need a number of tools, but these do not have to be purchased materials, they can be easily replaced with improvised means. So, for decoupage a plastic or glass bottle you will need:
- The bottle itself - it is better to choose a volumetric container, it is more difficult to work with thin and narrow vessels, and the result will not be so bright.
- Degreaser: acetone, nail polish remover, alcohol, window cleaner, and other solvents.
- Drawing for decoupage.
- Acrylic paint for painting the entire surface of the bottle (building paint is suitable for walls or other surfaces).
- Colors for paint (if provided by the idea of the project).
- A special foam rubber brush for decoupage can be easily replaced with a regular kitchen sponge or a piece of foam rubber clamped with a clothespin.
- Acrylic glue for decoupage is not much better than ordinary PVA diluted with water in a 1: 1 ratio.
- Wide tassel made of synthetic fibers(so as not to lose hairs during work) for applying glue.
- Glitter or acrylic marker, with which it is convenient to trace the contours of the picture on the bottle for greater brightness and effect.
- Various beads, ribbons, shells, twine or burlap - this decor is selected in accordance with the theme of the bottle design and should correspond to the general concept of bottle decoration.

Advice! It is not at all necessary for the first experience of decoupage to buy special tools and materials - they can be easily replaced.
But, if the master constantly works in this technique, it is better to purchase a professional set after all, then the finished decor items will be more accurate, and the decoupage process itself will become easier.

Decoupage bottles with your own hands
The first thing a novice master should do is to visualize the idea, that is, to imagine how the bottle will look after the decor. Numerous photos of finished works can help a beginner, various master classes or visiting a hand-made exhibition. In accordance with this, paints are selected the desired shade, pictures, various decorative elements.
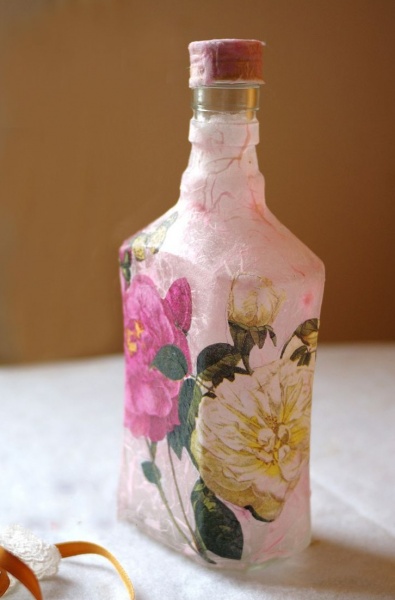
Now you need to find a beautiful vessel - a plastic or glass bottle of an interesting shape. Although the bottle will stain during use, it is best to choose a transparent container for the first time.

Armed with the right tools, you can get to work.
Preparing a bottle for decoupage
First, you should try on the selected picture for the existing bottle - they must match in size. Applying the rest of the decor items, you can understand how the bottle will look after decoupage, and how best to arrange all the decor details.

Now the bottle needs to be prepared for staining:
- first, the bottle is soaked in warm soapy water so that all labels get wet and easily separate from glass or plastic;
- with a metal brush, not only paper labels are removed from the bottle, but also all the glue on the surface of the vessel;
- a bottle that has been wiped dry is degreased by wiping with a cotton swab dipped in alcohol or acetone.
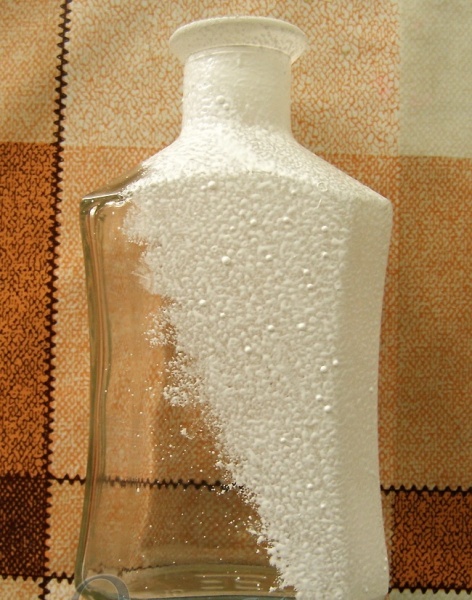
After that, you need to apply a primer to the bottle, which in this case is acrylic paint... But this is far from the only way to prepare the basis for transferring a picture. The bottle is often coated with various texture materials, such as sand, eggshells, seashells and many many others. However, it is easiest to work with smooth surfaces, so it is recommended that a beginner decoupage master still paint the bottle with acrylic-based paint.

The easiest way to apply the dye is with a brush, but with this technique, streaks will certainly remain on the glass, and the paint itself will lay down unevenly. Therefore, experienced decoupage masters suggest using a foam sponge.
In this case, the paint is, as it were, tamponed, that is, it is applied to the bottle with short pressing movements. This staining must be repeated 2-3 times - it depends on the master's idea and the desired degree of toning of the existing base.
Advice! The color of the base should be one or two shades lighter than the selected decoupage pattern. This makes it easier to hide flaws in the work, and the edges of the design will be less visible.
Each layer of paint should dry thoroughly. While the bottle is drying after the last staining, you can do the picture.
Preparation of a drawing for decoupage
It was decided to use an ordinary table napkin with a favorite pattern for the first experiment. From this napkin, you need to very carefully separate the topmost layer - the one on which the pattern is applied.
Now it is necessary to somehow separate exactly that part of the picture that is needed for decoupage. There are two ways to do this:
- small sharp scissors (often craftswomen use a tool from a manicure set);
- just tear off thin paper, highlighting the desired fragment of the drawing.
As practice shows, the first method is more convenient to use on large patterns with clear lines and borders, for cutting out geometric pictures, or in the case when the background is very different from the shade of the picture.
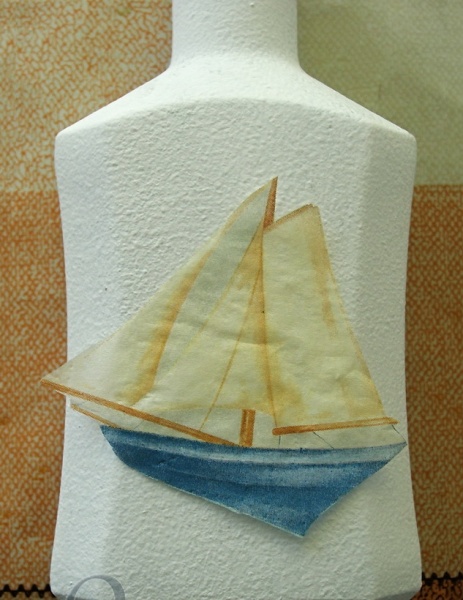
The method of tearing off the pattern with your fingers allows you to better mask the line where the paper and paint meet, but this will only work if the base is matched to the color of the picture itself. It is this method that is best used by those who are just learning the art of decoupage. How to do it correctly is shown in the photo below.

Important! To make your work easier, it is recommended to split large drawings into smaller pieces. This makes it easier to glue thin paper to the glass, and the likelihood of air bubbles in the decoupage process will be less.
Bottle decoupage: process
Pasting a picture on a base (in this case, a bottle) is called decoupage. In essence, this is the transfer of the pattern to the surface.
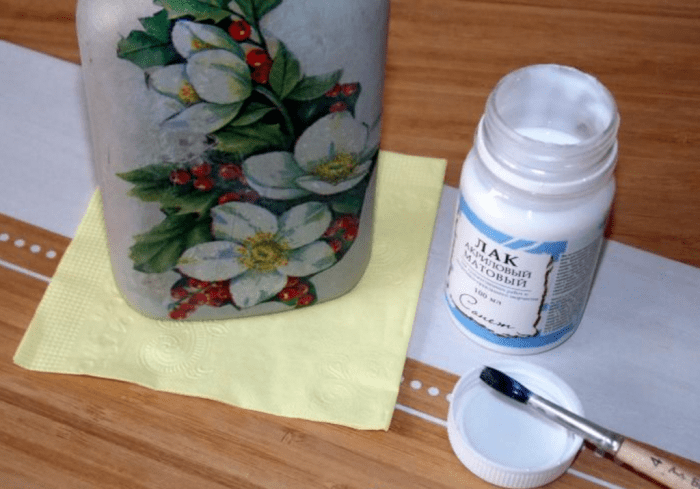
And it is performed quite simply:
- A special glue for decoupage or PVA stationery glue diluted with water is taken. The required amount of glue is poured into some container.
- A drawing cut from a napkin is applied to the designated place on the surface of the bottle.
- A wide and flat brush is dipped in glue and smeared with a napkin with quick movements. Here you need to be very careful, since the picture will be quite thin and tear easily after it gets wet, so you need to brush it over the surface no more than a couple of times. The movements of the master's hand should be directed from the center of the applique to its edges. The main task is to prevent paper wrinkles and expel all air bubbles from under it.
- In this form, the bottle is left until the glue is completely dry.
- So that the bottle can be used and the picture is durable, the surface is covered with acrylic varnish in three layers. Each layer of varnish should dry well.
Attention! Recently, PVA stationery glue is already being sold so liquid that it is not necessary to dilute it - you can work right away.
There is another option: use building PVA for decoupage, but such a composition must be diluted with water, choosing a proportion based on the desired consistency of glue.
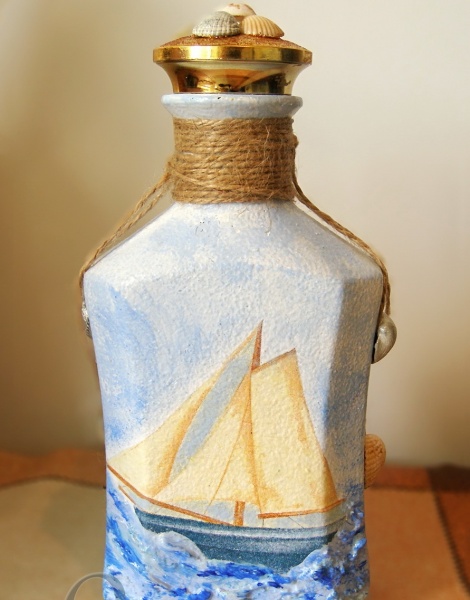
Finishing touches
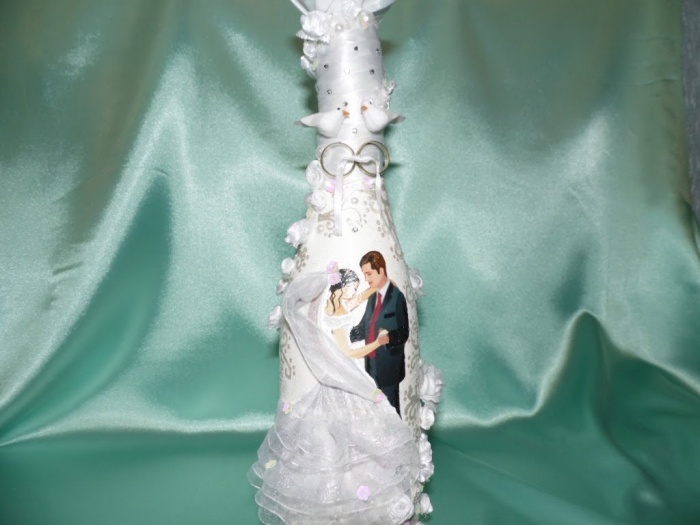
There are several ways to create decor:
- glue beads or sequins;
- tie a satin ribbon around the neck of the bottle;
- wrap the neck of the bottle with twine or knitting threads;
- use a glitter (dense acrylic contour of a contrasting color) or a special marker to circle the picture, make thematic inscriptions on the bottle, add sparkle;
- make the decoupage brighter using artistic acrylic paints and a thin brush.

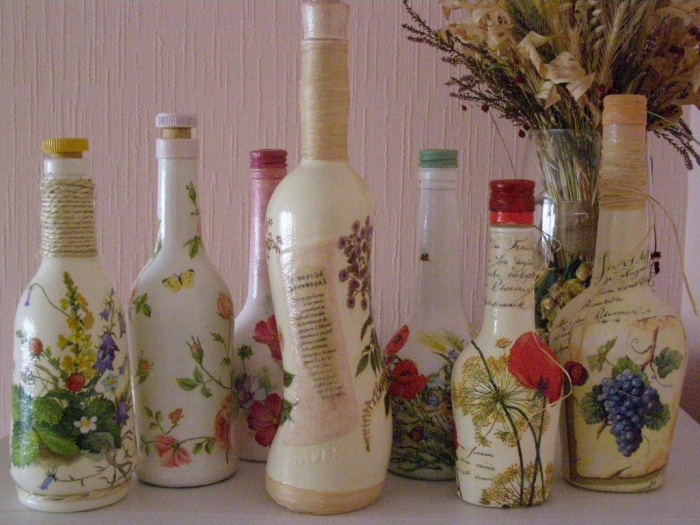
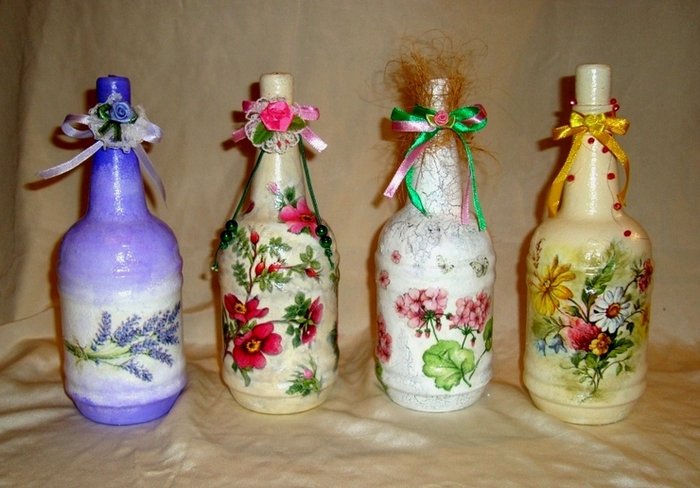
There are a lot of ways to decorate a bottle after decoupage, and this is evidenced by photos of finished works by both novice craftsmen and professionals in their field. It all depends on the skills of the performer and the range of decorative elements.
Decoupage bottles in different options(Photo)Decoupage of bottles in different versions (photo)
Now, most needlewomen are fond of decoupage, namely, they decorate various items with paper applique. And, to be more precise, the jewelry is made from special decoupage napkins, which are sold in a wide range on the shelves of specialized stores dedicated to needlework. Decoupage technique is done on many things made of wood, metal and plastic. But, the most popular is glass decoupage, or rather bottle decoupage.
Every housewife always has an empty glass container, for example, cans for bulk products, intended for disposal in the trash, from the prescription of use. Do not rush to do this with your own hands. You can try to remake a completely unnecessary thing into an interesting vase, which, in the future, will decorate your interior, for example, in nautical style... Especially when author's ideas are much more appreciated than factory decoupage on glass. 


Not only used alcohol bottles are subject to decoration, but also other glass items that have lost their appearance... Decoupage vases will be very relevant.
A bottle for a women's holiday
If you do not know how to make glass decoupage on a champagne bottle for the eighth of March, then the presented master class and instructions tell how to decorate and create decoupage bottles with your own hands.
Prepare a bottle of champagne by removing all labels. Then, degrease it with alcohol or window cleaner. Now, paint the bottle with light acrylic paint in several layers, as shown in the photo. 

Please select
, from which you can make an eight for the holiday of the eighth of March. Cut out the circles and make them in pairs. 

Take acrylic-based paints, mix them to get a delicate shade of salad color. Thus, we will make a non-traditional bottle background. Apply this paint using a washcloth to the entire surface of the product. The bottle will turn out to be a beautiful spring shade, as shown in the photo. 


Now we are doing the usual decoupage for beginners. Attach the cut out circles from a napkin to the bottle and anoint them with decoupage glue. After the glue dries, we can assume that the master class is over, but that's not all. It is necessary to decorate the ornament with an acrylic outline or glitter, circling them around the picture, as shown in the photo. 


In the center of the bottle, write the inscription for the 8th of March, it will be quite handy. When the green glitter is dry, it will shine beautifully. Cover all the work done with acrylic varnish, which will give an incredible shine. Now, a festive bottle of champagne is ready to decorate the table for March 8th. The video shows how the decoupage of a vase is made. 


Video: Decoupage glass vases
Decorating the bottle with eggshells
Technique for decoupage bottles, trimmed eggshell, you can safely give to your friends or loved ones. Since such work looks original and beautiful, acquiring a three-dimensional appearance. To work, you need the following accessories:
- wine container;
- alcohol;
- eggshell;
- napkin, decoupage glue and brush;
- priming.
Rinse the bottle well under warm running water to make it easy to remove the labels with your own hands. Then, the entire surface is degreased with alcohol or detergent. 

For primer, acrylic paint is perfect. Apply it to the bottle using a kitchen sponge. Leave the garment to dry for a short time, as shown in the photo. 


To make the layer look more even, apply another tier of paint, as shown in the photo. Using a sponge will help get rid of streaks. This time, it will take about 30 minutes to dry. 

And at this time, it is necessary to continue the eggshell master class and start cutting pictures from napkins in the decoupage style. Place the pictures on a stationery file and blot them with water. With meticulous movements, place it on the main body of the bottle. The following manipulations take place in the same way as for beginners, using glue and brushes. The workpiece remains to dry for one day. 


Eggshell decoupage begins with the manufacture of the base material. Rinse the shells under water and dry. Glue the entire surface of the bottle with glue and use tweezers to lay out the shell in the form of a mosaic. The eggshell ornament will be done on two sides, and in fact, the upper and lower parts of the bottle. After a break of 20 minutes, apply the background paint. This decoupage takes on a volumetric look. 


The last stage is to paint the formed areas with eggshells with a darker shade and open them with varnish. Now, decoupage on glass is completely done with my own hand. How to make a reverse decoupage on glass, in an interesting style, can be seen in the video. 


Video: Making a reverse decoupage of a bottle
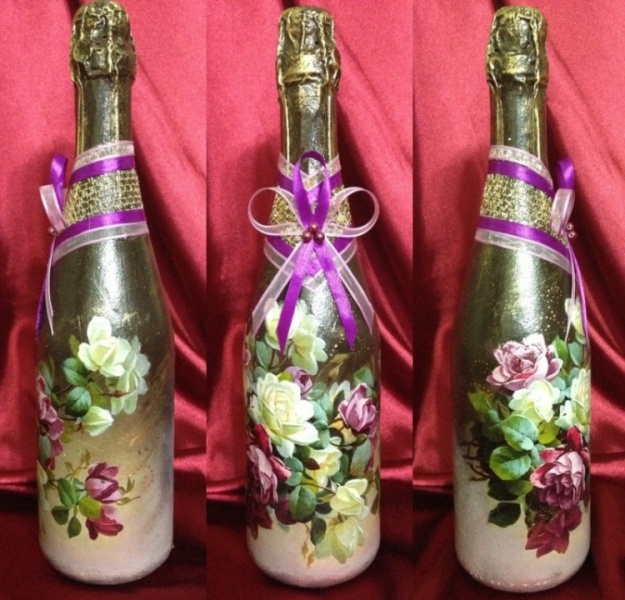
Wedding bottle of champagne
Wedding attributes are always given Special attention... This even applies wedding glasses and champagne. Decoupage of a bottle of champagne for a wedding, you can create it yourself. An example that presented a master class with step by step photos, great for beginners, using a postcard or picture. Prepare the following materials:
- champagne;
- pictures or postcards;
- acrylic-based varnish;
- acrylic paint;
- loofah.
Remove all labels from the glass bottle by soaking in water. Then, degrease the surface with alcohol. Paint the product with primer. The master class involves the use of a postcard. Cover it with acrylic varnish and dry it. Now, remove the top tier of the paper and cut out a suitable motif. 


The bottle is greased with glue, and the selected pictures are applied on top. Straighten the pattern with gentle strokes to avoid bubbles and wrinkles.
It is necessary to dilute the paint, which, in your opinion, matches the color of the bottle. Draw a darker outline with the brush. Dip the foam sponge into a light tone of paint and create a haze, smoothing the edges of the image. 


Now, all that remains is to sketch the veins in silver using an old brush and draw in the details. The final touch is the varnishing of the entire surface of the champagne. Decoupage of a bottle of champagne for a wedding, successfully done. Such a craft will perfectly decorate wedding tables. A master class on how to decoupage bottles with a cloth, look at the video presented. 

Video: Decorating a bottle with a cloth
Bottle decoration with tights
In order to realize such an interesting and voluminous master class, and create decoupage glass with tights, you will need the following list of material: bottle, craquelure, alcohol, tights, PVA glue, acrylic varnish and napkins, as well as
, washcloth and acrylic-based paint.
Take a bottle and degrease it using rubbing alcohol. Take nylon tights and dip them completely in the glue solution. Then, pull them over the object to be decorated and form folds. Napkins are also impregnated with glue; flowers must be made of them. Drying time is one or two days. 

After that, the product is covered with black acrylic paint. Leave to dry for a while. Pick the motif of the picture you like and apply it to the bottle, covering it with several layers of glue. Remember to take breaks between layers. 
Wait until it dries, and feel free to apply golden acrylic paint with a washcloth, painting over black. Further, the craquelure is applied with a synthetic brush, and after four hours, the second layer is established. When another two hours have passed, and you will see how the craquelure turns into cracks. Using bituminous patina, we make the effect of the aging of the craft, rubbing the cracks. The final touch that appears after the craquelure has been used is the application of acrylic varnish to consolidate the creative work. 

Decoupage from toilet paper
Decoupage on glass with toilet paper begins with the preparation of fittings:
- bottle or jar for bulk products;
- toilet paper;
- acrylic based paints;
- napkins;
- glossy varnish;
- scissors;
- brush, PVA glue and a washcloth.
Prepare the bottle, or if you want, you can use several cans, after wiping it with alcohol. Cut out suitable miniatures from the napkin. Small squares are cut out of toilet paper. To apply glue to paper, you need a thin brush. Now, apply the cuttings evenly to the bottle as shown in the photo. We leave it to dry. 


Toilet paper very thin, so paint it with acrylic paint white... Large pictures are glued to the central part of the bottle, and small ones to the cap. 

After everything is dry, cover the entire light part of the bottle with acrylic paint of blue color... The next stage is painting with a golden color, applying it to a washcloth. 

Twist thin strands from a napkin and paint them in gold. When they are dry, you need to make an ornament out of them and stick them on the bottle. After that, the entire surface is varnished. Decoupage of a glass bottle, safely done by hand, with toilet paper. 


Craquelure in bottle decoupage
The next master class for beginners will teach you how to use craquelure in work on crafts. We wash all the labels on the bottle and degrease it with alcohol or nail polish remover. We prime the container with white. 


Now, we need toilet paper, which we will use to decorate the bottle. Soak the paper in the glue and place it on the bottle, making small folds. This procedure must be done very quickly. After that, the craft will take on a three-dimensional appearance. Tear out a suitable motif from the decoupage card and glue it on PVA glue. The photo shows the result. Leave the bottle to dry for about 6 hours. 


Take paint from acrylic of the same color as shown in the photo. Apply it to the surface, just not all over, but in parts to make the craquelure more effective. Apply the craquelure and wait for about two hours. Then cover the item with light acrylic paint. Paint over the meta where the toilet paper is also white. 


After drying, the bottle is covered with a finishing varnish, as shown in the photo. The voluminous master class ended there. If you want to know how to do reverse decoupage on glass or decoupage bottles with napkins, we suggest watching a video showing the work on a bottle in a nautical style. 

As you can see, the instructions and master class on decoupage bottles and cans for bulk products are simple and interesting. It will be understandable, even for beginners. A variety of master classes, and even a voluminous one, will give a flight of your imagination.
Now, most needlewomen are fond of decoupage, namely, they decorate various items with paper applique. And, to be more precise, the jewelry is made from special decoupage napkins, which are sold in a wide range on the shelves of specialized stores dedicated to needlework. Decoupage technique is done on many things made of wood, metal and plastic. But, the most popular is glass decoupage, or rather bottle decoupage.
Every housewife always has an empty glass container, for example, cans for bulk products, intended for disposal in the trash, from the prescription of use. Do not rush to do this with your own hands. You can try to remake a completely unnecessary thing into an interesting vase, which, in the future, will decorate your interior, for example, in a nautical style. Especially when author's ideas are much more appreciated than factory decoupage on glass.
Not only used alcohol bottles are subject to decoration, but also other glass items that have lost their appearance. Decoupage vases will be very relevant.
If you do not know how to make glass decoupage on a champagne bottle for the eighth of March, then the presented master class and instructions tell how to decorate and create decoupage bottles with your own hands.
Prepare a bottle of champagne by removing all labels. Then, degrease it with alcohol or window cleaner. Now, paint the bottle with light acrylic paint in several layers, as shown in the photo.


Choose a decoupage napkin that you can use to make a figure eight for the 8th of March. Cut out the circles and make them in pairs.


Take acrylic-based paints, mix them to get a delicate shade of salad color. Thus, we will make a non-traditional bottle background. Apply this paint using a washcloth to the entire surface of the product. The bottle will turn out to be a beautiful spring shade, as shown in the photo.
Now we are doing the usual decoupage for beginners. Attach the cut out circles from a napkin to the bottle and anoint them with decoupage glue. After the glue dries, we can assume that the master class is over, but that's not all. It is necessary to decorate the ornament with an acrylic outline or glitter, circling them around the picture, as shown in the photo.
In the center of the bottle, write the inscription for the 8th of March, it will be quite handy. When the green glitter is dry, it will shine beautifully. Cover all the work done with acrylic varnish, which will give an incredible shine. Now, a festive bottle of champagne is ready to decorate the table for March 8th. The video shows how the decoupage of a vase is made.

Video: Decoupage glass vases
Decorating the bottle with eggshells
The technique of decoupage bottles, trimmed with eggshells, can be safely presented to your friends or loved ones. Since such work looks original and beautiful, acquiring a three-dimensional appearance. To work, you need the following accessories:
- wine container;
- alcohol;
- eggshell;
- napkin, decoupage glue and brush;
- priming.
Rinse the bottle well under warm running water to make it easy to remove the labels with your own hands. Then, the entire surface is degreased with alcohol or detergent.


For primer, acrylic paint is perfect. Apply it to the bottle using a kitchen sponge. Leave the garment to dry for a short time, as shown in the photo.
To make the layer look more even, apply another tier of paint, as shown in the photo. Using a sponge will help get rid of streaks. This time, it will take about 30 minutes to dry.


And at this time, it is necessary to continue the eggshell master class and start cutting pictures from napkins in the decoupage style. Place the pictures on a stationery file and blot them with water. With meticulous movements, place it on the main body of the bottle. The following manipulations take place in the same way as for beginners, using glue and brushes. The workpiece remains to dry for one day.
Eggshell decoupage begins with the manufacture of the base material. Rinse the shells under water and dry. Glue the entire surface of the bottle with glue and use tweezers to lay out the shell in the form of a mosaic. The eggshell ornament will be done on two sides, and in fact, the upper and lower parts of the bottle. After a break of 20 minutes, apply the background paint. This decoupage takes on a volumetric look.
The last stage is to paint the formed areas with eggshells with a darker shade and open them with varnish. Now, decoupage on glass is completely done with my own hand. How to make a reverse decoupage on glass, in an interesting style, can be seen in the video.
Video: Making a reverse decoupage of a bottle
Wedding bottle of champagne
Special attention is always paid to wedding attributes. This even applies to wedding glasses and champagne. Decoupage of a bottle of champagne for a wedding, you can create it yourself. The example that presented a master class with step-by-step photos is perfect for beginners using a postcard or picture. Prepare the following materials:
- champagne;
- pictures or postcards;
- acrylic-based varnish;
- acrylic paint;
- loofah.
Remove all labels from the glass bottle by soaking in water. Then, degrease the surface with alcohol. Paint the product with primer. The master class involves the use of a postcard. Cover it with acrylic varnish and dry it. Now, remove the top tier of the paper and cut out a suitable motif.
The bottle is greased with glue, and the selected pictures are applied on top. Straighten the pattern with gentle strokes to avoid bubbles and wrinkles.
It is necessary to dilute the paint, which, in your opinion, matches the color of the bottle. Draw a darker outline with the brush. Dip the foam sponge into a light tone of paint and create a haze, smoothing the edges of the image.
Now, all that remains is to sketch the veins in silver using an old brush and draw in the details. The final touch is the varnishing of the entire surface of the champagne. Decoupage of a bottle of champagne for a wedding, successfully done. Such a craft will perfectly decorate wedding tables. A master class on how to decoupage bottles with a cloth, look at the video presented.


Video: Decorating a bottle with a cloth
Bottle decoration with tights
In order to implement such an interesting and voluminous master class, and create decoupage glass with tights, you will need the following list of material: bottle, craquelure, alcohol, tights, PVA glue, acrylic varnish and napkins, as well as decoupage cards, washcloth and acrylic-based paint.
Take a bottle and degrease it using rubbing alcohol. Take nylon tights and dip them completely in the glue solution. Then, pull them over the object to be decorated and form folds. Napkins are also impregnated with glue; flowers must be made of them. Drying time is one or two days.


After that, the product is covered with black acrylic paint. Leave to dry for a while. Pick the motif of the picture you like and apply it to the bottle, covering it with several layers of glue. Remember to take breaks between layers.
 Wait until it dries, and feel free to apply golden acrylic paint with a washcloth, painting over black. Further, the craquelure is applied with a synthetic brush, and after four hours, the second layer is established. When another two hours have passed, and you will see how the craquelure turns into cracks. Using bituminous patina, we make the effect of the aging of the craft, rubbing the cracks. The final touch that appears after the craquelure has been used is the application of acrylic varnish to consolidate the creative work.


Decoupage from toilet paper
Decoupage on glass with toilet paper begins with the preparation of fittings:
- bottle or jar for bulk products;
- toilet paper;
- acrylic based paints;
- napkins;
- glossy varnish;
- scissors;
- brush, PVA glue and a washcloth.
Prepare the bottle, or if you want, you can use several cans, after wiping it with alcohol. Cut out suitable miniatures from the napkin. Small squares are cut out of toilet paper. To apply glue to paper, you need a thin brush. Now, apply the cuttings evenly to the bottle as shown in the photo. We leave it to dry.
Toilet paper is very thin, so paint it with white acrylic paint. Large pictures are glued to the central part of the bottle, and small ones to the cap.


After everything is dry, cover the entire light side of the bottle with blue acrylic paint. The next stage is painting with a golden color, applying it to a washcloth.


Using hand-made things to decorate your own home makes it possible to uniqueize the interior, give the composition originality. One of these decorative elements can be bottles decorated using decoupage technique.
Numerous photos of bottle decoupage clearly demonstrate that such things can be not only decorative accessories for the interior, but also become a wonderful unique gift for a variety of celebrations and holidays.

What is decoupage technique
The word decoupage came to us from France and in translation means "carving". If we talk about the technique itself, then it consists in sticking individual paper images on different surfaces, in fact, a simple application.


Most often, images are selected from napkins, special decoupage cards or rice paper are also used, if desired, you can use clippings from magazines.

To create a unique interior decor, you can use ordinary bottles of interesting shapes. Decoupage bottles with your own hands is a great opportunity to turn an ordinary thing into an original flower vase that you can give or decorate your home with.

For example, decoupage of a champagne bottle is often used to decorate a bottle that will stand on wedding table at the newlyweds. Also, champagne is decorated for the new year or birthday.


Materials for decoupage creativity
Decoupage technique can be used by both a beginner and an experienced master. To start creating, you need to purchase necessary materials and fixtures.

First of all, you need to choose a base - a bottle. It is better to choose a product with a smooth surface, without relief.

Next, a drawing is selected. For decoupage bottles with napkins, fragments of ordinary paper products are selected, it is also possible to use rice canvases, decoupage cards, clippings from magazines or pictures from the Internet.

To degrease the surface and remove all fat spots you need to stock up on any suitable liquid that will cope with this task.


After degreasing, the glass surface will need to be primed. For these purposes, acrylic paint of any color is suitable, which is suitable for the composition.

To glue the piece of paper to the surface, an adhesive is required. It can be a special decoupage glue or ordinary PVA diluted with water in a 1 to 1 ratio.

Brushes are required. It is advisable to use synthetic products, from which hairs do not fall out during the process.

A set of acrylic colored paints is required for the decoration of the product, and acrylic varnish for fixing the image. To give the bottle an aging effect, a craquelure varnish composition is used.

In addition to these materials, small scissors are also needed, better manicure, foam sponges, containers for paint and varnish, sandpaper.

Step by step instructions
To create a beautiful decor accessory from the first try, you should use the bottle decoupage instructions for beginners.


The preparatory process of the bottle. Any bottle should first be cleaned of all stickers and glue residues. To do this, the container must be soaked in soapy water, and then all fragments must be removed. Further, fat deposits are removed with a degreaser.


The next step is to separate the desired fragment of the drawing from the paper. For this, it is better to use small nail scissors. If a napkin is used, then only one top paper layer needs to be taken.

If a thicker magazine paper is taken, then first the surface is varnished, dried, and then soaked in water for 20 minutes. Then the transparent drawing will separate from the base.

Now it's time to glue the paper drawing onto the bottle. To do this, a dry fragment is applied to the bottle and a brush dipped in glue is smoothed from the center to the edges, squeezing out air bubbles and smoothing out wrinkles. In this form, the bottle should dry well.

The work is fixed by applying varnish to the entire surface of the bottle. It is better to apply varnish in three layers.


To decorate and decorate the bottle at the final stage, you can use sequins, rhinestones, beads, etc.

A detailed master class on how to decoupage a bottle will help everyone to create a unique composition for decoration.

Photo decoupage bottles


