The origami bat is not only interesting craft, in the creation process of which you can involve adults and children. This is also an interesting room decor for Halloween. We invite you to familiarize yourself with two master classes, how it turns out
Easy origami - bat
Master class:
- Take a regular sheet of plain paper. Make it square.
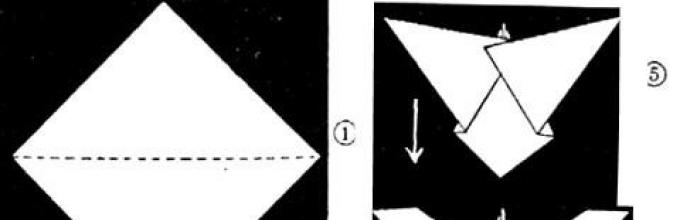
- Fold the piece of paper in half diagonally (Illustration 1).
- Then fold the resulting triangle in half (Illustration 2).
- Straighten the triangle and fold it almost in half perpendicular to the resulting fold line, as in Figure 3.
- Fold the triangle located on top (Illustration 4).
- Fold the resulting shape in half (Illustration 5).
- Turn the “wings” of the figure at an angle, as in Figure 6.
- Bend the almost finished figure, as in Figure 7.
- Fold the “wings” at an angle, as in Figure 8.
- Spread both parts of the figure in different directions (Illustration 9).
The origami bat is ready! Give it volume by carefully straightening out all the folds.
Second master class

Instructions on how to make a fly with ears:
- Take a square shaped piece of paper.
- Bend it in half to form a triangle (Figure 1).
- Fold the right and left sides of the triangle towards the middle as shown in Figure 2.
- You have a figure with a small triangle peeking out from below (Figure 3).
- Bend the right “wing” at an angle, as shown in Figure 4.
- Bend the second one under the first “wing” in the same way (Figure 5).
- Fold both sides so that the bat's wings are not triangular, but rectangular shape(Figure 6).
- From the upper part, form a muzzle with ears (Figure 7). You can make a muzzle from another leaf and then glue it on top.
- Carefully straighten all the parts.
The origami bat is ready! If you want, draw her a face.
You can please yourself and your loved ones on any holiday with an original paper craft that will become interesting decoration interior So, for Halloween you can make your own bat. The manufacturing technology is so simple that you can create one toy or several dozen. The unusual decoration of the room where the animals will be hung will be remembered for a long time by all the guests of the party.
What you need for crafts
When thinking about how to make a bat out of paper, you need to pay attention to the fact that the option presented below will be very easy, and even if a person has never used the origami technique, he can create unusual craft it will work without any difficulty.
So, to work you need to have on hand:
- scissors;
- black paper.
Step-by-step instructions, or How to make a bat from origami paper
First, from a sheet of black paper you need to cut a square, each side of which will be equal to 9 cm.
The resulting sheet is folded along one of the diagonals; it is important not to forget to carefully iron the bend. At the next stage, you need to unfold the paper and perform a similar action with the other diagonal.
This square is folded in such a way that the wrong side remains inside, again diagonally. The result is a triangle, which you need to position with its upper part facing you.
How to make The diagram given in this material shows in detail the manufacturing process original crafts. The upper part is bent downwards - to a height equal to 2/3 of the height of the triangle.

The next step is to make the wings. Here the oblique line is bent to the base of the lower part, which has triangular shape, about one centimeter. All folds must be carefully ironed.
Both wings need to be bent back; to do this, the folds are shifted towards the central part by a few millimeters.
After this action, you can see small triangles located on both sides on top of the craft. Along each side, which is located closer to the central part, it is necessary to make small cuts to the lines of each wing.
The central part running between the slits should be turned inside out.
How to make a three-dimensional paper bat? To do this, you need to select a line located in the center of the body, not forgetting to select the lines running parallel to the wings.

What other option can I do?
Even small children can take part in working on such a craft.
What do you need for work? Here you will need:
- colored paper;
- glue;
- scissors.
Step-by-step instructions
You need to cut three semicircles of the same size from a colored sheet. One of these parts will go to form the head and torso.
One of the semicircles needs to be folded in half and the semicircles bent diagonally. Then unfold the craft and fold it so that one part overlaps the other. The resulting protruding corners will serve as the ears of the future masterpiece.
The two remaining parts will go to the wings. To do this, wavy lines are cut out from each semicircle. Then all that remains is to glue the wings to the craft and, at the last stage, glue the fangs with eyes. Both of these parts are simply made from white paper.
Original version of the craft
When thinking about how to make a bat out of paper, you can turn to this method. Here you will need a cardboard base from toilet paper.

The base needs to be painted with black paint, and to give it shine it is best to use acrylic. White paint will be needed to make the animal's face. Then you need to cut out the ears from black paper and glue them to the inside of the cardboard.
Wrapping paper is perfect for making wings. Using scissors, two wings are cut out, each of which must have a bend at one end; it must be glued to the base.
Few have seen the bat: it is active at night, flies like a rocket, sleeps upside down. These qualities have always frightened people, who have come up with many fables about these animals.
To be fair, we have to admit: when you see it for the first time, you can be scared. I remember my first meeting with bats in one of the caves of the Caucasus Mountains. A huge colony hung under the cave roof, clinging to the limestone ledges and squeaking. It felt somehow uneasy, although most bats that feed on insects and fruits are harmless and safe for humans
A craft in the shape of a bat can look interesting for kids if it is made from glossy paper in black and gold. It is also better to use plastic eyes to “revive” the paper product. And for drawing small details on dark color elements, use a white marker. So let's begin!
Required materials:
- glossy paper in black and gold;
- black chenille wire;
- plastic eyes;
- hole punch;
- scissors;
- glue;
- pencil and ruler.
Manufacturing stages:
1. For the bat’s body, use a sheet of black glossy paper, from which we cut out a 12 x 7 cm rectangle.
2. Gently roll a black sheet of paper into a small tube. We fasten the ends with glue.
3. Then we also create the ears from black paper. Therefore, we draw two contours in the form of triangles. 
4. Attach the ear parts in the form of small triangles to the top of the tube. But it is better to glue them inside so that they look neat.  5. Then take golden paper and draw two wings for the bat. Carefully cut out every detail. Especially in places of bends.
  6. Glue cut-out wings of golden color, cut from glossy paper, on the back side on the sides.
7. To create the legs of the night hunter, we use black chenille wire. We create two long segments and two pairs of short ones.
8. Attach two short pieces of black wire to one long piece of black wire.  9. Now use a hole punch to create two holes in the bottom of the craft for the paws from chenille wire. It's better to do this in the background of the tube!
10. Carefully attach the fluffy wire to paper crafts. We secure it by twisting part of the wire.  11. Attach plastic eyes and draw a mouth with a white marker. This completes the bat's face!
  We attach the bat's legs to a twig or any other thin material so that it can hang upside down. At this point, our craft made from paper and chenille wire is ready and looks like a bat. With a child, you can come up with many stories with such a nocturnal resident.
Now your child will know exactly what this mistress of the night looks like. The craft can become part of an environmental project in kindergarten. The site Non-standard Children wishes creative success to its readers.
Paper bats are made to decorate everything. famous holiday Halloween. But it’s also fun to make such a figurine just for fun. How to make a bat out of paper? Those who already have at least some knowledge of origami techniques can make a mouse with voluminous wings. And young children can be taught to fold the simplest paper shapes. There are a lot of schemes of different levels of complexity for such mice.
Simple folded paper bats
Some diagrams are not made entirely using the origami technique, but for restless children of smaller sizes school age quite attractive and uncomplicated. "How to make a bat out of paper?" - the child will ask. And you can show him the diagram and teach him how to fold it on his own. For example, a small cube bat is tough enough for such children. It is enough to cut out a blank from cardboard and glue it together. The finished wings and ears are cut out separately, then attached to the mouse using regular PVA.
No less interesting for children is this figure, made from an ordinary sheet of paper.
You need a large single sheet of paper, about 15x15 cm. It is made as simply as an origami toad. One triangle is the wings, and the second is the legs. The mouse's ears are cut out with scissors. And the corner of the triangle bends down. You can make several crafts, as it is very fast.
Making a bat with voluminous wings and a face that looks more like a real one is a little more difficult to cope with.

In the process of folding this origami, you need to slowly and carefully make all the control bends and follow all the steps correctly.
- Make a double triangle and bend it twice. The most upper part triangle - mouse head.
- Next, each wing rises with a double bend.
- The wings fold like an accordion. All bend lines must be done equally on both wings.
At the end, all that remains is to bend the nose of the mouse and draw the eyes with a marker. After finishing the work it will be very beautiful model mice.

In principle, there is also nothing complicated in making this model. Therefore, if you are interested in how to make a bat out of paper, but do not have any special technical skills, then we recommend this particular model.
Other origami mouse models
For anyone interested in how to make a bat out of origami paper, experienced amateur practitioners offer a few more interesting models. There is origami, where the head is more thought out, and there are ears, there is a tail.
An interesting and more advanced mouse figure is suggested by Jeremy Schafer. His model is also known as a dynamic origami bat. It is advisable to have good technique working with details. If you want to learn how to make a bat out of paper using a more complex version of the origami technique, then choose this model to study.

There will be many small triangles that need to be carefully folded. Sloppy execution will disrupt the entire scheme. But after 2 or 3 times it will definitely turn out neat and beautiful. Everyone loves Jeremy Schafer's bat. And everyone wants to try their hand at performing this model.
The bat is called the “flying vampire” because they fly at night, prefer to sleep in dark caves and love to feast on small animals. But a bat, created in origami style from paper, will be a completely harmless little animal. They will decorate any themed party or gathering recent years popularity, Halloween. It is better to choose black or dark gray paper, so the craft will look very impressive. There are several assembly options. This master class will show one of the options. The diagrams below the numbers show the assembly process in detail.
How to assemble a paper bat with your own hands in a step-by-step tutorial
- Fold a square sheet of paper into a triangle.
- We turn the corners to the bottom and level the resulting bat blank.
- We make cuts with scissors from the center to the middle of the folds
- We fold the resulting triangles inwards with folds.
- Bend the left wing of the mouse.
- We bend the right wing in the same way.
- In Fig. 8 we make the head.
- Figure 9 shows only the top of the bat and we make small cuts along the edges of the upper part.
- We bend it with a valley.
- This is the end result. The origami style bat is ready.

These bats will perfectly create a festive atmosphere for Halloween.
For this decoration you will need:
- black paper
- Scissors
- Double sided tape
- Threads
- A simple pencil or printer
We print out the bat templates below or simply copy them.

We cut it out and place it on windows, walls or doors with double-sided tape. For greater effect, you can hang them on a chandelier or make them in the form of a garland.
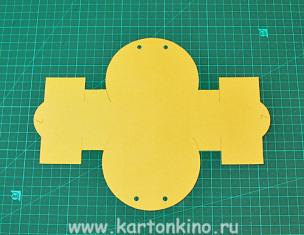
Halloween candy bar packaging.A bat can cause not only hostility, but also pleasant emotions, because it will bring with it in its paws sweet gift. You can do this for scary Halloween original packaging for a chocolate bar or large candy.
For a sweet surprise you will need:
- Bat pattern
- Sheet of black double-sided cardboard
- Finished small eyes
- Scissors
- Double sided tape
- Chocolate you want to give
1.First of all, print out the bat template, place it on top of the black cardstock and carefully cut it out.
2. Attach one pair of eyes to the workpiece with glue. Use double-sided tape to glue the chocolate bar in the middle.
3. Attach a small piece of tape to the bat’s wings and wrap one wing over the other. With such creative packaging you will surprise all the guests at the party.
Let's make a bat from egg paper trays with our own hands
From egg trays you can make amazing craft for Halloween with your own hands, it’s done in a couple of minutes. The materials you will need, in addition to egg trays, are black paint, scissors and a pair of ready-made eyes.

For one mouse, you need to cut out 3 cells from an egg tray and paint them with black paint. On the cell in the middle, this will be the head, we will glue ready-made eyes for toys. You can buy them at any hobby or craft store. Make a small hole at the top and thread a narrow ribbon of a contrasting color through it. Very original decoration it turns out.
Paper bat toilet rolls for Halloween:
Toilet rolls are an excellent material to make a bat craft for Halloween. The photo shows the assembly idea. For the body of the mouse we use a roll of pre-painted black paint or pasted over with black paper. We cut out the wings from colored cardboard or paper. Glue or draw eyes, mouth and ears. We hang the finished bat around the room by its legs. You can put candies and sweets inside and seal the top and bottom.
Video on the topic of the article