The cut-off type of applique is convenient for little children who are just starting to create their first paper crafts. Such work is considered safe for kids, since they do not have to deal with scissors, they simply tear the sheets into slices.
Consider examples of master classes with step-by-step instructions and stencils that relate to the topic.

IN younger group, and in the middle it is better to fill in the already existing drawing with torn pieces of paper. For example, any coloring with a large image is taken and the required number of copies is made or templates are printed.


Tear paper strips finely, finely. 
We glue them in the form of a mosaic on the prepared drawn figure, leave a distance between the pieces, you do not need to glue them close to each other.  The eyes and nose are cut out by adults or just like that, but they are torn out of paper of a different color.
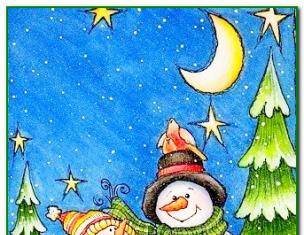
Snowman in breakage technique
The torn technique is about more than just tearing paper into small pieces. Step by step instructions in the next master class, they will help to understand this matter.
Phased execution:

Appliques of paintings in the cut-off technique
For children in preparatory group suitable for large works that are completely lined with torn elements. See what beautiful pictures your children will have:  It is not necessary to tear, you can randomly cut into uneven flaps:
  And this is for younger students a task for breaking off complex elements:
  An example of work, when there are contours, the inside is filled neatly and beautifully:
Tear off technique from napkins
Multi-colored napkins that are torn into pieces will add airiness and lightness to the applique.  Trees also come out remarkably, the trunk is made at will: it is cut, drawn or torn:
  But the most beautiful thing is when you roll the torn strips of napkins into random balls.
Breakaway cotton wool applique
Take cotton wool or cotton pads, and have the children tear them with their hands into small shreds, with which they will then lay out their individual picture. Birds, animals, flowers, snow, clouds will look beautiful and tender.  Lay out and glue the pieces of cotton wool step by step on the drawn figures.
 And for adult artists, it is proposed to complete a large complex image as a whole:

Video: Master Classes of Cut-off Applique
Applications from torn paper will be interesting even for those kids who do not know how to cut with scissors yet. Take several small sheets of colored paper (different). Allow your baby to tear it into small pieces. This activity, by the way, perfectly develops fine motor skills.
Take a clean album sheet, cover it with glue. Let the child place his pieces on him in a chaotic manner. You can call your craft whatever you like: "Flying Carpet", "Self-assembled Tablecloth", "Magic Glade", etc. For this type of applique, you can use not only colored paper, but also any other material:
cut pictures from old envelopes, Greeting Cards, pieces of styrofoam, pieces of wrapping paper, etc.
If your child owns scissors, have him cut pieces of paper himself. With my son at 2.5 years old, we made wat such applications:
- We add details. We draw the finished picture. In our case, a tree. Offer your baby to decorate it with "leaves". Take the green pieces cut by the child and stick them on the tree. In this way, you can make a vase of flowers, autumn leaves falling from a tree, etc.
- We glue the contour. Take a finished picture or draw one. Invite your child to glue the outline with cut pieces. Such crafts are suitable for the smallest.
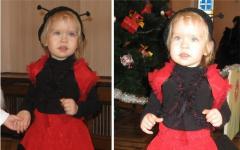
- Breakaway applique. A very interesting kind of creativity. We tear or cut colored paper into pieces and make various compositions from them. We got such a girl. Older children can not just tear, how it goes, but pluck or break off the contour drawing with more subtle and purposeful movements.


A popular type of needlework is colored paper crafts, which have retained their relevance for many years and are constantly being improved.
New and original approaches and options are gradually appearing to them. Such an elementary and rather simple thing as paper can captivate both an adult and a kid.

Favorably develops imagination, dedication and at the same time forms the perception of colors, the development of child's motor skills.

How much joy in the future will the kid play with handicrafts that he made himself.

Postcards, appliques, toys and a lot of other interesting things can be created from simple multi-colored paper.


Paper goldfish
Before starting work, you need to stock the necessary materials:
- ruler;
- thick piece of paper one sheet;
- plate, round;
- small scissors;
- colored sheets;
- paper glue;
- simple accessories (sequins, rhinestones, beads);
- mechanical pencil.

Turning the plate over on a thick paper sheet, outline its edges with a pencil, then cut out the resulting contour with scissors.

From the center of the circle, draw a triangle with a ruler (with an angle to the inside of the circle), cut it - this is the mouth of a fish. Glue it as a tail on the parallel side of the mouth.

Then make an eye, paint it with a felt-tip pen, or cut from black paper and stick in the required place. To decorate a goldfish, you need to overlay it with scales made of paper or other improvised means, sprinkle with beads, before coating the base with glue.

Paper flower
Interesting flowers will come out of paper in different colors. A simple set of things will come in handy:
- scissors;
- PVA glue (you can use a pencil);
- thick cardboard, it will serve as the basis for the toy;

Cut elongated strips out of light paper, first drawing them with a ruler, then cut out circles from a yellow sheet (middle of a chamomile). Cut green strips will serve as leaflets for it.

Of the whites paper strips flower petals are glued on both sides, in the form of a loop. You can decorate a cardboard postcard with a finished chamomile.

Funny butterfly
Enough interesting option crafts are obtained using the outline of the child's hands, which is outlined on colored paper. This is a great opportunity to please and captivate your child with a useful activity.

The following set of materials at hand will come in handy:
- several sheets of colored paper;
- White paper;
- small scissors;
- glue stick;
- accessories for decorating toys (colored pencils, sequins, paints).

Putting both palms of the child on a sheet of colored paper, carefully trace the outline with a regular pencil.

As a result, you will get a drawing of four palms of different colors, they will serve as the wings of a future butterfly. Glue the resulting palms (brought together) on a sheet of white paper.

Next, you should cut an oval out of paper of any other color, which will be the body of the butterfly, glue it between your palms. You will get a little body with wings, on it, using pencils or felt-tip pens, apply a drawing of eyes, a smile and an antennae.

It is reasonable to coat the finished butterfly with glue, apply various decorations, rhinestones and sprinkle it with multi-colored sparkles. Such fascinating activity the baby will like it and will help in the development of perseverance and considerations.

Colored curtains or Christmas garlands
This craft is the most popular and easy to make product. First you need to prepare:
- small scissors;
- paper glue;
- regular pencil;
- small ruler.
Slice a large number of strips of multi-colored paper, which should be the same size.

Glue the ring, thread the next one through it, also gluing its ends together. Perform such actions until the desired length is obtained. According to this principle, make a certain number of "strings" from colored rings.

To diversify the craft, the garland rings can be replaced with small butterflies, hearts or flowers.

It is possible to come up with a lot of different crafts handmade that provide a fun pastime and contribute to the development of the baby.

It is also always a pleasure to receive a surprise for any holiday made by yourself, especially with children's hands!

Photo paper applique


Breakaway application "Autumn landscape"
What to do if your kid still does not know how to use scissors, but is already drawn to creativity. Try to work with him in the cut-off applique technique. This is a very comfortable technique for babies from two years old.
To work you will need:
- colored paper,
- PVA glue,
- brush,
- brown pencil
- a sheet of white paper for the base of the applique.
Step-by-step instructions for performing the work.
Step 1. Draw the outline of the tree on the basis of the applique. Arrange it so that there is room at the bottom and top of the sheet. If the child is too young, do it yourself.
.jpg)
Step 2. Paint the trunk of the tree with a brown pencil. Place the pencil in the child's hand and draw a few strokes together. Let the kid try it himself, but remember little child sometimes it is difficult not to go beyond the contours of the drawing, so adjust its actions.
.jpg)
Step 3. We are now dressing the tree with autumn colored foliage. For this, paper of yellow, red, orange and green colors must be torn into small pieces. Since we do autumn landscape, then, of course, "leaves" yellow color there will be most of all, a little less reds and oranges, and even less green. We tear sheets of colored paper in half several times. Children do it with pleasure at any age. The resulting torn leaf details should not be the same. Everything is like in nature: there are no two absolutely identical leaves, each leaf is special.
.jpg)
.jpg)
Step 4. Mix all the torn pieces thoroughly. We get a multi-colored heap of the future crown of the tree. We divide it into two piles: one larger, one smaller, approximately 2/3 and 1/3. We glue the large pile on the branches, the smaller one under the tree, put it aside.
.jpg)
Step 5. Apply the glue in a thin strip along the tree branches on both sides and blend it with a brush. It is best to use a synthetic fiber brush because it is tougher and will not absorb the glue. Such a brush can be easily washed from the glue. Brushes from natural fur absorb glue and then it is almost impossible to wash them.
.jpg)
Step 6. We glue the pieces of paper to the branches in a different order. And we do this with each branch.
.jpg)
.jpg)

Step 7. Now we glue the flying leaves, spreading glue on each individual leaf. Ask your baby what color the leaves are falling off. Green leaves remain on the tree until they turn yellow.

Step 8. It remains to fill the space under the tree. First, we distribute glue over the surface of the sheet, and then glue the remaining leaves in random order. Extra pieces of colored paper may remain. Don't throw them away. Fold in a bag and use them for the next craft.
.jpg)
Assigned filters
Skill
- Imagination
- Coordination
- Logics
- Fine motor skills
- Memory
- Spatial perception
- Speech development
- Vocabulary
- Fantasy
- Sense of color
Age
- 2 - 10 years old
Capabilities
- Educational and creative
- Mental and special
- Mathematical
- Constructive and technical
- Musical
- Literary
- Artistic and pictorial
- Physical
- Unique
Colored paper appliques are a traditional creative activity for children.
It allows you to develop skills in handling scissors, improve the work of children's hands and make your baby more accurate. Each child will be able to make colored paper appliqués with his own hands, if you put a feasible task in front of him.
So, the most affordable options for colored paper applique for children 4-5 years old can be as follows:

Volumetric applications from colored paper
Ladybugs. Cut out two red circles and a black semi-oval. Black dots are placed on the circles, after which one circle is glued exactly above the black semi-oval, and the second is bent in half and glued to the first circle. We supplement the insect with toy eyes and antennae.

Materials for the application "Ladybug"
We supplement the insect with toy eyes and antennae.

Application "Ladybug"
Watch the video on how to make an appliqué « ladybug"In another technique:
Applique from pieces of colored paper
Chanterelle Cut out a triangle from a paper plate, use a stapler to attach two triangles made of orange cardboard to its round edge. Then cover the plate with pieces of orange thin colored paper.

We fill in the entire piece of paper.

Triangles - ears and circles - eyes

It remains only to attach the round eyes - and the chanterelle is ready!

Ice cream. We draw or cut out ice cream cups from colored paper in advance and glue round muffin cups to them, like creme brulee balls. With these molds, you can make other applications of dishes if you use them as plates.

Application "Ice Cream"
Applique from colored paper by pattern
Bunny. We cut out the ears, head and triangular nose of the bunny, as well as a bush of grass behind which it will hide, according to the template.

We collect the picture on a sheet of white paper, glue all the details and animate the bunny with toy eyes.

Application "Bunny"
Polar bear. Cut out a round body, a head with ears, a bear's face and paws from white paper using a template.

Finishing the necessary details. Cover the white cardboard sheet with blue watercolor to create the background.

Against this background, we collect our bear and supplement it with toy eyes.

Application "Polar Bear"
Multilayer colored paper appliques
As an applique made of colored paper for children 5-6 years old, you can use more complex, multi-layered paintings containing small details. Preschoolers may well cope with the creation of characters such as:
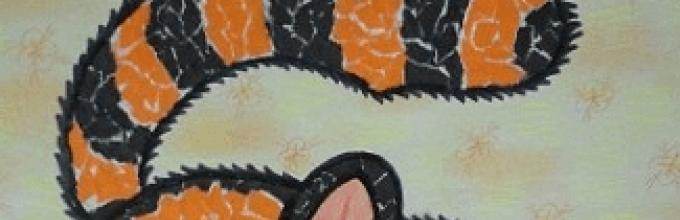
Fish. Cut out from disposable plate a triangular fragment, the rest of it is covered with "scales" - semi-oval pieces of colored paper of different colors, which must be superimposed, slightly overlapping each other. We attach the tail and fins with a stapler, glue the eye. Ready!

Here is another fabulous fish with colored scales.

Dragonfly. Cut out the body of a dragonfly with a head and eight multi-colored wings from thin paper.

We glue it all to a white sheet, complement the image with mustache and toy eyes.

Application "Dragonfly"
Applique made of colored paper and disposable plate
Chicks in the nest. Glue half of a disposable paper plate to a sheet of cardboard. Cut out three oval figures of chicks from blue paper.

We cover the figures with lumps of crumpled thin blue paper, and the nest with decorative shavings.

All that remains is to glue the eyes and beaks to the chicks - and the applique is ready!

Craft "Chicks in the nest"
In the "autumn tree" applique, a disposable plate serves as a background.

Application "autumn tree"
Applications from colored paper on a complex pattern
Girl in the rain. This applique is based on working with complex patterns to cut the umbrella, boots, head, dress, hair and arms of a girl.

What you need to cut out for the craft "Girl in the rain"
Putting the picture together on a sheet of blue cardboard, alternately gluing the details.

Application "Girl in the rain"
Combined colored paper applique
Chicken with an umbrella. This application also implies working with templates, but if it is difficult for kids to cope with such a task, the templates can be prepared in advance by educators or parents.

Materials for crafts "Chicken"
We decorate the umbrella with pieces of translucent colored paper, which will make the image more interesting.

All that remains is to collect the picture.

Application "Chicken with an umbrella"
Volumetric applique from pieces of colored paper
Flower. Cut out the contours of the flower from a disposable plate or sheet of cardboard.

Cut small pieces of colored paper and roll them into lumps. One by one we glue the lumps on the glue.

Gently fill in the entire space of the flower.

Application from colored paper "Flower"
Another version of the craft is "sunflower". Draw the outline of a sunflower on a piece of paper. Cut into pieces of yellow and green paper.

We glue a black circle in the center. We begin to decorate the craft with papers. Before you glue the piece of paper, crush it a little - this will add extra volume to the craft.

Application "sunflower" from colored paper.

Application "sunflower" from colored paper
Rainbow. It is made in much the same way as a flower: the child crumples colored paper and neatly stacks it in rows, observing the sequence of colors in the rainbow.

Application "Rainbow"
Very handsome in technique volumetric applique an autumn tree is made from colored paper.

From pieces of red and pink paper, you can make an applique "heart". We take a cardboard heart as a basis.

Crumple the pieces a little and glue them to the base. The craft will look interesting if you alternate red and pink lumps.

Fine appliqués are made using the facing technique. Small pieces of paper are glued tightly to one another with a thin stick.

Such an airplane can be folded from pieces of paper using the facing technique.

Instead of glue, small pieces of paper can be fixed on a plasticine base.

Flat appliques from pieces of paper
The applique made of colored herringbone paper is done in a very interesting technique... Pieces of tissue paper are glued to triangular bases. In this case, the pieces can glue the edges of the Christmas trees and stick one on top of the other. Only then is the triangular base glued to the previously painted background.

Herringbone applique made of colored paper
Straw stuffed animal. The applique is done using the mosaic technique. We glue the hat and the head of the scarecrow cut out according to the template to the sheet, draw the contours of the body.

Materials for the craft "Straw scarecrow"
The child's task is to fill the torso with pieces of colored paper, sticking them next to each other. With the same pieces of yellow, we spread the hair and beard of the stuffed animal.

Sunset. We lay out sand and purple sunset in pieces of yellow.


A small palm tree will complement the landscape.

Application "Sea" from paper
Application with quilling elements "heart"
Appliques with quilling or paper-rolling elements look very impressive. In order to make an applique, we need colored paper, a pencil, scissors and glue.

We make cuts on the paper about 1 cm wide and roll it into a roll. We cut the roll along the notches. We should have paper curls, the ends of which we fix with glue.

We glue paper curls on a pre-prepared base - a paper heart.

Decorate the curls with twisted green paper. The curls begin to look like graceful roses framed by petals. We get an interesting application using the paper-rolling technique.

Appliques from colored corrugated paper
Applique from colored corrugated paper- "Vase with Flowers"

Application "Vase of flowers"
From colored corrugated paper and wire, you can make a very effective postcard-applique "Summer Glade". The technique of making it is very unusual. We wrap corrugated paper several times around an easily bending rod or wire. We fix the end of the paper with glue.

Squeezing the paper on the wire. Cut off the excess wire and tuck the ends. We should have colored thick sausages.

Corrugated paper sausages
From these "sausages" we lay out the applique on paper.

You can make a very beautiful wall panel with yellow flowers from colored corrugated paper.

A paper plate is an excellent base for a colorful applique. How do you like the idea of making a carrot bed out of a paper plate?

Application on a paper plate "bed with carrots"
Very beautiful applications are obtained if they are based on a background painted with watercolors.

Application and drawing "spring"
Using different techniques, and combining ideas in your own way, you can create unique paintings that will become a real manifestation of children's talent.