Open lesson in origami in preparatory group"Butterfly"
Goals: to raiseinterest in making crafts in origa stylemi.Teaching children to fold paper square shape v different directions, carefully iron the fold lines; teach children to use the hint diagram.Introduce children to basic geometric concepts (rectangle, square, triangle, side, angle)... Develop constructive abilities, fine motor skills hands.
Preliminary work : decoration of an exhibition of handicrafts frompaper made in techniqueorigami .
Materials: Colored sheets rectangular and circles of colored paper, scissors, glue, a hint scheme, presentation, ICT, audio recording "Waltz of the Flowers" by Tchaikovsky.
Course of the lesson:
Organizing time. (music sounds, children stand in a circle, greet each other).
Voc-l:
Guys, let's say hello to each other,
Let's enjoy the sun and the birds
And also we will rejoice in smiling faces
And to everyone who lives on this planet
« Good morning"- we will say together,
Voc-l:
I am glad to welcome you to Origami City!
Behind the forests, beyond the mountains lies the city of Origami.
There is a paper boat. Fairies and magicians also live there.
The little white house stands, and Aibolit lives in it,
After all, there is summer all year round: The miracle tree grows -
Everything was folded out of paper, as if we were really magicians!
I am glad to meet you today!
My name is Princess Origami.
And here is a crane in the palm of my hand
And it seems that now he will come to life ...
He flew with me from Japan,
From the country where the sun rises.
The teacher shows the Square:
Guys in our city Origami lives a magic square and now he will tell about himself.
"Hello guys! My name is Kvadratik. I'm not a simple square, but a wonderful one! And why? Because I can work miracles and make different transformations! I can turn into a hat, I can turn into a boat, into a fish or an airplane - you can't list everything.
You know, guys, each of you can become a wizard and learn how to turn a seemingly simple paper square into any figurine. But for this you have to try and be careful!
I really love riddles, so today I brought you a few:
She is bright, beautiful
Graceful, light-winged,
Itself is like a flower
And he likes to drink flower juice. (butterfly)
Not a bird, but with wings,
Not a bee, but flies.
Bright, smart
Flutters over the flowers.
Moved by the flower
All four petals.
I wanted to rip it off -
He fluttered and flew away.
Square:
Guys, have you guessed who these riddles are about? (children's answers)
Butterflies are like little flowers
Come on, we'll turn into butterflies too.
Physical minutes:
In the morning the butterfly woke up
She stretched and smiled.
Once - she washed with dew,
Two - gracefully circled,
Three - bent down and sat down,
Four - flew away!
And now we will make paper butterflies. So we will become wizards with you! We need scissors and paper of different colors.
Phased show.
To make a butterfly, a rectangular sheet of colored paper is required, for example, 10 * 8 cm.
1.First, a square is made from a sheet of prepared paper, then it is folded in half, but so that a triangle is formed.
2.Fold the blank again. Rotate the triangle so that the revealing edges are at the top. Carefully use scissors to make a semicircular cut in the resulting triangle - these are the carved butterfly wings.
3. Make an incision at the bottom of the figure and bend the wings of the butterfly to the sides. 4.Slightly spread the upper wings of the butterfly with your fingers. Here is the origami craft and ready. Really easy!
Children watch the actions of the teacher.
Safety instructions for working with scissors
Scissors must not be left in open form
You cannot cut on the go
Do not bring scissors close to your face
Pass to each other in rings forward, closed
Guys have prepared a lot of square different paper and invites you to choose.
3. Finger gymnastics"Who is the flower friends with?"
(For this game, the hands need to be folded in a "flower": only the wrists touch each other, and the fingers are spread apart, like petals.)
The flower is friends with the butterfly,
(thumbs intertwine in the lock - palms away from you and wave your fingers like wings)
The flower is friends with the bees
(circle your straight index fingers around each other. The rest of the fingers are folded into fists)
The flower is friends with the sun, (turn your palms away from you, fingers are raised up and spread apart, like the rays of the sun)
With funny rains.
(tap the index fingers of one hand on the open palm of the other hand - these are raindrops)
Practical part - making a butterfly
I invite the children to make a butterfly using the hint diagram.
During children's activities, the quiet, calm music of P. And Tchaikovsky "Waltz of the Flowers" sounds.
Lesson summary
Guys, what was it difficult for you, did the hint diagram help you.
Well done! Let's admire our butterflies on them.
What a miracle is happening
Suddenly - heaven came to life ...
Butterflies have raised
Sails in bright colors.
Motley dresses
Sat down on a piece of paper
Touch - and it will spin again
Fluttering flower.
Children consider ready-made crafts,
listen to the poem
Guys, look at the box, I have prepared for you a gift a book "Wonderful Paper Crafts" and stickers for your diligence. And I wished you continued success.
In this uncomplicated step by step master class we will tell you about how to make an origami butterfly - it is known that the ability to fold such cute origami butterflies will definitely come in handy for those who like to create handmade cards, because such decor elements can often be found in a variety of DIY master classes for making cards.
Tools and materials Time: 10 minutes Difficulty: 3/10
- multi-colored paper squares with a side of 8.5 cm;
- hard object for smoothing folds.
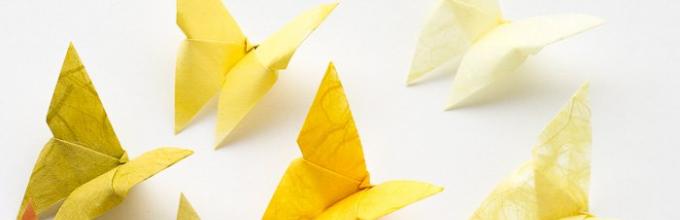
This graceful weightless origami butterfly is easy to make. We invite you to figure out with us how to make an origami butterfly - once having mastered this technique, hands will never forget it. And you can surprise and delight the interlocutor by folding this wonderful creature from a sheet of paper or an ordinary table napkin in a couple of minutes.

Step-by-step instructions with a photo
The origami butterfly, the scheme of which is presented in our master class, is suitable even for beginners, and step-by-step instructions with a photo will help you deal with creative work even faster.
Step 1: outline the diagonals
We bend the blank for the future butterfly in half horizontally, and then diagonally (photo 1). We bend along the diagonals (photo 2).

Step 2: form a triangle
We bend the edges of the horizontal fold to the bottom of the vertical fold (photo 3). You should get a double triangle, as in photo 4.

Leave the lower triangle alone. We work with the upper triangle: bend the edges at the base of the triangle to its apex (photos 4 and 5).
Step 3: shape the body
We turn the workpiece over to the opposite side, the top of the triangle looks down.
We bend the part so that the top of the triangle extends 2 mm beyond the base (photo 6).

Step 4: making the wings
Bend the protruding piece and glue it to the back (photo 7). Fold the workpiece in half (photo 8). We do not iron the fold, since the butterfly will turn out to be flat.

Step 5: shape the product
We turn the butterfly upward with a small triangle, bend the wings, while trying to give them a realistic shape.
Origami Butterfly. Step-by-step instruction with photo
Description: This material can be used by educators, counselors and teachers primary grades, as well as parents.Origami workshop "Summer Queen - Butterfly"
Target: making a butterfly using origami technique.Tasks:
Educational:
give brief information about the silkworm butterfly;
continue to teach children to fold the basic shape of the "double triangle", following the verbal instructions of the teacher;
to consolidate the ability to find and name angles, diagonal, top, base.
Developing:
develop small arm muscles, memory, patience, perseverance, auditory attention.
Educational:
cultivate respect for butterflies, accuracy in work.
Material: square multi-colored sheets of paper, can different sizes, illustrations "Butterflies" Children of the middle group stand in a semicircle, looking at pictures with butterflies.
Educator: beautiful creatures - butterflies, bright fluttering over the flower meadow, they fascinate with their beauty. Who among you did not try to catch a butterfly with something with a juice or just a cap, and if you succeeded, took the butterfly by the wings. What's next…?
Children: the butterfly cannot fly and is doomed to die.
Educator: But these extraordinary insects bring great benefits to nature: butterflies are the best pollinators of plants.

And some flowers cannot live without butterflies, since they are pollinated only by them. Without butterflies, we would not know natural silk,

which produces the silkworm.


Educator: Nikolai Borisovich Shumov wrote a wonderful poem about a butterfly and Kira Yudina will tell us about it:
I guys are a butterfly ...
My house is not a jar.
Take your net
And close on the hook.
Come slowly.
Admire, look!
And the hunt will appear -
You can even take a photo.

Educator: what are we up to today?
Children: make a butterfly
Educator: the magic workshop "Origami" will help us. What material do we need?
Children: square sheet of paper.
Educator: what tools are needed?
Children: skillful hands, attentive ears and keen eyes.
Educator: choose the material, and I will wait for you in the magic workshop
Practical part at the tables
We connect the lower side to the upper side, iron the fold line, get a rectangle, then unfold the rectangle back into a square.

We connect the right side to the left side, iron the fold line, then unfold the rectangle back into a square.

We turn the workpiece over.

We bend the lower left corner diagonally with the upper right corner, we get a triangle, iron the fold line.

Expand

We bend the lower right corner diagonally with the upper left corner, we get a triangle, iron the fold line.

Bend the edges of the horizontal fold to the bottom of the vertical fold. You should get a double triangle.

Double triangle we put the base to ourselves.

We work with the upper triangle, connect the right and left corners to the vertex and iron.


We turn the workpiece over to the opposite side, the top looks down.

We work with top, pull the top to the base so that it goes beyond the base.

We bend the small triangle, which has formed at the base, to the opposite side and iron it - it will be the antennae or the head of the butterfly. Turn the workpiece to the reverse side

We bend the wings


CHILDREN'S WORK
Educator: Well done guys, you are almost wizards and I am very glad for you that you worked together and helped each other. What are we going to do with these butterflies?
Children: we will decorate the group, and for girls you can make a hair clip, you can have a brooch or bracelet, or you can decorate a postcard
Educator: now it's time for us to walk, and after the walk you can decorate your butterflies.
CONSPECT NOD "Butterfly"
Purpose: To develop in children the ability to tell from pictures close to the text, answer questions about a fairy tale, perform coordinated actions when performing a physical minute. Remember the order of execution base form triangle, to consolidate knowledge of sharp corners. Teach children to bend corners in different directions, clearly ironing the fold lines. Develop visual perception, attention, creative design. To cultivate respect for comrades, patience, accuracy in the performance of work.
Material: pictures of butterflies, the tale of K. I. Chukovsky "Tsokotukha Fly",
handout: for each child, 1 square of any color, cuttings of colored paper, glue stick, oilcloth.
Preliminary work: examining a set of pictures "Butterflies"
The course of the lesson.
- Today in our lesson I want you to remember the wonderful tale of K. I. Chukovsky "Tsokotukha Fly". And we will remember looking at illustrations for a fairy tale. I'll start, and you help. (remember the whole tale from the illustrations).
- Now tell me, what kind of guests came to the fly?
- What do you think was the most beautiful insect? (butterfly)
- I also think the butterfly was beautiful. Remember how a fly talks about her ("the butterfly is beautiful ..")
- How else can you say about a butterfly? (children's answers)
- Now let's rest.
FIZMINUTKA "Butterfly"
Sleeping flower
(starting position: sit down, hiding your head in your knees, and hugging your knees with your hands)
And suddenly I woke up.
(raise your head, straighten your arms; then lower your arms along your body)
He did not want to sleep anymore.
He moved, stretched.
Soared up and flew.
(straighten your back, rise; swing slightly to the right and left; take your arms back - "wings grow")
The sun will only wake up in the morning -
The butterfly circles and curls.
("Fly", imitating the movements of a butterfly)
- Look how beautiful butterflies are. (Display of illustrations)
Let's make the same butterflies.
- Take a square and make a triangle.
(ask someone who will do it quickly to explain how they did it)
-Smooth the fold line strongly. Find sharp corners and fold them. Stroke the fold line clearly. Now be careful! Place the resulting triangle with the fold line facing you. Fold the sharp corner towards you, and iron the fold line. Turn the workpiece over and do the same with a different corner.
- So the butterfly is ready. Guys, what do you think the butterfly is missing? (pattern)
- Come up with a pattern, cut out what you want and stick it on the butterfly. While you are doing the pattern, I will prepare the antennae.
(children fantasize about the pattern and stick the antennae)
- What beauties turned out.
He lives, decorating the Earth with himself,
Fluttering from petal to petal!
At the same time, without breaking the silence,
She herself is a flying flower!
- Let's hang our butterflies in a group and remember the summer.
Belyakova Irina Alexandrovna
Educator
GBOU of Moscow "School №920" Kindergarten 1518
Open lesson in origami in middle group"Butterfly"
Goals:
To develop in children the ability to work with their hands under the control of consciousness.
To acquaint children with basic geometric concepts (square, triangle, side, angle).
Develop memory.
Materials: Squares and circles made of colored paper, scissors, glue.
Course of the lesson:
The teacher shows the Square: “Hello, guys! My name is Kvadratik. I'm not a simple square, but a wonderful one! And why? Because I can work miracles and make different transformations! I can turn into a hat, I can turn into a boat, into a fish or an airplane - you can't list everything.
You know, guys, each of you can become a wizard and learn how to turn a seemingly simple paper square into any figurine. But for this you have to try and be careful!
I really love riddles, so today I brought you a few:
Not a bird, but with wings,
Not a bee, but flies.
Bright, smart
Flutters over the flowers.
On a fragrant flower
The flying flower has sat down.
Moved by the flower
All four petals.
I wanted to rip it off -
He fluttered and flew away.
Guys, have you guessed who these riddles are about?
Remember what kind of butterflies you saw, tell us about them.
And now we will make butterflies out of paper and decorate them. So we will become wizards with you!
The teacher shows the sequence of making a butterfly.
Manufacturing sequence:
1. Bend the square diagonally (first one by one, then the second), unfold it.

2. Turn the square over, bend the square in half and unfold it.

3. "Press" the sides inward.


4. Bend the sides of the upper triangle to the midline.

5. Bend back the sides adjacent to the midline.

6. Grease the middle with glue.

7. Decorating the butterfly.

This craft can be used in board games or outdoor games for a walk, you can decorate the Christmas tree.