Due to the increasing spread fashion trends for natural and natural nail design, fashionable marble manicure or so-called marble stone style design is not inferior to its position in the 2020-2021 season.
A beautiful marble manicure features unusual stains on the nails that imitate the surface and patterns of natural stones.
To create a marble effect on your nails, you will need very little - two or more contrasting shades of varnish, a little skill and skill. At first glance, it may seem that only a pro can do a marble design on your nails, but this is not at all the case.
Having selected several shades of varnishes that you like and of high quality, and having studied a little the technique of creating “marble stone”, you can even perform an excellent marble manicure at home.
The laconic and discreet marble stone manicure looks special, adding a touch of mystery and mystery, ideal for girls who prefer discreet and democratic nail art.
This is also facilitated by the palette of shades in which the original marble manicure is most often performed: beige, gray, white, black, pale pink.
But if you want to create an intriguing and memorable marble manicure for 2020-2021, you can use colorful and deep tones of green, blue, red as a basis for a marble manicure, or to complement it, photo examples of which you can view in the gallery below.
Marble nail design can be created on all fingers at the same time or on just one or two – as you wish. As an addition to the “marble stone” manicure, you can use a mirror-like rub on individual fingers.
In addition to rubbing, stripes or threads in gold or silver colors will help diversify and decorate a marble manicure. A minimal amount of decor in the form of elegant rivets on one or several fingers is also allowed.
The advantage of the sophisticated marble manicure for the 2020-2021 season is its versatility - this design is suitable for any events and events, both for business meetings and festive events.
Besides, fashion design Marble stone nails look great on any length of nails - from short to long. Especially stylish, marble manicure complements sharp, rounded and coffin nails, giving them showiness and chic. 
Which marble manicure would you prefer in the 2020-2021 season: laconic and calm, or with accent nails in bright colors, stripes and rivets - your hands will look stylish and amazing.
We offer you best ideas marble nail design 2020-2021 in different shades and for different nails, among the variations of which you will certainly look for exquisite nail art in the marble stone style.
A beautiful marble manicure looks amazing and attractive, arousing special interest and admiring glances. Marble stone nail design may seem complicated in its execution, but we hasten to assure you that this is far from the case.
Armed with everything you need, having familiarized yourself in more detail with the possible methods of performing a marble manicure, which are presented in detail online in video reviews and descriptions, you can create a delightful marble manicure yourself. 
Manicurists offer us several variations on how to perform a marble manicure and create the desired effect of patterns of natural stones on the nails.
Popular water method creating a marble manicure, an option using a piece of polyethylene, and you can also achieve marble nail art using special gel polishes.
To create a marble manicure you will need a base for varnish, at least two shades of varnish in contrasting colors - one for the base, the other for creating streaks and, of course, a saucer with water (for the first method) or a piece of polyethylene (for the second option for performing a marble manicure) . 
It is necessary to perform a marble manicure in several stages: first apply the base, then desired shade varnish, wait for the coating to dry.
Apply a few drops of varnish to the prepared water different shades and dip your finger in the water so that the film formed from the varnishes on the surface of the water ends up on the nail.
Wait until everything is dry, clean your finger of excess varnish and secure the result with a top coat.
To perform a marble manicure with polyethylene, you need to create patterns on the nail using a crumpled piece of polyethylene, soaked in varnish, applying it to the surface of the nail. 
Thus, you can perform a fashionable and stylish marble manicure for the 2020-2021 season yourself without unnecessary fuss at home.
Let's take a look at the most beautiful ideas marble nail design 2020-2021 different styles and for every taste, demonstrated the best masters manicure business.
Stylish white marble manicure for the 2020-2021 season
The “marble stone” nail design in white is the most popular and discreet, demonstrating the beauty of the marble design on the nails to the fullest.
To create a white marble manicure, cover your nails with a white base and create stripes of marble on your fingers with black varnish, it looks very beautiful and mesmerizing. 
A classic white marble manicure will be appropriate for an office look, for school, as well as for stylish and graceful looks in almost any style.
Gold or silver stripes, rubbing with various effects and laconic rivets that can be used on several fingers will add emphasis and diversify the white marble manicure.
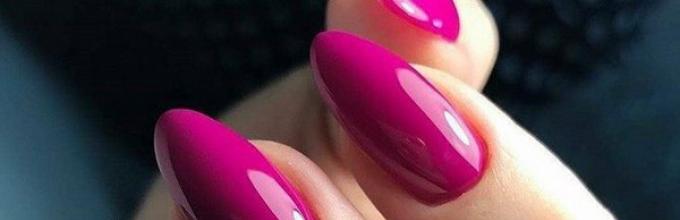
Beautiful pink marble manicure 2020-2021
Pleasant and cute pink color is incredibly harmonious in tandem with marble manicure and nail design in this style, giving it a special softness and romanticism. 
Pink marble manicure is beautiful for both short nails and long nails. different shapes, allowing you to create an elegant and graceful marble stone design for a special occasion.
A touch of chic will allow you to add a scattering of sparkles along the streak line, as well as an ombre effect on several fingers, stripes and bright accent varnishes on individual fingers.
Chic matte marble nail design 2020-2021
A matte solution on nails is always unusual and attractive, and a fashionable marble manicure in this style is no exception.
Manicurists demonstrated a stylish marble nail design, complemented by a matte effect. 
So, to achieve an irresistible result, make two fingers in a marble design, and the rest in soft peach or gray tones with a matte effect.
Complement this marble manicure, if desired, with laconic decorations in the form of stripes, glitter, scattering of sparkles and you will get an irresistible marble nail design for the 2020-2021 season.
Fashionable multicolored marble nail art 2020-2021
Do you wish yourself unique, original and at the same time stylish manicure in the 2020-2021 season? We have it for you great solution in the form of a marble nail design using several contrasting tones at the same time. 
We offer you the most fashionable marble manicure in spectacular and intriguing black, white, emerald and gray gel polishes. But a more delicate variation is pastel colors in blue, pink, and gray.
A marble pattern in such a manicure can be created both on all fingers and on individual fingers - as you wish. The most beautiful examples shown in the photo in the gallery below.
The most fashionable marble manicure of the 2020-2021 season: photos, ideas for marble nail design


Marble manicure is an unusual nail design, despite the fact that marble is found in nature, but on nails such a print looks especially chic and rich. Unusual winding lines that create the effect of marble are easy to make even at home. Marble nail design can be done various techniques: using special gel varnishes with the effect of marble, needles, water technology. To ensure that your manicure turns out right the first time, below we will look at all the subtleties and rules for creating marble nail art.
How to create a marble manicure with gel polish by hand
Marble nails can be done in various ways, the most popular among craftsmen is to draw the print by hand using different colors.
Advice for girls who have decided to get marble on their nails for the first time: print out a photo for yourself with an example of a marble print.
So, let’s do a marble manicure with hand-drawn print:
- We degrease the plate, working well in the areas near the skin so that the enamel does not flow there.
- Apply primer and base in a thin layer, rubbing in. Dry your fingers in a lamp. Remove the sticky layer so that the color coating does not spread or pull off.
- We apply a single-color coating (black, white) in one or two layers, dry it in a lamp.
- Looking at the marble patterns in the pictures, it becomes clear that this effect is created by mixing dark and whitish stripes. Therefore, we will continue to draw them. Mix on a piece of foil different colors, but similar shades. If the main color is dark, then draw the lines light, and vice versa. We draw spots and stains with a thin brush with different strengths pressure. To achieve the desired effect, lines should be drawn chaotically, unevenly, and slightly sloppy. There is no need to put pressure on the brush; it should barely touch the surface of the plate. You need to draw out the colors, leave the lines thin in some places, and weave in others. After drawing the lines, we send the fingers into the lamp.
- For whitish lines, mix the top with white color. When drawing lines, it is necessary to control the process, not to overdo it with the whitish color, so that the effect of marble is truly created. After this, we dry the fingers in a lamp.
- Apply a thin layer of top coat on top and dry.


Tips from experts in the nail industry:
— When doing a marble manicure with gel polish by hand, you don’t need to get carried away with the lines, because this activity is very addictive. After making several winding stripes, you need to look at the nail from the side: if the marble print is already visible, then you should stop.
— It is recommended to dry each finger after decorating it so that the paint does not spread.
Once you get the hang of doing marble nails with gel polish, you will definitely want to repeat the manicure again and again. After all, by drawing your nails by hand, each time you will create your own unique design.
Marble effect using a needle
If you are new to nail art, but want to decorate your fingers with a marble print yourself, then experts advise trying one of the easiest ways - doing a manicure with a needle. How to make a marble manicure at home without special tools or a lamp? For this manicure option, you only need a needle or toothpick, a thin brush and regular varnishes of various colors.
Apply a base color to the nails prepared for coating. Without waiting for it to dry, apply small drops of various colors using a thin brush. And now the most interesting thing: armed with a needle, you should carefully start making stains, connecting colors so that they mix with each other. Finally, coat your nails with a transparent sealer.
You can choose colors for a marble manicure according to your mood: closer, similar to natural stone is white marble, but beige is also suitable, gray shade. But you can experiment with other color combinations: pink, black, peach, brown.
Water technique for creating stains
Many girls are very fond of water technology, so they take this opportunity to create a marble effect on their nails using water. If you don’t know how to make a marble manicure with gel polish on water, then arm yourself with a pen and a piece of paper and write it down.
In order to bring this manicure to life, you should prepare the following materials and tools:
- a plate with warm water at a temperature of about 40 degrees;
- toothpick;
- gel polishes of selected colors;
- base clear coat;
- nail polish remover;
- cotton swabs;
- tape and scissors for cutting it;
- finishing coating.
So, let's start creating a manicure:
Step 1
We apply the base to the prepared nails, dry it, paint the plate on top with white or another color, and dry it again.
Step 2
We cut out strips of tape and cover the skin of our hands with them to prevent paint from getting there.
Step 3
In warm water, use a brush to create the desired print, for example, first drip paint blue, then white, blue. Then, armed with a toothpick, we make a pattern on the water: we pull out the resulting colored spot in different directions of the container.
Step 4
Dip your fingers into the colored water for 1-2 minutes. Then we take them out of the water and give them a little time to dry. If the skin is stained in some places, remove the varnish using cotton swab, soaked in a special liquid.
Step 5
The final stage is to apply a transparent sealer.
Making marble on nails for the lazy
If the methods described above seem complicated and time-consuming to you, then there is the easiest one, quick way– you need to buy a special marble nail polish and paint the plate with it in the usual way. If the varnish is thick and dense, then one coat of coating is sufficient. This nail design can be created with gel polish in a matter of minutes. The main thing is to choose quality material. It is best to buy such varnish from a reputable manufacturer, be sure to pay attention to the expiration dates of the material. Of course, such varnishes are expensive, but thanks to them you can get excellent results in the shortest possible time.
But, saving time on creating a marble effect, you can work on nail design. For example, add some zest to your nails: stick adhesive tape, make a casting, add rhinestones, stones, broths, combine several types of manicure.


Marble manicure looks amazing, this is one of the few designs that will look new every time. After all, divorces turn out different every time. With our detailed descriptions In the process of creating a marble manicure, you yourself will be able to bring to life the nail look that many girls love.
Marble manicure looks impressive; it can be discreet or bright, but it always looks stylish and elegant. How to make a beautiful marble manicure at home quickly and easily, what design will suit different shapes and lengths of nails, we tell you in this article.
How to do a marble manicure - quick marble
- First of all, the main color is applied, usually dark.
- You need to wait until it dries and apply the next layer, this time light.
- After drying, a third shade of varnish is applied, also dark.
- While the layer is still fresh, place a crumpled bag on its surface.
- Press it firmly against the nail several times so that noticeable marks remain.
- When the varnish is completely dry, the finishing coat is applied to the plate.
This method is the simplest, but if you want a better and more contrasting effect and you have time for it, try other methods!


How to do marble manicure using drawing method
This is one of the most common ways to achieve the marble effect. It is used both in salons and at home. To do this you will need several varnishes of different colors (at least 3), a thin brush or needle.
- First of all.
- After the base, apply the varnish of the main color and wait until it dries.
- Now a new layer of the same color.
- As soon as the last, third layer is applied to the nail, we begin to paint.
- IN different areas Several small drops of other shades are carefully dripped onto the nail.
- Use a brush or needle to move and mix fresh drops into the final layer of base color.
- When the varnish has dried, apply the finishing coat.
This method creates the most “marble” effect. It doesn't take much time and looks simply unique. It is by drawing that the pattern on the nail becomes as close as possible to the pattern on a real stone.


Marble manicure with regular varnish: video
How to do marble manicure on short nails
Design short nails usually a difficult task. Not all ideas can be realized due to the small surface of the nail, it is not convenient and not everything looks beautiful. But in this case, marble manicure is as easy as shelling pears!
- All you need to do is apply a background color and draw stripes or veins, or use another technique called water marbling.
- With its help, the pattern is transferred by the film that has formed on the surface of the water. You just need to choose the right base shade.
Choose varnishes for the main background and you will visually enlarge the nail plate. But if you want to emphasize the ideal shape of your short nails, or you have an evening out, a black manicure with a marble effect will shine like a black pearl on your neat nails. The white veins will sparkle like lightning in the black sky, and top layer A glossy top will reflect the light of bright lights.


Chic marble manicure for long nails
Long nails perfectly convey the beauty and various variations of a manicure with a marble design. Oval and mendala-shaped shapes are again in trend, which can be perfectly executed bright manicure with marble effect. The combination of colors can be very different:
- Classic white and black;
- Black with gold, silver, or bronze;
- Metallic manicure with rubbing and black marble;
- Combination with sliders and stickers;
- Decorated with foil, stones and pearls;
- Red mother-of-pearl and matte black;
- Malachite precious marble;
- Mixing several transparent pearlescent colors;
- Combination of several bright colors with marble trim on the ring finger.


Today, the beauty industry is developing very quickly, and every day there are more and more types of manicure. If you follow the latest fashion trends in this area, you should definitely try a marble manicure. It won’t cost you a lot in the salon, so we’ll tell you how to carry out the procedure at home.
Marble manicure with varnishes at home
In order to reproduce this master class, you do not need any special skills or abilities. Every woman can cope with such a simple task. Believe me, after painting your nails marbled at least once, this type of manicure will become your favorite.
You can use any colors and shades of nail polish that you like - don't be afraid to combine. All you need is to use your imagination.
What you will need:
Plastic mold with water at room temperature
Nail polish remover
Varnish base
Cotton swabs
Top coat varnishes
Scissors
How to do a marble manicure:
The first thing you need to do is paint your nails with a base coat; it will protect them from brittleness and yellowness.
Once the base coat has dried, apply the color polish of your choice. It is better to choose the color that should prevail in your opinion.
It's time to use the tape. You should wrap it around the nail, on the skin. Make sure that it does not touch the nail, this will ruin the manicure.

Now comes the fun and interesting part - mixing the colors. Take the first polish and hold the brush over a plastic pan filled with water. The brush should not be too high. The varnish will drip into the water and as a result, circles will form. Then make a few drops of another color, and another. You need to drip in the center of the container with water. You should end up with something similar to this.
Take a toothpick and place the tip on the last circle made by the polish. Start slowly pulling the toothpick inward, towards the center. Use your imagination and create any shapes you like.

Dip your finger into the cup where you created the lines and designs with the toothpick. Keep your finger in the water for a few seconds, then remove it and remove excess polish from the skin with a toothpick. Repeat the same with all fingers and when finished, remove the tape.
If you use all our tips, the result will impress you - you will get such a chic marble manicure!

Marble manicure: photo
These photos will inspire you and you will find several here interesting ideas for both short and long nails.
1.
Most recently appeared in nail design new trend to create a variety of patterns on wet surfaces. One of the most bright new products last year there was a marble manicure that quickly became a hit in salon and home designs. Its popularity is due to its simplicity and interesting appearance. In 2019, marble design changed somewhat, but that did not make it less popular. Nowadays, the texture of the stone is cleverly combined with geometric patterns, cobwebs, foil or stripes of silver or gold on an adhesive base. Additional decor makes the design even more interesting, but the main thing here is a sense of proportion. Marble is still a noble stone and the framing should be appropriate.
Step-by-step photo instructions for performing marble manicure with gel polish
Marble design can be done and regular varnish, but still gel polish is more durable, so we’ll focus on it. By using step by step photos, I will show you how to do a marble manicure at home yourself in 10-15 minutes.
Step 1– We prepare the nails for coating, apply white gel polish of any brand, and dry. Then the fun begins.
Advice for beginners
Some masters make marble nails by painting directly on wet nails. white color. It's possible. But the design will spread faster across the base coat. The base dissolves gel polish better. Therefore, it is better to do a marble manicure with a base. Also, do not use thick gel paint for painting. You will not get the desired effect of shading the lines. It is better to opt for a classic black gel polish with medium viscosity.

Step 2– Next, apply the base, retreating 1 mm from the cuticle area and side ridges. We don’t dry it, we immediately draw a pattern on it using a thin brush and gel polish. We give a minute for the lines to spread slightly over the surface, using a thin brush, bring the base closer to the cuticle and send it to the lamp.


Now you know how to do a marble manicure. If you have any questions, write them in the comments. If desired, you can do matte design. For light shades You can use both velvet and satin top. The photo below shows the design in a matte version.
Simple design on marble
The second part of the master class will be devoted to the idea of additional decoration of matte marble design.
As usual, marble design is complemented with some simple drawings. I took black gel paint and two brushes: Roubloff 5/0 DS43R for drawing long lines and Roubloff 10/0 DK13R for small details.

Advice for beginners
If you want long lines to be smooth, use a brush with synthetic bristles. It is more elastic and obedient. Natural bristles are very soft, so it is more difficult to draw long lines with them.

I decided to complete the beautiful marble manicure with a small geometric element and a twig. Metallized strips of different thicknesses on self-adhesive also look good on marble. This design with a stone texture is quite suitable for short nails.


