Autumn foliage is a wonderful material for creativity. Children are especially interested in making something out of it, and if your child is not very assiduous, then be sure to try making something out of foliage with him. He will definitely enthusiastically create an exciting toy, an animal from what he just ran around on. In our article we will present several master classes on making leaf applications for kindergartens and schools.
Applications must be made by children of preschool age and older elementary school, because this type of visual creativity develops children’s motor skills, imagination and creative thinking. You and your children try to make these types of crafts from natural material autumn:
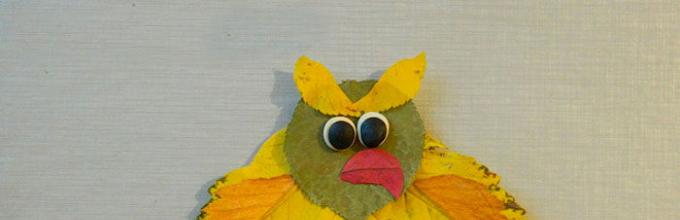
- Owl. To make such a craft, you just need to select leaves of different colors and appropriate shapes, as well as a small branch of a vine, because the owl you make will sit on it. Prepare dry glue and plasticine from the office. You will use glue to connect all the elements of the craft, and make eyes from plasticine.

- Autumn tree. Prepare any decorative cardboard to make the picture bright, take paper blue color. From other office supplies you will also need brown plasticine, a simple pencil to make a blank for wood, and dry glue. From natural materials, prepare as many dry leaves and rowan berries as possible.

- Butterfly. Just choose different leaves according to shape and color. Be sure to find thin brown leaves to make the body of the butterfly. As a last resort, yellow foliage can be painted with watercolors of the desired color.

When working with a child, it is very easy to come up with an application. You can invite him to make his favorite cartoon character or make a postcard for the person he loves very much and wants to show his feelings for him.
Applique carpet of leaves, details with photos

A carpet of leaves is very easy and simple to make. Any child preschool age will cope with such an application in 2 counts:
- First, ask your child to arrange the leaves on a sheet of paper so that there is practically no gap between them.
- Then let him smear each leaf with dry glue and glue it to the place where he intended it to be.
- If some gaps still remain, tell your child that they can be filled in with a felt-tip pen.
You can use not only leaves, flowers and fruits in this application autumn trees will also fit.
You can make a carpet of leaves, but do not completely cover the paper sheet. Come up with some kind of pattern, draw it on paper so that the child can clearly see the contours. Let him glue the leaves that he likes to the places of the pattern. Of course, in creative process orient your child so that the picture ends up looking symmetrical.

Hedgehog from leaves applique, step by step

- To begin, draw a hedgehog without needles. You can use the template we have attached below.
- Paint with paints or cover this blank with colored paper. Clearly draw the nose, mouth and eyes of the hedgehog.
- Lubricate the hedgehog's body with PVA glue:

- Glue the leaves in a chaotic manner to the coated base. The main thing is that there is a resemblance to thorns:

Hedgehog template for applique

Leaf fish applique in detail with photo

- On a blue or dark blue colored cardboard (we choose this color if we want to show that the fish is swimming in the aquarium), glue 1 yellow piece of paper, which will represent the body of the fish:
- We make a fish tail from identical red leaves.
- We tear off a small piece from the same red leaf to make a mouth for the fish:

- From the red leaf from which you will tear off part to create the mouth, tear off more pieces of fins. You can simply fold the rest and tear it in half.
- Make a fish eye out of colored paper. You need to make one circle white, and the second (it should be smaller in size compared to white) black.
- Under the finished fish, glue any dry grass or twigs that will act as seaweed:

Fish applique template

Peacock leaf applique, step by step with photo

- Take 5 identical yellow leaves and place them on cardboard of any color to form a semicircle. Immediately glue them with dry glue.
- Take the same number of red elongated leaves and glue them on top of the yellow ones in the same pattern - in a semicircle.
- Cut out the peacock's body from colored paper. For contrast, use bright blue paper.
- Draw eyes and glue a nose from yellow construction paper:

Peacock template for applique

Applique autumn bouquet of leaves, step by step

- On decorative cardboard, first glue a base of dark brown leaves that will represent a vase.
- Glue multi-colored leaves on top of it in a chaotic manner (the brighter these leaves are, the more beautiful the bouquet you will get).
You can combine leaves so that you get, for example, daisies. Also add green leaves to this applique to make the bouquet look lively and bright.
Applique vase with leaves

- On white cardboard or a piece of whatman paper, roughly estimate where your vase will be located.
- From pink decorative cardboard white peas(you can choose any other color and print) cut out the vase using the template below.
- Glue the dried leaves on top of the vase. The arrangement of the leaves can be any.
Use PVA glue or dry glue to make this type of applique.
Vase template for appliques


Applique portrait of autumn from leaves, step by step

- First, prepare everything you need to get started. You will need: a sheet of white paper with an image of a head, a herbarium, PVA glue, stationery scissors with pencils (you will need a simple pencil and multi-colored ones):

- Print out a face template (if you know how to draw, create it yourself):

- Coat the head with glue and then glue the leaves. They should be directed in the direction in which you want your hair to fall:

- Draw your face with pencils and glue on a nose from a strip of paper folded into a triangle:

Beautiful applications from leaves:
kindergarten


1st class


2nd grade


3rd grade


4th grade


Children's creativity made from natural materials is an opportunity for children to touch something beautiful; it is useful for mental development. Create applications with your child at home just like that on any topic. You can be sure that time spent with your child in this way will benefit both you and him.
Video: “Appliques from leaves”
Here it comes golden autumn! Warm sunny days invite you to go for a walk in the park or forest. And at the same time you can gain a lot beautiful leaves, because the time for crafts for kindergarten will begin soon!
What do you think yours will be like? Make a beautiful colorful peacock out of leaves!
The creation process is simple and interesting. Do it with your child and you are guaranteed an interesting evening!
Tools for creativity
You will collect all the materials for the peacock from leaves during a walk, on the way from school or kindergarten, as well as in the park near your house. You need leaves - maple, birch - it doesn’t matter! The main requirement is not too large and very bright!
In addition, you will need:
- Colored cardboard;
- Velvet cardboard in black or dark green;
- A piece of thick (or corrugated) cardboard;
- Glue gun;
- Plasticine.
Take any tools and materials you can imagine, and create them!
If you decide to skeletonize leaves, then prepare baking soda and an old toothbrush.
To make your panel the most original and beautiful, make skeletons out of leaves and paint them brightly. This is quite simple to do, and the result is surprising.
We present to your attention 2 methods of skeletonizing autumn leaves.
With the first option, the activity will not be very pleasant, and work will need to start at least 3 weeks before creating the craft. If you are ready for this, then try it.
For this method, take a container, put foliage in it, pour in warm water and close the whole thing with a lid. In a warm place, such leaves quickly begin to rot. In this case, the pulp of the leaf is most likely destroyed, and the hard veins are the least affected by this process.
After 3 weeks we need to remember our leaves. Clean water is poured into a basin and raw materials are placed there. You need to very carefully clean off the rot, trying not to damage the veins. You should try to remove all excess that cannot be removed with your hands using a toothbrush. Skeletonized leaves are placed under pressure and dried.
As you can see, it's not a very pleasant experience. Again, in our lives it is not always possible to prepare in advance, so there is another method - a much faster one!
In the second option, you need to boil the leaves in a soda solution.
To do this, dissolve 200 grams of washing soda powder in 600 ml of warm water. Prepared leaves are immersed in the mixture and cooked for an hour and a half on low heat.

After some time, this liquid is poured out and poured into the pan. clean water and continue cooking for about 30 minutes.
Use a fork to check the condition of the sheet. We finish when the separation of the pulp from the veins becomes free.
Now let’s take out the leaves and carefully, without pressing, wipe them. Some parts may not separate; in this case, boil the raw materials again. Remove from the “broth” carefully, because the leaves are very fragile and can collapse! Dry as in the first option.
Before work, the leaf skeletons can be ironed and then applied with dye - gouache, egg dyes, watercolor, spray paint. Bright colors are welcome, because a peacock made of leaves cannot be dull!
You can bleach them with regular “Whiteness”.
DIY peacock made from leaves
To create a bright panel, prepare a sheet of cardboard light shade, velvet cardboard, scissors and leaves.

Draw a semicircle on the cardboard in the middle - this will be a sketch of the tail. Squeeze out the glue along the largest arc and very quickly, without letting the glue harden, lay out the leaves.
To make the work fun, first sort all the leaves by size and shade.
Let the first row be made of ordinary leaves, but the second and all subsequent ones can be laid out from skeletonized ones.
Once the entire surface of the tail is filled, cut out the silhouette of the bird from black velvet cardstock and glue it on top of the leaves.
Peacock made of maple leaves and plasticine
It’s even easier to make such a bird, you just need to remember your modeling lessons! It’s even better if your baby helps you make the body, neck and head.
To do this, you need to take blue plasticine and knead it, and then make the desired shape.

For the tail, collect maple leaves - the brightest and most beautiful ones. But all fallen leaves have an unpleasant feature - they dry out and warp, losing their delicious appearance. To prevent this from happening in your case, prepare them - preserve them in glycerin or coat them with wax.
Stick several leaves into the tail part of the plasticine body so that they peek out from one another. For the head, you can make a tuft from a twig.
Create the legs from sticks and acorn caps.
Cut out a small stand from thick cardboard and paint it green or stick on green paper. Glue a peacock made of leaves onto it.
That's it! The child is delighted - his craft will be amazing!
Summer is ending, but why? Unfortunately, no one has an answer to this question. We have a guess, but we're not sure it's to everyone's liking. We think that summer is ending so that autumn can come. Like this. What's good about autumn? Someone has a birthday (but not everyone, so it’s not suitable), someone will fly to the sea, but what should the rest do? Admire the autumn forest and do crafts? Perhaps today we will do just that.
Beauty from dry leaves
Beauty autumn forest described by many Russian writers and poets, but even without this, every person knows perfectly well that it is in autumn that the freshest rain in the forest, the trees are full of yellow, red, fiery flowers and are pleasing to the eye, and sometimes pine cones fall on your head. Collect those that have already fallen down, take them home, and let's start creating wonderful crafts from tree leaves. 
Leaf and flower decorations
Of course, this is what children primarily like to do. In schools they are asked to make collages, and everyone strives to put beautiful pictures on a piece of paper that, to some extent, reflect their mood. Someone loves bright colors, some people like to post pictures using flowers, and others can even use twigs and roots. The scope for imagination is huge. Look at the photos below - you can use leaves to make wall paintings, lamps, and even funny little animals.

Leaf applications
The most common applications are on a sheet of paper. There is nothing difficult in creating them - you just need PVA glue and a little patience. Place the leaves on the sheet and glue one at a time. To create a spectacular background, you can use watercolor and in some places paraffin, this will create the effect of scuffs and uneven coloring. Often such leaves are given to relatives or friends for their birthdays, because making a card from autumn leaves- it’s as simple as shelling pears, and it pleases the person.

DIY autumn leaves crafts
What else can you make from autumn leaves? They can decorate a lampshade self made, or lamp body. Hanging it on a thread, you can make a wonderful decoration for the wall - you get a real magic branch on which the leaves dangle in weightlessness.

How to paint tree leaves
We want to help you surprise your guests. To do this, let's reveal one secret - you can give the leaves a different color in just a few minutes. For this we need a bunch of fresh leaves and regular table soda. We fill the leaves in containers with soda and add a little water, let them brew, and after the leaves have lost all their green background, you can paint them with ordinary children's paints. The result will be the effect of airy multi-colored leaves.

Spectacular decorative elements made from leaves

Garland of autumn leaves


Leaves on the front door

Pillow with a picture


Autumn garland of tree leaves

Modular paintings with autumn forest


Wall decoration with autumn leaves

Applique of autumn leaves


Wreath of autumn leaves


Bouquet of autumn leaves

Autumn is a real artist. She talentedly painted all the courtyards and parks, proving to people that autumn time It’s far from a gloomy and gloomy time of year.
It might rain sometimes outside, but what colors there are all around!
In the summer you won’t find such a riot, except perhaps in the flowerbeds of personal plots.
Walking in the yard with my daughter, we always collect fallen leaves.
Sometimes we pick still green specimens so that the herbarium collection will have different colors and plant forms.
Then all year round we make wonderful appliques out of them or use them to create crafts from natural materials.
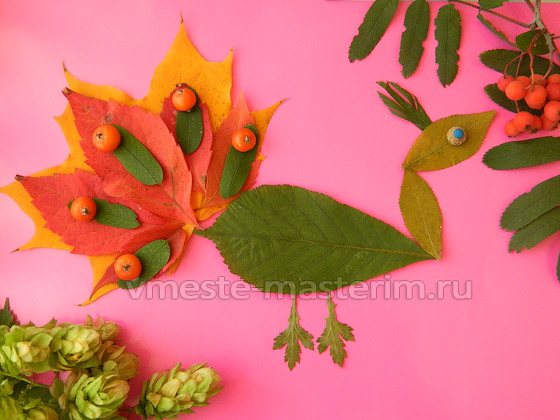
Today we will glue a peacock. Of course, a real bird attracts attention precisely with the abundance of blue and green colors.
It's OK. Our peacock will be the most beautiful and bright, made of yellow and red leaves.
So, let's get ready for work:
- colorful plants
- bunch of common rowan
- cardboard for applique base
- plasticine and PVA glue
- scissors.
In this case, we will need plasticine exclusively for the design of the bird’s eye.
If there is no such material in the house, it can be replaced with a suitable plant, black peppercorns or watercolors.
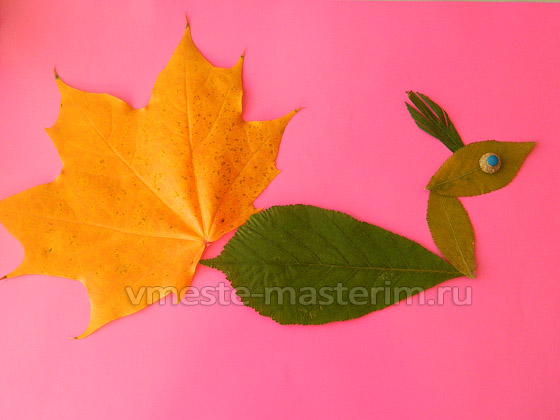
First, we select leaves for the head, neck and body of the peacock. In our case, these are plum and chestnut specimens.

We immediately make a bird’s crest from a rowan leaf (we cut the part into thin long strips).
It’s good to make a tuft from thin twigs, but then you’ll have to wait a long time for the PVA to dry.

At the next stage, we glue the elements to the paper base, placing the body in the center of the cardboard.
We apply PVA in small droplets so that the application looks neat.

This is roughly how we decided to make the peacock's eye.

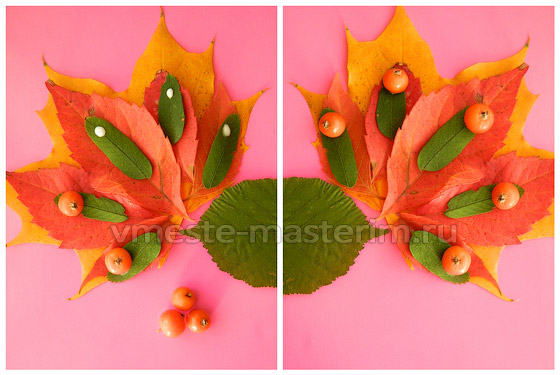
It’s time to give the bird a fan-shaped tail. It will consist of several layers. The bottom one is a maple leaf.
Glue five wild grape leaves on top of the yellow base. Here you will have to select the sizes of the parts.

Our applique lacks green colors - we correct the situation with elongated rowan leaves.
We also use 5 pieces. In principle, you can experiment with acacia or rose hips instead.

And finally, the final chord is five orange rowan berries. There is no need to be afraid of gluing three-dimensional parts to the applique.
It has been tested that PVA is able to securely attach them to a peacock’s tail.
We demonstrate the result. It turns out very beautiful.

All that remains is to figure out how to make the peacock’s legs. For this purpose, we took chrysanthemum leaves from the herbarium collection.
However, here you can use ordinary watercolors or gouache.
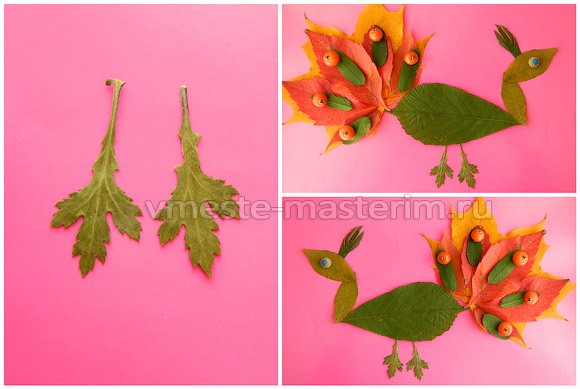
This is such a wonderful peacock.

Let's go and show our relatives the finished applique of autumn leaves. I wonder if the household will like it?
We wish everyone a successful weekend and a creative mood!
Children's autumn applications from leaves: step-by-step master classes and ideas for children's creativity. Photos of children's applications. Video for kids.

Children's autumn applications from leaves
Hello, dear readers of “Native Path” and participants of our autumn week children's creativity! Today in this article we will continue the topic autumn applications from leaves.
You already know from previous articles on the site in the series about leaf applique:
- how to prepare leaves for application, what types of autumn leaf applications there are, technology for their production (see article).
- how to do appliques - portraits made of autumn leaves : portrait of the queen - autumn, the girl - autumn and girlfriends - autumn (article),
- how to do three-dimensional figure- a bird made of autumn leaves: .
- And today you will learn from this article - the third article in the series about applique from leaves - what other appliques from autumn leaves can be made with children and how you can decorate a greeting card with a children's autumn applique from leaves.
The idea is shared by Tatyana Panova, a participant in our children's crafts competition (city of Novomoskovsk, Tula region). Tatyana did all the work together with her daughter Varechka Panova (4 years 2 months). Tatyana is happy to share with you the joy of joint creativity:).
No. 1. Children's autumn applique of leaves: postcard “Autumn landscape”

How to make a children's applique “Autumn Landscape”
Step 1. Prepare the background of the postcard. The postcard is made on watercolor paper, which Varya toned with gouache (white + blue).
Step 2. Make a window in the card.
The window was cut out. We walked along the edge of the window with a blue foam brush. The result was the edging of an oval window.
Step 3. Make the “Forest” applique inside the card using PVA glue. Glue on the pre-dried leaves. How to dry leaves - in the previous article of this series
Step 4. Birds flying in the autumn sky. Mom painted birds in the sky. which fly to warm countries for the winter in the fall.


No. 2. Children's autumn applique from leaves “Birds”
Step 1. Collect leaves for the applique. Varya collected the leaf birds herself.
Step 2. Dry the leaves (how to do this, see the previous article in the series about leaf applique at the link above).
Step 3. Glue the leaves with PVA glue (it is sold in liter jars at a hardware store).
Step 4. Make leaves from Play-Doh plasticine.
How they are made autumn leaves: mixed several autumn shades of plasticine, rolled it out and squeezed out the shape of a leaf with a mold.
Step 5. Draw a nest. 
No. 3. Children's autumn applications from leaves: hedgehog
The first version of the children's applique “Hedgehog”
Tatyana and Varenka took a picture of a Hedgehog without needles with them for a walk and collected leaves, attached them to the image and tried them on right on the street. Then at home they dried it in a book and decorated the hedgehog. This is what they did!

Another idea for making a “Hedgehog” applique was shared with us by Ovchinnikova Marina Viktorovna ( Krasnoyarsk region, Norilsk) and her son Timofey (5 years old, MADO " Kindergarten No. 45 “Smile”). Marina and Timofey’s craft is called “Hedgehog with Autumn Leaves”
The second version of the children's autumn applique “Hedgehog with autumn leaves”
This is a large hedgehog applique or autumn panel that can be used to decorate a room.
Material: cardboard hedgehog, dry leaves and flowers, buttons.
How to make a hedgehog:
Step 1. Cut out the hedgehog’s body from cardboard, draw eyes and a nose.

Step 2: Choose the autumn leaves you like and glue them to the back of the hedgehog. We form needles on the hedgehog’s back from the corners of the leaves.

Step 3. Decorate our hedgehog with dried flowers and buttons. Glue them with PVA glue.

The application is ready!
No. 4. Children's autumn leaf applications: rainbow
This idea was shared at our Autumn Workshop competition by Svetlana Kuznetsova and her son Artemy (2 years 2 months).
You will need for the application:
— Autumn leaves
— Cardboard white or colored
— Gouache
— PVA glue
— Paint brush and glue brush
Step 1. Prepare autumn leaves - collect and dry. How to do this - in the previous article in the series about applications from leaves (the link is given above in this article),
Step 2. Paint the leaves with gouache in rainbow colors and let dry. A child can do this.
Step 3. Glue the leaves onto the glue in the desired sequence of colors (“Every hunter wants to know where the pheasant lives”: red, orange, yellow, green, blue, indigo, violet).

No. 5. Children's autumn applique of leaves: panel “Girl Autumn”
The master class was shared by Olga Nikolaevna Tegaeva (Moscow region, Sergiev Posad district, Shemetovo village, MGBOU d/s No. 75 “Fairy Tale”). The application was made by Yaroslav Kucherikhin (4 years old).
To complete the application we will need:
- frame with glass,
- dried flowers and leaves,
- drawing or photo of a girl.
How to make an applique with children:
Step 1. Preparing the leaves.
The longest process is drying flowers and leaves. We dried it between magazine pages.
Step 2. Girl figurine - autumn.
Glue a picture of a girl of a size suitable for the frame onto the background. From dry leaves and flowers we form an outfit for Autumn.
We decorated the flower on Autumn's head with sequins.
Step 3. Place the finished autumn applique in a frame under glass. This is what Yaroslav did.

No. 6. Children's autumn applique of leaves: “View from the window”
This application was made and sent to our competition by Alexandra Albertovna Naumkina and her children: son Ivan (4 years old) and daughter Maria (1 year and 3 months) from Barnaul, Altai Territory.

How to make the “View from the Window” application with your children:
Step 1. First we make the background - draw the sky (Masha helped for 1 year and 3 months).
Step 2. Then we draw the birds in the sky (my mother did this).
Step 3. Cut out the window frame.
Step 4. Together with the children, we glue the “forest” - autumn leaves - at the bottom of the picture. Glue them with PVA glue.
Step 5. Glue the frame on top of the finished applique. And we put the finished work under a thick book so that everything dries well and sticks evenly.
No. 7. Children's autumn applique: “It's me”
This craft was also sent to our Autumn Workshop competition by Alexandra Naumkina. She writes: “The craft is simple, but the children really like it. I took a photo of my son mobile phone, sent a photo to myself by email. I opened the email on my laptop and printed out the photo. My son cut out his silhouette and pasted it on a white sheet of paper. Then we glued some leaves. It seemed to us that there were few of them. Using a stationery knife, I cut out a stamp in the shape of a leaf from an elastic band. My son quickly put some leaves on our craft.”
This is the children's autumn applique with autumn leaves that Alexandra and Vanya created.

Children's autumn applique No. 8: sailboat
This children's autumn applique from leaves was made by Georgy Osolikhin (5 years 10 months), and his work was sent to our children's autumn crafts competition by Georgy's mother Marina Osolikhin.
The applique uses leaves and seeds (to place the sun in the sky).

Children's autumn leaf applique No. 9: butterfly
Other materials can be used in leaf applique, such as in this children's Butterfly applique. The application was made by German Osolikhin (3 years 11 months) with his mother. Herman’s mother, Marina Osolikhina, sent an application to our competition.

Here is another version of an autumn appliqué made from leaves in the shape of a butterfly. This work was completed and sent to our autumn crafts competition by little Sofia (5 years old) and her mother Anna Shikhareva. How to make such a butterfly:
You will need:
- A4 cardboard (base for applique),
- PVA glue,
- scissors,
— leaves for wings: 4 different types of leaves in pairs,
- an acorn hat for the head,
- 2 acorns for the body.
Progress of the application step by step:
Step 1. Glue two leaves of the same type onto the background as upper wings. Below them, glue the lower wings - 2 leaves of a different type.
Step 2. Glue two acorns in the middle between the leaves to make the body of a butterfly
Step 3. Glue the acorn cap on top of the body. This will be the butterfly's head. Using a black marker, draw butterfly eyes and a mouth on the head.
Step 4. Make mustaches. To do this, glue 2 petioles from the leaves.
Step 5. When the wings are dry, they can be decorated with smaller leaves and a different color. Now the application is ready!

Children's autumn applique from leaves No. 10: bun, rooster
These applications were completed by children from MBOU Secondary School No. 5 (secondary group No. 11 “Stargazers”), Tyumen Region, Yugorsk. A teacher sent an application to our autumn competition for children’s crafts “Autumn Workshop” middle group Petushkova Lyubov Anatolyevna.


Children's autumn applique of leaves No. 11: autumn vase

This master class was sent to our competition of autumn children's crafts by Yulia Yuryevna Zainetdinova (Republic of Bashkortostan, Sterlitamak city. Municipal budget educational institution additional education children – Center extracurricular work"Hope" of the urban district of Sterlitamak)
Children's age: 3-4 years.
Materials: fresh and dry autumn leaves (preferably in different colors), a sheet with an image of the outline of a vase, PVA glue, a brush and good mood!
Application technique:
Stage 1. “Dressing up the vase.”
We rub the dry leaves with our fingers (at the same time we train fine motor skills and tactile sensitivity), apply a layer of PVA glue to the outline of the vase and sprinkle with leaves. Here our vase is ready.
Stage 2. “Filling the vase.”
From a set of fresh leaves, children choose the ones they like, then use a brush and glue to fill the vase, creating their own unique composition.
Examples of children's compositions are in the photo below (these are the works of children 3-4 years old).


Children's autumn applique No. 12: hedgehog under an autumn tree

Master class by Yulia Yurievna Zainetdinova from the Republic of Bashkortostan (Nadezhda Center for Extracurricular Activities of the Sterlitamak Urban District)
Children's age: 5-6 years.
Materials for application:
— autumn leaves are fresh and dry (preferably in different colors),
- rowan bunches,
- maple or ash seeds, so-called “helicopters” for hedgehog needles,
- a sheet with an image of the outline of a tree and a hedgehog,
- PVA glue,
- brush,
- plasticine
- and a good mood!
Appliqué technique for children: step-by-step description
Stage 1. “Dressing the tree in autumn attire”
From a set of leaves, children choose the ones they like, then use a brush and glue to “dress up” the tree.
Stage2. “Bring the hedgehog to life”
We roll plasticine balls and dress up the hedgehog, then we stick needles from “helicopters” into these balls.

Stage 3. “We decorate with rowan berries”
Stage4. "Autumn Land." Sprinkle the bottom of the picture with crushed dry leaves (see description of Yulia Yuryevna’s previous master class on this page).
Application of autumn leaves: idea No. 13. Flowers
You can make a pattern or mandala from autumn leaves. It will work out original flowers. These are the flowers made by Sofia (5 years old) and her mother Anna Shikhareva.
How to make a flower mandala:
MANDALA “Flower” (bottom photo in the illustration)
You will need: A4 size cardboard, 4 pieces of different types of leaves (yellow and brown), pine needles, PVA glue, acorn hat.
How to make an application: First glue the leaves in a circle, alternating in color. Next, glue the acorn cap into the middle. Finally, decorate your pattern by gluing green pine needles onto it.
MANDALA “Autumn Eye” (top photo in the illustration).
It is done by analogy with the “Flower” mandala.
You will need: A4 size cardboard, PVA glue, two pairs (four pieces each) different types leaves: 4 yellow, 4 green, 4 smaller brown and 4 smaller green, an acorn cap and 4 sprigs of dry grass such as feather grass.
How to make an application: As in the previous work, you first need to glue leaves of contrasting colors, alternating them by color. Then glue an acorn cap into the middle of the flower. When the leaves are dry, glue smaller leaves of a different color on top, place two branches of feather grass and secure them at the top and bottom to form an “eye” shape.

Children's autumn applications from leaves: video for kids
And in conclusion, I would like to invite all little readers of “Native Path” and little artists to watch lesson on leaf applique at the fun “Shishkina School” my favorite TV channel for children “My Joy”.
Together with the mouse Shunya, children will learn how to make appliqué from leaves and learn how to make crafts.
Enjoy watching everyone!
You will find more ideas for autumn applications with children in the articles on the site:
Get a NEW FREE AUDIO COURSE WITH GAME APPLICATION
"Speech development from 0 to 7 years: what is important to know and what to do. Cheat sheet for parents"
Click on or on the course cover below to free subscription


