
Simple New Year's paper crafts and decorations are good because you can do them with your children. Agree, very often in the pre-holiday chaos and constant household chores we forget to devote time to our family.
And now the holiday is approaching, so it’s time to get together and start creating paper decorations: these include paper Christmas tree decorations, lanterns, and paper garlands.
DIY paper Christmas tree
Small Christmas tree, example one
A decoration for a real Christmas tree in the form of a three-dimensional hanging Christmas tree can be made from ordinary cardboard.

To create we need:
- multi-colored cardboard;
- glue;
- awl;
- threads;
- scissors.
We draw the most primitive children's Christmas tree with splayed branches, the main thing is to maintain symmetry, cut it out, then trace exactly the same Christmas tree on another sheet of cardboard and get a second blank. We bend the workpiece along vertical symmetry and glue it together. You can decorate our paper toy with rhinestones. Then use an awl to pierce a hole in the upper part and thread it through. The decoration is ready.
A cardboard craft that you can either put on your desktop or hang on your Christmas tree.
About original decoration New Year tree read in this article: you will find here fresh ideas, original options Christmas tree decorations.
Another Christmas tree, option No. 2
Another example of paper crafts. The basis of such a Christmas tree is cardboard cone. To create we need:
- multi-colored paper;
- glue;
- scotch;
- scissors.
Manufacturing procedure:
This is the Christmas tree we got:

A bright Christmas tree can decorate any room
Christmas tree from a magazine
Unusual, but Very easy craft origami. Every home is sure to have an unnecessary magazine - so you can make an original Christmas tree from it.
In the magazine, we bend each page like this: the upper right corner towards us at forty-five degrees, then we bend the sheet diagonally in half.

Our bottom corner has gone beyond the boundaries of the magazine, so we turn it up.

We put all the pages together like this.
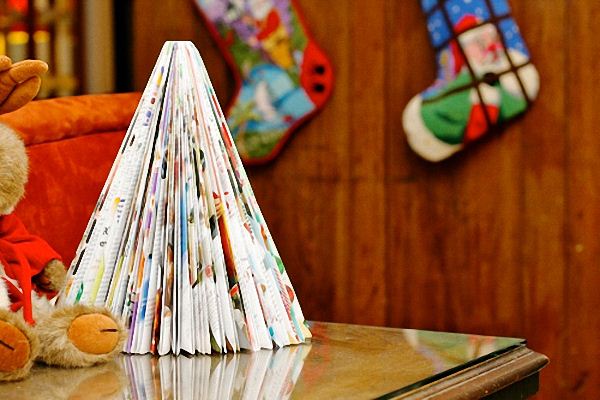
Like this original craft it worked out. As you can see, nothing complicated, but a lot of pleasure because you were able to make it with your own hands.
New Year's paper lanterns
We made a Christmas tree, now it’s time to make our own paper lanterns. Let's look at several simple options on how to make paper lanterns with your own hands.
Lantern made of stripes
To create such a flashlight, you need to cut strips of colored paper of the same width and length: the longer the strip, the larger the flashlight will be. Average length the strips will be 15 cm.

Your little one will love creating with you. unusual crafts
We fold the strips and pierce holes at both ends. We fix the end of the lace on one of the sides and secure it so that the lace does not jump out. Then we thread the lace through another hole and pull it tight. The strips will curve in a semicircle.
We straighten the flashlight so that the stripes form a ball shape. The flashlight is ready.
Chinese lantern
How to make a Chinese paper lantern with your own hands? To create such a craft you will need:
- scissors;
- strips of colored paper (18 pieces);
- glue;
- two paper circles with a diameter of 4 cm;
- thread with a needle.
We bend the strips in half. Using a needle, first string a circle onto a thread, then one side of the strips, then the second and last circle. It will look like a spiral.

DIY Chinese lantern, photo
We tighten the thread so that the strips form a ball and straighten it. You can decorate the top and bottom with beads. Glue the loop. Our Chinese paper lantern is ready, it can be hung on a fluffy beauty - a Christmas tree.
sky lantern
How to make a sky lantern out of paper with your own hands? To create a craft you need to take a sheet of colored paper measuring 24x60cm. We bend the sheet in half, then fold it like an accordion.
We unfold the sheet and along the central fold we make triangular creases on all the folds of our triangular accordion.

Sky lanterns can be made colorful
We make the same creases along the bottom and top edges of the sheet. Glue it into a cylinder. Sew a loop on top.
Advice. Such a lantern can be glued from any paper, but preferably in bright and saturated colors. Abstract drawings or oriental motifs will look very good. Before creating such a craft, you can pre-paint the paper to your taste.
Paper garland
How to make a paper garland with your own hands? We suggest you do it paper ball decoration.

Photo of a paper garland of homemade multi-colored balls
To make such a garland, we will need strips of equal length and width. To make it more convenient to fasten them with tape, we make the upper and lower parts pointed. You will need 4 strips per ball, preferably if they are different colors.

We braid the strips until they form into a ball.
We take two strips, glue them with tape and start braid a pigtail. As you weave, the braid will twist and turn into a ball. When the ball is ready, you will need to hide the loose ends between the weaving. It's worth doing this action until the ball is completely formed.
To create long garland You will need to twist a lot of balls.
Then we string each ball onto a colored thread. The garland of paper balls is ready: you can decorate both the Christmas tree and the room with it.
Volumetric paper toy for Christmas tree
Our next craft - volumetric sprocket made of paper. What needs to be done?

This is what a finished volumetric paper star looks like


Christmas ball ready!
New Year's angel made from napkins

You can decorate a table, a Christmas tree with this angel, or make it as a gift for your family. To create you will need: scissors, glue, thread and ordinary table napkins.

We secure the angel's head with white thread

Lift up the lids
The angel is ready!
New Year's snowflake
Let's do it beautiful snowflakes from paper for the New Year. How to cut a beautiful three-dimensional snowflake? A paper snowflake can be cut out according to a pattern or made using the quilling technique. The instructions for making paper snowflakes are simple: prepare paper blanks and make a finished snowflake out of them. Glue the parts together.

This paper snowflake is made using the origami technique.
To create such tender and air crafts you just need office paper. Twisted in a special way, they look like real snowflakes. First we will prepare strips of paper. To create a curl, a strip of paper must be twisted tightly on a skewer. After winding it, we straighten the paper curl and remove the “washer”.

For those who like to make things with their own hands, we suggest making such a miracle as a kanzashi tree; master class will help you master the creation necessary elements Christmas trees.
Read how to decorate your home on New Year 2015 with your own hands, here are all the secrets of festive decoration of rooms, walls, doors and windows, decorating tips.
Master class on New Year's wreaths, see: http://dom-mechti.com/pomeshheniya/prazdnichnyj-dekor/novogodnie-venki.html
Snowflake blanks
We need to come up with a pattern for our snowflake. The number of rows can be from one to four. The main thing is that the patterns allow all the parts to be glued together.

Details of origami snowflake blanks can be of a wide variety of shapes
First row– glue six “drops” on the sides;
Second row– six “arrows”;
Third row– six “squares”;
And here’s a sample snowflake:

You can get creative and make a variety of various applications on glass or thread a shiny thread into a snowflake and hang it on the Christmas tree.
As you can see, you can make a great variety of Christmas decorations from paper with your own hands. We have shown you only a small part of what can be made from paper. These New Year's crafts, paper decorations, toys and origami snowflakes will perfectly highlight the festive New Year's decoration both the Christmas tree and the interior.
Photo gallery (23 photos):


Simple New Year's paper crafts and decorations are good because you can do them with your children. Agree, very often in the pre-holiday chaos and constant household chores we forget to devote time to our family.
And now the holiday is approaching, so it’s time to get together and start creating paper decorations: these include paper Christmas tree decorations, lanterns, and paper garlands.
DIY paper Christmas tree
Small Christmas tree, example one
A decoration for a real Christmas tree in the form of a three-dimensional hanging Christmas tree can be made from ordinary cardboard.

To create we need:
- multi-colored cardboard;
- glue;
- awl;
- threads;
- scissors.
We draw the most primitive children's Christmas tree with splayed branches, the main thing is to maintain symmetry, cut it out, then trace exactly the same Christmas tree on another sheet of cardboard and get a second blank. We bend the workpiece along vertical symmetry and glue it together. You can decorate our paper toy with rhinestones. Then use an awl to pierce a hole in the upper part and thread it through. The decoration is ready.
A cardboard craft that you can either put on your desktop or hang on your Christmas tree.
Another Christmas tree, option No. 2
Another example of paper crafts. At the heart of such a Christmas tree - cardboard cone. To create we need:
- multi-colored paper;
- glue;
- scotch;
- scissors.
Manufacturing procedure:
- We cut out a large number of strips of the same length and width from colored paper. We glue each strip with glue so that it looks like a loop, then we glue all the loops with tape.
- We apply layers of tape onto the cardboard cone, to which our strips are glued.
This is the Christmas tree we got:
 A bright Christmas tree can decorate any room
 Christmas tree from a magazine
Unusual, but very easy origami craft. Every home will definitely have an unnecessary magazine - so you can make an original Christmas tree from it.
In the magazine, we bend each page like this: the upper right corner towards us at forty-five degrees, then we bend the sheet diagonally in half.

Our bottom corner has gone beyond the boundaries of the magazine, so we turn it up.

We put all the pages together like this.

This is such an original craft. As you can see, nothing complicated, but a lot of pleasure because you were able to make it with your own hands.
New Year's paper lanterns
We made a Christmas tree, now it’s time to make our own paper lanterns. Let's look at several simple options on how to make paper lanterns with your own hands.
Lantern made of stripes
To create such a flashlight, you need to cut strips of colored paper of the same width and length: the longer the strip, the larger the flashlight will be. The average length of the strip will be 15 cm.
 Your child will love creating unusual crafts with you.
 We fold the strips and pierce holes at both ends. We fix the end of the lace on one of the sides and secure it so that the lace does not jump out. Then we thread the lace through another hole and pull it tight. The strips will curve in a semicircle.
We straighten the flashlight so that the stripes form a ball shape. The flashlight is ready.
Chinese lantern
How to make a Chinese paper lantern with your own hands? To create such a craft you will need:
- scissors;
- strips of colored paper (18 pieces);
- glue;
- two paper circles with a diameter of 4 cm;
- thread with a needle.
We bend the strips in half. Using a needle, first string a circle onto a thread, then one side of the strips, then the second and last circle. It will look like a spiral.
 DIY Chinese lantern, photo
 We tighten the thread so that the strips form a ball and straighten it. You can decorate the top and bottom with beads. Glue the loop. Our Chinese paper lantern is ready, it can be hung on a fluffy beauty - a Christmas tree.
sky lantern
How to make a sky lantern out of paper with your own hands? To create a craft you need to take a sheet of colored paper measuring 24x60cm. We bend the sheet in half, then fold it like an accordion.
We unfold the sheet and along the central fold we make triangular creases on all the folds of our triangular accordion.
 Sky lanterns can be made colorful
 We make the same creases along the bottom and top edges of the sheet. Glue it into a cylinder. Sew a loop on top.
Advice. Such a lantern can be glued from any paper, but preferably in bright and saturated colors. Abstract drawings or oriental motifs will look very good. Before creating such a craft, you can pre-paint the paper to your taste.
Paper garland
How to make a paper garland with your own hands? We suggest you do it paper ball decoration.
 Photo of a paper garland of homemade multi-colored balls
 To make such a garland, we will need strips of equal length and width. To make it more convenient to fasten them with tape, we make the upper and lower parts pointed. You will need 4 strips per ball, preferably if they are of different colors.
 We braid the strips until they form into a ball.
 We take two strips, glue them with tape and start braid a pigtail. As you weave, the braid will twist and turn into a ball. When the ball is ready, you will need to hide the loose ends between the weaving. It's worth doing this action until the ball is completely formed.
To create long garland You will need to twist a lot of balls.
Then we string each ball onto a colored thread. The garland of paper balls is ready: you can decorate both the Christmas tree and the room with it.
Volumetric paper toy for Christmas tree
Our next craft is . What needs to be done?
 This is what a finished volumetric paper star looks like
The Christmas ball is ready!
New Year's angel made from napkins

You can decorate a table, a Christmas tree with this angel, or make it as a gift for your family. To create you will need: scissors, glue, thread and ordinary table napkins.

The angel is ready!
New Year's snowflake
Let's make beautiful paper snowflakes for the New Year. How to cut a beautiful three-dimensional snowflake? A paper snowflake can be cut out according to a pattern or made using the quilling technique. The instructions for making paper snowflakes are simple: prepare paper blanks and make a finished snowflake out of them. Glue the parts together.
 This paper snowflake is made using the origami technique.
 To create such delicate and airy crafts, you only need office paper. Twisted in a special way, they look like real snowflakes. First we will prepare strips of paper. To create a curl, a strip of paper must be twisted tightly on a skewer. After winding it, we straighten the paper curl and remove the “washer”.
Snowflake blanks
We need to come up with a pattern for our snowflake. The number of rows can be from one to four. The main thing is that the patterns allow all the parts to be glued together.

First row– glue six “drops” on the sides;
Second row– six “arrows”;
Third row– six “squares”;
And here’s a sample snowflake:

You can get creative and make various applications on glass or thread a shiny thread into a snowflake and hang it on the Christmas tree.
As you can see, you can make a great variety of Christmas decorations from paper with your own hands. We have shown you only a small part of what can be made from paper. These New Year's crafts, paper decorations, toys and origami snowflakes will perfectly highlight the festive New Year's decoration of both the Christmas tree and the interior.
How to make beautiful Christmas decorations with your own hands Christmas tree and New Year's interior.
These New Year's decorations can be used to decorate a classroom at school or a kindergarten playroom.
Spiny ball
Cut out 14 circles of the same diameter from paper. Using a pencil and a compass, divide each circle into 12 identical sectors (Fig. a).
Roll each of them into a ball and secure with glue (Fig. b).
Do the same with all fourteen circles. Place them in two piles of 7 each. front side down. You need to fold it so that each upper petal bag lies between the two lower ones (Fig. c).
.jpg)
Secure the circles in stacks together with glue or thread (Fig. d). You will get two hemispherical blocks. Glue them together by placing a thick thread with a loop between them - the prickly ball is ready.
.jpg)
Spiral of stars
Place a sheet of blue paper on a plate, trace it, cut out a circle in a spiral (Fig. a). Make 8 holes. Trace and cut out 8 stars from yellow paper (Fig. b).
.jpg)
Make a hole on each star with a needle and thread it through. Tie the stars to the spiral (Fig. c).

Volumetric Christmas tree
On colored paper, draw a template for half of the Christmas tree (Fig. a). Using this template, cut out more Christmas trees from four double sheets (Fig. b).
Glue them together with the wrong side. When gluing, put a loop of thread or decorative rope inside so that you can hang the toy later.
.jpg)
The Christmas tree is ready (Fig. c).
.jpg)
Christmas tree garland
Take colored, silver or gold paper of the required length. Fold the strip several times. Translate the drawing and cut it out. Decorate the Christmas tree with the resulting chain.
Eight pointed star
Fold a square piece of white paper in half, then in half again, and cut out a circle. Draw rays with a pencil and cut them out
Openwork garland
Fold a sheet of paper 4 times, make cuts alternately on both sides. Unfold and stretch the garland. It is best to make it from foil or gold and silver paper.
Christmas boots
Fold colored paper in half. Cut out the silhouette of a felt boot or boot so that the back line of the boot falls on the fold line.
Cut a narrow strip from white paper. Unfold the card and glue it to the very top of the boot. Fold the card and trim off any excess white paper. Decorate the boots, thread them so they can be hung.
Cone
Prepare three strips of paper 3x15 cm. Make cuts on each strip, and small cuts on the two edges of the strips. Roll the strips into a roll, one on top of the other, fixing the ends - the pine cone is ready.
Christmas trees with accordion
Fold a sheet of paper measuring 14x20 cm like an accordion along or across the sheet. On the workpiece, make a “straight cut with intervals” element. Place the cuts as far as possible to the opposite edge. Turn the strip of paper over so that the cut out triangles are on top. Repeating the triangle shape, make a straight cut again, leaving the edging the same width. Ready craft unfold and straighten.
.jpg)
Rice. Christmas trees with accordion
Metallized paper star
Fold a square sheet in half diagonally metallized paper to make a triangle. Complete the template and attach it to the resulting triangle. Following the dotted lines, fold the right corner of the triangle inward, repeat this again until the next dotted line.
Flip the triangle over and repeat the same steps from the other corner. At the same time, make sure that the fold lines on one side run along the edge of the other. Redraw the pattern onto the folded triangle using the template. Cut along the edges with a cutter, and punch inside with a punch (Fig. a). Unfold and smooth out the folds coming from each ray so that they are of the same type - with a bend. All folds separating one beam from another should face the opposite direction.
Make another star in the same way using paper of the same or a different color. Cover the craft with 3D effect paint and, while it is still wet, sprinkle with glitter.
.jpg)
When the paint has dried, connect the stars with double-sided tape with the opposite sides (Fig. b). Cover the joints with paint. Pull the thread into the beam hole (Fig. c).
.jpg)
Rice. Metallized paper star
Pendant "Star"
On colored paper, draw the outline of a five-pointed star, and inside it - three more similar outlines. For each contour, mark with a pencil the lines that do not need to be cut (Fig. a). Cut out excluding the marked areas. The contour of each star will be linked to the other (Fig. b). Attach the thread.
.jpg)
Paper cascade .jpg)
You will need a cylinder of cardboard from under food foil, patterned wrapping paper, foil, PVA glue, adhesive thin tape.
Wrap the cardboard cylinder in foil and fold the edges inward. From the wrapping paper, cut out a 16x16cm square and a 10x16cm rectangle. Then cut out two 14x16cm rectangles.
Step back 2 cm from the edge and draw a line on the sheet. Do the same with all four sheets.
Cut strips 1 cm wide from the opposite edge. Take a 10x16 cm rectangle.
Attach the paper to the cylinder with the front side inward, then glue the wider parts. Turn the cylinder over and shake it slightly so that the paper turns right side out (Fig.).
Cut out various shapes from the folded shiny paper and glue them to the ends of the strips.
Hang the finished decoration where the light will fall on it.
Paper crafts are something that can be made quickly and easily for the New Year of the Dog as a gift to loved ones or just to decorate your home. There is always paper in the house and it’s fun to make crafts with it! We offer best crafts for the New Year 2018 from paper, which you can make with your own hands using step-by-step photos and videos.
In addition, let’s look at what else you can do for the New Year with your own hands at home from what you have on hand. For such crafts, you do not need to spend money on purchasing materials, and the result is interesting and does not at all look like completely unnecessary things were used. Let's look at several master classes, from which everyone will choose what suits them.
? Important! Each description shows the colors of materials and a set of decor for those crafts that have already been made and shown in the photo. But you don’t have to choose the same shades and the same decor. You can take those materials for New Year's paper crafts 2018 that you have at home.
 PHOTO: Paper garland for the New Year
 Several options for a decorative paper Christmas tree
Without elegant Christmas tree on New Year's Day - no way. Of course, the main character of the holiday is a large fluffy living spruce or pine tree in the center of the room, or an artificial beauty, dressed up with garlands and colorful toys. But you can also make small ones decorative Christmas trees with your own hands from paper and decorate with them for the New Year a table or shelf in the office or at home. Below are two master classes on creating such paper beauties.
For each of them we will need:
- Sheet thick paper for a cone.
- Paper napkins of any color, you can combine several colors.
- PVA glue or pencil.
- Scissors.
- Stapler.
- Pencil or any wooden stick.
- Christmas tree decor. Whatever you find at home: sequins, small beads, bells, ribbons, and so on.
Now let’s take a look at both options for Christmas trees in turn: paper napkins.
Option 1 – Christmas tree made of paper roses
- make a cone out of thick paper. Glue it together with glue or a stapler.
- Now we make roses from napkins. To do this, fold each napkin in half and then in half again, and secure it in the middle with a stapler.

- cut out a circle.

- We have a multi-layer circle and we need to take each subsequent layer on top and twist it tightly. We do this with all layers.

- When all the layers are twisted you need to straighten the rose a little. This is how we make all the flowers.
- We cover the cone with roses. It’s better to start from the bottom in a circle and work your way up.

- The roses should be glued close to each other so that there are no gaps.

- After the entire Christmas tree is “dressed” in roses, you can decorate it with any decorative elements by simply gluing them randomly on top of the flowers.

This DIY paper craft for the New Year 2018 is very easy to make, even a child or teenager can handle it, and it looks very impressive and beautiful.
Option 2 – Christmas tree made of paper napkins using the cutting technique
A similar very simple version of the Christmas tree. Everything that is needed for it is listed above, let’s prepare everything according to the list and proceed:

- you need to start from the bottom. Thus, we place all the twisted squares tightly as possible closer friend to a friend.

When we cover the entire Christmas tree with twisted squares, we get a fluffy beauty that can also be decorated with any decorative elements.

Using these techniques (roses from napkins and trimming), you can create postcards by gluing elements onto a base with a drawn outline of a Christmas tree or other design, a snowman, for example.
 PHOTO: DIY paper Christmas tree
You can make Christmas trees out of paper using other techniques. Simply by gluing colored paper circles onto a cone, or cutting out outlined palms from green paper. You can also make loops from strips of paper and stick them on the cone.

Very beautiful Christmas trees are made from paper using the weaving technique. To do this, you need to fold a sheet of paper in half, draw an outline according to the template and cut through all the necessary places. Do the same with the second sheet. Then connect the 2 sheets together at the fold.

In general, a Christmas tree made from a paper cone can be decorated with anything. The idea is to make a cone out of construction paper and decorate it.
For decoration you can use:
- threads for knitting, simply wrapped or cone;
- buttons;
- tinsel and sweets, gluing them in alternating rows;
- petals made of crumpled paper;
- pasta;
- coffee beans and jute rope.
This Christmas tree can be decorated with everything you can find at home. Afterwards, you can cover the resulting creation with golden paint or artificial snow, or leave it as is.
Paper crafts for the New Year in the form of a Christmas tree:
Decorative paper candles
As surprising as it may sound, you can make candles out of paper. They, of course, will not glow, but they can decorate a Christmas tree or New Year's table.
 PHOTO: Craft in the form of paper candles
 Let's prepare everything you need for your work:
- colored thick double-sided paper.
- scissors;
- glue stick;
- ruler;
- marker or felt-tip pen.
When everything is ready, let's proceed:
- Cut colored paper into strips. The strips can be taken of any width, optimally 3 - 4 centimeters. To do this, you need to make marks on one and the other side of the sheet, draw lines along a ruler and cut. For one candle you need 2 strips. They can be made in one color or two shades.
- Take 2 strips and glue the ends together as shown in the photo.
- Now we make weaving (see photo) and secure the ends. This is how the candle itself turned out.
- Cut out a circle-shaped stand from paper. Glue the wicker post onto it.
- Cut out a candle flame of any shape with a rectangle at the bottom, behind which the flame will be glued to the post.
- We draw the wick on both sides with a felt-tip pen, bend the rectangle and glue it to the post.
 Step by step photos for making paper New Year's candles
 The finished candle can be glued to a clothespin and decorated with a Christmas tree, or you can leave it like that and place several of these candles on a shelf or on New Year's table. You can make such a craft for the New Year 2018 from paper with your own hands for school or kindergarten for a competition!
Santa Claus and Snow Maiden made of paper
The main characters of the New Year - Father Frost and Snow Maiden - can also be made of paper. Let's try to make them with our own hands for the New Year of the Dog 2018!

Let's prepare for the creative process:
- We will need colored thick paper in blue and red for the cones.
- White paper for finishing.
- Beads, any decor.
- Paints and brushes.
- Glue.
- Scissors.
- Thread (you can take cotton for knitting).
Now let's get started:
- The description is for Santa Claus, the Snow Maiden is made in exactly the same way, but you can change the color of the base and decor.
- We make a cone out of thick red paper.
- We cut out several (2 or 3) semicircles from white paper and cut them so that we get terry. This will be a beard. We glue it in several layers onto the cone. You can also use cotton pads for your beard.
- You can paint the eyes and nose with paints or glue beads: black for eyes, pink or red for nose.
- Now you can make the cap. For it we will make a small cone of red paper and glue a white strip along the bottom. Put the cap on Frost and secure it with a drop of glue.
- You can draw or stick any decor on the figurine.
- You can glue a thread to the top of the head, with which we can hang Frost on the Christmas tree, or attach a white pompom to the tip of the thread.
This craft is something you can do for the New Year with your own hands and give to your mother, friends, and relatives.
Using this technique, you can also make penguins, snowmen, deer, and any New Year-themed figure.

Santa Claus, reindeer and snowman made from paper towel rolls
For such beauties, you can use regular paper towel rolls or make a roll of any diameter and height yourself from thick paper.
Before we begin the process of creating Santa Claus, let’s prepare everything that will be useful in our work:
- Roll for base.
- Felt or colored paper in red, white, light brown, black and yellow.
- PVA glue.
- Blanks for eyes, they are sold in any craft stores. Or you can use half beads, buttons for the eyes, or, in the end, just cut out circles from black paper or felt.
- Scissors.
Now let’s start making paper crafts for the New Year 2018 with our own hands!
First we make Santa:
- We cut out a strip of red felt whose width is equal to the height of the roll plus 2 cm, and the width is equal to the diameter of the roll.
- Cut out a semicircle from light felt brown for the face, stick it on.
- We cut out an oval from white felt, cut off an indentation for the face on one side and glue it on top of the face part.
- We cut out parts for shoes from black felt (two ovals connected together). Glue it on the bottom side of the roll.
- We cut out a strip of black felt and glue it in the middle of the roll - this is a belt.
- Cut out a buckle from yellow felt. Glue it on top of the waistband at the front.
- Now we glue the eyes and the circle of the nose.
- We glue the cap on top of Santa.

Now let's make a snowman:
- We cut out a strip of white felt whose width is equal to the height of the roll plus 2 cm, and the width is equal to the diameter of the roll.
- We paste a strip over the roll, bending the ends inside the roll on one side and the other.
- We glue the eyes, nose and buttons - felt circles.
- Cut out a scarf from red felt and cut along the edges, tie it to the snowman.
- Making a cap. Cut out a semicircle from red felt and glue the sides together. Cut a strip of white felt and glue it to the bottom of the cap. Glue a pompom to the tip.
- Glue the cap on top of the Snowman.

Next is the deer's turn:
- We cut out a strip of light brown felt whose width is equal to the height of the roll plus 2 cm, and the width is equal to the diameter of the roll.
- We paste a strip over the roll, bending the ends inside the roll on one side and the other.
- We glue the eyes and nose.
- Making a cap. Cut out a semicircle from red felt and glue the sides together. Cut a strip of white felt and glue it to the bottom of the cap. Glue a pompom to the tip. But here we still need to cut out the horns from brown felt and glue them on the sides of the cap.
- We glue the cap on top of the deer.
Thus, three figures are ready. Such paper crafts can be placed under the New Year tree.


Video of Santa Claus crafts from paper in origami style:
Christmas tree toy made from strips of paper
Among the crafts for the New Year 2018 made from paper with your own hands, you must also make a Christmas tree toy!

Let's take a closer look interesting toys from strips of colored paper step by step, first prepare everything you need:
- Colored paper. For one toy, use two shades.
- Scissors.
- Needle and thread. You can use fishing line, or you can use regular sewing thread, but thicker.
- A pair of beads.
When everything is prepared, we begin the process of creating a Christmas tree decoration:
- Cut the paper into strips about 10-15 centimeters long and 1.5-2 centimeters wide. For one toy you need 9 stripes of one color and 9 of another.
- Cut out 2 circles with a diameter of 1.5 centimeters.
- Thread a needle and attach a bead to the end.
- Now we add all the stripes, alternating colors into a stack. We put 1 circle on the thread over the bead and a stack of strips from one edge.
- Then we fold the strips in half and thread the entire stack onto the thread from the other edge.
- On top is a second circle and a bead. We make a loop and the toy is ready.

You can make several of these in different colors Christmas tree decorations and decorate your Christmas tree or room with them. It's just one option Christmas decorations from strips of paper, and you can make a great variety of them.
New Year's garland made of paper - video:
Ideas New Year's crafts for New Year 2018:
And they will be very cheap in cost, and in beauty they will not be inferior to store-bought ones. Moreover, this year the trend is the naturalness and authenticity of materials in decorating the Christmas tree and the room. So the forest beauty, dressed up paper toys, will not only be beautiful, but also stylish and fashionable.

Snowman with a broom
Another craft is a snowman, which we will try to make from paper, simply folding it in a certain way.
Let's get ready for work:
- Let's take white, black, orange and blue paper;
- scissors;
- glue for paper.
Now let's begin:
- We make two circles for the snowman's body. To do this, take 2 sheets of a larger format and 2 sheets of a smaller format. We fold them like an accordion.
- Bend the accordions in half. On one side we glue the ends together, we get a semicircle. Glue together 2 large semicircles and two smaller semicircles. Glue the smaller circle on top of the larger one. This is the body of a snowman.
- In the same way, we make small circles for the hands and glue them to the snowman.
- We cut out circles for eyes and buttons from black paper and glue them onto the snowman.
- We make a cone out of orange paper and attach it to the snowman in place of the nose.
- Cut out a hat from black paper, decorate it with a strip of white paper and glue it onto the snowman’s head.
- We cut a long strip of blue paper, cut it along the edges and tie it to the snowman as a scarf.
- All that remains is to make a panicle. We fold white paper with an accordion and fasten the ends.
- We make an accordion out of orange paper and fold it in half, attach it to a strip of white paper and attach it to the snowman’s handle.

You can decorate a wall in your room with this snowman by attaching it to needles or double-sided tape to the wallpaper.
And if you make this snowman in a smaller format, it will be an excellent decoration for a postcard. Complete the postcard with snowflakes made of paper or a Christmas tree made using the same technique, that is, from sheets of paper folded like an accordion and glued in layers.
To create beautiful crafts for the New Year 2018 from paper with your own hands, use the tips given in the article and add an important “ingredient” - imagination! Then you will get unique crafts with which you can decorate your home and give them as a New Year's gift to friends and family, or send the product to school and kindergarten for competitions!
Video craft options:
Happy New Year! ?


