13/05 23943
The success and beauty of photographs depends not only on the photographer, but also on the model. Her appearance, postures and mood play an important role. The first thing a master pays attention to when meeting a model is her image. For a professional photo shoot, it is very important that the makeup https://marysia-visage.pro/ hairstyle and outfits are bright, complement each other and attract attention. Most often, if you are invited to a shoot, the photographer has already planned to create an image for the model. If you are going to shoot yourself, then you should take care of your image yourself. Where to start? What subtleties of makeup should you follow to look amazing at a photo shoot?
Face
Before you start creating an image for yourself, you need to even out the tone of your face. A corrector and foundation will help you with this. First you need to mask some skin unevenness with a slightly yellow-tinged concealer. If it has a thick texture, then blend it thoroughly or use your fingers for final blending. Otherwise, during shooting, all boundaries will be visible. To add volume and brightness to the face, use a dark, natural shade on top. foundation. Due to it, your face will appear healthy and less pale.

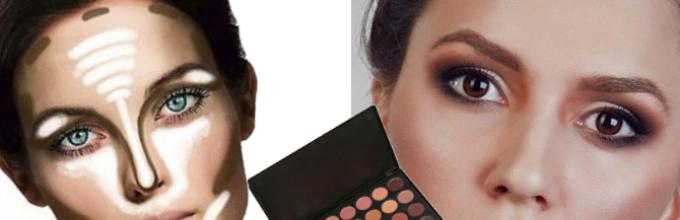
Using special darkening products, you can correct your face. If you are aware of your little shortcomings, e.g. long nose or big cheekbones, then it is worth using such means female magic. With their help, you can even correct the oval of your face. The main thing is to carefully blend the products with a natural bristle brush.

All makeup artists advise using only matte shadows and lipsticks in natural shades. Even in everyday life It is better to exclude all foundations, blushes and shadows that contain glitter. They create an unnatural effect. Excessive shine in any part of the face can ruin a photo, especially on the lips. Lipsticks with large glitter will create the effect of a large shapeless spot on the face.

Eyes
It is the eyes that should be emphasized as much as possible for photo shoots. IN ordinary life you are unlikely to use dark shadows and bright eyeliner. Your light shadows will simply be invisible in your photos, and your eyes will look dull. But I want to make them expressive. To do this, take dark shadows without glitter, a pencil and mascara with a curling effect. These women's weapons will help create a beautiful and gentle image for a photo shoot. If you want to make your look even bigger and more impressive, then use false eyelashes. You can pre-extend them from a specialist or buy them in a store just for shooting. If you glue eyelashes yourself, it is better to buy good glue so that your real eyelashes are not damaged and remain in the same condition.


Be careful with the lower eyelid area. Correct them first so that blue circles under the eyes are not visible. Be careful with shadows. If you want to additionally line your eyes with a dark shade, then apply them only to the outer corners, and do not touch the inner corners, so that unwanted bruises do not appear again.

Powder
When you buy powder, look carefully to make sure there are no shimmering particles. Manufacturers have learned to very carefully hide this fact, so that girls then have to buy other powder. However, even the smallest glitter can be very noticeable in a photograph. In natural life, powder looks natural and beautifies the face. In the case of cameras, flashes and additional light, the nose, cheeks, forehead and chin can be strewn with flour, or rather this will be the effect. Therefore, choose your powder carefully.

In addition, a professional photographer will be able to remove the imperfections that formed during makeup. Most importantly, you must give yourself beautiful bright eyes. Then the whole emphasis will shift to yours expressive look. You will like the result, and the photographer will be delighted with such a model. And so that you do not make a mistake with the creation proper makeup, we invite you to watch several videos in which professional stylists and photographers give advice. With their help you can be beautiful and natural at a photo shoot.
Every woman wants to be special and beautiful, especially when it comes to some important event or holiday. That is why it is very important to be able to do beautiful evening makeup with your own hands - it is not always possible to invite a makeup artist. Today I will tell you how I do makeup for holidays and special events, and also give a couple of recommendations on how to properly apply makeup at home.
Looking at some girls who don’t even go to the grocery store without full makeup, it’s very difficult to determine what evening eye makeup is and how it can be distinguished from any other. For myself personally, I define it like this:
- this is a full make-up using large quantity cosmetics(and not just mascara, for example);
- This is a bright make-up that is done to match a certain image, specific clothes and accessories;
- This is a make-up in which you can make two accents - on the eyes and on the lips.
What you need to learn evening eye makeup - photos and videos are a must. Moreover, both the photo and the video must be step-by-step - otherwise you will not understand anything and will not be able to repeat it. I have selected for you several video examples that tell you how to do evening makeup step by step - you can see them just below.
I would like to talk about one more feature that evening makeup has. It should look good in artificial light, in photographs and in dimly lit rooms.
This should be taken into account when choosing your image - what in bright directional light looks like a beautiful gradient from pink to purple in the twilight can turn you into a vampire with burgundy streaks above the eyes.

Learning to do
How to do evening makeup quickly? Use the application technique smokey eyes, moreover, use medium shades - not too dark, and not the lightest. But if you have time, then it is quite possible to make your makeup for the holiday special and unique.


Hollywood evening makeup for blondes is not too difficult to do, and if you practice, you will certainly succeed. So, how did Hollywood beauties prefer to look at evening events?
- The complexion should be healthy, even and beautiful.
- Performed in a classic natural palette using black and red.
- Traditionally, they add shine to either the eyes or the lips - for the eyes you can use shadows with a shimmer effect, and for the lips a drop of gloss on top of bright red lipstick.
- You definitely need to paint your eyelashes and eyebrows well. Shades of brown are used for eyebrows, and only black mascara is used.


You need to start first of all with tone. Bearing in mind that we are doing evening makeup for blondes, it’s better to start by removing the hair - on blonde hair Traces of not only black mascara are noticeable, but even light foundation.
- First, you need to apply a makeup base to your face, this will help even out the texture and give your face a little shine.
- Then you need to use concealer and correctors of different shades.
- The foundation is applied with light movements, it is best to do this with a good sponge.
- If you know how to work with sculpting techniques, then emphasize the line of the cheekbones and hair growth near the forehead with a darker tone, and use a highlighter to open up your eyes.
- Dust your face with a gentle, fine powder that will protect you from shine and give your skin a soft glow.
- Then proceed to the eyes - light shadows are applied to the entire surface of the upper eyelid. Best option- take shadows a tone lighter than your skin tone. Don't go with white ones, it looks out of place and artificial. Light peach or beige shadows, ivory or baked milk colors would be appropriate.
- Draw arrows - slightly raise the outer corner of the eye and draw a line along the growth of the eyelashes, and then repeat this for the second eye. If you can’t make arrows with ordinary liquid eyeliner, then you can always use a felt-tip eyeliner.
- After the arrows have dried, you can apply mascara. It is best to do this in two stages, so you can paint each eyelash more thoroughly.
- You need to powder your lips, outline the contour with a pencil, and lightly shade the inside of the contour, and then apply red matte lipstick.
Some more interesting options:


And also watch a video about Cat and European makeup:
Okay, how to do evening makeup for brunettes? Are there any significant differences? Will step-by-step evening makeup be very different for girls with dark hair?
Not really. Evening makeup for blondes, brown-haired women, redheads and dark-haired women, it is applied almost identically, the only difference is in the design and color scheme - naturally, brunettes and brown-haired women should apply makeup completely differently from blondes.


I'll tell you how to do it interesting makeup for an evening for brunettes.

Beautiful makeup can change the appearance of any woman beyond recognition, making her more feminine and attractive. Knowing a few simple techniques, can be done very beautiful makeup without resorting to professional makeup artists. It is equally important to harmoniously integrate makeup into the image, so that the shades of decorative cosmetics and the manner of its application emphasize the advantages of your face, skillfully hiding flaws. Learning this is not so difficult, the main thing is to strictly follow the basic rules of makeup and adhere to generally accepted canons.
How to do beautiful makeup at home
When starting to apply beautiful makeup at home, use our simple instructions and step by step photos. Face makeup includes several main steps:
- When choosing a makeup base, focus on your skin type and its shade. For drier skin, choose creamy foundations, and for combination and oily skin, choose lighter textures. The tone should even out the tone and texture of the skin without creating a “mask effect”.
- For the beautiful and natural makeup eyebrows use a soft pencil and shadows. Choose the shade according to the rule: if the hair is dark, then the eyebrows should be a tone or two lighter, and if the hair is light, then the eyebrows should be several tones darker.
- Doing eye makeup, consider not only the features of your appearance, but also its purpose. Day makeup should be done in calmer and more natural shades, and evening makeup involves the use of dark and rich shades of decorative cosmetics. We offer you several options for beautiful makeup:


4. Lip makeup no less important for creating a beautiful image. When choosing lipstick or lip gloss, consider this rule: if the emphasis in makeup is on the eyes, then the lip color should be as neutral as possible, and vice versa. We offer you several options for beautiful lip makeup:


5. Using blush, highlighter and bronzer must be very dosed. Their use is appropriate in delicate nude makeup options, and sometimes for correcting the shape of the face in evening makeup.

Beautiful Makeup Ideas
We present to your attention a selection best ideas beautiful makeup for any type of appearance and for different occasions. Get inspired with us!
Beautiful light makeup
This light makeup made in delicate beige shades with a coral accent on the lips. All the strokes of this makeup are soft and slightly blurred. They create a gentle natural image that emphasizes the beauty and youth of the face.

Beautiful makeup for every day
The photo shows classic makeup for every day, which uses a muted brown palette of shadows and a cool shade of lipstick. This technique allows you to place the main emphasis on the eyes.

Beautiful natural makeup
The makeup in the photo is so transparent that it is almost invisible, but skillfully applied foundation, delicate beige shadows and nude lipstick make the model’s young face more fresh and expressive.

Beautiful makeup for school
Makeup for high school girls is designed to make bright accent on the eyes, using a soft pencil and voluminous mascara for eyelashes. Lipstick, in in this case it should only moisturize the lips and give them a delicate natural tint.

Beautiful makeup for a bob haircut
If you wear a bob haircut, then there are two makeup options for you. In the first case, you can make your eyes more expressive and bright, and in the second case, you can emphasize beautiful shape lips

Beautiful makeup for brown eyes
Chocolate shades in makeup are a win-win makeup option for owners brown eyes. You can emphasize the oriental type of appearance with the help of elongated arrows.

Bright curved arrows can create makeup in the style of “ cat eye" This makeup will perfectly highlight the beautiful shape of the eyes, and in some cases help to correct their shape.

Bright lipstick and a clearly drawn lip contour can become the main highlight of your makeup, provided that eye makeup is minimal.

Use the most delicate shades of decorative cosmetics and make only light accents to highlight the depth of your child's eyes and the beautiful shape of his lips. The photo shows an excellent version of children's makeup for a photo shoot.

- In this video you will learn how to make the most popular in the world of fashion and cinema and at the same time very beautiful makeup.
- Video from stylist Naeem Khan, in which you will learn how to make beautiful hair.
- Video about how How to do beautiful and simple makeup step by step at home.
- This video will show you how to make a beautiful one yourself.
- A short video on how to make it quickly and easily handsome schoolgirl or a student.
- This video will show you how to make your child beautiful.
- Video with a master class teaching how to make a beautiful one with arrows.
To find your ideal beautiful look, we recommend that you try out several of the techniques we offer, experiment with color and develop your own individual style makeup. Share your creative finds in the comments and tell us what techniques you use to create beautiful makeup.
Makeup for beginners, done step by step by a professional make-up artist with extensive experience, is suitable for a special occasion or for an evening out. Due to the fact that all stages are performed one after another, the end result not only looks great, but also remains in its original form for a very long time, without smearing or spreading. In this article we will look at each step, taking into account skin types and other nuances.
Basic stages of makeup
Makeup for beginners, done step by step, consists of many stages.
Each part of the face needs attention special attention. So, it is prepared separately for applying tone, base and subsequent correction with dry or greasy textures. Afterwards they are painted and, if necessary, stained.
A separate point is the lips. In most cases, they need not just to be painted, but also to be prepared for work and given a harmonious shape. And of course, the eyes. This is one of the longest stages. Therefore, step-by-step makeup for beginners often begins with applying shadows using one technique or another. At the end, either sculpting is done with dry textures or simply powdering the face and fixing the image using thermal water or special products.
Let's look at each of the above points in more detail and start with tone alignment. Although there is a rule in makeup that says work is done from top to bottom, we work on the face first.
Makeup for beginners: preparing the skin and applying tone
Depending on your skin type, different preparation may be required. If your skin is dry, it is recommended to apply a moisturizer. This is also true for aging skin. At the same time, owners of fatty or combination skin a cream with a mattifying effect or a special gel for the T-zone is applied. It reduces pores and prevents the appearance of oily shine.
Further work is carried out 5-10 minutes after the cream is applied, since it needs time to be absorbed and begin to act.
The mystery of transformations: it's all in the base
The base is the first stage at which deficiencies are corrected. For example, in the presence of rosacea, redness or inflammation, a green base is used. Depending on the scale of redness, it is applied either locally or to the entire face. Under-eye circles are corrected with a peach concealer, and yellowness is covered with a lavender shade of base.

Afterwards the tone is applied. Ideally, it should be slightly lighter than your skin, but of the same shade. For example, for those with pinkish fair skin, a tone with a pink tint is suitable, and for girls with olive skin, a foundation with an olive tint is needed, and so on.
Eyebrows are everything
Even when doing makeup for beginners at home, we must not forget about eyebrows. Well-groomed eyebrows not only change the expression of the face, but also add completeness to the image, thanks to which all the makeup ultimately looks like a single whole. Nowadays, graphic dark eyebrows are going out of fashion, and their place is taken by a natural shape.
It is important to remember here that their beginning should not be very dark. The main emphasis is on the “tail”. In this case, the body of the eyebrow should be evenly wide. After the approximate shape has been drawn with a pencil, we begin to shade the lines in the direction of hair growth.

When the shading is done, it’s time for the shadows. They secure the pencil and give extra definition to the shape. Finally, you can apply a special gel that adds shine and hold.
Eyes: there is no such thing as too much base
Eye makeup for beginners involves applying shadows diagonally. This is the so-called diagonal classic, which suits almost everyone and is used for both daytime and evening makeup. We begin work by making a pencil base, that is, drawing the darkest areas with a pencil.
Then, using a pencil, the lower eyelid is “cut” and the line is slightly shaded. You can also mark an arrow so that later there are no problems with applying the pencil over the shadow layer. When preparatory stage completed, we shade the pencil, achieving a soft transition and a slight haze.
Shading is also done diagonally from the outer corner of the eye. Next, colorless or pearlescent is applied. It is important to apply optimal quantity, because if there is not enough of it, the shadows will not fall as needed. If there is an excess, they can roll off within an hour after application.

The base is applied with a synthetic brush, like all oily textures, and lightly shaded. After this, we begin to layer the shadows. The first one is the most light color- in the corner of the eye, then a little darker, and in the corner and where there is a pencil - the darkest.
In order for the makeup to look complete, you need to work out the area under the eyebrows. The base is applied just under the eyebrow. It will give a delicate glow and the ability to achieve pure color. We layer the lightest color on it, and then towards the eyelid - a darker color. That is, the makeup on the moving eyelid is repeated on the sub-brow area. Eventually the colors will come together, making it a complete composition for beginners.
How to create a clear lip contour
The penultimate stage is lip makeup. Many makeup tutorials for beginners do not contain information, but we will fill this gap. So, it is important to prepare them in parallel with the face by applying a nourishing balm. While the rest of the makeup for beginners is being done, the balm will be absorbed and the lips will be ready for use.

So, first of all, a pencil outline is indicated, and then a base is made to match the lipstick. If possible, you can use special fixatives as a base, which extend the durability of the lipstick to 6 hours or even more. But if there is no such product in your arsenal, then the surface of the lips is simply filled with broad pencil strokes.
After this, you can perform the first stage of correction. It consists of drawing a contour with lipstick, slightly going beyond the contour, closer to the corners. In the area of the cupid's bow, this can no longer be done. Strive to ensure that two lines come out from one point, from a corner. One of them is displayed for the upper lip, and the other for the lower lip.
Now we can powder our lips if we want a matte effect. This will also set the lipstick. The last stage of correction is to outline the contour of the lips with a wax corrector. This will help correct minor flaws when applying lipstick.
The same technique will help correct the shape of the eyebrows. Due to its dense texture, the wax corrector helps create graphic lines.
Sculpting with dry textures and applying blush
Sculpting is performed as the final touch. To do this, apply light-colored powder or a special corrector to all protruding parts of the face.

In some cases, you can use a shimmering highlighter, but the main thing here is not to overdo it. A dark corrector is applied to those places that need to be visually reduced and carefully shaded so that clear transitions from one color to another are not visible.
If you look at the makeup for beginners, the photo of which is posted in the article, you will notice that the transition from one area to another is not visible.
Consolidation
This is an additional step that extends the life of the finished image. You can secure it in several ways. The easiest way is to sweep a fluffy brush with translucent powder over your face. The disadvantage of this method is that the makeup may become a little less bright.
The second option is to use thermal water. Due to the mineral salts it contains, it “grabs” layers of makeup well, and it lasts longer. The most reliable option is to use professional makeup fixatives, sold in specialized stores.
If you adhere to the above rules, then the makeup of novice home makeup artists should turn out great.
Any modern girl wants to look amazing and receive compliments from others. Properly selected and well-executed makeup is one of the main components of the finished product. female image. Therefore, it is very important to be able to use decorative cosmetics and know correct order actions.
 When applying makeup, it is important to consider the texture of the cosmetics. Cream and gel products should be used at the beginning, and dry products should be used after some time. This secret will allow the makeup to last longer and not float. The principle of fixation applies here - the cream foundation is perfectly fixed by powder.
Daily make-up can be done for no more than 15 minutes. This time is enough to complete all the steps: even out the tone of the face, make up the eyebrows and eyes and shape the lips. Evening makeup is usually done from the base of daytime makeup. To do this, you can simply paint your eyes or lips brighter and add blush.
In order for the makeup to look natural and to avoid mistakes, it must be done in daylight. The whole face should fit in the mirror.
Keep your makeup brushes and sponges clean. They should be washed at least once a week. Do this under running water and liquid soap.
Application stages
 When performing makeup step by step, you need to start with preparing the skin.
Makeup should only be applied correctly to clean skin. Therefore, first you need to remove the remnants of makeup, wash your face, and wipe your face with tonic. Next, we determine your skin type. It is important to moisturize dry skin with day cream. For oily or combination skin, apply a mattifying agent or base.
The next stage is the correction of deficiencies.
Most often, there are various defects on the skin, which at this stage can be hidden with correctors different colors. Using a small synthetic brush, apply the product pointwise and lightly shade it along the contour (do not smear).
The following shades may be needed:
- Yellow – removes bruises, purple spots, wreaths;
- Green – hides allergic redness and acne;
- Pink – on the contrary, fights sallow complexion and green spots;
- Lilac – hides the orange tint of a tan.
Remove with concealer dark circles under the eyes. It should be slightly lighter than your complexion.
Setting the tone
 To apply foundation, use a synthetic brush or sponge. You can also use BB cream. There is no need to use moisturizer before it. The product should be applied from the center of the face to the periphery along massage lines. Don't forget about the transition to the neck and hairline. It is better to choose a foundation color as close as possible to the skin tone on your cheek. Not worth taking dark colors– they make the face look very old, and light ones can give a sickly appearance.
The next step is powder. We apply it to the T-zone. For correct application We use a natural large brush or powder puff. Choose powder to match foundation. Its main task is to fix makeup and mattify the skin. Loose powder gives the thinnest coverage, while compact powder is convenient to take with you and use throughout the day.
Color correction scheme
After we have applied the foundation to the face, the effect of a mask is obtained. This happens because natural highlights and shadows disappear. Our task is to give volume to the face and make it alive.
Dry correctors of brown and light beige colors can handle this. This contrast will give the desired effect. Step by step, using a natural brush, apply a dark shade along the contour of the face (hairline, under the chin, corners of the jaw). We also darken the part under the cheekbone from the middle of the cheek. A light corrector should be applied to the middle of the face (forehead, bridge of the nose, chin), as well as under the eyebrow, above the cheekbone, above the lips. All transitions are thoroughly shaded.

Perfect eyebrows
Step by step we do the eyebrow shaping like this:
- First, you need to comb them with a brush.
- Using a flesh-colored pencil, draw a contour above and below the eyebrow and blend with your fingers.
- Using shadows or a pencil we create correct form brows. See the diagram, with its help you need to determine the shape of the eyebrows based on the oval of the face.
- Finally, you can fix the result with gel.

Eye decoration
This is the most important stage, so let's look at it in detail. You need to do the following steps step by step (as in the diagram):
- Apply a shadow base to a clean eyelid. This will help the makeup last all day and make it easier to apply makeup.
- Apply with a natural small brush light shade shadows on the inner corner of the eye, darker on the outer corner.
- Carefully shade the boundaries of the transitions.
- Now you can highlight the eyelash line with an arrow. Eyeliner will give a more provocative and playful look. The pencil can be shaded and the look will be soft and alluring.
- The mucous membrane of the lower eyelid is painted with beige kajal.
- The final touch is mascara.

Lip design
It is important to choose the right lipstick color according to your color type. Girls with fair skin Cool shades are suitable: pink, purple, berry. Warm shades It is better for dark-skinned and red-haired girls to choose: peach, terracotta, coral.
It is important to do everything step by step (as in the photo):
- To begin, apply balm to the lips and blot with a napkin.
- Using a pencil to match the lipstick, outline the outline and shade the color.
- A small synthetic brush is suitable for applying lipstick.
- If desired, you can add transparent glitter.

Blush
It is better to choose the shade of blush to match the lipstick if the makeup is natural. Using a special brush, pick up a little color and shake off the excess from the brush. This is followed by applying blush to the apples of the cheeks and blending towards the temples. How to properly use blush according to your face type - see the diagram.

After completing all these steps, look carefully at the result in the mirror. Perhaps something needs to be corrected or added. At the end, you can refresh your face with thermal water. This can be done during the day.
Watch the video from step by step training various techniques make-up In this case, it is better to see once than to hear a hundred times.
Any girl can master such simple steps if she wants to look irresistible. Now your job is to put these actions into action. We wish you good luck in achieving your ideal beauty!


