Beautifully intertwined braids that look like a spikelet pattern are called “Spikelet”. Its varieties are considered to be “Fishtail”, “French braid”, as well as many double, triple, air braids, baskets and zigzags.
Many are at a dead end, not understanding where to start and how to weave a spikelet correctly. Detailed step by step diagrams will help you quickly learn how to create spectacular hairstyles.
The classic spikelet is the foundation for a variety of braids. Its creation takes no more than 3 minutes. Having mastered the basic weaving pattern, the spikelet can be modified into various hairstyles.
The principle of weaving is simple, but requires skill:
- Wet your hair with water or moisten it with mousse to make it more manageable and not get tangled in your fingers while braiding.
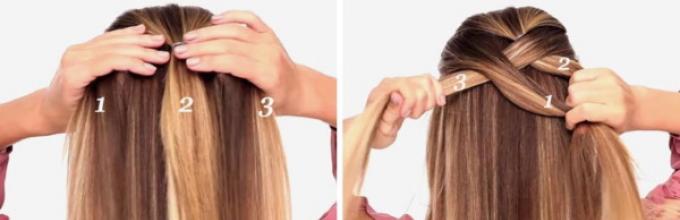
- In the area of the parietal part of the head, you need to separate the hair, one strand thick. Beginners are advised to put it in a small ponytail on the top of the head, securing it with an elastic band. This will make it easier to start creating your hairstyle and prevent it from falling apart.
- A second strand of the same thickness is separated from the right side and placed to the left on top of the strand collected in a ponytail.
- A third strand is taken from the left side and superimposed on the previous intertwined curls.
- Then you need to separate the strand from the main part of the hair, attach it to the right curl and continue weaving.
- Next, take a curl from the left side of your head and apply it to the left strand.
- Alternately take identical tufts of hair from left and right
- The braid ends with a regular 3-strand braid.
- The spikelet is secured with a beautiful elastic band.
The finished braid can be wrapped inside and pinned with hairpins. Gently straighten the strands, decorate the braid lengthwise with small hairpins in the shape of flowers, and sprinkle with varnish.
How to braid a spikelet for yourself?
You can braid the spikelet yourself. The procedure will take a little longer, since the strands need to be separated carefully so that they are even and neat. Before starting work, you need to comb your hair well. It is not recommended to constantly look in the mirror, as it distracts attention.
Instructions:
- Must be carefully separated top part hair and divide it into 3 equal bundles.
- Then start weaving a regular braid, placing strand on strand.
- After the third application of the curl, a small part of the hair is separated from the side and put into the braid.
- Sequentially applying strands of equal thickness, you need to braid the braid to the base of the neck.
- Secure your hair with an elastic band.

Braiding your own hair requires patience, as your hands quickly become numb and the braid may turn out uneven. Therefore, for beginners to create beautiful braid need to practice.
Is it possible to braid a spikelet on short hair?
How to weave a spikelet (the diagram for the stupid will show step by step the entire weaving process), and creating another hairstyle on short hair is impossible without hairpins - hairpins, bobby pins, clips. A tight weave will also help with braids falling apart.
Instructions:
- Moisten hair with water and comb.
- Start braiding a regular braid from a thin strand. The thinner the strands, the better the curls will stay in the hairstyle.
- After completing 6-7 rows, you can begin to take additional curls, as in a regular spikelet. You need to cross them at the roots so that they do not fall apart. As you weave, begin pinning your hair with hairpins.
- Then carefully secure the braid with an elastic band and spray with varnish.
You can braid a spikelet on short hair using not all of the hair, but only a part. A hairstyle is also created from two or three braids.
Step-by-step instructions for weaving different types of spikelets
Spikelets are very diverse. You can create any beautiful hairstyle, not limited by your imagination.
Spikelet on its side
A spikelet on its side looks unusual and impressive.
The principle of weaving is the same as that of a classic spikelet:
- It is necessary to comb your hair thoroughly, directing the hair back so that the parting is not visible.
- Then a strand is carefully taken from the side of the head and divided into 3 equal parts.
- The collection of the main mass of hair begins after 3-4 crossings of curls.
- Gradually applying hair on both sides to each strand, you need to braid the braid to the base of the neck and secure with an elastic band.

It is better to weave a side braid from thick strands. This spikelet looks more original. For medium-length hair, the hairstyle should be secured with a clothespin or bobby pin. A side braid will not suit a short haircut.
Inside out
A spikelet inside out requires more skill. Unlike a classic spikelet, here the strands are placed from below, and not from above.
How to weave a spikelet (pattern for stupid people) inside out:
- Comb your hair well and spray with spray to prevent tangling.
- Separate the bun closer to the bangs.
- Divide into 3 parts.
- Start weaving by pulling the left strand from below, between the right and middle.
- Repeat the same action with the right strand.
- Attach a curl to the left strand and stretch it from bottom to top.
- Hair is also applied to the right strand.
- Continue weaving to the base of the neck.
- Braid with a regular three-row braid and secure with an elastic band.
This hairstyle has a pronounced pattern, unlike a regular spikelet. The braid stands out against the general background and looks voluminous. A spikelet inside out won't fit very well short hair, since the curls will constantly fall out.
2 inverted spikelets
2 neat braids will help highlight your facial features. The inverted spikelets on both sides of the head look unusual.

Instructions:
- The hair is divided into 2 parts. One part is gathered with an elastic band so that it does not interfere.
- Next, you need to take a small bunch and divide it into 3 identical strands.
- Each curl must be placed under the other, intertwining the left with the center, then the right with the center.
- After going through 2-3 weaves, you can begin to take hair from the main mass.
- After finishing the braid, you need to tie the ponytail tightly with an elastic band, otherwise the hair may quickly straighten out from the clip.
- Weave the second braid in the same way.
Braids on both sides of the head are suitable for both long hair and medium and short haircut. The spikelets can be combined into one tail.
Around your head
The spikelet around the head does not disintegrate for a long time. This hairstyle is suitable for kindergarten and school. It is braided on long and short hair.
1 option for long hair:
- Divide the hair into 4 equal parts, making partings from ear to ear and in the center of the head from the bangs to the base of the neck.
- Secure the 3 parts with tongs and begin to weave a classic spikelet from the bottom up clockwise, carefully rounding it. When braiding, use 3 strands, picking up hair on both sides.
- Having risen to the upper fixed part of the hair, you need to remove the tongs and continue braiding to the bangs.
- When the hair runs out, you need to move on to part 3, and then to the last, fourth.
- Having picked up all the hair, the remaining ponytail needs to be braided to the end, then gathered with an elastic band and hidden, secured with a bobby pin.

Option 2 for short hair:
- After combing your hair, make a side parting from the temple to the crown.
- Start weaving a regular spikelet from the top from the beginning of the parting, taking strands from both sides.
- Having gone through the entire circle and returning up to the parting, the rest of the hair needs to be braided to the end.
- Place the braid on the parting and secure with a bobby pin.
The spikelet can be decorated with beautiful hairpins and sprayed with varnish.
Snake
The “Snake” hairstyle consists of one classic spikelet, which is woven in a zigzag pattern.
When weaving, hair is taken from both sides and from one:
- After combing your hair back, you need to make a side parting from the temple towards the crown.
- Weaving starts from the temple, the strand is divided into 3 small identical parts.
- When braiding a spikelet, the hair is caught on both sides.
- Having reached the ear, the braid needs to be turned in the other direction and braided, creating a triangle with the top spikelet. Now additional strands are placed on top of the main ones only, while the lower strands remain free.
- Having finished the row, the spikelet needs to be turned around again and continued to be woven, using only the top grip of the hair.
- The final stage is weaving the spikelet to the base of the neck and selecting the remaining hair into one simple three-row braid.

The hair is collected from the bottom with an elastic band. The strands can be carefully pulled out to give the “Snake” pomp.
Spikelet from the tail
The spikelet on the tail is called “Fish tail”. A diagram for stupid people will help you weave it. Main secret This hairstyle is that it is created from 2 strands.
Instructions:
- You need to collect a high ponytail on the top of your head.
- Then divide it into 2 equal parts.
- Carefully separate a very thin curl from the outside of the right strand and place it inside between the two main ones.
- Then you need to take a thin curl from the left strand and again put it between the main two. It is important to hold it carefully thumbs woven strands.
- The hair is gathered at the bottom with an elastic band.
This braid looks elegant, but it is quite strong and does not fall apart quickly.
Braid in braid
The double braid looks original. It requires special care when weaving.
Instructions:
- Take the top part of the hair and separate a strand.
- Divide the strand into 3 identical curls.
- Start weaving the spikelet inside out, alternately placing the left and right strands one under the other.
- After three weaves, hair is taken from the main mass and added to the braid.
- From each large strand, a thin strip of hair is separated, which remains free until the end of the weaving.
- When the bulk of the hair is over, the braid needs to be braided to the end, while also separating small strands.
- Secure the spikelet with an elastic band.
- A thin braid is woven inside out from pre-separated small curls on top.
- Pin both braids together and pull out the lower strands a little.

For convenience, small strands left behind during weaving should be fixed with a special clothespin.
Braiding 2 braids
Braids on both sides always refresh the face and are especially suitable for young girls.
They can be woven into different techniques:
- simple spikelet;
- inverted braid;
- fish tail.
Instructions:
- Divide the hair in half, taking one of the parts, and secure the excess with a clothespin or gather it into a ponytail.
- Start weaving a simple spikelet from the temple, picking up strips on both sides. If it is an inside-out braid, then you need to place the curls from below, also adding strands on both sides. With the “Fishtail” technique, the bun is divided into 2 parts and a small curl separated from the outside is placed between the two main ones.
- When there are no additional strands left to grab, weaving continues until the end using the chosen technique.
- Another braid is woven according to the same pattern.
The parting does not have to be strictly in the middle. A side parting will emphasize individuality and help you stand out among others.
Fishtail for yourself
For beginners, creating such a hairstyle will not be easy. But there is an easier way - braiding with a high ponytail.

Instructions:
- Make a tail.
- Divide it in half and take both parts in your hands.
- A thin curl separated from the outside of the left strand is passed between the two main ones and applied to the opposite right curl, thereby creating an interlacing.
- Then the current strip is separated from the outside of the right strand and applied to the left side. How finer curls, the more elegant the spikelet looks.
- Braid the braid to the end and secure with an elastic band.
Having mastered this type of hairstyle and learned to separate identical strands, you can move on to more complex types of fishtail. These include braiding from the bangs or crown with a hair fence, as well as a braid from the back of the head, where there is no need to grab additional curls.
Triple fishtail
Weaving technique of this fashionable hairstyle almost no different from a two-row fish tail. It is created from three beams.
Instructions:
- A thin strip is taken from the outside of the right side and placed on top of the main curl.
- Then the same strip is brought under the middle strand and attached to the left main part.
- Next, a thin strand is separated from the outside of the left side. Now it is carried out under it and above the middle curl and applied to the right side.
- The weaving continues until the end and is secured with an elastic band.
It turns out that the middle part remains unused. It appears in a ring of thin strips, separated from the left and right main parts.
Air spikelet
To braid a braid, you need to divide the entire hair into 3 parts. In this case, the middle strand will not be used. It must be carefully held during the entire braiding process, adjusting the tension of the braid.

How to weave a spikelet (pattern for the dumb using the air weaving technique):
- Separating the bun at the top of the head, divide it into 3 parts.
- The right curl extends over the central one.
- Then the left one is thrown over the center one.
- Next, a strip from the main mass is grabbed and again thrown over the central strand, which must always be in the hand.
- The action is repeated on the other side.
- After there are no strands left to grab, the braid is braided using the fishtail technique. Small strips are separated from the outer side of the strands and thrown over the central part, which still remains in the hand.
- Having finished braiding, you need to collect the braid with an elastic band and straighten the links.
This braid is suitable for long hair. To give the hairstyle airiness and volume, it is necessary to straighten the links during weaving, stretching them a little and making semicircular airy patterns.
Wave
The wave creates a spikelet in the form of a rim from one ear to the other and is braided onto the loose hair.
Instructions:
- Gently distribute hair over entire head.
- Take a small bun from the left side from the ear to the bangs and divide it into 3 curls.
- Start weaving a classic spikelet, grabbing additional strands on both sides.
- The bottom strand should be left, and additional strands should be added to the braid instead.
- This weaving continues until the middle of the head.
- Then you need to weave the braid on the right side in exactly the same way.
- Connect both braids and secure with a bobby pin.

This easy, charming hairstyle is suitable for long and medium hair.
Square spikelet on itself or double spikelet
A hairstyle made of large strands looks elegant and solemn. It is braided onto long or medium hair.
Instructions:
- Taking a bunch of hair in the crown area, you need to divide it into 3 large parts.
- Start weaving the spikelet inside out, placing the curls under the main strands.
- Gradually grab the hair from both sides.
- When weaving the curls into a braid, you need to separate a large part from their outer side and secure it with a clothespin so that it does not interfere.
- Braid the braid to the end and secure with an elastic band.
- From the remaining hair you need to create a second braid using the same technique.
The result should be a double braid - one on top of the other. The larger the strands left, the more pronounced it will be. square shape braids.
Zigzag
To create a “Zigzag” you need a thin parting comb. The smoother the parting, the more beautiful the hairstyle will look. This braid is similar to the Snake braid. The difference is that when weaving a simple spikelet, you need to grab additional hair on both sides.

How to weave a spikelet (pattern for stupid people using the zigzag technique):
- Make a parting to the left of the bangs to the right temple and begin to weave a spikelet, grabbing hair from both sides.
- Having reached the right ear, you need to re-part it diagonally towards the left ear.
- Next, you need to weave the spikelet in the opposite direction, again grabbing the hair from both sides.
- Having brought the braid to the base of the neck, it is completed with regular braiding.
A spikelet secured with an elastic band can be decorated with hairpins and clothespins.
Diagonal
The braid is woven diagonally using different techniques - a classic spikelet, an inside-out spikelet, a fishtail. You need to start creating such a hairstyle from the temple area.
Before you start braiding, you need to comb your hair and take a strand and divide it into 3 equal parts. You need to braid the braid down diagonally, picking up loose hair on both sides and weaving it into the spikelet. If the hair medium length, then it is advisable to catch the hair from the opposite side with bobby pins after finishing the braiding.
Basket
A beautiful hairstyle that does not go out of fashion is a basket. At first glance it seems complicated. It can be done on long and medium hair.
Instructions:
- Divide the hair into 2 parts, parting from one ear to the other and combing the upper part of the hair forward.
- In the center of the crown you need to take a thin strand and divide it into 3 parts.
- Start braiding a regular braid clockwise, grabbing the hair only on the right.
- When the hair ends, the braid is collected with an elastic band.

The ponytail needs to be hidden on the head, secured with bobby pins. The basket is decorated with hairpins or clothespins.
Spikelet with released strands
A braid with loose strands looks unusual. It is built on the basis of a spikelet inside out.
Instructions:
- A strand of hair is taken from above and divided into 3 parts.
- The curls are intertwined, lining the bottom.
- During braiding, the main hair is applied to the braid.
- On each woven strand, a curl is separated from the outside and removed to the side. Actions are performed alternately on the right and left.
Having reached the base of the neck, the braid needs to be braided to the end, also releasing the curls.
Large spikelet
A large spikelet is woven on both long and medium hair. It will look more beautiful the thicker the hair. After combing and straightening the strands, you need to separate the upper part of the hair and begin weaving the inverted braid. To do this, you need to place strands under the bottom, taking curls from 2 sides one by one.
It is necessary to separate large strands, capturing the entire hair from the roots to the braid.
Every 4 weaves of the braid are carefully straightened. This will make the spikelet look thick and lush.
Weaving with ribbon
You can decorate any braid with a beautiful bright ribbon. You can do this hairstyle yourself. It is woven into 4 strands, one of which will be a ribbon. It is better to start braiding from the top of the head.

Instructions:
- Separate the top part of the hair, dividing it into 3 parts.
- Secure the invisible tape under the separated hair.
- Start weaving the spikelet inside out.
- Place the first strand under the second and on the tape.
- Place the fourth strand on the first and under the ribbon.
- The second strand under the fourth and onto the ribbon.
- First to second, grabbing hair from the head and passing it under the tape.
- The fourth one is under the first one, adding hair to the left and to the ribbon.
- Continue to the base of the neck until there is no more free hair on the head.
- Then weave the spikelet to the end using the same principle.
Carefully secure the ribbon or tie a bow.
Following detailed diagrams even the most inexperienced can quickly learn how to braid spikelets correctly. Thin strands will make your hair neat, and thick curls will make your hair look voluminous and fluffy. Owners of medium and short haircuts do not have to worry about accidentally straying hair, since the careless style is now in fashion.
Article format: Lozinsky Oleg
Video on how to weave a spikelet
Spikelet. French braiding technique for beginners:
Braids are popular. They have become an element of hairstyles and in themselves create a complex and beautiful hairstyle. Choose both for everyday use and for holiday option. They are practical, but at the same time sophisticated (more and more new weaving methods are being developed). Some options are complicated. While others are performed independently. The reverse French braid is exactly one of these.
French treasure is a braidWho is suitable for a reverse French braid?
While the French braid is familiar to fashionistas, not everyone knows what an inside-out braid is. IN traditional braid weaving occurs in such a way that the selected strands seem to “go” into the mass of hair. The hairstyle itself looks flat, pressed tightly to the head.
WATCH VIDEO INSTRUCTIONS
It’s not for nothing that the inverted braid got its name. Visually it looks traditional. But turned inside out, the direction of the strands is not inward, but outward, not towards the scalp, but away from it. The result is a complex hairstyle that looks much more sophisticated.
This hairstyle will suit absolutely everyone, as it can be varied. It can be lifted up, or let down, like a regular braid. The sufficiently large volume of the element allows you to correct some imperfections in the shape of the head. If the head is oblong, then the reverse French braid should be placed at the back, secured just below the back of the head. If your head is flat, you can, on the contrary, raise it to the occipital region. For a small head, form voluminous hairstyle. For a large head, leave the braid at the back, going down to the shoulders.
The outer braid is voluminous due to the peculiarities of the weaving. Therefore, it is indispensable for owners of sparse or thin and bulky curls. A nuance - you can create it only on long and straight curls. On wavy and curly hair, the structure of the hairstyle is not so clearly readable. It is not easy to braid an inverted braid, but some fashionistas manage to master the reverse braid and even do the hairstyle on themselves.
Hair preparation
Braiding a braid inside out is difficult both on yourself and on another person. It is even more difficult if the hair is not properly prepared. To ensure that the inside-out French braid holds well, the hair does not get tangled during the process, and the procedure itself is as simple and quick as possible. You need to prepare your hair in a special way:
- Think over the braid itself (direction, type, size of links);
- Comb your hair thoroughly so that it can be easily divided into strands with your fingers;
- If your hair is curly or very wavy, straighten it so that the braid with tiebacks can be read more clearly;
- Treat your hair with foam, mousse or gel. This will make them easier to divide into strands, less likely to slip out of your hands during the weaving process, and to fall apart. The hairstyle will ultimately look much neater and more professional;
- After applying the styling product, comb your curls thoroughly again.
Before weaving an inverted braid, select the part of your hair on which you will do it. Divide this volume by required quantity strands.
Step-by-step instructions and diagram for weaving two reverse braids
The diagram for weaving a braid, on the contrary, shows that a French braid, on the contrary, can be braided from three strands, which are intertwined in a non-standard way for a given hairstyle.
- Visually divide the wide strand into three narrow ones;
- Take the central (second) strand and place it crosswise on the first one;
- Take the first strand, in turn, out from under the second and place it on the third;
- Now take the third strand out from under the first and place it on the second below its intersection with strand number one;
- Place the first strand again under the second, below its intersection with the first;
- You should succeed next order strands: 3 – 1 – 2;
- This is one link;
- Continue to braid the French braid in reverse as if you were just starting out and the order of the strands would be 1 – 2 – 3.
It’s easier than describing in words how to weave a braid in reverse, to show its diagram. A braid is a woman's dignity, braid it correctly!
Today no one will be surprised by an ordinary braid, so we invite you to learn how to weave an amazing braid inside out. It not only looks beautiful, but also has the ability to transform sparse hair, adding attractive volume to it. We will not only tell you about the technique of weaving such a braid, but also teach you how to make stylish hairstyles using it as a basis. It will be interesting and informative!
Is everyone ready for class?
The principle of weaving such a braid may seem complicated at first, but in fact it is too elementary to fail. This hairstyle will certainly be a success for anyone who is familiar with a standard braid. But even if you are not familiar, it is never too late to learn.

- The first step is combing your hair. This should not be skipped so that the strands stand out easily and are not injured during weaving.
- Select 3 strands. If you start braiding from the very top of your head, then separate the curls from the top of your head.
- Place the left strand under the center one, then point the right one over the center one, and then the left one over the top of the right strand.
- When braiding, it is worth tightening the strands quite tightly to make the braid more secure.
- Now you need to make sure that the left strand is in the center. To do this, place all the strands in right hand and turn the 2 outermost parts of hair up.
- Go under the left strand from the edge, grab some loose hair and attach it to the central strand.
- Hold the base of the braid with your left hand, turn the 2 outer strands up.
- Place the rightmost strand on the central strand, connecting part of the loose hair to it.
- That's the whole principle of weaving a French braid.

2 cute braids
You can also braid 2 braids for yourself this way. This photo tutorial will show you how to do it correctly.

Braids with Kanekalon
The 2019 season invites fashionistas to add new colors to their image and emphasize their individuality. If on bright coloring hair you are not ready, you can use Kanekalon - synthetic strands of various shades.


The principle of weaving such a braid has only one feature: create several braids, and then attach a strand of Kanekalon to each of the 3 parts of hair.
Side braid
A French braid braided to one side looks incredibly feminine and romantic. Its difference from the classical technique is that you start weaving from the temple and go to the opposite ear.


This technique easily turns into an elegant evening hairstyle if you curl a couple of strands near your face and pull the individual links of the braid in opposite directions for volume. Also great idea The hairstyle will be decorated with flowers, decorative hairpins, a beautiful hairpin or weaving in ribbons.

Side braid
A hairstyle in which the French braid takes a side position looks amazing.
Having learned how to weave a diagonal braid, you can easily repeat this option. To create it, you should select 3 strands and weave french braid first along the forehead, and then downwards from the side.


Inverted fishtail braid
A twisted fishtail braid will look amazing. This is a wonderful hairstyle choice for both everyday and festive events.


- Pull the top of your hair into a ponytail just below the crown.
- Using your fingers, make a hole above the elastic and pull the entire tail through it.
- Grab parallel strands of hair from both sides, tie them again with a ponytail along with the previous one and pull them over the elastic using the already familiar technique.
- After this, weaving of the inverted fishtail braid begins. To do this, separate the outer strands and place one in the center below the other.
- At the end, secure the braid and stretch the individual links.


Fishtail using rubber bands

4-strand twist braid
It's even more interesting option on the topic of back braids. A 4-strand braid looks more voluminous and creative - this hairstyle will definitely not leave you unnoticed.

- Separate a section of hair from the crown area and divide it into 4 equal parts.
- The process begins with the left strand. It should be placed under the next 2 strands, and then held over the right one.
- Then comes the turn of the right strand, which is threaded under the two adjacent ones and passed over the left one.
- Loose hair is brought under the 2 left parts and brought out above the right.
- The same manipulations need to be carried out with the right side.
- That, in fact, is the whole principle of weaving such an original braid.


Braid with ribbon
Braiding a braid inside out with a ribbon is not at all as difficult as it might seem at first glance. Having mastered simple technique, you can easily repeat this idea for any special event.

The whole principle of weaving is based on this pattern.

These step by step photos together with our description will help you quickly understand the intricacies of this spectacular weaving.
- Select a strand at your temple and secure a ribbon underneath it.
- Divide the selected curl into 3 parts. In this case, the tape will take on the role of 4 strands, which are located third in a row.
- Place the first strand under the second, and then guide the ribbon under it.
- Connect an additional part of loose hair to the outer strands and place it underneath.
- Using this principle, create the entire braid, and lightly comb the end at the end.

Hairstyle ideas
Idea #1
Reverse braiding can transform any hairstyle and make it much more interesting. For example, 2 buns look better with pigtails from the back of the head. Try it yourself!

- First, divide your hair into 2 halves by parting vertically in the center.
- Tie one half into a high bun so that it does not get in the way.
- Braid from the second part of the hair reverse braid from the back of the head upward. The easiest way to do this is to tilt your head down.
- When you get to the top, pull your hair into a ponytail.
- Do the same manipulations with braiding and creating a high ponytail with the second half of your hair.
- Comb the resulting ponytails and form into buns.

Interesting! The buns will turn out more voluminous and more textured if you divide the tail into 2 wide strands, comb it, weave it around each other and only then twist it into a bun.
Idea No. 2
Want to create a stunning look without much effort? Then a spectacular French braid is the perfect option for you. Start weaving such a braid from the very back of your head, and then let it go over your head in the form of a headband. If your hair is not long enough for this option, braid 2 braids, each of which will serve as half of an improvised headband.

Idea No. 3
Is long hair your pride? But, you must admit, always walking around with loose hair is incredibly boring. A completely different result will be obtained if you braid 2 braids in addition to the flowing curls.

Idea No. 4
The combination of a ponytail and a braid is a trendy hairstyle option that we advise all fashionistas to pay attention to. With this approach, even a banal ponytail takes on a more creative expression. The technique for performing this hairstyle is simple - you just need to select a wide strand and braid it to the base of the tail. Once the ponytail is formed, select one strand and twist it around the elastic.


Idea No. 5
Trendy hairstyles also rely on slight negligence. For example, you can braid 2 reverse braids and form a ball out of them at the bottom of your head. To achieve fashionable effect mess, you can straighten individual strands from your hairstyle or go to bed with it - the next morning you will get a trendy look by itself.

Idea #6
This master class explains step by step with photos how to braid a braid inside out and turn it into a stylish bun.


Idea No. 7
This hairstyle is similar in principle to the previous version, however, in the finale, one careless bun is created in the back of the head.

Idea #8
If you finish the weaving not in bunches, but in low ponytails, you will get something like this original hairstyle for every day. This option can be braided for a child, but also adult girl it will look great.

If you want to learn how to weave a braid inside out, photos, videos and descriptions from our article can become best helpers for you. Spend just 10 minutes of your time on such a lesson and then you will be able to create spectacular hairstyles as often as you like.
Accessories should be selected according to your body type. That is why small jewelry is not recommended for large ladies. But neat, medium-sized stud earrings would be a great idea. Stylists also recommend having long beads in your jewelry box.
Do you want to know how to make your braid not only attract the admiring glances of the opposite sex, but also add the missing volume, making your hair thick and voluminous? Then it's time to master the technique of weaving an inverted braid. In addition, the inverted French braid is reaching the peak of its popularity this year.
With the help of this essentially simple weaving, you can simply stand out profitably at work in the office or at a party.
Inverted braids are gaining immense popularity around the world.

Agree, a very elegant option
Inverted braids have a lot of advantages that no woman can resist. There are many circumstances to try this option.
Here are just some of them:
- as mentioned above, this hairstyle adds additional volume to the hair;
- it is perfectly suitable for ladies of any age;
- This weaving style adds romance and tenderness to the look;
- an inverted French braid looks amazing on both long curls and medium-length hair;
- Despite the apparent complexity, the inverted braid is even woven very simply, but the effect from it is simply stunning.

A French braid, as in the photo, makes hair larger and more voluminous.
A huge number of Hollywood divas have already tried out all the beauties of this non-standard and elegant hairstyle. Now your time has come. And in this article you will find all the necessary information about weaving techniques and options for using inverted braids.
Weaving technique
Before braiding the inverted voluminous braid, you need to master the basics of weaving techniques. We will talk about them below. Do not forget that no matter what hairstyle will look great only on perfectly washed and painstakingly dried hair.
The following step-by-step summary on how to weave an inverted braid will help you in mastering a new skill:

In the process of weaving an inverted braid, the strands do not overlap each other, but under
- Using a comb with a narrow tip, separate a small triangular strand from the main parting and divide it into three similar parts. Don’t forget to look at the symmetry of the strands, this is the only way your hair will come out well-groomed and beautiful.
- Start braiding the braid by wrapping one strand under the other, simultaneously grabbing small strands at the edges and weaving them into the overall pattern. Just a couple of tries and you can create an amazing hairstyle with your own hands. Main feature What distinguishes an inverted braid from the ordinary French version is that the strands are not woven on top of each other, but one under the other.
- Repeating the movements, braid the braid to the very bottom, tie the end of the hair with a thin elastic band.
- Slowly and very carefully begin to moderately stretch the strands from the middle.
- Secure the resulting result with varnish. If you see short hairs sticking out from the main body of the braid, don't worry. Just secure them with small bobby pins.

Inverted braids look great in any look
Voila! You have become the owner of a chic and unusual hairstyle. You see, in order to achieve a great result it is absolutely not necessary to waste a lot of time and effort.
Hairstyle options with inverted braids
Another advantage of an inverted braid is that it can be combined with various styles and get a new hairstyle every day.
Styling bangs
Knowing how to braid an inverted braid, you can experiment with its use. For example, you want to leave the main part of your hair down, but at the same time you want to decorate your haircut with an inverted braid.
The way out of the situation is simple - you can braid it on your bangs:
- Comb your hair well. Next, use the narrow tip of a comb to separate the bangs (or a strand near the forehead, if you don’t have bangs).
- Start braiding your hair using the same pattern., which was described in the last section with the only difference being that the braid should be woven from ear to ear.
- For greater effect, it is best to twist the rest of the hair a little with curlers or a curling iron. This will give your hair an even more gentle and cute look.

Using a braid, you can simply hide boring bangs
Bun
A comfortable and versatile hairstyle that is perfect for everyday styling:
- Start weaving an inverted French braid starting not from the frontal area, but from the back of the head.
- Finish it at the crown, and gather the remaining strands into a stylish bun.
- Decorate your hair with a catchy bow, ribbon or an unusual elastic band. Their cost in the store is even very affordable, but the effect is estimated in the millions.
Floral motifs
A formal option that is very popular as a wedding hairstyle. We said that the inverted braid is universal.
To make an indescribably beautiful and extraordinary weaving, follow the instructions below:
- Divide the main part of the hair with a side parting;
- start weaving an inverted braid on the half where there is more hair;
- continue the braid to the side from the parting;
- when you reach the other side, smoothly turn the braid around its axis and braid in the opposite direction;
- After finishing braiding, wrap the finished braid in the shape of a flower and secure with bobby pins.

A flower-shaped braid will help you create a sophisticated and touching look.
A wonderful hairpin or hairpin placed in the center of an impromptu flower will help to add more charm to your hairstyle.
Conclusion
Inverted braid - good option for elegant and prestigious women who want to highlight their special features in every possible way. This ordinary and at the same time extraordinary method of creating a beautiful and unique hairstyle has appealed to many people. In addition, it should be noted that this type of hair styling is gaining increasing popularity every year.
Want to find out even more about inverted braiding? Be sure to watch the video in this article! If you suddenly have questions, ask them in the comments to the material.
The last few years have seen an increased interest in weaving various braids. At the same time, these can be either fairly modest hairstyles that you can do at home yourself, or real masterpieces that are performed by masters of hairdressing. Even evening and wedding hairstyles have adopted this fashion. Today we would like to talk about weaving a French braid, popularly known as a “spikelet”. And any girl can easily braid it at home after familiarizing herself with the basic rules.
French braid weaving pattern
The French braid, the weaving pattern of which is quite simple, is one of the most popular options. This hairstyle large number pros. Firstly, it is not difficult to braid, and secondly, such a braid will look good on hair of almost any length, as long as it allows you to braid your hair. This hairstyle can be done for every day at work or school, or you can make it a holiday version and then it will act as an evening hairstyle. If you have not yet encountered weaving such a braid, we recommend watching the step-by-step video on how to weave a French braid:
French braiding video
Patterns for weaving a French braid can be easily found in many women's magazines, specialized books and of course on the Internet. Moreover, on the World Wide Web there is a lot of information about both French braiding photo instructions and French braiding video tutorials. Here everyone must decide for themselves how it is easier for them to learn: from photographs or from videos. We invite you to watch the French braiding video clips:
Step-by-step instructions for braiding
Weaving a French braid can be done either in the form of a regular braid, that is, from the forehead simply down in the direction of hair growth, or in other options, for example, diagonally, or you can make two braids, or in the form of a wreath. Therefore, we recommend that you familiarize yourself with the video instructions - weaving a French braid step by step, different options:
Reverse French braid
In addition to the usual French braid, there is also a reverse braid, or vice versa as it is called. Weaving a French braid, on the contrary, can also be easily mastered, and such a braid, just like a regular one, can be braided yourself, especially if you have already learned how to braid yourself a standard French braid. To make it easier for you to do this, we suggest watching the reverse French braiding video tutorials:
Today we told you about one of the varieties of braids - the French braid, but there are a huge number of them. You can alternate between weaving a regular French braid and vice versa, braiding them in different directions, or do two braids. If the first time you didn’t manage to braid the perfect braid, like in the videos you watched, don’t be discouraged, just practice more often and then everything will start to work out for you.


