Needle-shaped forest trees delight people not only with their appearance and air filled with phytoncides, but also with other gifts. Such gifts include cones, common to the Russian eye, which are the basis for many excellent crafts. One of these simple but cute crafts is a deer made from pine cones.
Good old craft
A small figurine of a deer made from scrap materials can be created even by children. For such a deer you will need:
- spruce cone;
- five straight branches;
- two branches with branches;
- fluffy willow flower;
- two peppercorns;
- one rowan berry;
- one acorn with a cap;
- two sunflower seeds;
- brown plasticine;
- glue;
- awl;
- stationery knife.
The fir cone will play the role of the body. To one of its sides you need to glue four small balls of plasticine in a rectangular projection to attach the legs and one ball closer to the base of the cone, on the opposite side from the previous fastenings.
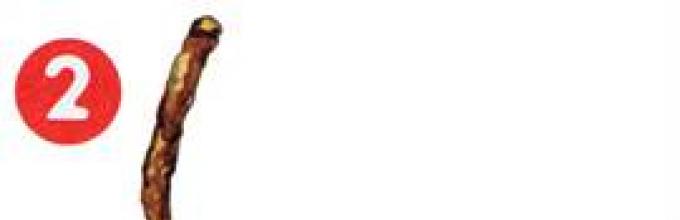
The legs and neck will be played by five straight branches, which are attached to plasticine balls on the pine cone. The tail - a willow flower - is attached with glue to the top of the cone.
In the acorn cap you need to make two holes for the horns in the front and one in the acorn itself on the opposite side for the neck.

The horns are made from two gnarled branches, and their bases are sharpened with a knife so that they fit freely into the holes in the acorn. They can be attached using glue or plasticine.
We glue ears from sunflower seeds, eyes from peppercorns and a nose from rowan berries, finally forming the head of a deer.

After the head is attached to the neck, the craft is ready.
Cute little deer
From the cones you can make a deer that looks like a good old cartoon character. For such a deer you will need following materials and tools:
- closed cone;
- an open lump;
- bunch of rowan;
- plasticine brown, white and black;
- leaf of any tree;
- ruler;
- scissors.
The closed cone should be smaller than the open one; it plays the role of the head. The opened cone is the torso. From a bunch of rowan berries, it will not be the berries that will be used in the craft, but the branches to which they are attached, these will be the horns and legs. Plasticine will be used to connect the details of the craft, and you will also need to make the hooves, muzzle and eyes of the deer from it. Leaf - eyelashes.
First you need to sculpt the eyes by rolling out two balls of white plasticine, flattening them into small cakes, then rolling out two smaller balls from black plasticine and attaching them to the white parts. Drops of leaf cut out with scissors are attached to the back of the eye parts, forming eyelashes. The muzzle is rolled out with a ball of brown plasticine and crushed to an oval shape. On it, the outlines of the mouth and nostrils are pressed with a ruler.
The resulting details are located on the unopened cone: the eyes are on the sides, the muzzle is on the top of the cone.
We remove the berries from the rowan bunch, cut off two branchy branches for the horns, they can be trimmed with scissors to make them more similar in shape and size to each other. Two pieces of twigs from a bunch should be thick with one bend.

The horns are attached with the branches up to one ball of plasticine, which is located on the head above the eyes.

The finished head is attached to the body - the top of the open cone - onto a similar ball of plasticine.

The legs are also attached to this ball, at the ends of which the hooves are already attached. The hooves are rolled into two brown balls, crushed into trapezoidal pancakes, and a notch is made from their wide bases with a ruler.

A craft in the form of a fawn made from pine cones and plasticine can be decorated with a variety of autumn foliage.

Replacing parts
Most master classes on making deer from cones contain variations on how to design one or another part of the crafts.
The deer's head is made from both a pine cone and an acorn, and sometimes from knitted threads in the form of a fluffy bubo. For deer ears, you can use the wings of maple seeds or scales from a pine cone.


For the horns, you can use any branchy twigs, even from bunches of grapes, but without berries, as well as modeling from plasticine.

Eyes are also made from beads on pins or without them, fragments cotton swabs with a black marker placed on the pupil.
The muzzle can be an acorn cap, colored and dried cotton wool, twisted into a ball, or a ball made of copper wire.
The legs, tail, and neck can be made from ordinary matches.

Connecting cones using plasticine can also be done with a glue gun.
The created deer are placed on a cardboard base, a board made of pressed sawdust, or a cut of a branch or tree.
Jewelry is made both from natural materials and through paper applications and artificial additions.
Cones are a very fertile material for children's creativity.
From cones you can create various natural compositions, funny and funny little animals.
We will tell you how to make a deer and a cunning fox from pine cones.
Horned deer made from pine cones
To make a deer you need:
Fir cone,
Twigs,
Willow flowers,
Sunflower seeds,
Plasticine,
PVA glue.
Making a deer
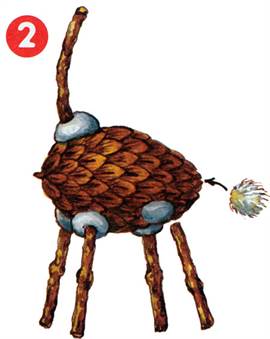
To a large fir cone we attach four pieces of plasticine from below - for the legs and one piece from above - for the neck (1).
.jpg)
We will make the legs and neck from straight branches without knots and stick them into plasticine. Glue the fluffy willow tail at the back with PVA glue (2).

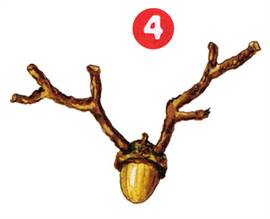
We will make the head from an acorn. Use an awl to make two holes in the hat for the horns (3).

Insert the branched horns into the holes and secure everything with PVA glue (4)

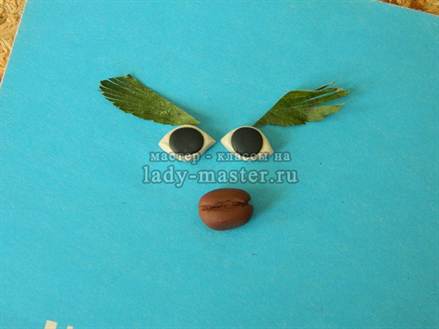
Using “Moment” glue, glue the sunflower seed ears (5).

Now we attach the head to the deer’s neck using a small ball of plasticine. And the proud deer is ready for a walk in our fairy forest.
Fox made of cones
To make a fox you need:
Fir cones of different sizes,
peanuts,
pistachio shells,
Beans,
Plasticine,
Glue "Moment".
Making a fox
Glue together a large fir cone (for the body) and another, smaller one (for the tail), with “Moment” glue. Place a piece of plasticine on the tip of the large cone to attach the head (1).
.jpg)
We will make the head from a small fir cone. The ears are made from the seeds of cones, and the nose is made from a bean and attached to the head with plasticine. We will make the eyes from plasticine and black beads (2).

We will make the upper legs from peanuts. And the lower ones are made from pistachio shells. Let's glue them to the fox's body. And the fox is ready (3).

You can make a squirrel in the same way, only you need to take smaller cones, and make all the legs from pistachio shells (we glue the legs from pistachio shells using plasticine).
Using these characters, using your imagination, you can put together a whole composition of a Fairytale Autumn Forest.
.jpg)
From one cone you can make a crow like this. You can see how to do it

A deer made from pine cones is a craft that anyone can easily make! Arm yourself with some old plasticine, grab an acorn, a couple of fir cones and a few thin branches, and get to work!
So, how to make a deer with your own hands from pine cones?


Using plasticine, we fasten a pair of fir cones at a slightly pointed angle. Using plasticine greatly simplifies the process, so this craft becomes accessible even to kids. At the same time, well-fixed parts will hold quite firmly, which opens up the possibility of participation in various exhibitions and competitions.

From the bottom of one cone we make plasticine fastenings for the legs. We just roll small plasticine lumps and stick them where the legs should be - two lumps in the front of the cone, opposite each other, and two lumps behind.

We insert pieces of a thin branch into these fastenings. It is advisable to saw the branch or cut it with a knife into equal fragments so that the cut is even. Then the deer will stand well on a hard surface. You can fix the figure on a solid base - for example, a piece of thick cardboard, using the same plasticine. Please note that the legs should not be too short or long; it is important to find the optimal proportion.

So, the legs have taken their rightful place, and we already have the silhouette of a deer drawn!

Using the same plasticine, we attach the head – an acorn – to the top cone. In the absence of an acorn, you can make a head from a small spruce cone, if you can find one, or sculpt it from plasticine. There are many other options - for example, find a pebble of a similar shape, a physalis nut and other natural materials. Can be used wooden bead or a small cut of a branch.

We decorate the head with beautiful branchy horns. You will have to work hard to find a suitable twig, but the result is worth it. You can assemble horns from several thin branches, fastening them with thread or the same plasticine.

We fix the horns with plasticine, and our forest prince is almost ready!

All that remains is to correct all the details and think about the design in which the craft will be presented. If desired, you can decorate the deer's chest with pieces of moss or a dry leaf to emphasize its nobility and beauty.

That's it! You learned how to make a deer from fir cones, building your work step by step. Using pine cones different sizes, you can make a whole family of deer, and you can also create a beautiful composition in which the deer will play a key role.
Yellow coins are falling from the branch... There is a whole treasure underfoot! This is golden autumn Gives leaves without counting.... Autumn treasure. I. PivovarovaIN autumn forest it smells of frosty freshness, and nature freezes in anticipation of the first cold weather. But autumn gives us not only gold coins. Look at your feet and you'll see plenty of craft material for your kids. Cones, maple seeds, acorns, sticks, twigs - collect, you will need all this. And now you are not afraid of rainy days - you and your baby have something to do.
Now let’s make a hedgehog and a deer from the collected gifts of nature.
The hedgehog is easy to create. Even kids can do it.
For a small prickly miracle we will need a larch cone (can be a pine one), ash seeds and plasticine.
Roll small balls of plasticine. We plant them on the edge of the ash seed. Then we fix the ball under the scale of the cone.

When the spines are made, we attach a plasticine muzzle to the hedgehog. We make eyes, nose and mouth.
This is the kind of hedgehog we got.

We've made a hedgehog, now let's make a deer.
Deer
For our noble friend you will need: an acorn, a fir cone, linden seeds, toothpicks and grape sprigs for the horns. Twigs from the forest are also suitable for horns.

We make legs with hooves from toothpicks and linden seeds.

We make a head from an acorn and grape branches. From a toothpick neck. Plasticine eyes for our future deer.

We assemble the deer: we attach the head, legs with hooves and tail to the fir cone. We make the tail from a linden seed and connect it to a fir cone with a toothpick.
Crafts and decorative elements made from natural materials are not uncommon in modern interiors and for modern needlewomen. In addition, in kindergartens and lower grades of school, such products are a mandatory topic in art lessons. Autumn crafts made from pine cones and other natural materials are indispensable participants in exhibitions.
This natural material widely available even in big cities. There is hardly a single park where pine trees do not grow, and in many courtyards you can find this tree.
First of all, all gifts of nature need to be washed with warm running water, getting rid of soil, leaves, pine needles, etc. It is best to use an old toothbrush and soda, especially if a child will participate in the subsequent making of the craft.
Cones are an interesting material, because even when working with old, dried-out specimens, you can influence their shape. Dry buds have a more fluffy, “spread out” appearance and are ready to release seeds. Closed ones are a little wetter and are more suitable for crafts. If you have only opened specimens at your disposal, then you can place them in warm water for a while, then they will close literally before your eyes. After they take the desired shape, the cones need to be removed and removed from excess moisture, and then soaked in wood glue for literally half a minute (to fix).
Additional materials for crafts
Cones are an excellent base material, but using them exclusively, the master’s capabilities will be very limited. What other materials can be used in combination with them?

Figurines made from cones for children
In the first autumn months, kindergartens and primary schools traditionally hold exhibitions under the common name “Gifts of Autumn”, etc. Crafts made from cones and leaves occupy a worthy place among the exhibits.
In order to make a swan, you will need:
- Fir cone;
- Plasticine white and red;
- Dried leaves: oak or maple, oblong;
- Two small black beads.
 Roll a sausage out of white plasticine: make one end thinner, the other a little thicker. Place the cone horizontally and attach the plasticine sausage with the thick side to the top of the cone. Give a bend - this is the swan's neck. From a small piece Make a beak with red plasticine and attach beaded eyes a little higher. Attach leaves to small pieces of plasticine on the sides of the cone, which will represent wings. The swan is ready.
A peacock is made in a similar way, only the cone can be a pine cone, and the plasticine must be green or blue.
Deer made of fir cones and acorns
To work you will need:
- Fir cones - 2 pieces per deer;
- Acorn for the muzzle;
- Plasticine or hot glue;
- Small branches of suitable shape for horns and legs. You can use matches for the legs.
 You need to choose a thicker cone for the body, attach it perpendicularly to it on a thick layer of brown plasticine, or glue a thinner one with hot glue. The acorn should be attached in the same way. Fir cones are slightly longer than pine cones, so they are perfect for this craft. Using plasticine or hot glue, attach the legs and check the structure for stability. Glue branches-horns to the head, draw eyes on the acorn with a felt-tip pen. The deer is ready!
Owl made of cones and felt
A small owl or even an owl family can be made quite simply with a child. To do this you will need:
- Pine cones;
- Felt yellow, black, white, brown colors;
- Scissors and cardboard templates - it is better to draw eyes and wings on paper in advance or use a ready-made template from the Internet;
- Glue gun and glue sticks.
 First stage. Cut out the necessary details from felt: a yellow or brown triangular beak, white eyes and black pupils, brown or yellow wings.
Second stage. Glue the eyes together - glue black circles to the white base. Place the cone on the base, and place the eyes on the opposite part of it and attach it. Attach a beak a little lower between the eyes. Glue the wings on the sides. The owl is ready!
Owls, squirrels and deer are good for kids who are preparing crafts for kindergarten or after-school activities. Crafts from pine cones for 1st grade should be a little more complex and interesting. Of course, a child is unlikely to get by without the help of an adult, but the effort will be justified.
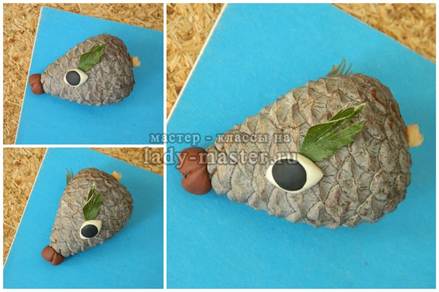
Small and big hedgehog
For a small hedgehog you will need:
- One bump;
- Gray or brown plasticine;
- Two black beads for eyes;
- Red and green plasticine for the apple on needles, black for the nose.
 You should stick a piece of gray or brown plasticine to the top of the cone and give it a slightly elongated shape, making a muzzle. Place a black ball on the tip - a spout. Attach bead eyes. Roll an apple out of red plasticine and place it on the hedgehog’s needles, attach a piece of green plasticine and a leaf to it. The hedgehog is ready.
Now let's try to do big hedgehogs in two versions. For the first you need:
- Plastic bottle with a capacity of no more than a liter;
- Glue gun and glue sticks for it;
- Cones;
- Black gouache;
- Brown paint in a can or a lot of brown plasticine;
- Leaves, decorative berries and small fake fruits.
 Paint the bottle with spray paint or cover it completely with brown or gray plasticine. Dry the paint, but if you chose the second option, then you can move on to the next step. Paint the tip of the nose (plug) with black gouache (or cover it with black plasticine).
Sort the material by size and fluffiness. Smaller and denser cones will go in the first two rows, the rest will be located further down. Glue the pine cones using hot glue. Glue leaves and decorative elements into the gaps formed between them. If you don’t have anything at hand, you can take a few pine cones apart into their components and fill in the gaps with them. The hedgehog is ready!
Second option:

Step-by-step manufacturing instructions:

Winter compositions: from simple to complex
With the onset of the first month of winter, almost all shops, salons and other public places they begin to decorate for the New Year. This creates an atmosphere of anticipation for the holiday, its anticipation and high spirits. People start decorating their houses and apartments for the holiday much later, however, you can prepare something interesting for this moment in advance.
Basket of cones
Many people receive so-called “baskets of happiness” as a gift - in a wicker basket, usually a bottle of champagne, fruit, sweets, etc. Or skin and hair care products. One way or another, the contents are used, and it’s a shame to throw away a beautiful, durable basket, but it’s not really needed in the house. Such a basket can be used by filling it with “winter mood”. To do this you will need:
- Gold and silver enamel in aerosols;
- Lots of bumps walnuts, several oranges or tangerines with thick peel;
- Battery-powered diode garland (preferably);
- Decorative elements: large plastic beads on one thread, small Christmas balls;
- Newspaper.
 Spread a newspaper on the balcony or landing, place cones, nuts, acorns, etc. on it. Cover them with a layer of paint from one can. After some time, turn the unpainted side up and paint with a second color. Leave to dry.
Using a knife, cut the peel off a tangerine or orange in a continuous spiral. Take the tip and twist it from the tail to the center with a tight twist. You will get a rose. Secure the tip with a needle or pin. Leave to dry. Eat citrus.
Place cones, nuts, etc. randomly into the basket. If you have a diode garland at your disposal, “mix” it with the contents of the basket. Place orange peel roses on top. The interior basket is ready. Such a thing not only helps to create New Year's atmosphere, but it will also be a wonderful decor for beautiful photographs.
Spruce paw wreath
For Catholics, Christmas is much more important than the New Year and they celebrate it with no less scope. There are many worldly traditions associated with Christmas, including the custom of hanging front door wreaths Making such a wreath is not that difficult. To do this you will need:
- Artificial spruce branches;
- Fir and pine cones;
- Decorative elements: beads, small Christmas balls;
- Foam base for wreath;
- Glue gun and sticks;
- Wide ribbons of green, red, gold, burgundy colors.
 Wrap the base of the wreath with ribbons of all colors alternately. Secure each turn with a drop of glue. Glue a loop on the back of the wreath on which it will hang on the door. Place spruce paws along the top part, bending the wire so that the circle is continuous and closed, but the interior of the wreath is not covered by branches.
Fix the branches in the chosen position with hot glue. Wrap a ribbon of the same color in a circle, grabbing each branch at least once. Apply tape.
Glue the cones onto hot glue, closing the gaps between the spruce branches. Arrange decorative elements along the wreath and glue them with hot glue. The wreath is ready!


