Origami doll is one of the most popular paper origami. If you don’t know how to make an origami doll, then on this page you will find everything you need to assemble this simple paper figurine.
In the first photo you can see what you will get if you follow the assembly diagram below. The second photo of the origami doll was taken by one of our site users. His doll turned out to be much more interesting, but assembling it is not so easy. If you have photos of origami you have collected, send them to: This email address is being protected from spambots. You must have JavaScript enabled to view it.

Assembly diagram
Below is a diagram of how to assemble an origami doll from the famous Japanese origami master Fumiaki Shingu. If you strictly follow the instructions, then assembling the origami doll will not take much time, and the result will be the same as in the picture. After doing what is described in the diagram several times, you will understand how to make an origami doll quickly and without looking at the diagram.

Video master class
Assembling an origami doll may seem like a daunting task for beginners. Therefore, we advise you to enter the query “origami doll video” on the largest video hosting site on the Internet, YouTube. There you will find a lot different videos about origami dolls, which clearly show the steps to assemble a doll. We hope that after watching the video of the assembly master class, you will have no more questions about how to make an origami doll.
This video lesson will teach you how to assemble an origami doll of a more interesting design:
And after watching this video, you can surprise many with an original paper doll:
Symbolism
There are dolls in almost all cultures. They were most often used as toys for children, but dolls have a range of symbolic meanings. For example, in many cultures a doll is a symbol of a transitional state. In many fairy tales, dolls played the role of guides between worlds or human states.
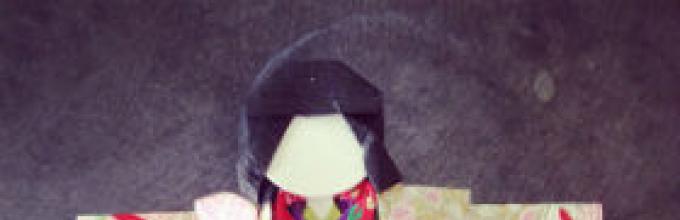
Bookmark paper dolls in Japan are called shiori ningyo, which means bookmark girl. Such dolls have another name - chiogami ningyo - paper doll. Such dolls are common in the Land of the Rising Sun among girls as bookmarks for books or for playing pretend to be their mother’s daughter. Having made such a traditional Japanese doll, you can stick it on a postcard or make a bookmark - it will be a great gift for a friend who is into anime. Traditionally, a Japanese paper doll is made without a face, just like our Russian one. rag-doll. In our master class we will show you how to make a simple Japanese paper doll and tell you which ones you can use for it.
How to make a Japanese paper doll Shiori (chiogami) ningyo.
Dimensions are given for a doll 8.5 cm.
Japanese paper doll girl - paper craft.
For this paper doll you will need the following materials:

- For the head - a circle of white cardboard with a diameter of 2 cm.
- For the neck - a rectangle of white cardboard 0.4x4cm
- We make the hair from black corrugated (crepe) paper - two rectangles 2x5cm and 2x1cm. Place strips of corrugated paper vertically (2cm) to imitate doll hair.
- Eri (kimano neck) – rectangle of colored paper 1.5x3cm
- Kimono – rectangle 6.5x6cm. It's best to use patterned matte origami paper, but you can cut colored squares from old magazines, use wrapping paper, or beautiful napkins. As an option, make a plain kimono for a doll from ordinary colored paper.
- Obi (belt) is a rectangle of plain paper 3x4.5 cm.
- The sleeves are a rectangle 8x3.5 cm. You can take the same paper as for the kimono, or you can make the doll’s sleeves in a different color.
- Glue - pencil
Step-by-step instructions for making a Japanese paper doll Shiori (Chiogami) Ningyo.
 Glue the doll's head to the neck.
  We put the eri (kimano neck) on the doll. Fold the eri strip in half along the long side. We put it on the back of the neck (you can glue it) and bend the sides forward at a slight angle.
We put a kimono on the doll. We bend a strip of kimono paper from the top (approximately 1.5 cm) to the wrong side.
  Flip the rectangle to front side and make another fold on top (approximately 0.5 cm)
We place the paper doll on the kimono in the center (you can glue it), so that the eri is visible a little.  We fold the kimono on the doll. There should be two folds on each side: we bend the first fold at an angle, the second we align the clothes so that the bottom of the doll forms a rectangle.
We put on the obi (belt).
 Fold the edges of the waistband towards the center.
 Place the belt on the doll and fold the edges back. If desired, you can use glue.
Making hair for a doll from corrugated paper.
 Place a rectangle of paper over the doll's face. Fold the exposed edges of the paper back. Use glue if necessary.
  Make a tail from the second rectangle by crumpling the bottom part.
 Glue the ponytail to your hair.
Making sleeves for a Japanese paper doll's kimono.
 Fold the edges on a strip of paper, you should get a narrow strip of paper in three folds.
 Glue the strip down the center back of the doll and fold the sides of the sleeves down.
As an option for decorating a paper doll's kimono: you can slightly bend the corner of the kimono. This option looks especially impressive if you used paper for the kimono. different colors on both sides.
To attach a string to it. On the other side of the string, hang a bead, tassel or rectangle of cardboard.
I still went to the Rumyantsevsky mansion (44 Angliyskaya embankment) to the exhibition “The World of Paper Dolls”. And I not only saw the exhibition itself, but literally miraculously got to attend a master class with Emiko Tanno...
My usual request to specialists: if you lied about something, correct it.
This post is dedicated to the paper doll exhibition.
Emiko Tanno is an outstanding origami master, a specialist in making products from Japanese traditional washi paper. Director and main ideological inspirer of the Sakura studio in the city of Morioka.
1980 – the beginning of the passion for the art of washi paper. Opening of an origami school.
1989-2001 – decorating the Kawatoku department store with washi paper dolls, designing calendars.
1993 – creation of the composition “Sansa Odori” - a dance to exorcise the devil (300 dolls).
1994 – creation of the composition “Seven traditional types produced by Iwate Prefecture." Kept in the museum of the Asabiraki sake factory.
1997 – production of a collection of dolls dedicated to the 400th anniversary of the city of Morioka (654 dolls)
1998 – creation of a collection of dolls in the form of traditional Japanese sweets (750 dolls), dedicated to the 23rd All-Japan Exhibition of Japanese Sweets.
1999 – creation of the composition “Pull-Pull Umakko” for the traditional horse parade of the city of Morioka (92 dolls)
2001 - creation of the compositions “Hanamikoshi” (festive procession), “Feast of the Four Seasons in the Town of Yonezawa”, “Opening of the Port in the City of Miyako” (for the 385th anniversary of the port of the city of Miyako), “Autumn Festival” (200 dolls)
2002 – creation of the composition “Making linens in the city of Yonezawa” - a story about the development of weaving in the city
2005 – creation of the composition “History of the Kunohe Fortress”, “Uprising in the Kunohe Fortress”
2007 – “The Tale of Kunohe Fortress” - exhibition of the collection in the Abehanko Gallery (1000 dolls)
2008 – creation of the composition “Diaries of the Holidays of the City of Ninohe” (800 dolls)
2009 – creation of the composition “Festive Chariots of the City of Morioka”
2010 – creation of the composition “The Feast of Sansa Odori in Morika is 30 years old”
I was very impressed by the titles of the compositions and the ideas themselves in general...
Here is the first composition that is presented in the Rumyantsev mansion:
This composition is associated with the four flowers of spring. Iris, narcissus... uh... sclerosis...

Origami and washi paper.


Here are other compositions.


These people appear to be performing a deer dance.

Large composition "The process of making urushi varnish in the city of Ninohe.
Here Emiko Tanno shows the craftsmen at each stage of the work: stripping the bark, soaking, etc.

Here's a closer look to see the details.

Here are the products made from this varnish. So that we can imagine how important the work of paper craftsmen is.

Multi-figure composition associated with the tea ceremony. Under each scene that the dolls show is a piece of paper with a drawing and an explanation of what stage of the tea ceremony the characters are at.


What looks like silk fabric is actually washi paper.


Chiogami ningyo means paper doll in Japanese. The first similar dolls in Japan began to be made back in the 12th century. Japanese girls used them to play daughters or as bookmarks. Traditionally, a Japanese paper doll did not have a face painted on it. In this master class we present probably the simplest version of a Japanese paper doll. Later you can make more complex versions of Japanese paper dolls or a paper doll on a toothpick. With such dolls it is interesting to make a postcard or bookmark. Get it interesting gift to a friend who is into anime. For a Japanese doll's kimono, it is better to take a special one shiny paper for origami with a pattern. But you can replace such paper with wrapping paper, just colored paper, cut out pieces from old magazines, or just take beautiful napkins.
How to make a simple Japanese paper doll. To make such a paper doll you will need:
For the head - a circle of white cardboard with a diameter of 2 cm
For the neck - a rectangle of white cardboard 0.4x4 cm
For a kimono - a right triangle with 12 cm legs. If you have double-sided paper (different colors on both sides), then you only need 1 triangle. If you have the colors you need different paper, then cut out 2 triangles, and then glue them together.
For a doll's belt – 3x2.5cm
For the hair, cut out two rectangles from corrugated black paper 3 (or 4) x 2.5 and 2 x 5. Please note that the stripes on corrugated (crepe) paper should be positioned vertically.
Making a simple Japanese paper doll Glue the circle - the doll's head and neck to each other.
  For the paper doll's kimono, glue together, if necessary, two triangles to each other. If you have paper of different colors on both sides, then this operation is not necessary.
  Bend the edge of the triangle (hypotenuse) to the front side by approximately 1 cm.
  We place the neck with the doll's head in the center of the triangle and glue it.
First we bend one left side to the right, then the other side.
Again we bend the right side towards the center.
Then we make the last fold on the kimono from left to right.  Making a belt. Fold the edges of the rectangle to the center line along the long side.
We put the belt between the folds of the kimono of a Japanese paper doll and glue it. If the belt is longer than necessary, cut off the excess.
Making hair for a Japanese doll out of paper. We glue a long piece of corrugated paper to the back of the doll's head.
We bend the protruding edges of the hair to the front side and glue it.
Place the second part of the hair on the front side and glue it.
We bend the excess edges to the wrong side, forming a round outline of the head.
You can decorate the doll by gluing a small bow, flower or butterfly to her hair.
We showed you how to make a Japanese paper doll with long hair, you can see other options for designing the hairstyle of a traditional Japanese paper doll.
How to make a bookmark with a traditional Japanese paper doll.
Shiori ningyo means "bookmark girl" in Japanese.  We attach a thread to the doll's head using glue or by piercing the doll's head with a needle.
  Make a knot on the other side of the thread, thread the bead through and make a tassel.
A simple paper doll is ready.
A ping pong ball, a sheet of bright paper, add a little imagination, and you will get an elegant doll using the technique modular origami. If you choose the right color and style of “clothing”, the craft will look beautiful in any interior. A cute face will always cheer you and your loved ones up. Such an origami paper doll - wonderful gift, into which you put a piece of your soul.
Required material:
- table tennis ball;
- thread;
- 1 toothpick;
- a small piece of paper for the eyes;
- a small sheet of paper for lips;
- yellow rectangle measuring 4x2 cm - 1 piece;
- yellow rectangles measuring 8x3 cm - 6 pieces;
- squares of colored paper 8x8 cm - 12 pieces;
- colored squares measuring 10x10 cm - 8 pieces;
- colored squares measuring 34x34 cm - 3 pieces.
1. The most important thing in making this doll is the module. For the module we need a colored square of the required size.

2. Make a “valley” fold, bending it with the colored side inward.
3. Bend it and fold it again, getting a second fold vertically.


5. Bend the opposite side in the same way.

6. Now you need to bend the square with the wrong side outward, and along the lines of the resulting bends, fold the “double square” figure.

7. After this, bend the corner from the resulting figure on the left or right side, flattening it.


8. Do the same actions with the following angles

9. Bend the corner of the part so that you get a diamond of the same color (only wrong side square).

10. Grasp one corner of the diamond and fold it towards the curve in the middle.

11. Do the same on the other side of the diamond.

12. Lower the top corner of the diamond as shown in the photo.

13. Perform operations of the same kind with the three remaining diamonds. You now have the basis for the module.

14. Carefully open it.

15. Place the resulting square with the outer (colored) side down, fold one part of the corner along the fold lines.

16. Fold the second corner in the same way. Did you succeed the first time? Then you are a real master origamist! Fold the remaining corners in the same way.

17. The module for the origami doll is ready!


18. Let’s move on to the actual production of origami dolls from modules “ young lady" To do this, make 3 modules from 34x34 cm squares.

19. From 8 squares measuring 10x10 cm, make modules-parts for the drape.

20. Thread them onto the thread, piercing them with a needle.


22. Glue three colored modules together. This is the basis of the dress. Glue the cape to it.

23. Then, from 4 squares 8x8 cm, make colored modules that will serve as the sleeves of the dress. They also need to be glued to the dress.
24. Take the yellow rectangles, cut them into thin strips of about 0.2 cm. Using a toothpick, curl the curls.
25. Make bangs from a yellow 4x2 cm rectangle.

26. After twisting all 6 pieces of hair, glue them to the ping pong ball.

27. All that remains is to glue on the bangs, and the lady’s hairstyle is ready.
28. Glue the head to the dress.

29. From 8 squares measuring 8x8 cm, similarly to the cape, make an elegant hat.


30. Cut out and glue the eyes and lips to the origami doll's face. When all the parts are dry, “Young Lady” is ready.
This is just one example of dolls from origami modules, but you can make an unlimited number of them, using only your imagination and desire. Inspiration to you!


