Carnival costume A wizard for a child is one of the easiest New Year's outfits to make; it consists of a simple robe with stars. In the master class, we replaced the usual wizard's cap with a pointed hood - it can always be removed, and it fits better on the head without hindering the child's movements. It will be possible to complement your child’s New Year’s image various accessories, which we’ll talk about at the end of the article, but for now let’s look at the process of creating its basis - a mantle with brilliant stars.
How to sew a wizard costume for a boy: step-by-step master class with photos
In order to make a wizard costume for the New Year we will need:
- The fabric is light blue or dark blue. The length of the fabric must be equal to the length of the product without a hood plus 12 cm and a width twice the length. For the hood you will need a rectangular piece of fabric measuring 80 by 40 cm;
- Threads in the color of the fabric and white - for processing the attachment of stars to the fabric;
- Foil.
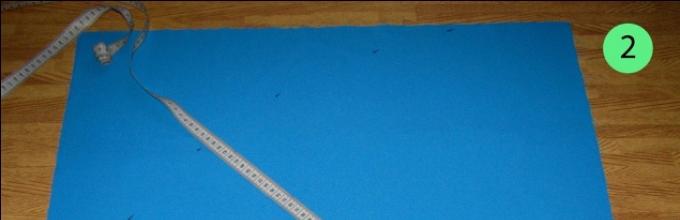
Fold the rectangle of fabric for the main part of the mantle in half front side inside. The sides of the resulting square should be equal to the length of the mantle plus 12 cm. Take this measurement, and, holding a centimeter at one end of the fold, make several outlines for the arc connecting two opposite corners.

Let's draw a smooth line connecting the outlines. Let's draw another one using the same principle, but using the 10 cm measure.

Cut the fabric along the marked lines and unfold it. This turned out to be the basis for our cloak. Let's try it on a child to correct the neckline.

Let's open the hood by folding the fabric right side inward and making a blank based on a rectangle with by the following parties: a) this is the height of the head (from the neck to the crown), b) half the length of the neck. With your free hand, draw the outline of the hood, making a pointed top.

Let's cut the blank and, having connected the hood and the base of the cloak along the neckline, we will process the sections.

Let's sew a loop and an interesting button to the mantle.

Now let's move on to the stars. To make them we need silver foil. In order for the stars to shine brighter, you need to slightly crumple it, then, smoothing out the folds, glue it left side tape to strengthen the material.

Let's cut out the stars different sizes: small and large.

Sew the stars to the mantle using a large zig zag stitch, using reverse for convenience.

If the foil has become a little dull during processing, a damp cloth, which is usually used to clean computer monitors or photographic equipment, will correct this. Just lightly wipe the star and it will shine again. Our mantle is ready!

You can complement the costume with a “magic wand” cut out of soft material and wrapped in foil. You can add a hoop to your costume with “ precious stone"on the head of the "wizard" and a wide shirt, secured with a belt under the mantle. On such a belt you can attach a bag with a “magic potion” - candies that have “wonderful properties” to bring joy.
Every children's party accompanied by bright carnival costumes. One of the popular ones is the wizard costume, which is suitable for both boys and girls. In most cases, the price of such products is too high, which can negatively affect the family budget. With a little ingenuity and imagination, the costume is easy to make yourself.
We'll tell you how to make such a costume with your own hands.
Costume for girls
Good fairies and sorceresses are the favorite heroes of little girls. To create a suitable look, a light flowing dress or full skirt with top.
Materials
To make a sorceress dress you will need the following materials:
- tulle (colors depend on personal preferences);
- rubber;
- threads;
- needle;
- scissors;
- satin ribbon in a bright shade.
Getting the job done 
Using an elastic band, measure the child’s waist and cut it off. Sew both ends of the elastic on sewing machine or manually. We cut out ribbons from tulle. The length of each ribbon should be multiplied by 2. Fold each ribbon in half and thread the ends through the resulting loop. Within a few minutes the skirt will be ready.
We tie it on a belt light satin ribbon bow.
To decorate the skirt, small artificial flowers are suitable, which are attached to the material with glue..
As a top, you can use a top or a bright T-shirt, decorated with artificial flowers, rhinestones, tinsel or satin.
Reference: you can use ribbons to make a skirt different lengths. Such a product will stand out with its original appearance.
Boy's suit 
Good stories about wizards and magicians are especially loved by young defenders. For a carnival outfit, you can choose a wizard costume, which is easy to make yourself.
Materials
The wizard costume will require you to prepare the following:
- satin fabric;
- braid;
- decorative stars of different colors and sizes;
- scissors;
- threads;
- needle;
- glue;
- sewing meter;
- a pencil pin or a piece of chalk;
- sewing machine.
Sew a magic robe 
The main attribute of every wizard is the robe. For sewing it use satin fabric.
- Using a sewing meter, measure the required length from neck to toe. Fold the material in half, mark a semicircle and cut it out.
Reference: Don't forget about the neck slit.
- We sew a beautiful braid along the edges. In the throat area, the strip should remain long so that it is easy to tie.
- We place stars in a chaotic manner over the entire area of the finished mantle.. They can be attached using glue or thread and needle.
The mantle is ready.
Advice: the bottom of the trousers can be complemented with lace, the neck of the shirt with a lush bow.
Wizard Costume Attributes 
The main companions of every wizard are a hat and wand, the fairy has a flower headband, wings and a wand.
Materials:
- wooden stick;
- cardboard;
- glue;
- scissors;
- wide elastic band;
- threads;
- needle;
- tulle;
- metallized paper;
- artificial flowers;
- decorative stars.
Wand
Suitable for creating a magic symbol small wooden stick. Let's wrap it up metallized paper, secure with glue. Rhinestones, a knob in the shape of a star or a small figurine are suitable as decoration. Both boys and girls will like this stick.
Reference: You can also purchase a plastic wand from a gift shop.
Cap
An indispensable element of a boy's suit. We roll up a tall cap from cardboard and fasten the edges with glue. We attach an elastic band above the ears to secure the headdress.
For decoration, you can paste over the cap satin fabric, decorated with stars.
Fairy wings 
Wings for girls are also made from cardboard. We cut out the blanks and attach the halves with glue. The elastic band acts as a fastener on the shoulders. It can be attached to the wings using a stapler. Tulle is glued onto the wings themselves to match the skirt or another shade.
Attention: wings can be decorated with rhinestones different shades and sizes that are attached with glue.
An unnecessary wide accessory or a wide elastic band is suitable as a headband. We measure the circumference of the child's head and sew the edges. We cut artificial flowers from the stem and attach them to an elastic band using glue.
Costumes for boys and girls are ready. The outfit for an adult is made in the same way, only the sizes of the clothes change.
Useful tips 
- A boy's suit can be complemented with an artificial white beard. Then the child will look like the famous wizard Merlin.
- The cone hat is suitable for both boys and girls. In a girl's outfit, it will replace a floral headband.
- A tulle skirt for a girl can be made from material of different shades. Such a product will look brighter and more original.
- A festive dress can be used as a costume for a young sorceress. We decorate it with several tulle ribbons, bright artificial feathers and wings.
Every child perceives the holiday as something magical and fabulous. Colorful costumes and bright decorations add a special atmosphere. A wizard costume, sewn and made with his own hands, will help every child feel like a real wizard at the holiday. Don't forget to take a photo of the wizard as a souvenir!
The New Year's wizard costume is a universal outfit, suitable for both carnivals and theatrical performances and themed matinees. Image recognition and spectacular appearance The costume is provided with three simple attributes: a hat and a magic wand.
Wizard's Cloak
The most important element of the costume, which will take the most time to make, is the cape. To make the raincoat look most colorful and expressive, it is recommended to use bright, shiny fabric: large scraps of satin, rayon, satin, tricotine or fabrics with lurex, shiny coating.
The fabric is folded in half, the lower edges are smoothly rounded, and a small cutout is made in the upper corner for the neck of the cloak. The edge is folded and stitched, after which it is trimmed with decorative shiny braid. The neck of the cloak is also treated with braid and long ties are sewn on, which will hold the cloak on the wizard's shoulders. Multi-colored patterns can be sewn across the entire surface of the cape. shiny stars or embroider it with sequin patterns.
Wizard hat
As a headdress you can make either wide-brimmed hat, or a high cap. The hat is made from thick but flexible cardboard: a circle equal to the width of the hat is drawn, a circle is cut out in the center, the diameter of which corresponds to the circumference of the child’s head. A cardboard strip is glued to the base of the hat, the length of which is equal to the circumference of the head, the height is optional. The bottom is glued on top of the crown of the hat. After the glue has dried, the finished hat can be painted in the desired color and decorated with a shiny buckle, sparkles, and stars.
It's even easier to make a wizard's hat: on a sheet thick paper draw a circle whose radius corresponds to the height of the future cap. If you plan to make a cap with a brim, then you will need another circle - draw it, 10-15 centimeters away from the first circle, after which both parts are cut out.
One side of the smaller circle is cut along a line drawn from the edge to its center and rolled into a cone, fixing the junction with glue or tape. Small cuts are made along the edges of the cap, the paper is folded up and the margins are glued. The finished cap is covered with fabric in the color of the cloak or painted, decorated with braid, beads or various pendants.
Wand
To make a magic wand, straight tree branches, Chinese cooking sticks, etc. are suitable. An even, smooth stick is painted with gold paint or tightly wrapped in shiny fabric, foil, gift wrapping paper and secured with glue or transparent adhesive tape. The head of the wand is made in the shape of a star from cardboard or thin tin; glitter is glued along the entire length of the wand or painted with “magic” patterns.
Holidays are a time when mothers have the opportunity to express their creativity. But where do you get all the time, money, ideas for this, and how to make a fairy costume for a girl with your own hands in an hour?
We offer you 3 detailed instructions for creating fairy costumes. Here is everything, where to buy from and what, as well as how to put it all together.
All you have to do is apply all this at home together with your daughter to create the costume she dreamed of.
Who did she dream about? Fairies Winx or Tinkerbell or just fairies?
Imagine how your daughter will make a splash by coming in an unusual costume that will simply blow everyone away and, perhaps, she will become the winner in the competition for the best costume.
Prepare a pen and paper, let's begin the magical transition from dream to reality, you need a little patience and time to create it.
 Cartoon lovers will be looking for a DIY Tinker Bell fairy costume (photo) to make for their princess.
This costume does not have a strict age limit, so schoolgirls and kindergarten visitors can try it on.
It's green short dress strapless, slippers with white pompoms on the front, also green.
She also has transparent wings - 4 pieces and a bun hairstyle made of wheat-colored hair.
She is all glowing with magic.
What can mothers do for girls?
- To understand what is most important and beautiful in the opinion of its owner in a suit: a dress, wings, a crown or a magic wand - you need to emphasize it by focusing on it.
- Perhaps your girl wants to be different, for example a forest fairy or a Winx fairy.
- Then the costume version will be different. To do this, look at the photo of the heroine and work on a new costume.
We approve the image and costume with the main person. Ask her what she really wants to be?
And only then, depending on the answer, select suitable ideas. To do this, draw or show an approximate version of the costume.
Selecting a wardrobe
A fairy costume may consist of:
- dresses or blouses with a skirt;
- wings;
- crowns optional;
- gloves;
- magic wand;
- shoes;
- tights or knee socks;
- accessories (handbags, earrings, neck jewelry, bracelets)
Which is better, a dress or a skirt?
 If you already have a dress and your choice is on it, then we will decorate it.
If there is nothing to wear, then the most quick option without sewing - this is a Tutsi tutu skirt detailed master- to the class here.
In the process of choosing organza, it is not necessary to purchase it in a single color; 2-3 tones of green or blue will look more advantageous, choose to your taste, cut their edges obliquely and of different lengths.
This is how you make a skirt with extensions on the sides or how you tie the seams.
How to make the top of a dress or blouse?
We are doing an inspection of the house, a top or a piece of mesh will do. This can be a top or knitted mesh, or a ready-made mesh, this is sold in sewing stores, see the photo.
In this case, we take a wider organza, or cut longer strips, do not forget that you will fold them in half.
Look at the photo to see how such a skirt will look. Please note that it will be fluffy and bell-like, so you will definitely need a belt.
Wings

Here you need to determine the goal and possibilities, if you quickly and want to immediately see the finished result - then this is the purchase of those in the photo or similar ones, there is 1 evening for a costume - then consider exclusive wings in your pocket, in this case everything will depend on you .
Which wings to choose and make for your daughter should be determined by her wishes and other details of the costume.
Wings made of plastic
You will need: a piece of transparent plastic, 1 mm thick (you can buy it in workshops where they do advertising), for a pattern in A1 format or newspaper, a hot gun for decorating the wings, as well as sequin thread to match the dress, transparent straps.
- Draw wings of the desired size and style; wings tapered upwards look more impressive.
- Provide a middle part on the pattern that will be hidden in the dress or behind the belt, i.e. such a tail on the wings.
- We put polyethylene on top and apply the design and the shape itself to it.
- Cut according to the marked edge.
- Decorate with a glue gun and sequin thread. We recommend choosing light green thread color to blend perfectly with green dress Tinker Bell fairies.
- We make 3 holes in the middle so that the straps can be threaded through, and also provide a place on the front of the clothing where they will be attached.
- The wings are ready, you need to let them dry.
- It is important to make a pocket in the back where the wings will be inserted.
Completely finished suit in 1 hour
- Tutu skirt.
- Cape - dress.
- Wings.
- Shoes.
- Decorations.
We will need:
for a cape - a dress - a satin cut, where the radius of the circle is the desired length of the dress.
Cape - dress
- For the cape, take green satin fabric - 1 by 1 meter and fold this square in half and in half again and cut off the bottom so that you get an arc. It turns out to be a quarter circle.
- Take the T-shirt and attach it to the corner, folded in half - this is the neck of the future dress, using chalk or soap, measure the size of the neckline, as in the photo.
- On the second side, turning the T-shirt horizontally, mark the location of the sleeve cutout.
- Using the marked measurements, we make a semicircle for the neck and sleeves. Let's cut them out.
- We draw petals along the bottom of the semicircle of the dress so that there are so many of them without halves, or we draw half a petal on the side, but cut off not half.
- We glue the bottom of the dress with a thread of sequins; for a green dress we take golden or yellow ones. We glue it well so that the bottom of the fabric does not fray.
- We decorate the neckline by cutting off a strip of tulle and gathering it into strings; it should look like rain. Glue it onto the fabric around the neck, press it with your finger and hold it so that it grabs.
Tulle skirt
Take an elastic line and for a girl 3 - 4 years old - 3 meters of light green tulle or yellow.
Cut the tulle into strips and collect these ribbons on a needle with an elastic band. It should be a fluffy skirt. When everything is assembled on the fishing line, tie a knot so that your daughter can put it on.
For wings
Required: aluminum wire covered with insulation - 4 m, masking tape - 5 cm, glue, tulle, elastic bands - 50 cm for attaching the wings..
- It is important to try on the size of the wings so that they do not turn out too big or too small. The guideline could be a piece of paper.
-
We make them according to the desired shape, for example, triangles. Important to do top part 2 wings, and then the lower one.
Ask your future fairy or butterfly for advice, what kind does she want?
- Cut out a shape for the wings from tulle, making allowances of 1-2 cm so that it is easy to wrap around the wire and glue.
- Connect the parts of the wings with glue and press, when dry, wrap with masking tape.
- We trim it with tulle braid.
- At the junction of the wings we glue elastic bands on which our wings will be held. The harnesses must be firmly glued.
- We make another tulle braid to glue around the perimeter of all the wings.
Belt
Satin ribbon 5 cm - yellow. We make flowers from fabric or buy ready-made ones and glue them to the belt.
Make a hairpin in the same way.
Shoes
We choose green felt, thickness - 3 mm, size A3.
- We take the child’s foot and trace either the insole of the shoe and apply it to the material, tracing the patterns. Be sure to allow an allowance of 0.5 cm from the edge. Strip height 5 cm.
- Measure the perimeter of the resulting part, make an overlap of 5 cm.
- Before sewing, we lay it out and the overlap should be about 4-5 cm. We sew the slippers after trying them on the child, pinning them in front of the pin.
- Sew the sides of the slipper with a slip stitch.
Make a pompom from threads
- Cut half a disk out of paper, then lay a thread inside the arc - this is for collecting.
- Wrap threads around it white. Tie the bottom thread so that the threads do not fall out; the more threads are wound, the more magnificent the pom-pom.
- Cut along the edge, the side of the threads. Cut off the protruding threads of the pom pom. We thread the remaining thread into a needle and stitch the overlap of the slippers.
- Trim off excess threads.
We decorate existing shoes or sandals with butterflies cut out of paper or made from a plastic bottle.
Headdress
Tinker Bell does not have any headdress, but you can make your own, for example, take a light hat and add organza to match the dress and a flower or leaf.
Crown or tiara
If you decide that you will have one, then here you will find many options for making it. From plastic bottle to the beaded version.
And this article describes in detail how you can crochet a crown and attach it to a hoop or hairpin.
If you choose a bun as your hairstyle, then put a crown around it crocheted from threads to match the dress or gold, like pollen from the Tinker Bell fairy.
How to do a hairstyle like the Tinker Bell fairy
This hairstyle will suit hair medium length or long.
- Tie high ponytail, put a hair donut on it, if you don’t have one, cut off the end of the sock, roll it up and put it on your tail in the same way.
- Spread all the hair over the donut, covering everything empty seats. Then put an elastic band on the base and, turning the edges in a circle, secure with pins.
- Fairy hairstyle is ready!
Video on creating a bagel, hairstyle like the Tinker Bell fairy:
Fairy costume
For the skirt: 5 meters of tulle, thick enough to hang down, elastic 4-5 cm wide (elastic for panties will not work). 
- Measure the size of the elastic equal to your baby's waist. Sew it together with thread rather than tying the ends. Place on the back of a chair.
- Cut the tulle into pieces 20 cm wide, because... the tulle itself is usually 1.5 meters.
- We tie it with a double knot with an elastic band. If you have chosen 2 colors, then alternate them. It is important to tie the tulle so that it does not tighten the elastic, but is simply tied.
- Cover the entire elastic band with tulle knots.
- We continue this way until we run out of scraps.
Fairy crown
You will need: a plastic hoop, tulle scraps, rhinestones, beads, seed beads.
Tie the remaining tulle onto the hoop, select pieces 20 by 10 cm.
Decorate the base of the crown, at the place of attachment, with rhinestones, beads, beads. Glue with a hot glue gun or glue moment or sew.
Beaded crown
Required: wire, beads, beads, rhinestones.
- We fold the wire into a ring of the desired size. We string the required number of beads on it, taking into account the desired size and pattern. Twist it into a ring.
- We measure out segments equal to the height of the crown, only 2e more.
- We fold these pieces in half, put a bead in the middle and twist the wire.
- Then we put beads on the legs, alternating the desired pattern or colors. Finished item We attach crowns to our circle. We fill the inner part with beads on a wire, wrapping it around the leg.
Wand
We make a magic wand from felt, sushi sticks and beads.
Cut out a star from felt or baize, put a smaller one in a contrasting color inside, and sew it on.
We sew beads along the perimeter of the star and fasten the edges of the star, stuff it with cotton wool and glue it to a sushi stick.
If you are interested in a DIY fairy costume for a girl on YouTube, then watch this video:
Wings like the Winx fairy
- Make a wire frame, 2 upper wings and 2 lower ones. We wrap the fastening points with electrical tape or tape.
- Glue white fabric to the wings. Having cut along the contour, leaving an allowance of up to 1 cm, we sew it around the wings.
- Draw the outline of the pattern onto the fabric with a pencil.
- Then we heat up the wax and apply along the contour of the design + spray so that the contour does not spread. We apply it in places where there will be glare and white colors. Let it dry.
- First moisten the cloth with water. We decorate the wings with acrylic paints or on fabric. Let the paint dry.
- Lay newspapers under the dried wings and on top in several layers. Iron them with a hot iron on top of the newspapers - this will remove all the wax.
- We paint unfilled areas with white paint.
- We fasten all 4 wings together and sew fastenings from underwear elastic.
Video master class on making Winx fairy wings - Stella
Bloom from Winx
What does Bloom's fairy costume consist of: skirt, blouse, mittens or armbands, wig and wings, shoes and knee socks.
Wings taken from ready set, so almost no time was spent on them.
Now you have a few ideas on how to make a fairy costume for a girl with your own hands, it’s time to buy everything necessary materials and go after them.
Prepare a scarf, round knitted hat and a feather - we will make a turban from them. Use a bird's or paper feather. Cape, trousers made of lining fabric. Shoes made of lining fabric, lined with non-woven fabric on an adhesive basis (this way they will keep their shape better). A mask - made of paper, a veil from old stockings or a curtain, or maybe a piece of guipure.
1. Make a turban:
put on a hat, throw a scarf on top, positioning it so that the obtuse angle of the triangle is in the middle of the forehead. Tie a knot (Figure 1b). To give the turban its shape, place cotton wool or padding polyester, or parallon on the top and sides of the head (Fig. 1b). Tuck the ends of the scarf under the turban (Fig. 1c)
Fold the two paper parts of the feather (Fig. 1d), after stretching the wire between them and glue them together. Color the feather in bright colors. When dry, cut out the fringe along the edges and tuck the feather into the knot of the turban (Fig. 1)
2. Cloak.
Fold the fabric for the cloak in half to make it easier to cut out the bottom and neckline. Sew the braid along the neckline. The month and stars can be drawn or cut out of foil and glued.
3. Shoes
To keep the shape of the shoe fabric, duplicate it with non-woven fabric with an adhesive base. The voids in finished shoes are filled with cotton wool or synthetic padding.


