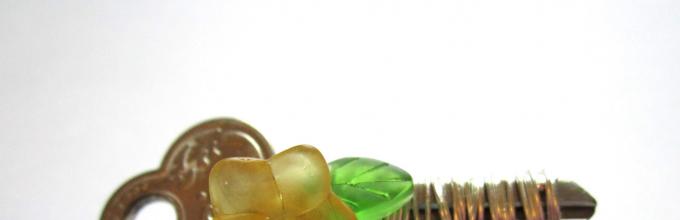
Where should I put the old key? Many will suggest simply throwing it away, or hiding it in a distant drawer, so that after the audit, after some time, they will still throw it away. And we suggest you use it to make a chic brooch from beads and have prepared a master class for this purpose. This will be a very original, unique and interesting decoration.
Tools and materials Time: 30 minutes Difficulty: 2/10
- one small key;
- beads, beads of various shapes and sizes;
- brooch base (the simplest);
- wire for working with beads.
Step-by-step operating instructions
To create this original brooch made of Klyuchik beads, absolutely all available means and leftover beads and beads will be useful.

To work you will need the following materials:

Step 1: secure the base with a pin
It's very simple. Initially, we need to somehow secure the base with a pin on our key. Of course, this can be done with glue, but the key itself is heavy, and the brooch may not fall apart into its components in time.
To prevent the beaded brooch from falling apart, we will tie it with wire. There is no need to cut a piece from a common skein of wire yet. Simply secure the end to the edge of the key with a few turns.


Step 2: winding the wire
Now we place the base on the leg of the key and begin to wind it slowly. In this case, it is better to unfasten the pin to make it more convenient to form turns. And be careful with the tip, otherwise injuries cannot be avoided.
We wind it tightly, the turns should be as close as possible closer friend to a friend. And in the end, we do not cut the wire near the key, but leave a small piece free, after which we cut directly from the skein.


Step 3: weave beads
Now any beads and beads that you have will be used. Texture, shape and color are not important.


You simply string a bead or seed beads (you can even have several, depending on the size of the key and the beads themselves), and secure it to the brooch with one or a couple of turns. In this way we design either the entire leg of the key or its upper part. At the end, the excess wire is cut off, and the tip is hidden among the turns. If you are afraid that a sharp cut may damage your clothing, then treat it with regular sandpaper. Then it will become smooth and will not be able to scratch any material.

Just a few simple manipulations in accordance with our master class - and the Key bead brooch is ready.
And for inspiration for future creations, we invite you to look at our section. We are always glad to see you as a guest on our website. We are trying for you and will be glad to hear your opinion in the comments to the article!
Beads are a truly unique material for creativity. You can use it to make a simple bauble or stunning interior items. And if you approach the creation of beaded crafts with your soul, and even apply a little imagination, you can create an exclusive item that will delight the eye and warm the soul. And you can decorate not only yourself, but also your favorite phone, keys, handbag.
So, let's talk about keychains. Of course, you can just buy them... But purchased items will not be unique, no matter how much they cost. This is the secret of the popularity of hand-made accessories. Handmade beaded keychains will cost you pennies, but they will bring you much more joy than factory stamped items.

How to make an “Orange Slice” keychain from beads with your own hands
The master class presented below is quite simple, and detailed descriptions and photos will help even a novice craftswoman cope with this task. So, step one is to prepare the material necessary for the work.

What is needed to weave a keychain?
Beads in dark orange, white and light orange colors
Monofilament (this is a cross between regular thread and the finest fishing line; can be purchased at craft stores)
Bead needle (very, very thin so that the beads can easily slip through the eye; also sold in handicraft shops)
A cotton pad or piece of cotton wool as a “filler” for the keychain
Small metal ring and cord pendant (worth looking for in hardware stores)
Now you can start creating a beaded keychain with your own hands.
Weaving pattern for the first three rows
Cut about a meter of monofilament thread and string six white beads onto it. Pass a needle with a thread threaded through it into the first of the strung beads along the weaving path so that you get a ring.
Then comes the turn of light orange beads. The second row is woven like this: string one bead, thread the needle through the second white bead in the “ring,” string another orange one, thread the needle through the third bead in the “ring” - and so on. This row should consist of seven beads.
In the third row there will again be white beads. They should be woven between the light orange ones according to the pattern of the second row.

Weaving pattern for all other rows
On the fourth row the number of beads increases: instead of seven there are fourteen. The weaving pattern remains the same as in the second and third rows, but the beads need to be woven two at a time.
The next stripe alternates white and orange beads. They are woven again one at a time according to this principle: the orange ones are attached to the orange ones, and the white ones, accordingly, need to be woven over the white ones.
In the next row, the principle of weaving beads one at a time is maintained. Only orange beads are used. They should be attached strictly above those of the same color.
The next four stripes are woven in the same way as the previous three pieces. Next are a couple of rows of white beads without additions or omissions.
After this, dark orange beads come into play. The first dark row must be woven, making additions on every third bead, that is, according to scheme 1 - 1-2. The next two stripes are made without additives. The result should look something like this.

The final row needs to be woven from only one side, folding the orange slice in half before weaving. When the last row is woven, you should cut the cotton pad to a size slightly smaller than the product and put it inside the slice.

The edges of the fabric need to be sewn with a brick stitch. The final touch is to attach a loop. Its place is in the corner of the slice where the weaving ended. Important: before attaching the loop, you should thread the prepared fittings into it, that is, a ring and a ribbon that will help attach the keychain to your phone or handbag.
That's all for the question “how to make a keychain orange slice from beads with your own hands.” The product is ready, you can attach it wherever your heart desires - and enjoy the unique accessory.
This kind of keychain can be not only “orange”, but also slices of other fruits. To get, for example, a slice of apple or watermelon, you just need to change the design - the pattern remains the same.

How to make simple bead keychains with your own hands
Bee
The simplest bead charms, which you can easily and quickly make with your own hands, are made with transverse or honeycomb weaving. For example, you can consider a scheme for creating a funny striped bee.
It looks like this:

The product must be completed moving according to the pattern from bottom to top.
IN starting row There is only one bead. It needs to be threaded through a special wire (can be bought at craft stores) and placed in the middle. After this, thread the wire again in a different direction.
From the third to the sixth row you need to weave according to the pattern, not forgetting to monitor the ideal tension of the thread or wire so that the product does not sag or hunch.
On the seventh row, bee wings are performed. This is done like this: eight black beads are strung on each end of the wire, and a ring is made from them (the wire is threaded through the first one).
These kinds of schemes are uniquely simple. They are great for getting people interested in beadwork. After all, having finished the “bee”, you can create many more funny figures using similar patterns.

And even if the first beaded keychains you make yourself will be slightly crooked, and with mistakes here and there, this is not too important. Because mastery in any business comes with experience. And if a novice craftswoman really wants to, she can create unique things from beads.
Evgenia Smirnova
To send light into the depths of the human heart - this is the purpose of the artist
Beadwork is an art that has won the hearts of many needlewomen. Once you learn the craft, you can make all kinds of beautiful products. It's amazing to see an accessory made with my own hands, especially as exclusive gift. Even a beaded keychain can become a memorable one for your loved one if it is made with soul.
How to make a keychain with your own hands

Having everything you need at hand, you can make jewelry of any complexity. On the Internet you can find countless descriptions of any technique for making flat or three-dimensional keychains. Before starting work, craftswomen need to arm themselves with all the tools and materials. You will need:
- Beads of various shapes, colors, sizes, materials. Thanks to their diversity, you can make picturesque keychains from beads that will amaze with their uniqueness.
- Fishing line, strong thread, flexible wire, elastic band. In addition, you will need fasteners, snakes, buttons, chains, cufflinks, and a carabiner.
- A set of thin needles, scissors, tweezers, special pliers, a saucer, a ruler, a piece of fabric on which the beads will not slip.
Beaded figurines for beginners

It will be fun to weave beaded keychains for the littlest dreamers. True, you will initially have to use simple circuits. Once they get the hang of it, craftsmen will be able to come up with their own patterns and beading techniques. The main thing is not to discourage! To do this, you need to have it already on the table, if possible. finished craft And multi-colored scheme With step by step description. Then the child will be interested in doing everything from the beginning and showing his parents his master class. The simplest figures will be:
- looped flat butterflies;
- snakes;
- flowers;
- Sun;
- animal physiognomies.
How to weave a keychain
Learning how to make beaded accessories is not too difficult. The main thing is patience and attentiveness. After a while, everyone will be able to make keychains with their own hands. Crafts will not only decorate your handbag, but will also become an unforgettable souvenir for your friend. When deciding on a scheme, be confident in your abilities, but be sure to prepare your workspace. With good lighting, a clear schematic image and a great mood, you will definitely succeed.
For keys

How to make a keychain from beads? It's simple if you already know what will decorate your keychain. For example, it could be a flower, a large handbag, a beaded bow, an orange slice, a ball, a snake. Will help you make your choice detailed instructions weaving starfish from beads of two colors:
- We string 5 beads onto the fishing line and close the ring.
- We add beads one at a time, and at the end we thread the needle through 2 beads. You should visually get a star.
- We make the third row according to the same principle, but we already string two beads.
- Making star rays! We attach two beads in turn, then one, and so on until the circle is closed.
- In the fifth row, where the rays are, there will be 2 beads, and between them - one after another.
- We repeat everything according to the scheme, lengthening the rays (up to 6 pairs of beads) and adding peas between them according to the same principle.
- In the last row in a circle we add one bead at a time, making the rays pointed.
- We put the accessory on a metal chain with a ring.
For mobile phone

To transform things that you always have at hand, it is better to make keychains from colored material. These could be zodiac signs, different animals, berries, spiders. For beginning craftsmen, it will be easier to focus their attention on accessories made in one row. For example, you can take as a basis the instructions for weaving the “Orange Slice” keychain:
- We put 7 white beads on the fishing line. We make a loop by connecting the threads through the last piece of glass.
- We do the 2nd orange and 3rd white row like this: weave another one through one ball.
- Next, 2 peas are strung in a circle through each glass of the previous row.
- The next level is created again one ball at a time.
- Then two orange pieces of glass and one white piece alternate. The latter should coincide with the line of division of the lobules.
- Then we do everything according to the same principle, focusing on the two previous steps.
- Through 3 levels, 4 orange beads are woven between white beads. If desired, you can lengthen each slice in the same way.
- We add white beads around the circumference in two rows, and then complete the making of the keychain with orange beads.
Heart

Making heart keychains is easier than you think! You can present such a delicate souvenir to your boyfriend or girlfriend, who will be delighted with the handmade gift. If you want to give the figure volume, then the bead product can be sewn to padding polyester. Instructions for creating a keychain:
- We put 3 red balls on the fishing line. Make a loop by threading the thread through the first two beads again. This straight brick technique is simple, making it easy to weave the heart.
- We will braid 2 more balls, threading the fishing line through the two previous beads. We secure the workpiece by passing the needle through the last piece of glass.
- We take the next ball and thread the thread under the same loop. Then we pass it through the beads again.
- Next, we weave 2 pieces of glass at once into one loop of the previous level, and two pieces alternately into the other. It turns out that there are only 4 elements of this row.
- Using the same principle, we make subsequent levels, each time increasing the subsequent loop by one bead. Subsequently, you should get 6 balls on one line.
- We string 5 beads and, skipping one loop of the row, insert the thread into the 3rd piece of glass from the edge.
- We do the same procedure again, only on the opposite side.
- To make the keychains without holes, we string one bead on a thread and close the gaps.
- At the end, we pass the fishing line around the entire perimeter of the heart. We make a decorative loop from the balls and attach a carabiner.
For men
If you want to impress young people, then make keychains from beads. This spectacular accessory will look impressive on both mobile phone, and with car keys. As a basis, you can take a bead weaving pattern for a guitar, a keychain with a car emblem, a cube, a dollar, or a tire. As an example, you can read the brief instructions for creating a very simple “Horseshoe” keychain:
- We make a square of 4 beads. We string them onto the middle of the wire and close the ring.
- We put 1 and 2 beads on both sides of the thread. We make a closed circle again, securing the chain through the last ball.
- We do this until the flagellum is the desired length. Use pliers to secure the ends of the wire.
- Give the product a horseshoe shape.
New Year's keychains

Beaded keychains with do-it-yourself weaving patterns (photo)
Once upon a time, key chains were used to decorate only key rings. And now this one fashion accessory can be found everywhere. Keychains decorate our bags and wallets. They are hung on phones and even on trousers and jackets. In addition, it is not at all difficult to make a keychain with your own hands. They are created from fabric, felt, clay and anything that falls into the skilled hands of a craftswoman. After all, in addition to being beautiful, creating a keychain helps to use up those materials that would seem to be of no use. Beaded keychains are especially popular among needlewomen, both experienced and beginners. These small products are stunningly beautiful, and a minimum of materials are used to weave them. The patterns used to weave beaded keychains are simple and quite varied.
You can use absolutely any technique for weaving. A beaded keychain can be flat or voluminous. It may consist of one part, or it may be assembled from several elements. Such a cute product, which is easy to make with your own hands, will become a wonderful gift for friends and acquaintances. 


Beaded keychain “Smart Apple”
Beaded charms, which consist of several similar parts, are absolutely simple even for beginning craftswomen. Created for weaving various schemes, on almost any topic. And using such schemes is not at all difficult. Let's look at weaving such a beaded keychain using the example of a green apple.
To create it, the following schemes are used: 
The “Smart Apple” bead keychain is woven with brick weave according to the diagram. At the end of the first half you can stop. Or you can weave another one using the same weaving technique. And connect both halves together.
If you want to make a flat beaded keychain from one piece, then use wire to weave it. Then it will be denser. But if you still make an apple from two parts, then it is better to make it using fishing line.
We start weaving each apple half from the middle. In order to detect it, conditionally divide the diagram with a vertical line. After dialing required quantity We weave the beads using the brick technique until the end. And then attach a new piece of fishing line and weave in the same way, but in the other direction. The other half needs to be done the same way. The pattern is simple even for beginning craftswomen. 
After both parts are completed, they need to be sewn together through beads located along the edge. Lightly stuff the apple with any filling to give it a convex shape. 
Attach the ring to the stem of an apple or add a chain of beads in green and pearl tones to it. That's all. A wonderful handmade accessory is ready. Decorate your child's school backpack with it. This apple is perfect as a decoration for any things related to study or books. 
Volumetric beaded keychain
As mentioned earlier, beaded keychains can be not only flat, but also voluminous. Let's look at how to do it yourself volumetric heart for a keychain.
To weave it, it is better to use large-sized beads or bicones. But in principle any size can fit. This keychain can look very interesting if you use elements different sizes. These beaded keychains are very easy to weave. The weaving is based on a regular cross. 
In this way we weave several rows.
We get a part that resembles a heart in shape, but only angular, without curves. 

We will need two of these blanks.
And now these parts need to be connected to each other. That is, simply sew it, but using the remaining beads or bicones. In this case, we will, as it were, create the side surface that we are missing. 


Now all that remains is to create for
. Simply thread the beads onto the fishing line and attach this string at the top of the heart. You can attach a keychain ring to this loop. These beaded keychains can become a memorable valentine for your loved one. 
Keychain in the shape of a sheep
Let's look at how to create beaded keychains with your own hands, consisting of several parts, using the example of a sheep keychain. To weave it, prepare monofilament, number ten Czech beads. The colors we will use are mainly pink and white. But we also need 2 black beads, 3 light pink beads and one red bead. You also need 4 black beads. Their diameter is 3 mm. Prepare additional padding polyester for stuffing, a base for a keychain, five pins with caps and 4 metal rings measuring 5 mm. As well as pliers and wire cutters.
The work is based on the usual cross-weaving technique. 
We start working with the torso. We use a piece of monofilament one and a half meters long. We thread both edges of the thread into needles and start working with the cross that is indicated in red in the diagram. It is important not to forget that the crosses at the corners consist not of four beads, but of three. At the end, the monofilament is tied, but not cut. You need two such blanks. They weave the same way.
Now these halves should be connected so that crosses are formed between them. So we connect along the entire circumference. Be sure to leave room for stuffing. And at this moment you need to take care of attaching the key fob and using a pin to make a loop. To do this, insert a pin into the hole so that its head remains inside the lamb. And wrap it into a ring from the outside using pliers. Now you can fill the sheep with padding polyester and sew up the remaining area. 
Now we begin to create a muzzle from pink beads. We use a piece of thread 70 cm long. We thread each edge into a needle and weave according to the pattern. Here you will need to weave colored beads, indicated in the diagram according to the colors. At the end of the work, do not cut the thread. With its help, you need to attach the muzzle to the body. To do this, we add crosses to the muzzle using crosses on the body. Before sewing the muzzle completely, stuff it lightly. 
We make the ears according to the diagram. For weaving, cut 40 cm of thread. We take the thread out from the edge of the eyelet and go along the edge to the top, adding the missing beads for a smooth edge. After this, we pass the threads at the top through three beads towards each other and add another element in order to make a cross. We braid both ears and sew them to the body. 
Now we will weave two rows of crosses with white beads above the muzzle and connect them to the muzzle. This will be imitation wool. In each of the two rows you need to make five crosses.
To make our sheep have a tail, we simply braid one cross of four elements to the beads of the body in the place where you want it to be. 
To make eyes for a sheep, put five beads on a thread and pull them into a ring. Do this again. Now, using black beads, sew these rings to the muzzle. 
Attach the blank for the keychain to the loop previously made from the pin. And all that remains is to make the paws. Take four pins and put a black bead, three pink beads and two white beads on each one. Now pinch the tops of the pins to form rings. Where, in your opinion, the legs should be attached, we thread metal rings. We put our paws on them and clamp them using pliers. 
Our sweet little thing is ready. The most important thing is that this keychain is not only cute and original, but also made by yourself. And it’s unlikely that anyone will be able to refuse such a gift.
Video: Master class on weaving a keychain from beads
Comments
Related posts:
 Beaded necklace: DIY weaving lessons (photos and videos)
Today, based on numerous requests from site visitors, we will make a treble clef from beads. We will make such a key from a tetrahedral rope.
We will need:
- beads size No. 8/0 (I used turquoise, but you can use beads of any other color),
- fishing line with a diameter of 0.3 mm,
- copper or aluminum wire with a diameter of 1 mm,
- one or two needles for beading (depending on the technique used for weaving a tetrahedral rope).
Let me remind you that on our website there are two master classes on weaving a tetrahedral rope of beads: using one needle or two needles. I used the option of weaving such a tourniquet on one needle, but you can use the option that is more familiar to you.
Also, before you start weaving a treble clef, refresh your memory of the basic techniques for working with such a strand, which we used in this and this master class.
Let's start weaving. First we weave a rope of 40 cubes.

Then we take a piece of wire 25 cm long (or slightly longer) and insert it into the center of the bundle along its entire length. If you are using a fairly soft wire, then the end of the wire that comes out from the working end of the fishing line (we will similarly call this end of the wire the “working end of the wire”) can be left small at this stage (as in the photo). If your wire is more rigid, then the working end of the wire must be left long, and at the beginning of the bundle, leave the tip of the wire literally 1 cm long.

Next, we pass the working end of the wire perpendicular to the axis of the bundle through the center of the 16th cube from this end of the bundle.


Then, using 4 additional beads, we attach the end of the rope to the rope itself. Let me remind you that the technique of connecting parts of a harness is described in detail in this master class.

We pass the fishing line through the bundle and then weave one cube so that the wire passing through the bundle is in the center of this cube.

After this, bend the initial part of the bundle into a loop

and pass the working end of the wire perpendicular to the axis of the bundle through the center of the 3rd cube from the side of the beginning of the bundle.

Again, using 4 additional beads, attach the end of the rope to the rope itself.

We pass the fishing line through the bundle and then weave three cubes so that the working end of the wire passes along the axis of these cubes.

Again we pass the working end of the wire perpendicular to the axis of the main part of the bundle, but this time through the center of the 13th cube from the side where the bundle begins.

Again, using 4 additional beads, we attach the end of the rope to the rope itself.

Once again we pass the fishing line through the bundle and then weave eight cubes around the wire.

We secure the fishing line, bend the end of the bundle so that it looks like the rounded bottom tip of a treble clef, if necessary give the treble clef its final characteristic shape, and then cut off the ends of the wire on both sides of the bundle.
The beaded treble clef is ready!

P.S. Don't want to miss our new master classes?


