There are many modern techniques aimed at developing various skills in children. We offer a classic method in which the child, together with you, will learn to use adult objects: scissors, paper, rulers and pencils. Let's try to make a paper basket today.
We have specially prepared several instructions for you, including one video instruction(at the very end of the post). As they say, instructions for every taste)
Instruction number 1:
Most simple basket which even small children can do. Made from a square sheet of cardboard or paper. To make the basket beautiful, you can choose cardboard with a pattern, or stick the pattern on yourself.
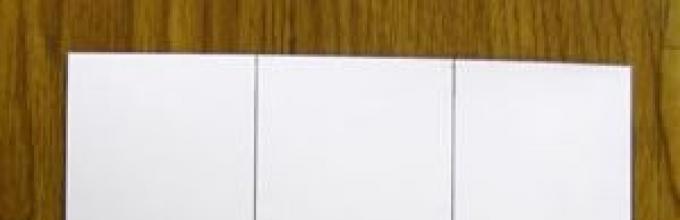
1. We need to do the following: draw into 9 equal squares (you should get 3x3 squares), in general, as shown in the figure:

2. Make cuts so that you can fold the structure:

3. Now you need to bend the workpiece so that the opposite edges are parallel to each other, and the remaining two are inclined equally:
 4. The squares in the middle should fix the basket and hold the entire structure; to do this, take glue and glue them together:
 5. All that remains is to cut out the hair that will serve as a handle for our basket, and then glue it in too. That's it, the basket is ready! Business for 5 minutes))

Instruction number 2, wicker basket:
Here everything is somewhat more complicated than in the origami technique and in the simple basket technique. It takes longer, but it’s more interesting, and the result will be much more beautiful. This basket is made from long straight pieces of paper. Take two large multi-colored sheets of cardboard (flexible and thick) and cut them into many pieces 30-40 cm long and 1.2-2 cm wide. Once prepared, you can start weaving. It is better to make the first basket from two different-colored sheets in order to see the result of weaving - this will simplify the task. Start weaving the strips together to get this checkerboard pattern:
 2. Weave the bottom until you are satisfied with its dimensions. You should approximately get a square with sides of 10-20 cm. Then you can start weaving the sides: you need to bend the strips and secure the bends with glue and paper clips, and remove the paper clips only when the glue has set:

3. Weave the sides in the same way until you are satisfied with the height of the basket, with another 3 cm left to bend and seal. If you want a deeper basket, then you need to prepare longer strips:

4. Basically, the basket is almost ready. It remains to bend the ends paper strips and glue them together. And then glue the handle to the basket.

Instruction number 3, origami basket:
You will need a square piece of paper, take an A4 sheet and cut enough from it to make a square:
You can create a task with your child: let your favorite doll go to visit with this basket and bring gifts; or make a flower basket together. Draw it first, think about its color and shape, think about how you can decorate it. Give your child room for imagination!
Help us develop the site, tell your friends about it by clicking the button :)
A modular origami basket is assembled in almost the same way as most crafts using this technique - quite simply. Therefore, both a master and a beginner can do it. We invite you to learn how to make modular origami “Basket”, as well as existing options his design.
Making modules
Before assembling the modular origami “Basket”, you will have to make a lot of modules.
We offer you a master class on how to assemble them correctly. And it will help to make it more clear step by step photo provided in the article.
- Cut identical rectangles from colored paper.
- Take one of them and fold it in half lengthwise (Fig. 1).
- Then fold it in half again so that a fold line is formed (Fig. 2).
- Place the rectangle in front of you, with the convex side of the fold line facing up.
- Bend its right and left sides towards the center to form “wings” (Fig. 3).
- Turn the figure over and fold the edges of the “wings” (Fig. 4).
- Unscrew the edges and bend one corner on the right and left sides (Fig. 5).
- Fold the edges in again (Fig. 6).
- Fold the shape in half (Fig. 7 and 8).
The part is ready! It remains to make a few dozen more of them in the same way to make it beautiful. modular basket origami.
Collecting the first circle

A modular origami basket begins the same way as most other crafts made using this technique. That is, you put two parts on the edge and put the third on top. To continue the circle, add a fourth module down and slide the fifth on top. In this way, assemble the entire ring (see how this is done in the proposed photo). To continue the assembly, you need to make several rows.
By the way, if you want the modular origami basket to be spacious, then make the first row large enough. True, then the craft will have a bottom with a hole. But it can be closed using ordinary cardboard, from which you cut out a circle of a suitable diameter and insert it inside.
Modular origami - assembling a basket
When the modules are ready and the first two rows have already been assembled, you can form the basket. To do this, continue to create walls from triangle parts. Row by row, put on the modules in the order you need. Over time, you will see your basket expand.

By and large, the modular origami schemes “Basket” and “Egg” are assembled in the same way. Only for the basket you only need half an egg, and the bottom should be wider.
When the craft reaches the desired height, proceed to assembling the handle.
Handle for basket
By the way, if you don’t make a handle, you won’t end up with a basket, but a vase (for example, for sweets). But since we are making a basket, we offer you a master class on assembling its handle:
- Apply glue to the middle of one module and place it on the wall of the basket.
- Place two more next to them, also greased with PVA glue.
- Continue putting the modules on top of each other.
- You should have three pieces in each row.
- When assembling the handle, try to bend it into an arc.
- When the handle is completely assembled, grease the last modules with PVA glue and attach to the wall of the basket.
To complete the craft, add a couple more rows of the named parts on the sides of the handle.

If you are going to use the basket as a table decoration, then you do not need to use PVA glue. But if you know that you will need to carry the basket holding it by the handle, and there will also be something weightless inside, then it is best to lubricate each module of this element of the basket with glue.
Paper basket design options
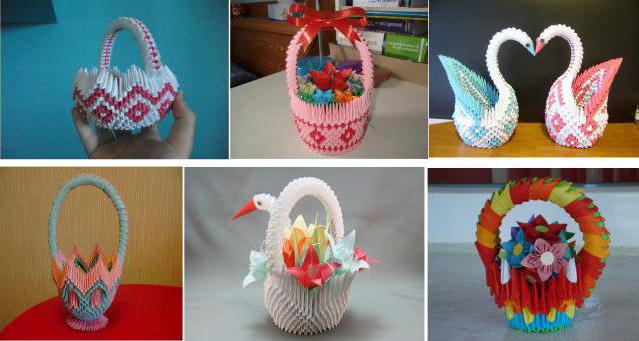
A modular origami basket can be absolutely different types, it all depends on your capabilities, imagination and preferences.
The easiest way to diversify the design is to make a basket with a pattern. To do this, you should use multi-colored modules and assemble them in a certain order (for example, to make diamonds).
It will be no less beautiful if the edges of the basket are made not even, but zigzag. This is done simply - put on the modules not in a circle, but in sections.
You can assemble a basket in the shape of a swan. This could be a traditional basket with a handle, with a swan head added to one of the walls. It is assembled in the same way as the handle, only at the end one large module is added that performs the function of a beak. It can also be a basket with a swan's head and tail instead of a handle. To make it, you need to assemble modules in the shape of a triangle.
You can also make an origami basket on a stand. The technique is the same as when assembling the “Egg” craft. First, a small plate is assembled from the modules, then it is turned over and the basket itself is assembled on it.
You can also diversify the design of paper baskets using the internal filling. For example, place real candies inside or collect additional flowers using the origami technique.
To make your craft last longer, keep it away from moisture and wipe off the dust with a dry cloth.
Origami- an art that allows you to give an ordinary sheet of paper another life. Among various directions origami, often complex and requiring basic skills, I like the direction of working with one sheet, which allows you to quickly create a simple three-dimensional design. It’s especially great if it’s also multifunctional.
Today I want to offer you a basket that is not at all difficult to make, which can temporarily replace a vase for short flowers or carefully store small trinkets.
1. To work you will need a paper square, the larger the better. We bend the diagonals, turn them over, bend the middle lines of the sides.
2. We bend the fold lines along the diagonals inwards, we get a square with a drop-down bottom. We bend the side corners towards the middle, aligning the cut line with the middle fold line.

3. Use your finger to open the resulting “pocket” and flatten it, aligning the middle lines.
4. We have formed an acute angle. It must be bent to the line of intersection of the previously bent corners. Now you need to hide it under this intersection (you can completely, you can leave a small triangle sticking out).

5. Turn over and repeat the same on the other side.
6. Bend the formed figure in half so that the folded corner is inside.

7. We bend the side lines of the cuts to the middle line and glue them.
8. Place the basket on the table and level the bottom. The resulting product should be stable and voluminous. The side projections can be glued together to create a short handle. You can extend the handle with an additional strip. The sample uses an additional strip 1 cm wide and 6 cm long, on which roses are glued on top.

9. Decorate the sides with a bow or applique. For greater strength and color preservation, the basket can be sprayed with hairspray.

You can use double-sided printer paper for the product, or you can use regular single-sided paper colored paper or wallpaper. If you need to create a product from scrap materials, colored paper can be obtained on a regular printer by printing the required color on one or both sides. This paper will be thinner, but quite suitable for creating a surprise in a couple of minutes.
Website Holiday every day presents a master class. Give your friends and family some paints in these baskets. Such non-standard way Everyone will enjoy presenting colored eggs. More paper basket can be used for serving.
For an origami basket you will need a square sheet of paper measuring approximately 22 by 22 cm. Special sets of colored paper for origami with a pattern are very convenient.
For the basket you will also need a stapler or glue.
1. Fold the sheet along the lines as in the photo to create a basic square.

2. Place the basic origami square so that it is open at the top.

3. Bend and straighten the top corner of the origami as in the photo. You will get a fold in the middle of the square.

4. Fold the top corner toward the center of the square.

5. Now bend top part along the central fold.

6. Turn the origami basket model over. Then repeat the steps 4 , 5 .

7. Make an origami fold as in the photo. And turn the model over.

8. Bend the basket model along a vertical line.

9. Make two folds inward as in origami basket pattern, then straighten both halves.

10. Fold two corners to the fold lines.

11. Fold the corners along the fold lines made in step 9.

12. Turn the origami basket model over and bend the right and left corners towards the center.

13. Fold the corners and repeat step 10.

14. Now fold the right and left halves along the existing folds, as in step 11.

15. Rotate the origami basket 90 degrees.

16. Extend the basket model following the direction of the arrows.

17. Rotate the origami basket 90 degrees and level the bottom.

18. Rotate the origami model. Apply glue to the tip of the right half of the basket handle and glue it to the left. Or fasten the two halves together with a stapler.

19. Decorate an origami basket for Easter egg flower.

Now you can put a painted egg or egg in the basket.

Origami is a recently popular technique of folding various paper figures. This ancient art was born in China in the early Middle Ages. In those days, only people from the upper classes knew origami. The technique became widespread in Western countries after the end of World War II. Nowadays, both adults and children enjoy doing origami. This art perfectly develops logic and attention. There are several types of it - flat and volumetric. Both of these types are interesting in their own way. We suggest you try your hand at volumetric origami. The figure is usually assembled from large quantity modules, that is, identical elements that were folded in advance. So, let's make a modular origami “Basket”.
How to make a basket from modules - preparatory stage
Immediately before assembling the origami basket, you should start making many modules. They come in different types, but the most commonly used is the so-called triangular module. Will do office paper A4 format. The sheet needs to be cut into 16 identical rectangles.


It has pockets on the sides, where the same modules are then inserted. Due to this it is going volumetric figure origami from modules - a basket.
For our future craft we need to make 494 triangular modules blue color and 168 triangular modules pink color. This process, of course, is labor-intensive and requires patience.
Modular origami “Basket” - master class
When you have completed all the necessary modules, you can begin making the basket. Assembly diagram modular origami the basket looks like this:
- We assemble a chain of blue modules. Insert one corner of two modules into both pockets of one module.
- Then the module pocket is attached to the free side corners of the upper modules.
- In a similar way, the entire chain of two rows is assembled, each of which should contain 32 modules.
- Then you need to close the circle.
- Next, we build eight rows of the future basket from triangular modules. In each you need to use 32 blue modules.
- In the next row you need to use pink modules. The total number of modules is 32, but every two blue modules alternate with two pink ones.
- The next row is laid out as follows: the pockets of one pink module are placed on the two central corners of two pink modules. We do the same with blue modules. As a result, we have a series of 16 modules.
- After this, we put on two blue modules, and then one more blue module.
- We build new elements in the form of an arch: we string six blue modules with one pocket on top of each other. Then we fasten the upper elements together. We perform these actions around the entire circle of the basket.
- After this, we lay out a new continuous row of pink modules.
- We need to make a stand for the basket. It consists of 1 row of blue modules and 2 rows of pink modules. In each such row you need to use 27 elements.
- All that remains is to make a handle for the basket. It is composed by alternating 1 pink module with 2 blue ones.
- A total of 79 rows need to be made. Having bent the handle in an arc, we attach it.


The origami paper basket made from modules is ready!


