While visiting your grandmother, you probably saw small handmade rugs in her house. Our ancestors did not throw away old things, they gave them a second life. Once you learn how to weave a rug from scraps without a hook, you can create it yourself. It will not only decorate your home, but also a very practical thing to use.
There are quite large crochet hooks on sale, but such a rug can be made without tools.
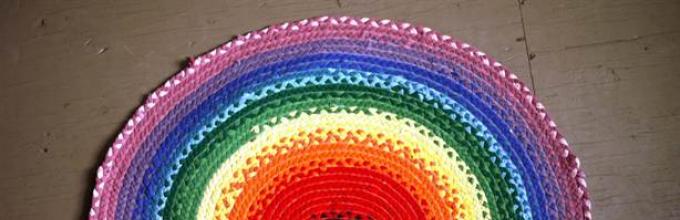
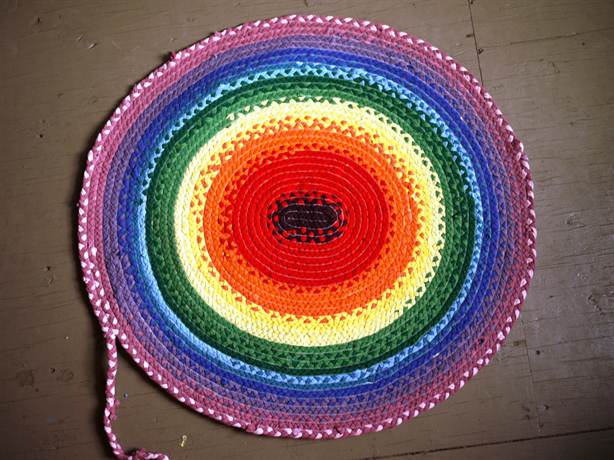
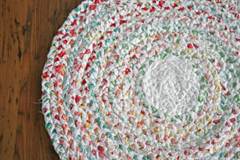
Round rug
The simplest version of a rug made from scraps of fabric is round. To make it you will need:
- Old fabric items;
- Scissors;
- Needle;
- Threads.
If you just want to recycle old things by creating door mat for shoes, you can safely use any fabric. If you have ideas to fit this product into the interior, carefully select the color and texture of the fabric.
Start by cutting the fabric into long strips.
If the fabric is fraying a lot, it is better to sew each strip and turn it inside out, leaving the seam inside. This is quite a labor-intensive task, but a product made from treated fabric looks neater and will last longer.
From the resulting pieces of fabric you need to weave a braid. The tighter it is, the stiffer the resulting rug will be; therefore, if you want a soft rug, then do not twist the braid too much.
Secure the ends of the scraps with a pin.

And start weaving.
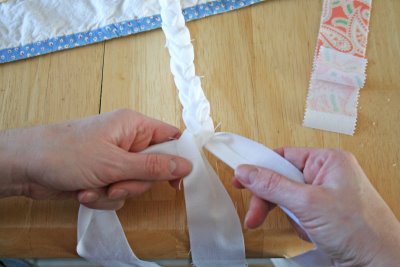
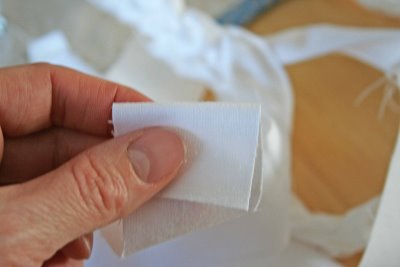
Having reached the end of the ropes, you need to lengthen them. If you tie a knot, it will turn out rough and ugly. There are two options - carefully sew on a new end or make cuts at the ends of the flaps and stretch an additional rope through the working end and insert its tail into the cut. Pull gently and you have a long rope without any knots or stitching. The whole process is clearly visible in the photo:


You need to make a long enough braid.

Do not process its ends yet, but simply grab them with a pin so that they do not unravel. If during the process of making the rug you want it to be larger, simply attach new pieces of fabric and braid it until you get the desired diameter of the finished rug.


You can braid the braid with ribbon instead of thread. To do this, weave it with zigzag stitches either into the side of the carpet or into the working braid thread. Pull the tape and it will connect the parts together.
For greater strength, it is better to completely weave or stitch the edge row of the rug, then the product will definitely not fall apart.

The round rug is ready!
Bathroom decoration
You can make a comfortable and practical bathroom rug yourself. For this you will need:
- Old towels;
- Ruler and tailor's chalk;
- Sewing machine;
- Tailor's scissors.
The process of making such a rug differs little from that described above. To begin, cut the towels into long strips 4-5 cm wide.

Connect the first three pieces using sewing machine. You also need to increase the “working thread” using this sewing tool.

When braiding a braid, the raw edges need to be folded inward.

During the assembly process, you need to stitch the rows on the machine.

The bath mat is ready! It is very soft and pleasant to the touch, absorbs moisture well and can be washed.
Woven models
Rugs from shreds can be woven using a base. It looks like a small loom. Make a frame out of wood that will fit the size of your rug. It can be rectangular or square, it all depends on your idea. You need to put nails on the frame at a distance of 2-2.5 cm from each other.
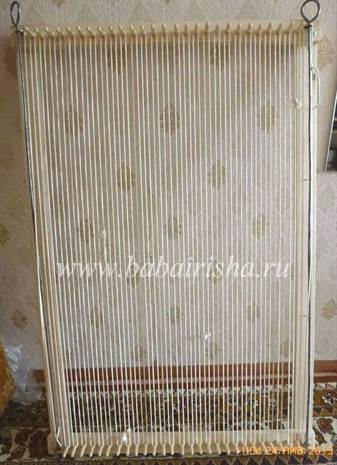
For these purposes, you can use a furniture board or an old table. Making the machine is not difficult, and it will serve you for a long time.

Strengthen warp threads made from pieces of fabric onto them. On the leftmost warp thread, reinforce the working thread. It's best to sew it on. Weave the rug by passing the rope over one warp thread and under the other. You can use more complex techniques and weave with two working threads at once. During the weaving process, the fabric must be constantly pushed up to make it denser.
Flat braids and voluminous cords woven from leather strips are used for finishing and decorating products. They are also the basis for making woven bracelets and belts, bag straps, hairbands, etc.
Flat braids
To weave braids, you need strips of soft elastic leather with a smooth back surface (as we remember - bakhtarma).
The beginning of weaving will not cause complications if we leave one end of the leather strip 2–3 cm uncut. If we weave from separate straps, each of them should be nailed to the table; if they are too thin, it is advisable to straighten them and tie them before starting weaving. You should try to weave as tightly as possible, because dense weaving will stretch less during use.
At the end of weaving, lightly beat the product with a shoe hammer and stretch it a little with our hands to smooth out the unevenness.
A three-strap braid is woven like a regular braid.
A four-strap braid can be woven in various ways. Figure 29 shows the sequence of interlacing stripes.
Rice. 29
The 5 strap braid can also be done in a variety of ways; Figure 30 shows an example of French braiding.

Rice. 30
From two fairly long straps, a thick, beautiful cord of square cross-section is obtained (Fig. 31). To begin, you need to lay the strips crosswise and glue them together. In the pictures, the gluing area is marked with a cross. As a result, 4 strips are formed, indicated in Figure 32 by the numbers 1, 2, 3, 4. When weaving, for convenience, similar designations can be made ballpoint pen at the ends of the strips.

Rice. 31
The weaving order is shown in Figure 32:
A– strip 4 is bent towards strip 3; strip 2 – crosswise to 3 and 4;
b– strip 3 is folded crosswise over 1 and 2;
V - strip 1 is folded and pulled through the loop formed by strip 4;
G - all strips are evenly pulled to the sides, resulting in the first crossing;
di– the drawings are given for clarity and repeat the weaves shown in the drawings a-g. Subsequent weaving is done in exactly the same way.
Such a square cord makes very beautiful bracelets. To connect the cord into a ring, the open ends are inserted into the initial crossing and tied with fringe. Or you can trim the excess cord, insert the ends into a cross and glue them.
By braiding a rope or utility cord with four strips of leather, you will get a bag handle that will never stretch out. The ends of the strips (1, 2, 3, 4) must be glued in pairs and secured to the rope using glue and a needle and thread (Fig. 33 a).


Rice. 33
In Fig. 33 shows the weaving order in detail:
b – place strip 1 to the right above strip 3 and above the cord;
V - Place strip 2 to the left under strip 4 and above strip 1 and the cord;
G - take strip 3 back to the right, under strip 4 and the cord.
The subsequent braiding should be done in the same sequence.
When weaving, you need to make sure that the leather lies flat against the rope.
In order to connect a braided cord into a ring, one strip must be left longer, the ends of the rest are sanded and glued to the ring. A long strip on the bakhtarma side is smeared with glue and wrapped around the other ends and the ring itself (Fig. 34).

Rice. 34
This cord can be used to make not only handles for bags, but also bracelets, neck jewelry, belts, hair strips, etc.
Round weave
The essence of round weaving is that the strap from behind is directed to the opposite side, then passed between two or more straps to the side from which it was taken.
Round weaving can be used to make bracelets, leather necklaces, straps for tightening bags, belt loops for bags, handles, and belts.
Any leather can be used as a material for weaving, it all depends on the purpose of the weaving. If fine weaving is required, the belts are planed, doubled and fattened. When thinning the belt, you can leave the end of it solid, but it is even better if the belt is taken at twice the length and first folded in half. If desired, the tip of the weaving can be completed with a ball or knot; For this purpose, you can also use separate strips of leather, tied at a distance of 5 - 10 cm from the end.
It will be easier to start weaving if you tie the straps in pairs, turning right sides to each other. Round weaving is made from only an even number of straps. During the weaving process, you should also pay attention to the proper density. Having reached the end, we temporarily tie it, then, placing the product on the table, using a board, roller, pressing strongly, we roll it so that the weaving acquires a beautiful round shape. For bag loops, you need to do a strength test if they are woven into a thick belt.
Round weaving can be made rectangular. In this case, the shape is adjusted not by rolling, but by a shoemaker's hammer. Rectangular shape can be achieved by aligning the sides using a bone.
It depends on the start of weaving whether there will be color stripe wrap around in a spiral or run vertically. You can try other types of weaving with the introduction of color. Their number is impossible to list. The choice of weaving depends on the imagination of the author. One piece of advice I can give: don't use leather bright colors industrial painting. The combination of two related shades will be more interesting than contrasting, flashy ones that are detrimental to the shape and design.
Handicraft called kumihimo came from Japan. This is weaving cords using a simple device. Such cords were used by warriors to fasten armor, and by women to attach a bow to their belts.
Where narrow strips of leather were used in medieval Europe, in Japan they used silk braided cords.
To weave such products in Japan they used relatively large wooden looms, but now they use small plastic disks.
You can make the discs yourself from thick cardboard.
You need to make triangular notches along the edge of the disk.
Usually they make 32. But the choice of quantity is yours.
Download the book :)
The art of kumihimo.rar
In English. The diagrams are clear.
http://files.gameworld.kz/va57yxmh3y.html
Jacqul Carey Creatibe Kumihimo - Creating Kumihimo
Description: A guide to weaving cords and belts using the Japanese kumihimo technique, allowing you to work at a professional level.
More than 40 weaving patterns on 8 and 16 cords.
Full layout of patterns for color selection.
Ideas and advice.
http://files.gameworld.kz/5vyfprxnkv.html
Monkey Fist Knot
Sea knot
It was invented in the days of pirates, when a ship in distress needed to throw the saving end of a rope from another ship.
The pirates used a cannonball as a weight.
In order to secure the core, this knot was developed.
It was also used as a bladed weapon. A metal ball was woven inside the “fist”.
It is still used as a weapon to this day in various variations.
Eight-strand cord
Two types of cord can be woven on 8 threads.
A point knot is woven in the middle of the 4 threads, resulting in 8 ends (Fig. 23).
Weaving begins from left to right: the 1st thread is laid on the 2nd, the 2nd on the 3rd, etc., the last - the 8th - is pulled into the loop formed between the 1st and 2nd threads.
Repeating this weaving in one direction, a round cord is woven. Alternating direction:
one circle clockwise
the other is against it - you can weave an octagonal gaitan cord.
The second type of cord of 8 ends is woven on a base of thick rope.
4 threads are folded in half, tied with a knot “through the hand” and secured at the upper end of the warp, -
it turns out 8 ends of threads.
The threads are divided into 2 groups: 1 - 4th from the left, 5 - 8th thread from the right (Fig. 24).
The outermost thread on the left (1st) is placed behind the warp, brought under the 8th and 7th threads, then placed on the 6th and 5th. The outermost thread on the right (8th) is placed behind the warp, brought under the 2nd and 3rd and placed on the 4th and 1st threads.
So, alternating weaving techniques, the cord is woven to the required length.
Lotus cord
Place 2 crosswise and secure them in place.
You now have 4 ends:
lower (1st and 2nd),
upper (3rd and 4th).
Place the 1st end in a loop on the 2nd.
2nd end - on 1st and 3rd.
3rd end - to 2nd and 4th.
The 4th end is on the 3rd and pass under the 1st into the loop.
Tighten the knot by pulling all ends at the same time.
Continue weaving in the same direction
(from right to left, counterclockwise) and you will get a round twist cord.
Knots can be tied clockwise or counterclockwise.
If you alternate these directions, you will get a cord with a square cross-section rather than a round one.
You can weave a “lotus” cord from threads of 4 different colors.
Mystic knot
In Chinese, "Pan Chang" means "endless".
One of the Eight Buddhist Symbols, Pan Chang symbolizes the mysteries of the Universe and is also known as the Mystic Knot.
It is believed to bring good luck.
The knot is quite complex, so study the pattern before you start weaving.
1. Take a thread 3m long. Pin it onto the pillow in the middle, form a loop at each end (see Fig. 1, vertical loops), pin it.
2. Take the right end of the thread and make it long loop and thread it through all the vertical loops that were formed in the previous step. The loop will pass through each of them according to the “under the thread - above the thread” pattern (see the same Fig. 1). Stab it. Now make another long loop from the same thread, pass it through the vertical loops, like the first, and pin it.
3. Now we take the left end and lead it along the top of the knot, wrapping around all the vertically running threads, except for the rightmost eye loop. In this case, the thread will pass first over the loops and then under them (see Fig. 2). We stab it. Once again we wind the same thread to the right (this creates a loop on the left) and repeat the same thing at the bottom of the knot.
4. Now you need to additionally pass the left end of the thread along the vertical of the knot (see Fig. 3).
The main principle to remember is:
when the thread goes up, it goes under 1 thread, over 3, again under 1, and again over 3 threads,
and when the thread goes down, it goes under 2, over 1, under 3, over 1 and under 1 thread.
Remember this sequence for yourself ("under one-above three-under one-above three-
and down-under two-over one-under three-over-under"), this will simplify things.
1 - 3 - 1 - 3 - 2 - 1 - 3 - 1 - 1
5. Gently tighten the knot using the outer loops and loose ends. All that remains is to equalize the size of the petals by pulling up the corresponding sections of the thread (go from the middle of the knot in turn in different directions).
Weaving of 4 cords is the most common and most simple technique weaving.
Before braiding, make an initial knot with a loop for hanging.
1. Fold the cords in half.
2. Lay one cord around the other and make a knot. One of the cords can first be threaded into a ring for a keychain.
3. Pull the knot tightly to create a hanging loop.
4. Turn the workpiece with the loop upside down, place the 4 ends of the cords crosswise and continue weaving in a round or square manner.
Round weave of 4 cords is drawn in a circle at each end in turn. The colors in it are distributed in a spiral.


1.
Lay 2 long cords crosswise. The upper end of the cord (A) is transferred down to the right end (B), forming a loop.
2.
The right end of the cord (B) is transferred to the left, to the lower end (C).
3.
The lower end of the cord (B) is moved up to the left end (D).
4.
The left end of the cord (D) is shifted to the right and threaded into the loop formed by the upper end (A) - the cords are secured in a “lock”.
5.
Repeat steps 1-5 until the required length of the product. The result is a circular weave with alternating colors in a spiral.
Square weave of 4 cords It is carried out first with two cords of the same color, then with two cords of a different color. The colors in it are distributed along the edges of the braid.


1.
Lay the cords crosswise. The upper end of the cord (A) is moved down, forming a loop.
2.
The lower end of the cord (B) is moved up, forming a loop.
3. The right end of the cord (B) is shifted to the left and threaded into the loop formed by end B.
4.
The left end of the cord (D) is shifted to the right and threaded into the loop formed by end A - the cords are secured in a “lock”.
5.
Tighten all four ends of the cord tightly.
Repeat steps 1-5 until the required length of the product. The result is a plexus square shape with edges alternating in color.
Having completed the last row, seal the ends of the cords using one of the following methods.
Elizaveta Rumyantseva
With diligence and art, nothing is impossible.
It is believed that wicker jewelry was first used by the American aborigines - the Indians. Using threads and ribbons of various colors, the Indians created a writing system, a kippah, which has not yet been fully deciphered. Modern followers of the Indians - hippies - put a special meaning into baubles. It is known that with the help of ribbons of various colors, hippies indicated belonging to a certain group, as well as the age and sexual orientation of the owner of the talisman. Hippies often used baubles instead of wedding rings.
Of course, not all bauble wearers are hippies, now in most cases it’s just fashion decoration, which is quite easy to make with your own hands and give to a loved one, friend or just a good acquaintance. In order to do this, you don’t need to be a special needlewoman. You just need to prepare the materials - satin ribbons and fasteners. The only thing left to do is put in a little work and perseverance. Look at the photo diagrams and repeat. So let's get started!
How to weave the simplest bauble for beginners
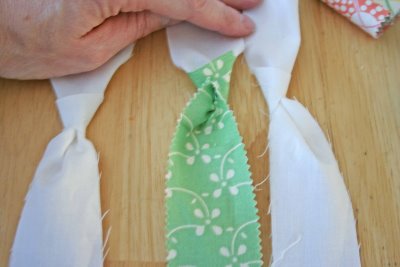
- You need to prepare two satin ribbons 3-5 mm wide and 50 cm to 1 meter long. Ribbons can be either one color or multi-colored. For beginners, it is better to use pieces of different colors. Take, for example, green and yellow flowers.

- We start with the green segment, fold its tip into a loop.

- Holding the green ribbon with one hand, take the yellow one with the other hand and roll it into the same loop.

- The yellow loop needs to be threaded into the green one.

- The green loop needs to be tightened.

- Next, we collect a new green loop, and thread the green loop into the yellow one.

- The yellow loop needs to be tightened.

- Next, you need to fold the yellow loop again, thread it into the green one, and pull it up.

- That's it, then the operations are repeated until the satin pieces run out or the bauble is woven.

- According to the ideas of hippies and some other subcultures, a certain combination of colors of baubles carries a certain meaning. Therefore, the choice of color must be taken responsibly. Otherwise, it may happen that a woven bracelet given by a girl to her beloved guy will “testify” that the young man belongs to representatives of non-traditional sexual orientation.
- When weaving, you do not need to use excessive force when tightening the knots. The knots should be a little loose - this way they will have a neat and uniform appearance, and be positioned strictly symmetrically. Only in this case will the wicker bracelet look beautiful and attractive.
- If the bracelet turns out to be unpresentable and unsuccessful the first time, it’s okay, you just need to unbraid it and braid it again.
- While working, you need to be careful - then the work will go smoothly, and everything will work out the first time.
- If during operation the ribbons slip out and the loops fall apart, they can be secured with a pin. Subsequently, with experience, everything will work out in the air, but at first, in order to save your nerves, you will have to secure the ends of the loop with a pin.
- At the end of making the bracelet, the ends can be tied into a knot, or you can leave them hanging.
You may also be interested in this type of creativity such as. After reading the step-by-step video tutorials and diagrams with photos, you will quickly master this technique.
How to weave a round bauble
A round bauble is usually woven using lotus knots (“Chinese knots”). It will take at least an hour to weave the bracelet. To ensure that the bauble does not lose its original shape, it will have to be tied tightly.
- To weave, you need to stock up on a pair of ribbons 2.5 meters long or four ribbons 1.2 meters long. If two segments are used, they are arranged crosswise and fastened with a pin. If you took four, they need to be placed together, retreating about 10 centimeters for the ties, and tied into a knot, which is secured with a pin.

- Let's look at an example of weaving black and silver ribbons arranged crosswise. To begin with, the upper end of the vertically located black segment needs to be placed on the horizontally located left side silver.

- Then the left end of the silver piece needs to be brought behind both halves of the downward-pointing black piece.

- Next, the right half of the black tape goes up.

- At the end of the node formation there remained top part Place a silver piece under the top half of the black one.

- That's it, all that remains is to tighten the knot.

- If it is not easy to tighten, you need to straighten the tape and tighten it tighter.

- Then all steps are repeated, and the result is a cord.

- It remains to stretch half of the ties under the ribbon from the reverse edge of the cord. If you fulfill this condition, putting on the bracelet will be much more convenient.

How to weave a spiral bauble
For this weaving method you will need two satin ribbons about a meter long. Consider, for example, weaving in this way using black and silver ribbons.
- First, you need to bend 10-15 cm from the end of each tape and fold the ends over the rest of the tape.

- Both tapes are placed at an angle of slightly less than 90 degrees to each other.

- We bend the black ribbon under the silver one like a knot.


