It's a wonderful spring day outside, filled with playful rays of sunshine. Why don't we give ourselves a positive mood and place a paper sun in our house or apartment, making it ourselves?
For this you will need:
— colored paper yellow or orange;
- scissors;
- a simple pencil;
- disposable plate or cardboard (yellow and orange).
The process of making the sun:
- First, prepare a circle of cardboard to create the face of the sun. To do this, take colored cardboard, attach a plate for the second course to it and trace it with a simple pencil. You can do it easier: take a disposable paper plate and paint it with yellow paints.
- Using a simple pencil, outline the child’s palm on yellow or orange sheets. These will be rays of sunshine. There is an idea to have the image of each family member’s palm in the sun, then you will get a family sun! By the way, two palm prints fit on one standard sheet of paper.
- Take scissors and cut out each palm image, making small allowances for gluing.
— Consistently glue the cut out rays to the back side disposable plate or a cut out circle. Adjust the density of the rays and their length.
— Then we design the face of the sun. To do this, use a felt-tip pen or pencil to draw his eyes, nose and mouth. By the way, you can cut out these elements from colored paper and glue them to the circle with glue or buy the corresponding elements at a craft store.
- Wait a bit for the glue to dry! All! The wonderful sunshine is ready!
This craft will be a wonderful decoration for a child’s room, living room or hallway, giving good mood, and comfort even on the most cloudy and gloomy day.
By the way, the sun can be made not only from colored paper and cardboard! Next, I will present to you a whole collection of suns made from scrap materials.
Here, for example: a sun made from a plastic plate and ordinary yellow table napkins. This sun is made according to the principle of the previous one, only the rays will be napkins folded into a triangle.

You can also create a sun from a foam ball, colored wire and yellow paint. Simply paint the foam ball yellow. After the paint has dried on it, use an awl to make holes at the same distance from the center and place wire with a yellow, golden or orange pile in them. Hang the sun on a string anywhere indoors!

There is an idea to make a sun out of thin ribbons and a cardboard circle. Such a sun is so light that at the slightest movement of air it will rotate or oscillate, developing its ribbon-rays.

Recently I saw several versions of the sun that the children made kindergarten. I really liked the idea, so I want to present it in my article! The point of making all three suns is to cut out both the circle and the rays from colored paper. The rays can be in the shape of triangles and rectangles. Some kids drew or glued the details of the face, and some filled the sun circle with small pieces of napkins, gluing them with glue.

For those who like to draw, we can suggest interesting way images of the sun. Draw a circle with pencils, felt-tip pens or paints - the face of the sun, and stamp the rays with a fork, after dipping it into the paint.

For children. One of the varieties of origami is modular. It involves manufacturing using separate modules folded from paper. This is exactly what the sun is, the stages of its creation are shown in our master class.
To make it you will need square sheets of paper. You can use one color or several. We took red, yellow and orange. 
Fold one of the sheets along two diagonals. 
Then we bend each of its corners towards the center. 
We make folds on both sides towards the center line so that the workpiece takes on the shape of a rhombus. 
Let's turn it over to the other side and bend the top corner. 
Now all that remains is to fold the blank of the future ray in half lengthwise. 
You need to make several of the same modules from paper of a different color. 
Next, we begin to collect our sun. To do this, insert the lower edge of one of the blanks into the lower part of the other blank from the opposite side. You can assemble the modules in any color order you like.


We are gradually continuing to work on connecting the modules. Our sun begins to take on the appearance of a circle. 
We close all the rays into a circle when we see that we have an even inner circle. As a result, our sun is ready. 
You can make such a wonderful card with the sun and give it to anyone, be it mom on March 8, or dad for his birthday. Making such a postcard is not at all difficult if you put in the effort, especially under the guidance of an adult. And our step-by-step master class will help, tell you in what order what needs to be cut, pasted and drawn to make it beautiful postcard, which you won’t be ashamed to give.
Master class on making postcards
We will need: a sheet of white A4 paper, colored paper, glue, felt-tip pens.

Divide a sheet of white paper into 3 equal parts using vertical lines. The outer parts are still in half. We designate “ears” - the future sun. Trim off the excess. We bend it, bending the ears outward.

Cut colored paper into strips 0.5 cm thick. From yellow paper we cut out a circle to the size of the “ears”.

We bend strips of colored paper in half and glue the ends together. You will get multi-colored rays of the sun.

We glue the “rays” onto the “ears”.

We glue a yellow circle on top, cut it in half so that the card can open. We draw the sun's eyes and mouth to make a cute face. And inside you can stick a printed congratulation poem or write a congratulation yourself and draw flowers. The postcard is ready.
From the very early age kids love to be creative. Drawing, modeling, applique - these are the types of activities in which kids take part with great pleasure. Moms and dads try to diversify these activities every time, coming up with new ones. This article presents master classes for children and their parents that tell how to make the “Sun” craft from different materials. Such a product can become both an attribute for outdoor games and an element puppet theater, and a symbol of the Maslenitsa holiday, and simply a decorative decoration in a child’s room.
We make paper crafts. "Sunshine" to every home!
This version of the product is very easy to manufacture. It will take no more than half an hour to create it. And as a result, the sun will turn out bright and beautiful. We prepare for the creative process following materials:
- yellow cardboard;
- double-sided colored paper;
- or PVA;
- pencil;
- round object (cup, saucer, etc.);
- hole punch;
- scissors;
- ruler.

The DIY "Sun" craft is made using following instructions. Trace a round object onto cardboard and cut out the piece. This will be the basis of the product. Punch holes along the edge of the circle using a hole punch. The gaps between them should be no more than 0.5 centimeters. The more often you make holes, the more magnificent and beautiful the craft will be. On colored paper, draw long rays (10-15 cm) in the form of sharp triangles and cut them out. The number of these blanks must be equal to the number of holes. Using a sharp edge, thread each ray into a hole, bend the tip and glue it with wrong side to the round base of the craft. Place the figurine under a heavy flat object. If desired, the product can be painted with colored pencils or felt-tip pens: eyes, mouth, freckles. The “Sun” craft is made with your own hands. Such a figurine can be either Christmas tree decoration, if you make a loop on it. This product is also an excellent toy that develops the motor skills of the baby’s hands and allows him to study colors with interest.
Sun made of paper and thread: an original children's craft
The principle of making this version of the figurine is the same as described in the previous master class. Only here yarn is used to make the rays. It is cut into pieces of 8-10 centimeters. Next, the threads are folded into bundles of 5-6 pieces. These blanks are threaded through the holes and tied into knots. If it is inconvenient to insert the yarn into the holes, then do it using crochet hook. You can attach a wooden skewer or a cocktail tube to the base of the product, to the cardboard circle, using tape or hot glue. Then the DIY “Sun” craft will become a wonderful attribute for a puppet theater.

Disposable tableware as a material for creativity
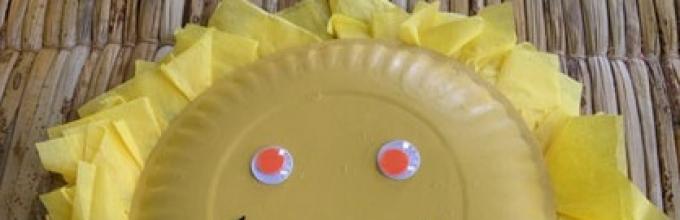
From this part of the article you will learn how to make a “Sun” craft from a paper plate. In addition to this, the work will require the following materials: yellow and orange paper, glue, “eye” fittings or two buttons.
We manufacture the product according to the following description. We cut out rays of any shape from colored paper. They can be in the form of stripes, long triangles, waves and even palms. Place the plate with the wrong side up. We attach the rays to the base close to each other. circle, the size of which corresponds to the diameter of the bottom. We glue this part on top of the rays. Turn the product over and decorate it front side paints. We draw the details: bangs, nose, smile. Glue on the button eyes. Let the craft dry. This figure can be used as an attribute carnival costume, pendant, wall decoration.
From the article you learned three ways to make the “Sun” craft with your own hands. Offer these ideas to your children, and they will join in with excitement and great pleasure. creative process.
The sun brings an atmosphere of warmth and joy to the house.
Especially something made by yourself.
This is the best guest for a children's room. What if you make it with a double function: decoration and toy?!
Such a sunshine will be ready to delight your baby every minute. It can even be used as a small pillow.
The textile sun is easy to use and also easy to wash. washing machine.
It is recommended to sew the sun with your own hands together with your child. This is a very useful activity. It learns to be methodical in the actions performed, disciplines and teaches concentration. The creative process of sewing develops fine motor skills, perseverance. During this activity, under the supervision of an adult, the child learns to use scissors and, if age allows, a needle.
All this brings the family closer together and unites them.. In addition, old unnecessary things disappear from the house and are born in a new interesting form.

To make a sun with your own hands you will need the following materials: round container (for example, a regular dinner plate), simple office paper to create a pattern, fabric for the sun (you can use fleece or velor), fabric for the lining (you can use calico), white and felt yellow flowers, Moment glue, synthetic filler for the sun, yellow and orange yarn for making sun rays, ribbon for decoration, toy eyes, decorative buttons (bugs, vegetables, fruits), scissors, pencil, needle, matching threads, sewing machine.

The creative process of sewing the sun begins:
1. Take a suitable plate and place it on the paper. If desired, select dishes of the largest diameter. A circle appears. You need to draw one hand to the resulting circle yourself. It is located above the imaginary middle of the sun (Fig. 2);

2. The resulting pattern is folded in half and the future pattern is cut out (Fig. 3);
3. In Fig. 4 shown finished pattern with two handles. That's why there was no need to draw the second hand on paper yourself. The figure also shows in what positions the fingers can be inside the future finished toy;
4. Take paper in your hands and cut out another pattern - the back of the sun. It is equal in diameter to the first. An ellipse-shaped hole is made in it (Fig. 5). Subsequently, fabric will be sewn to this part along the entire edge - a sleeve;

5. To make a sleeve, a rectangular section is cut from a suitable fabric, the length of the side is equal to the length of the elliptical hole (Fig. 6). The depth of the fabric on the hand is measured at will (from 20 cm or more);
6. Figure 7 shows all the details that should ultimately be obtained;
7. Patterns can be transferred to fabric (Fig. 8). It is recommended to cut the sun according to the same pattern that was made paper pattern: outline half, bend and cut out one whole. It is recommended to stitch the fabric along the outline before cutting, since the fabric tends to stretch greatly;

9. The lines of the handles are drawn together. There is no need to make allowances. There is also a hole for turning it right side out (Fig. 10);
10. Now you can cut out the part (Fig. 11). In parallel with this, the sleeve is sewn together;
11. Take the pattern of the back of the sun in your hands and apply it from the side of the lining. A hole is made for stuffing the toy with synthetic filler (Fig. 12);

12. The filler is filled into the internal space (Fig. 13). It is recommended to use tweezers. Finally, the hole is sewn up manually using a blind seam;
13. A sleeve is sewn on the back side of the product. The round neckline needs to be tightened with any thick thread (Fig. 14). Then the sleeve is sewn on the wrong side. It is advisable to stitch the line manually;

14. In Fig. 15 shows the resulting product: a sun with handles, a sleeve on the arm. The main stage is over;
15. The decorating process begins. Make your own rays for the sun. The yarn is taken and wound onto any suitable object with a length of 16 cm. On the right side (or on the left), the wound yarn is cut (Fig. 16);
16. The yarn is laid out on paper (length from one handle along an arc to the other) and a machine stitch simply runs along it (Fig. 17). The paper is separated, torn off;

17. The resulting rays are glued to Moment glue. Later, after the glue has dried, they are sewn on manually with thread for reliability (Fig. 18). Similar actions should be carried out with the rays of the lower half of the sun;
18. Now the rays are braided into braids (Fig. 19). The braid at the bottom is tied with a string to prevent unraveling;
19. The face is decorated. To make the sun's nose, a round piece of fabric is cut out of fleece. It is hand stitched along the edges and the thread is tightened to create the shape of a bag. A synthetic filler is stuffed inside the nose (Fig. 20). The resulting nose is sewn to the sun;

20. Toy eyes are glued on. The shape of the mouth and eyebrows is embroidered by hand (Fig. 21). A decoration (for example, a fungus) is sewn onto the sunny palm. It should be connected with threads to the front fabric, not to the back. The toy can be decorated with a shaped button ladybug. A felt daisy is constructed on one of the upper rays. This fabric is very dense in properties, holds its shape well and will not wrinkle spontaneously. Chamomile petals can be joined together with a seam by hand, or glued with glue. The yellow circle is glued last on top;

21. The ribbon for decoration is divided according to the number of braids. The edges are burned with a candle flame. All ribbons are tied to the sun’s braids;
22. Using regular blush or a red pencil, draw rosy cheeks on the sun.

That's it, the wonderful magic sun with your own hands is ready!


