Simple winter and New Year crafts with children 2-3 years old
Hello, dear readers!
On winter days, especially New Year's, you want to immerse your child in a short fairy tale and do something interesting with your own hands. Today we will look at craft options that children 2-3 years of age can do. Despite their simplicity of production, these variants of creative tasks are distinguished by their originality. Such crafts can even be imagined in kindergarten at the exhibition.
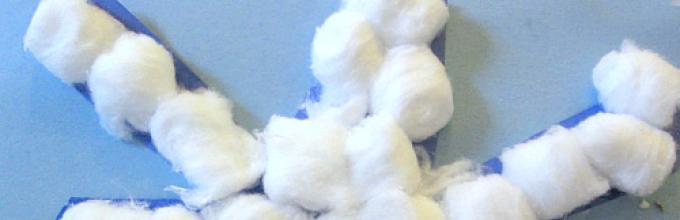
- Snowflake made of cotton wool (cotton balls)
 Apply a snowflake design to a sheet of paper using a glue stick or PVA (using a wide brush). Instruct your child to apply the balls to the glue strips. The result is a voluminous and beautiful snowflake!
- Snowman made of cotton pads

- Crafts from paper plates
The following works can be done using paper plates:

| 
|
And if you cover the plate with pieces of napkins or crumpled paper, you will get a wonderful white bear, whose nose will be paper cup, and the ears are 2 pre-cut circles from paper.

| 
|
- Wax drawings
 On a white sheet of paper with a wax candle, draw snowflakes or another winter-themed design. Invite your child to color a sheet of paper in blue tones. And then a miracle happens: under the stroke of the brush, the drawing that you have drawn in advance will begin to appear.


Source: maam.ru
This is another one interesting technique drawing. Ask your child to color the cabbage leaf with white paint or toothpaste and attach it to the paper. In the print you will see a wonderful winter tree. And if you try a little, you can depict an entire forest in this way. It is better to use Chinese cabbage.

If your child likes to sculpt, then he will definitely like the creation Christmas tree decorations from salt dough.
Salted dough without cooking:
1 cup flour
0.5 cups salt (preferably “Extra”)
0.5 cups water (add food coloring if necessary)
1 tbsp. vegetable oil
Mix all ingredients and knead thoroughly until smooth.
This dough makes wonderful figures that can be dried and painted.
Using molds for modeling (can be replaced with cookie cutters), we cut out the figures, dry them in a warm place (for example, for several days near a radiator) and paint them with paints. When sculpting, you can also decorate the product with cereals or seeds.

Surely every home has a roll sleeve toilet paper or paper towels. Cylindrical packaging can also be used.
Wrap the sleeve in wrapping paper or a nice fabric and tie the edges with a ribbon. Don't forget to hide a surprise inside the cylinder!
This candy can be used as a Christmas tree decoration.

The tree can become a baby's handprint. When the drawing is dry, spread it with glue and sprinkle with salt. After the glue has dried, shake off any remaining loose material.

A child can decorate such a Christmas tree with felt balls or plasticine balls that he rolls himself. To give festive atmosphere, the cone can be painted green in advance, apply glue to the edges and sprinkle with glitter or salt.

Cut off the front part of the sock (this will be the cap) and set it aside. Turn the resulting workpiece inside out and tie one free edge with a thread. Instruct your child to pour rice into the resulting bag (it’s more convenient to do this with a spoon). Tie the free edge. Using a thread, form the snowman's body and head. Wear a hat and decorate as you wish. The child can tie a scarf for the snowman.
A snowman with cereal is not only a home decoration, but also a wonderful tactile toy.

Volumetric paints look very unusual and beautiful. And it’s very easy to do. Just mix shaving foam with PVA glue in a ratio of 2 to 1. If necessary, you can add liquid dyes.
We bring to your attention crafts for the New Year or New Year's crafts for children 1.5, 2, 3, 4 years old.
DIY glass ball with snow
(jar with snow, craft)
Materials:
- A jar for example from baby food or any other.
- Glitter or fake snow.
- Small toys (for example from Kinder Surprise)
- Distilled water.
- Glycerin solution.
- Glue that will not allow water to pass through.

1. Glue the toys to the lid.
2. Take a clean jar, fill it with water, then add glycerin. There should be a little less glycerin than water. It is needed so that sparkles or snow fall more slowly.
3. Glue the lid to the jar with glue.

The snow globe is ready.
These balloons can be made on any theme.


New Year's toys for the Christmas tree made of salt dough.
These are the toys we made with our son when he was 2 years old.

Materials:
Acrylic pearlescent paints. I bought it from Children's World.
Molds or special ones for plasticine or for making cookies.
Roll out salt dough, the child uses special molds to cut out the required shapes. Don't forget to make holes for the string so you can hang your Christmas tree decoration.
Let the dough harden, then paint it with paints.
Wall panel Christmas tree made of salt dough

My child and I made this panel when he was 1.6 years old. He got so carried away that he stuck needles into the salt dough for half an hour. The idea came spontaneously, the child was sculpting, I was cleaning up and throwing out an old pine branch, the needles fell off and the child decided to stick one into his craft. Then cones from the same branch were added there...
Material:
Green salt dough (we just painted it when the craft was dry)
Pine needles and cones.
Disposable plate.
Place the green salted dough on a plate, kneading it with your fingers. Then we make a hole with the pen cap so that in the future we can hang the craft on the wall. We stick the needles into the salt dough, preferably at an angle, so that the needles do not stick out in different directions. Add cones to the center. Let the craft dry. The tips of the cones can be coated with shiny paints. to make it look more festive. Let the craft harden.
Now you have a wonderful home decoration made by your favorite child.
Craft "Snow is Falling"

This kind of work can be done very easily by a child aged 1 year or older.
Material:
Blue cardboard
White plasticine
Manufacturing:
We roll small balls out of plasticine and attach them to cardboard. Children 1 year old can easily cope with this craft.
A very good way to spend time is to make something with your own hands for the holiday, involving children in this wonderful activity. Let them also feel involved in preparing the holiday. It also helps them develop their imagination.
1. Black and white print Christmas tree, which you can decorate with your children. 
Or this one (we are now painting it ourselves)

2. A Christmas tree figure cut out of felt, which can be decorated differently every day. 
3. DIY December calendar. Each day on the calendar is a different toy, and children can be an invaluable help in coming up with the toy's pattern. 
4. Popcorn garland. It's simple - popcorn, needle, thread. 
5. Cardboard cones decorated with wrapping paper, bows and stars. Nothing complicated! 
6. Wall decoration or on a shelf - a Santa Claus hat made of cardboard in wrapping paper, instead of fur and a pompom - cotton wool. Even small children can handle it. And then you can take a photo with the result of your work. 
7. You can paint on paper not only with watercolors, but also with unusual materials - for example, mix flour, water, and drop a little paint there. Draw various shapes, dry until hardened. 
8. You can make small “drums” out of plain paper and wrap them with shiny garland or tinsel. You will get these cute hanging decorations or toys for the Christmas tree. 
9. If you add eyes, noses, and horns, the little ones’ footprints will turn into majestic reindeer from Santa Claus’s team. 
10. Drawings made from fingerprints on Christmas tree decorations will look great. And the memory will remain. 
11. Again - prints of children’s heels, but on a panel, in the form of Christmas tree decorations. 
12. Christmas tree decorations - snowmen. Materials - bottle caps, buttons, threads and ribbons. 
13. Toys in the form of deer from puzzle elements. 
14. Toys with family photos, and during the holidays the tree turns into a family tree. 
15. Mittens made of cardboard and paper for crafting. Purpose - any, at will, decorating various objects. Or on a Christmas tree if you add thread. 
16. Rings made of colored paper, decorated with ribbons and large beads, can become wonderful toys for the Christmas tree. 
17. A wreath and a “candy cane” made from small pom-poms on a cardboard base. The result was some funny Christmas tree decorations. 
18. If you roll a lot of polymer clay balls of different colors, then you can glue them onto cardboard wreaths lovingly cut out by mom or dad. Makes a wonderful decoration for a door or wall. 
19. Plain parchment can become festive wrapping paper for gifts if you decorate it with tiny pompoms. Attach with glue. 
20. Nativity, hand-drawn, in Naive style. Decorated with pencils, which gives the scene a completely childish look, and that's great. 
21. Old wooden cubes on which you can stick photographs of children will make a wonderful decoration for the holiday tree. 
22. A Christmas tree made from tinted ice cream sticks, instead toys - colorful buttons. 
23. Paint a Christmas tree decoration black and it turns into a magic board on which you can draw with chalk! 
24. Snowman made from pompoms! Wonderful toy for the Christmas tree 
25. Cinnamon gingerbread cookies can also be a wonderful decoration for the Christmas tree. And then you can eat them! 
Here are some exciting ideas for crafts with children that we offer you! Nothing complicated, but the result is amazing.
Create with love.
Our children. With what trepidation and enthusiasm they prepare for the New Year holidays. On the eve of the magic, kids try to please their parents: songs and poems, round dances around the green forest beauty - the Christmas tree and, of course, wonderful crafts. And this is another advantage of the pre-holiday bustle. After all, what could be better children's creativity? Except when the whole family is working on creating the next masterpiece.
If you are also planning to diversify your family leisure time and make an original New Year’s craft with your child, we will offer you some interesting ideas.
Master class on New Year's crafts for children 4-5 years old
Example 1
There are only a few days left until the New Year, but your apartment is not decorated yet? It's time to correct the situation and involve the smallest family member in the process. Children's crafts in the form of a New Year tree made from the palms of family members will quite cope with the role of a decorative element. And you can do it in a matter of minutes. Let's get started.
To make such a wonderful Christmas tree, we will need: several sheets of cardboard, green colored paper, glue scissors, glitter and sequins.

Example 2
A wonderful children's gift - Santa Claus made from children's palms - can be a memorable gift for grandparents.

Example 3
As you continue to prepare crafts for the New Year with your children, pay attention to the wonderful natural material– There are actually a lot of ideas for using them.
One of the most simple options is a small owlet that can be used as a Christmas tree decoration. Take a small cone and pieces of multi-colored felt.

Here's another simple nursery New Year's craft from cones, which you can make with your own hands. Christmas tree decoration- Father Frost.
To make it we need a white cone polymer clay, ribbon, acrylic paint with glitter, a small piece of wire to make a hole for the ribbon.

Example 4
And in conclusion, when making New Year's crafts with children 4-5 years old, do not forget about the main symbol of the new year 2016 - the monkey. It's very easy to make.
- Let's prepare everything you need.
- Cut out a red rectangle and roll it into a tube.
- Next, cut out a circle from double-sided red cardboard.
- We will cut out other elements of the muzzle from yellow cardboard. We immediately glue the ears and heart onto the circle.
- Draw a nose and mouth on the oval, and use double-sided tape to attach the oval to the circle. Let's finish the eyes.
- Next, cut out the monkey’s legs.
- Let's connect the parts together.
- Then add a tail and a yellow spot on the tummy. In the end, we should end up with such a funny children's New Year's paper monkey craft.


Articles on topic:
On the eve of the New Year, many begin to think about how to create a holiday atmosphere at home.
First of all, it is a joy for children who are waiting for gifts, the arrival of Santa Claus and love decorating the Christmas tree.
The child will be pleased to see the toy he made with his own hands hanging on the lush paws of the New Year's beauty.
This article will discuss the manufacturing process New Year's toys with children 4-5 years old, with step by step instructions execution.
During the procedure for making crafts, the child should be given the opportunity to express his imagination by making any additions to the craft.
Carry out all processes associated with the use of piercing and cutting objects yourself to avoid injury to the baby.
A child can make such a toy independently, without outside help. An adult just needs to follow the process, help the child in some difficult moments, but at the same time give him complete freedom of imagination.
 You will need the following material:
- Any plastic or paper cup.
- Colored tape (2-3 colors is enough).
- Stickers (confectionery).
- Scissors.
- Ribbons of different colors.
- Glue.
- Paints (preferably gouache).
Manufacturing process: a small hole is made in the bottom of the cup through which a ribbon tied in a loop is passed. This will make the glass look like a bell. Turn it upside down and give your baby the materials that were prepared for decoration. He will show his imagination and decorate the New Year's toy himself.
Multi-colored garland
One of the main attributes New Year's holidays is a garland. It can be used to decorate both a Christmas tree and door or window openings.
You will need the following:
- Colored paper (3-5 colors will be enough).
- Glue.
- Scissors.

The simplest garland made of colored paper
Manufacturing process: first cut the paper into strips 10-12 cm long and 1-1.5 cm wide. Glue one strip together to form a ring (colored side out). Thread a strip of a different color into it and glue it too. This way, you will gradually form a multi-colored chain. You can make a similar decoration of any length and different alternation of colors.
Festive Christmas tree
What is a holiday without the main symbol of celebration - elegant Christmas tree. This toy is used to decorate a table, window or shelf. It can also be presented as a gift to relatives or friends.
What you need:
- Set of colored paper.
- Cotton wool.
- Cardboard.
- Scissors.
- Small pastry stickers.

Cardboard Christmas trees
How to make: take a sheet of green paper and cut strips 15, 10, 7 and 4 cm wide from it. Fold each of them like an accordion, then glue the ends together so that you get voluminous snowflakes. Glue the largest one to a sheet of cardboard, and the rest, in ascending order, are fixed on each other with glue. You should end up with a Christmas tree, which is decorated with stickers, and cotton wool imitating snow is glued to the cardboard.
Cut a strip 2 cm wide from a red sheet of paper and make it three-dimensional snowflake, as described above - this will be a star on the spruce. Secure it on the top of your head. The elegant beauty is ready.
Fairytale decoration
Pine cones are often used to make various crafts. This natural material has beautiful shape and unusual appearance. And if you give the pine cones a different color and make an applique out of them, you will get a truly fairy decoration, which can be hung on the Christmas tree.
 What you will need:
- Pine cones (5-7 pieces).
- Paint (gouache).
- Gift ribbon (any color).
- Scissors.
- Sheet of cardboard.
- Green tinsel.
Manufacturing process: the cones are pre-painted green a day (time for the gouache to completely dry) before making the craft.
Circles with a hole inside are cut out of cardboard (as many cones, as many circles). Glue tinsel along the edge of the circle on each side so that there is room to fix the pine cone.
Then the cone is glued to the circle with the back part (it is best to use liquid glue for secure fastening). We make a loop from a gift ribbon and fix it on the circle on the side opposite to the glued pine cone. The decoration is ready.
Fun mittens
Every child has ordinary, inconspicuous mittens. But, if you make them yourself in the form of a toy, you will get a very beautiful and unusual craft. Such mittens do not perform their main function - keeping warm, but they are suitable for playing in a warm room.
Material for making:
- Thick cardboard (colored).
- Glue.
- Semolina.
- Nail polish.
- Scissors.
- Colored paper.
- Markers (2-3 colors).
- Stapler.
- Cotton wool.
- Fishing elastic band (thin).
How to make: Place the baby's mittens on the cardboard and trace them along the outline, then cut out 2 pairs. Start decorating them.

Craft mittens
First pair. Various patterns are drawn on the surface of the cut out mittens with glue, then semolina is sprinkled on top. Small snowflakes (2-3 cm in diameter) are cut out of colored paper and glued between the “manna figures”.
Second pair . The edges of the mittens are covered with a layer of nail polish (approximately 0.5-1 cm). Then, various New Year's figures (Christmas trees, snowflakes, balls, etc.) are drawn in their center with a marker. Snowflakes are also glued to the surface, as in the first pair.
When decorating the toys is finished, you need to secure the elastic band to the back of the mittens. To do this, it is fixed at the base and in the center along the edges.
It is important that it does not put pressure on the baby’s hand, so when attaching it, you should not pull it. The mittens are ready.
New Year's picture from cereals
 All children love to sculpt from plasticine and also make various crafts from cereals.
We will combine these two activities and make a New Year's picture that will become a great gift for the New Year.
The following is required:
- Cardboard (any color).
- Plasticine (color different from cardboard).
- Cereals (buckwheat, rice, etc.).
- Toothpick.
How to make: pre-crushed plasticine is spread on the surface of the cardboard. The layer should be small (1-2 mm). Then, using a toothpick, a pattern is applied to the surface of the plasticine (you can draw a Christmas tree, a snowman, a bunny, etc.). After application, the figures are filled with various cereals, at the child’s discretion (let him do this creative process himself).
When the picture is ready, you can add an inscription to it in the form of a congratulation or the baby’s name.
Santa Claus under the Christmas tree
The owner and keeper of New Year traditions is Father Frost. It is believed that if this fairy-tale character is not under the tree, then happiness will not come to the house in the coming year. In this regard, it can be made from available materials and involve the child in this process.
For the craft you will need:

- 2 sheets of cardboard (red and white).
- Colored paper.
- Plasticine.
- Corrector.
- Scissors.
- Cotton wool.
- Thick thread or rope (piece 10-12 cm long).
- Glue.
- Plastic bottle cap.
Manufacturing process: fairy tale character is made in 2 stages - Santa Claus himself and his bag of gifts.
Father Frost. Roll the red cardboard into a cone, glue it and cut off the bottom to create a stable base - this will be the body of Santa Claus. Cut 1.5-2 cm from the top of the cone. Cut an oval out of white cardboard - this will be the grandfather’s face, which needs to be glued to the top of the cone (body). Using plasticine, make eyes, a mouth and a nose on the face, and also glue cotton wool at the bottom of the oval - this will be a beard. From red cardboard, cut out an uneven triangle that will be your grandfather's hat. It needs to be attached to the head with glue. Draw snowflakes on the body of the figure using a corrector.
Bag of gifts. Take a 10x10 cm sheet of cardboard and place a cork in the center of its back side. Then lift up all the corners of the cardboard and tie them with thread (rope). Draw various patterns on the bag using a corrector.
Glue the bag to the Santa Claus base. That's it, the toy is ready, you can put it under the Christmas tree or give it to someone.
Postcard in the form of felt boots
New Year is the time for gifts to be given to each other. Do it with your child original postcard and give it to your beloved grandma or grandpa.
 Material for making:
- Paint (gouache).
- White paper.
- Markers or pencils.
- Cotton wool.
- Glue.
How to make: fold a piece of paper in half and draw a felt boot on it so that the bend line is its back part, and cut it out.
You should end up with a folding postcard in the shape of Russian national shoes.
Inside the postcard, on one side you can draw any shape (Christmas tree, bunny, snowflake, etc.), and write a congratulation on the other. The outer side of the card must be decorated with felt-tip pens or pencils (entrust this work to a child), and also small pieces of cotton wool in the form of snowflakes must be glued. The postcard is ready, you can give it to relatives or friends.
Christmas tree toy made from dough
All children love to tinker with dough, roll it out and sculpt it. In the process of making such toys, you can feel like a cook, since the action is more reminiscent of baking cookies than creating a craft.
The key to this process is to create a dough that dries very strong.
To do this they add large number salt. What you will need:
- 1 cup flour.
- 0.5 glasses of water.
- 0.5 cups salt.
- Rolling pin.
- Cookie molds (in the form of Christmas trees, balls, stars, animals).
- Paints (gouache).
- Threads.
Manufacturing process: First you need to prepare a thick dough. To do this, mix salt with flour, add water and mix thoroughly until a homogeneous consistency is formed. When the dough is ready, it is rolled out into a layer of 1-1.5 cm and various figures are cut out using cookie cutters, with thread loops attached to the top of them.

Dough toy
Place the dough figures on a baking sheet, previously covered with baking paper, and place it in the oven for 2 hours at a temperature of 50-60 degrees, but no more, as future toys may crack.
After drying, let the figures cool and begin painting them with gouache paints. Ready!
Conclusion
Whatever the result of the crafts, the main thing here is the child’s interest in the very process of making toys. Try to help your child as little as possible in the making process (except for cutting and piercing), let him be proud of the fact that he made the craft.
Video on the topic


