Who started knitting a sleeveless vest, haven’t given up yet? Let's finish it.
Knitting up to the armholes should not raise any questions. The only possible thing is a discrepancy with the pattern - the canvas is either narrower than necessary or wider. Even with the most accurate calculation of loops, this is quite possible. This does not mean a lack of skill at all.
Here you need to look: if the + or - is small - well... you can leave it as it is. When the Fabric has narrowed, you usually smooth it with your hands along the pattern with the thought: “I’ll stretch it with an iron...”. When the pattern is wider it turns out: “Ah! I’ll sew more on the sides!” I can’t even count how many I’ve unraveled in my knitting life. finished products, hoping to stretch and sew up like this. Believe me, all craftswomen face this. It's better to fix the error at the very beginning.
Our opening is rectangular. Having finished knitting the last row of fabric, you can “crawl” up to the beginning of the armhole with connecting loops (Fig. 1), make a rise and knit a row to the beginning of the armhole at the opposite end. You can also simply break the thread, tighten the knot, and tie it to the beginning of the row along the armhole line (Fig. 2). Whichever is more convenient for you.
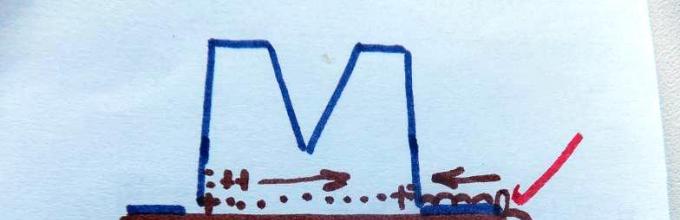
Having tied to the line of the beginning of the neckline (it doesn’t matter whether it will be rounded or, as in our pattern, V-shaped), we mark the middle of the fabric with a colored thread or a pin (Fig. 3). Moreover, the middle is determined not simply by folding the fabric in half, but by counting the loops. You need to do everything exactly. After this, we knit the right and left parts separately.
Reducing stitches when knitting a collar does not have to be done in each row; the frequency of decreases should be dictated by the pattern. Here we use the entire arsenal of what you and I already know: double crochets and single crochets, connecting and air loops. You need to learn how to knit these other stitches - with a common tip. In diagrams they are usually designated as Λ with transverse sticks indicating the number of yarn overs. It is they that are necessary when decreasing our V-shaped gate. In the video they are knitted in threes, but we will need two together.
In short, you need to knit anything, as long as the edge exactly matches the pattern (Fig. 4). It is impossible to explain anything here once and for all. This can only be achieved through trial and error. If the knitting pattern is very complex, then the last or first couple of stitches associated with decreasing will not break it. If the fabric is knitted with simple stitches, everything is much simpler.
Mandatory rule: each row begins and ends by attaching to the pattern. My assistant at this stage of work is a low children's table, on which everything can be laid out without any problems.
If knitting, when decreasing, behaves as in Fig. 5, this means that the decreases are not enough. And if so, as in Fig. 6, - you need to decrease it less often.
Having knitted one part up to the shoulder, we break the thread and tie it, as in Fig. 7, i.e. as if we continue to knit the interrupted row in the same direction. Otherwise, it will turn out that the same row is knitted “towards each other”, then one half of it on the front part of the canvas will turn out to be the wrong side.
The collar on the back will be rounded. This cannot be explained better than in video clips. It doesn't matter how deep the goal is. The knitting principle is the same. Don't be confused by the fact that in the second video we are talking about a round armhole.
When the back and front are knitted, you will need to sew them along the shoulder seams.
The next lesson is about this and about filling the armholes with binding.
.JPG)
.JPG)
.JPG)
.JPG)
.JPG)
.JPG)
.JPG)
Now there are a lot of ways to knit a neckline and armhole on the Internet, we have collected in this section the most unusual and interesting ones with which your models of pullovers and blouses will be stylish, elegant and fashionable.
The proposed methods of tying the armhole and neckline are suitable for summer blouses knitted with openwork patterns, or those that require delicate and fine knitting.

Processing the neck with a roller
The roller will always turn purl stitch up, which means you need to make sure that the purl stitch matches the design of your project.
Always knit the bead on knitting needles 0.75-1 mm thinner than the main fabric. Facial surface does not have the same elasticity and ductility as an elastic band, but you need to assemble your product and support it around the neck, which means tighter knitting with thinner knitting needles will help here.
Closing the loops in the usual way check if your head fits. But you don’t need to close the loops too stretched either, because the tighter closed loops help the roller to curl nicely inward.
To make the roller look like a roller, it is enough to knit only 3-7 rows.
1. Model Bray . The first row of the roller is knitted with purl loops. Then - in the usual way - facial.


2. Robin model . Enough rows are knitted so that the roller wraps just up to the main fabric.


3. Wheat model . The roller here is crocheted with a thread of a different color, which prevents the roller from wrapping up too much. The roller is also used for the pocket, edges and cuffs.


4. Hybrid model . Just 3 rows of roller create a thin line of a completed look and repeat the fragile lines of the pentagons.


5. Sundial model . Here the roller is knitted in reverse, not with the front stitch, but with the purl stitch and is bent to the wrong side.


6. Bewitched model . Not only the neckline, but also the fastener straps are tied with a roller. The roller here also bends to the wrong side.


Processing armholes using the I-cord “Lace” method
 The armholes are tied manually using the I-cord method, see the link for the master class and description. This is done like this: a set of loops with front side along the edge of the entire armhole, turn the product to the wrong side.
1 row is knitted from the wrong side (it forms the edge while simultaneously closing the loops): knit 2, remove 2 loops separately as knit stitches, knit these 2 loops together behind the back wall, slip all 3 resulting loops from the right needle back to the left. repeat first until the last 3 stitches remain, then knit 1, knit 2 together, pass through the first. tighten the thread. At first it’s not clear what’s happening, but after 10-12 loops everything becomes clear!
 The result is that it looks like a lace of three loops is sewn on with an edging, but in fact nothing is sewn on, and the edge is neat and tight. I noticed that my foreign colleagues never crochet the edges, but use this method. This method works for armholes, necklines, and even front panels.
 The loop fasteners are knitted together with the placket. First, plank according to the indicated method, then (when you need to make a loop) knit 3 loops in a circle: i.e. Do not knit the 3rd loop together with the next loop on the jacket, but knit it separately, then transfer 3 loops to the left knitting needle and knit them again, etc. until the required loop length is reached. Then knit the bar again.
Processing neck cuts
Let's consider the method using the example of the neckline and armhole of a sleeveless vest.

1) When knitting the main fabric, decreases along the armholes and neckline should be made at a distance of 1-2 loops from the edge. (Here at the neckline there is 1 loop at a distance, along the armholes - 3 loops). For example, a decrease from the right edge of the canvas will look like this: 1 knit, 2 knit together, then follow the pattern. Decrease on the left: knit to the last 3 stitches, knit 2 together with a slant to the left (most often this decrease is called a simple broach: remove the first loop as in knitting, knit the next one and pull it through the removed loop), 1 knit. This is for classic knitting stitches. Those who knit the grandmother's way will turn the stitches so that on the right you get 2 together with a tilt to the right, and on the left - 2 together with a tilt to the left.
With this method of reduction, the edge is already smooth and neat, which makes it easier for further processing.

2) You need to learn how to beautifully lift the loops along the edges. If the cut is vertical, then raise 3 loops by 4 rows (but this number may differ depending on the knitting density). If the cut is inclined (for example, like the neckline in this sleeveless vest), then you need to lift each loop. The loops are pulled out between the broaches formed by the edge and first loops.
3) Here are the loops on the knitting needle. The first row (front row) is knitted with purl stitches to imitate a kettle stitch. The second row (purl) - also with purl loops. Then a 2x2 elastic band. When the length reaches twice the required length, all loops are closed. The strip is turned to the wrong side and sewn along the loops to the cast-on row (or to the edge loops of the cut being processed).
In this sleeveless vest, in the armpit binding, I made decreases with a corner (as well as on the neckline) so that the binding would not fold or bunch up.
Master class on how to close a narrow neck

WITH wrong side I pick up stitches on the neckline, view from the inside - photo No. 1,


I knit the required number of rows, usually depending on the knitting density, usually 8-12 rows - photo No. 3.

 I close the loops in the most usual way, leaving, without breaking, the thread twice as long as the length of the neck. This is because further work will be carried out on the front side and if the thread runs out, it will be very difficult to extend it unnoticed.
 I use a needle to hook the loop of the cast-on - photo No. 4 and then I will forge the pigtail formed when closing the loops by both pieces, pull the thread - photo No. 5.
 Be sure not to skip loops, so the number of cast-on loops and closure loops is equal.
Knitting the neckline from belochka
I'll show you one more of the binding options I use.
Along the edge of the cut being processed, cast on the loops on the knitting needle with thread in the color of the binding:
For horizontal straight lines, we pull out loops from each loop of the last row, for vertical straight lines and bevels - between the broaches formed by the edge and first loops, pulling out loops in the ratio of 2 loops for 3 rows or 3 loops for 4 rows, depending on the density.
When knitting in the round, we knit the first row with purl loops (for turning rows, the purl row with knit stitches) to form a rib:
For training, it is better to use contrasting yarn for the placket so that you can more clearly see the stitches of the cast-on row on the wrong side. They are slightly “sunk” in the canvas and are difficult to distinguish. But it is necessary to catch them, without missing them, because they tighten the loops on the front side, and the bar ends up looking like it has been pinched.
TO a beautiful way to treat the neck
Pick up the stitches on circular needles, knit a purl row, then two rows of garter stitch and purl stitches.


Crochet neckline from Svet@u

1-2 rows: single crochet;
3rd row: alternate double crochet and one chain stitch;
4th row: single crochets;
Row 5: cross step
Most often I knit 1 row of st. without n. and "crawfish step".

IN pink blouse after a series of st. without n. knitted, alternating 3 tbsp. s n. (with a common top) and 3 ch. Last row: 2 tbsp. without n. alternate with pico.
If the harness is tightening the neckline, use a larger hook.
We tie the neckline in a circle with a pigtail crochet.
This will be the basis for casting on loops from both the front and back.
We press the loops on the front side with one pair of knitting needles, and on the wrong side with the second pair.
We knit two rows, making a so-called “pocket”.
Third row - we connect the loops from the front and back sides together. And then we knit an elastic band of the required height.
Close the elastic loops with a needle.
Finishing the neckline when knitting with garter stitch
Garter stitch seems to be one of the simplest, but this simplicity is deceptive. When you start. knitting and processing the neckline, you are faced with a serious problem: the peculiarity of this knitting is such that it is very difficult to do the processing in such a way that it looks neat. A step to the left, a step to the right and the rows lie unevenly, somewhere there is a stretch, somewhere a hole has formed. I tried a sea of methods and as a result I found the only option that seemed really successful to me. I did not cover the neck loops, but knitted them in short rows with wrapped loops. I'll try to describe the process, maybe it will be useful to someone. author Gala68

The model, as can be seen in the photo, has raglan sleeves, so the back and sleeves were finished in a straight line, without decreases, leaving the loops uncovered. But in front... On the two halves of the shelves, I first left 13 central loops unknitted, leaving them on the knitting needle (their number depends on the thickness of the yarn and the shape of the cutout), and then knitted in short rows (without knitting one loop in every second row, wrapping its working thread).
We knit all the loops in garter stitch until the last one closest to the middle of the neckline, remove it without knitting, entwined.
The principle of knitting entwined loops:
1. Thread at work, remove the loop on the right needle.
2. Bring the yarn forward between the slip stitch on the right needle and the next stitch on the left needle.
3. Slip the same stitch onto the left needle.
4. Turn the work over to the other side. The loop is entwined. Continue garter stitch in reverse direction on the following stitches.
After finishing knitting the shelves, collect the open loops of all parts (shelves, sleeves, neck) in order on circular knitting needles and tie the neck. At the same time, when knitting entangled loops, insert a knitting needle under the entrapment and into the loop and knit them together.
With this processing option, the connecting line of the strapping is neat, without holes or irregularities.
Learning to knit a V-shaped neckline
This type of neckline for knitwear is unlikely to go out of style. It is used in knitting sports and sophisticated patterns for men, women and children. You can wear a model with such a neckline over a blouse or simply on the body, and beautifully tie a scarf well matched to the model.
For a V-neck, the loops are divided in the middle and bevels are formed on both sides of the middle using decreases. If there is an odd number of loops, the middle loop should be closed or left temporarily (see the red ring in photo 3).
Simple decreases are made directly at the edge; for this, one loop is pulled through another (1 of them is edge). For the right half of the work in every 4th r. knit a row, except for the last 2 stitches, then knit these 2 stitches together (photo 1). For the left half of the work, knit the first 2 stitches together with a tilt to the left, i.e., remove the 1st stitch as a knit stitch, knit the 2nd stitch and pull it through the removed loop, then continue knitting with the main pattern (photo 1 ).
Casting on loops for binding along such edges is not so easy. Therefore, the 2nd method is recommended, in which the decreases are noticeable, since they are performed at a distance of one or several loops from the edge. For the right half of the work in every 4th r. knit a row, except for the last 4 stitches, then knit 2 stitches together, finish 1 knit and edge loop(photo 2).
For the left half of the work, start with an edge and 1 knit stitch, then knit 2 stitches together with a tilt to the left, as described above, then continue knitting with the main pattern (photo 2). An inclined path is formed between the main pattern and the edge. Decrements made at a certain interval from the edge may have the loops tilted towards the bevel, in which case they are a decorative design for the cutout. In this case, knit as in the previous version, but 2 stitches knitted together with the knit stitch and 2 stitches knitted with a slant to the left are swapped (photo 3). When knitting with some patterns, such as semi-patent or patent elastic bands, the neckline is not formed with simple decreases, because they fall alternately on the front or back loop.
Reductions for V-neck
In this case, it is recommended to perform double decreases, which are done not every 4th, but every 8th r. In photo 4, the detail is made with semi-patent elastic. For the right half of the work, knit all the loops of the row except the last 6 stitches, then knit 3 stitches together (= 1 double decrease), finish the row with 2 stitches of semi-patent elastic and hem. For the left half, start with an edge and 2 stitches of semi-patent elastic, then perform a double decrease, i.e., remove 1 stitch as a knit stitch, knit 2 stitches together and pull the removed loop through the knitted one (photo 4). If in the middle knitted details The motif of the pattern is performed, it is recommended to use it to design a V-neck.
For example, the two slanted face loops of a diamond serve as the edge of a V-neck (photo 5). The middle “braid” continues on both sides along the bevels of the neckline (photo 6). Symmetrical middle motif white pullover from page 23 at the beginning of the V-neck is divided into 2 parts, which continue on both sides of the neckline. Decrements in this model are made at a distance of 27 sts from the edge.
V-neck trims
When knitting the binding, an angle should be formed in the middle of the front. There is a very simple way to knit tape. Using circular or flexible knitting needles, cast on loops along the edge of the neckline (start and end in the middle of the front) and knit the binding with an elastic band (alternately 1 knit, 1 purl) in rows in forward and reverse directions to the desired width.
In every 2nd r. at the beginning and at the end of the binding, add 1 stitch.
Place the ends of the trim on top of each other and sew along the edge of the neckline (photo 7). If the V-neck is deeper and the trim is wider than in the photo, then decorating the neckline with such an asymmetrical trim is very impressive.
For a symmetrical binding, the stitches decrease in the middle of the front. Cast on an even number of stitches on short circular needles along the edge of the neckline and knit in the round with an elastic band (alternately 1 knit, 1 purl).
In every 2nd r. knit the last 2 stitches before the middle of the front together with a tilt to the left, knit the next 2 stitches together with the front one (photo 8). If the middle loop of the main pattern was closed or temporarily left, then it is included in the binding. For the binding shown in photo 9, in every 2nd r. knit the loops of the row with an elastic band, except for 1 st in front of the middle loop, remove the next 2 sts together, like knits. (i.e. insert the knitting needle from left to right, first into the middle one, then into the previous loop), knit the next loop in accordance with the pattern and pull the removed loops through it. If the neckline is decorated with double trim, then first on the faces. On the side of the binding, decreases are made on the middle loops, then on the wrong side. on the side of the binding there are also increases on the middle loops. Knit the binding with decreases, as described above, to the desired width and mark the fold line = row with purl loops. Then, on both sides of the middle loop, increases are made (knit 1 crossed loop from the broach) in the same rhythm as decreases, until there is an initial number of loops on the knitting needles, respectively. double-width binding is knitted (photo 10).
If the binding is made with a 2x2 elastic band (alternately 2 knits and 2 purls), then there should be 2 knit stitches in the middle of the front. In every 2nd r. knit loops, except for 1 st in front of the middle 2 sts, then knit 2 sts together, knit the next 2 sts together with a tilt to the left (photo 11).
If the main pattern is raised, especially along the edge of the cutout, then the finishing of the edges should be simple and unnoticeable. Cast on loops along the edge of the neckline, knit 1 p. with an elastic band (alternately knit 1 and purl 1) and close the loops (photo 12). The pullover from page 23 has an edge tied with st. b/n and picot, emphasizes the romantic openwork pattern.
Instructions
If you are knitting a sweater or dress from large parts (front, back and sleeves), knit the front to the place where the neckline begins. Find the middle of the row and mark it somehow (for example, with a knot).
Next, knit one half of the fabric. Gradually decrease stitches from the neckline side. The order of decrease depends on the shape of the neck. For example, for a V-neck, knit 2 stitches together across a row if the neckline is long and narrow, and in each row if it is short. At the same time, decrease the loops for the armhole according to the pattern. In general, the part must be periodically applied to the pattern and even pinned with pins to check whether you are making the decreases correctly.
Work to the shoulder seam and bind off the loops. Tie the thread to the place where you divided the knitting and work the second half of the piece. The order of reducing the number of loops will be the same, but the part should be a mirror image. This method is good for items knitted with a simple knitting stitch, such as double crochets or single crochets.
The round neckline is worked in approximately the same way, only the decreasing order will be different. Knit the piece to the beginning of the neckline, divide the knitting in half in the same way as in the previous case. Mark the middle, then work the row to the end, turn the work over and work almost to the mark, leaving 5-6 middle stitches undone. Turn the knitting over again, knit the second row to the end (that is, to the armhole line). In rows 3, 5 and 7, do not knit the last 3-4 columns. Next, knit straight, without increasing or decreasing, until shoulder seams. Secure the thread and break it. Knit the second half of the part in a mirror image.
IN knitted products A square neckline is also common. It works like this. Tie the piece to the neckline. When working the last row, find and mark the middle, then work the row to the end. Turn the work, start knitting the next row, but before you reach the middle of 12-15 stitches, turn it over again. Knit the remaining rows straight, without increasing or decreasing. The second half is done in exactly the same way.
If you are knitting a product from individual motifs, make the required number of squares, circles or flowers, pin them onto the pattern and fasten them with a needle or hook. The neckline in this case can be done in several ways. For example, tie it - for starters, with simple columns. Make sure that the fabric does not tighten. Then you can make a series of double crochets or knit lace, which is a combination of stitches and chains, into which groups of stitches are knitted in the next row.


