The most fun times for face and hands begin in winter and autumn. They are constantly in contact with fresh air, which means rain, cold, wind and other unpleasant phenomena of the cold season. And if the face can be hidden in a collar, under a hat or a hood, then a pitiful refuge in the form of pockets or gloves is reserved for the hands. And it's good if the gloves are good enough so as not to interfere with your fingers. After all, on the street you have to get your wallet (and then count the money), and use your mobile phone, and perform a bunch of small operations.
Crochet gloves and yes gloves knitting, invented specifically to combine the incompatible: the mobility of the fingers and warmth for the hands. Clear, simple patterns will make the process of knitting gloves and mittens enjoyable, and you will be rewarded with wonderful accessories that will allow you to fully enjoy the cold weather. A mittens knitting, who were knitted by our grandmothers as a gift to restless grandchildren, will warm the most dear and beloved sons and daughters. And for those needlewomen who have not yet mastered the knitting needles, are available crochet mittens which in loving hands turn into a real security talisman for your kids.
You can knit warm mittens for the winter different ways: on two, on five needles. Mittens on two knitting needles are easier to knit, but knitted on five knitting needles are more neat and beautiful. The complexity of the work largely depends on the chosen model and pattern. Of course, mittens are not gloves, but knitting them also requires a certain skill. Knitted mittens The knitting patterns and descriptions presented in this article are designed for craftswomen who know how to knit mittens and gloves of the basic model.
"Owl"
For these beautiful gloves "Owl" for women you will need:
- 100g wool yarn;
- two sets of knitting needles # 4 and # 5;
- large pin;
- buttons or beads for eyes - 2 pcs.
Patterns:
- elastic band 2 faces.x2 life;
- crossings to the right and left from 4p. - see the diagram.
 Description of knitting left mittens "Owl"
We dial 32p. on joint venture # 5 and knit an elastic band 2l.x2i. 24 rub. We go to cn. No. 5 and make a uniform decrease: every 6 p. Two p. We knit in 1 p. In total, we subtract 4p. We have -28p. Then - 2p. we knit persons. n. For the thumb, knit a wedge:
1p .: 3l., From 1p-2l., 15l., 4i., 5l. We have 29p.
2p .: 4l., From 1p-2l., 14l., 6i., 4l. We have 30p.
3p .: 5l., From 1p-2l., 13l., 8i., 3l. We have 31p.
4p .: 6l., From 1p-2l., 12l., 10i., 2l. We have 32p.
5p .: 7l., From 1p-2l., 11l., 12i., 1l. We have 33p.
6p .: 8l., From 1p-2l., 10l., 14i. We have 34p.
7p .: 9l., From 1p-2l., 10l., 14i. We have 35p.
8p .: 10l., From 1p-2l., 10l., From 1p-2i., 2i., 8l., 2i., From 1p-2i. We have -38p .;
9p .: 11l., From 1p-2l., 10l., 4i., 8l., 4i. We have -39p.
10p .: 12l., From 1p-2l., 10l., 4i., 8l., 4i. We have -40p.
11p .: 13l., From 1p-2l., 10l., 4i., 8l., 4i. We have -41p.
12p.: 14l., From 1p-2l., 10l., 4i., Cross from 4p. to the right, cross from 4p. left, 4i .;
13r.: 16l., Remove 10p. for the thumb on a pin, 4i., 8l., 4i. In work 32p .;
14p.: 16l., 4i., 8l., 4i. = 32p .;
We repeat the last row 7 times.
22r.: 16l., 4i., Cross from 4p. to the right, cross from 4p. left, 4i .;
23r.: 16l., 4i., 8l., 4i.
Repeat 23r. -3 times.
27r.: 16l., 4i., Remove 2p. at work, 2p., removed p. -2i., remove 2p. before work, removed p. -2i., 2l., 4l .;
28r.: 16l., 4i., 2l., 4i., 2l., 4i .;
29r.: 16l., 4i., From 2p. - 1p., From 1p. - 2i., 2i., From 1p. - 2i., From 2p. - 1l., 4i. We have 32p.;
30r .: 16l., 16i .;
31r .: 17l., 14i., 1l .;
32r .: 18 years., 12i., 2 years.;
33r .: 19l., 10i., 3l .;
From 34 p. for 40r. we make the descent of the "Owl" glove using the classic schemes. Thumb we also knit in the usual way.
We make the right “Owl” glove mirror. Sew on eyes - buttons. Warm gloves "Owl" are ready!
Patterned mittens: video master class
Mittens for lovers
Of course, you can buy gloves and present them to your beloved, but it is much more romantic to knit original warm mittens for lovers. They can be associated with any ornament, but hearts are a must.  Necessary:
- mixed yarn: black - 100g, white - 50g, red -10g;
- sets of direct cn. No. 2.5, No. 3.5;
- knitting needles on fishing line No. 3.5;
- needle with a large eye.
Patterns:
- gum 1l.x1i .;
- persons ch. - for circular rows - all face loops.
Description of knitting mittens for lovers
We knit 2 cuffs (each 50p.) With an elastic band from 26r., Alternating colors. We begin to combine with 2 p., Adding to them in each p. another 2p. At this stage, we will knit mittens on two needles. We bring up to 50 general p.  We turn to knitting on circular knitting needles and knit a common glove for lovers according to the pattern.
  Mitten for women
  Dial 26p. and knit a regular mitten using the pattern.
  Knit the thumb according to the pattern.
  For knitting a man's mittens, the classic instructions and the diagram in the photo are used.
 Carefully embroider gloves for lovers with red thread on the loops. If the suggested sizes differ from yours, adjust the number of loops. If you wish, you can knit gloves for lovers with a different ornament, embroider them with hand embroidery. Just be sure to make sure that on seamy side there were no long broaches that a finger could cling to.
Double mittens: video master class
Mittens "Hedgehogs"
Using the usual patterns for knitting mittens with knitting needles, you can get an exclusive thing, showing a little imagination. The funniest "Hedgehogs" can be knitted with "Grass" yarn. Gloves are usually knitted in the right size. And then, on the back side above the elastic, loops are crocheted, and a section of "needles" is knitted with an even cloth. You need to finish it before you start descending onto your fingers. Sew along the edges of the "needle" knitted stitch... Crochet ears "Hedgehogs" from 2VP and 12 s / n columns. Sew on them, as well as beads for the eyes and nose. Warm gloves "Hedgehogs" are ready "
Now let's look at how to knit mittens - transformers.
And you can also knit mittens with knitting needles not just warm, but the warmest! Because they are double! 
Of course, self made will be twice as much as if you knit single gloves. But on the other hand, you will get comfortable, beautiful, original double mittens... First knitted top part... It can be decorated with any ornament. By the way, if the gloves are double, then the requirement for the absence of long broaches on the wrong side of the work becomes less critical. The thumb, like the entire product, is knitted with a margin for the second, inner part of the mitten. Loops for the second, inner part are drawn from the bottom of the outer part. And it fits mirrored top.
We offer several options for knitting ornament. Doubles with this design look especially impressive. 

As you can see, there are many options for knitting mittens!
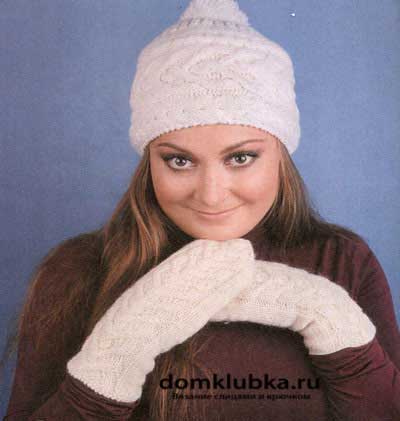
If you know how to knit, then knitting mittens will not be difficult for you. And so that the mittens are not only warm, but also beautiful, they can be knitted with various patterns, patterns and braids.
White braid pattern mittens
For these tops you need 100 grams of yarn. 100 m. It is better to take thick yarn.
# 7 circular knitting needles work best.
On the needles we collect 30 loops and knit 6-9 cm with an elastic band. Elastic band knit 1 p. Purl 1 p. Front.
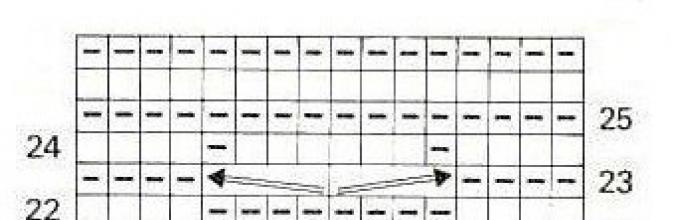
After tying the elastic, move on to the braids pattern. To start forming the pattern, knit 2 p. Purl 9 p. Front and again 2 p. Purl. The rest of the pigtail is knitted only with facial loops, as shown in the diagram. Look at the diagram to the left and follow it. You just need to start knitting according to the pattern, and then the principle will be clear.
Having knitted 15 centimeters, we leave 6 loops on the finger, threading a pin into the loops, and put 6 new loops on the knitting needles and continue knitting.
When the mitten is about the size of your hand, start starting the loops.
First, on the sides of the picture and approximately in the middle of the palm. When 8 stitches remain, tighten the stitches.
So we got beautiful knitted mittens.
Patterned Gauntlets

These mittens with beautiful braids knit on five knitting needles or so-called stocking needles. We cast on 52 loops, it turns out, 13 loops on one knitting needle. The elastic is knitted 2x2 for about 40 rows. Below is a diagram and description of how to knit braids correctly.
We knit a finger on the 10th row. On the side of the small braids, add to the two middle loops - in the second row 3 times. Then in the third row 3 times. When there are 18 loops, put them on a pin and continue to knit a mitten. The finger can be tied later. It fits just like the mitten itself, only in a smaller size.
Next comes double knitting, in the first row on the needles we knit alternately one front loop and two together with the front one. In the second row with front loops, two loops together, and so on until the end of the row. Pull off all remaining loops.


Beautiful Knitted Gauntlets
Knit mittens with front stitch, circular knitting, all front loops.
Knit a braid according to the scheme (see the scheme below).
Divide 48 stitches into four knitting needles and tie together to form a circle. Of the first two knitting needles, these are 24 loops, there will be a palm. Of the other two knitting needles, this is also 24 loops, there will be the back side. The first and second knitting needles are knitted face stitch.
We count on the third and fourth knitting needles for a pattern, 3 knit loops, 9 loops on a braid, on one needle and on the second 9 loops on a braid and 3 knit loops. Then, after 40 rows, remove 7 finger loops on a pin, and cast 7 air loops on a knitting needle.
Having knitted the mitten along your hand, start running, for this, in every second row, decrease the loop. To get a triangular launch, you need to shoot from the 1st and 3rd spokes at the beginning of the row. With 2nd and 4th needles, last sts. After 24 stitches remain, start decreasing in each row. Pull the last 8 loops.
Knit a finger
Separately, on a knitting needle, remove 7 loops from the pin, on the second knitting needle, cast on 7 loops from the top edge and remove two loops on the sides. You should have 18 stitches. Knit a finger in a circular stitch, all loops are facial. After the right size run your finger, just like the mitten itself.
The edges of the mittens can be crocheted and decorated with beads or beads.
Mittens - very warm cozy and stylish accessory. Knitted mittens can be afforded by any needlewoman, even a beginner. They are very easy to use and the result will not be long in coming. In order to get a pair of warm and stylish mittens you will need to spend one or a couple of evenings.
In the article below, we will consider knitting mittens with a pattern with knitting needles, patterns, descriptions and photos different models... The pattern on mittens can be knitted according to the pattern, embroidered, jacquard or sewn on. Elements of the picture can be knitted or welded from wool for felting. There are many options, let's deal with them all in order. But first, a little about what yarn is suitable for knitting mittens.
For knitted mittens and gloves, you should choose a not very thick thread. It is good to lie down in a product with a thread 200-250 meters long in a 100 gram skein. You should not take a thicker thread, then there will be difficulties with knitting a finger. If the yarn is thinner than the above, then you can knit in 2 strands.
For mittens with a pattern, you need to take ordinary blended yarn. It is a semi-wool with various composition options. A thread in which wool and acrylic are half-and-half will do. For fluffy mittens, you can use alpaca or add a thin thread of mohair or kid mohair to the warp.

As for the knitting needles, mittens are usually knitted on 4 knitting needles. To do this, use a set of 5 double-sided stocking needles. The number of knitting needles can be taken according to the recommendations on the yarn or the peculiarities of knitting. Numbers 2.5 or 3 will be universal for mittens.
The principle of knitting mittens
Mittens can be knitted in different ways, consider the most common 4-knitting method. Any mittens can be knitted according to this description, both simple, smooth, and mittens with a pattern, simply relying on the diagram of the selected pattern.
First you need to calculate the number of loops. This is easy to do, you need to tie the sample, measure the girth of the palm and calculate the required number of loops. On average, for a palm girth of 20 centimeters, you need to dial 40 loops. The description is designed for this number of loops, but it is easy to adjust it for your number.

Let's prepare the yarn and knitting needles and proceed:
- We cast on 40 loops and, knitting the first row with a 1 by 1 elastic band, distribute 10 loops on each knitting needle.
- We knit in a circle an elastic band 1 by 1 several rows. We make an elastic band 5-7 centimeters or according to the idea.
- Next, we begin to knit with front loops. Some advise making additions here, but they are not needed, especially if the palm is not wide, since the elastic narrows the canvas, and the front rows make the canvas wider with the same number of loops. Knit several rows (10-12) with front loops until the thumb is formed. In the process of knitting, it is better to try on a mitten on yourself.
- To form a thumb on the first knitting needle, knit 1 loop and put the next 7 loops on a thread or pin. We collect new 7 loops on the knitting needle and continue knitting in a circle for another 10-15 centimeters, until the mitten reaches the height of the little finger.
- We begin to round off the toe. To do this, we make decreases in each row, knitting together 2 extreme loops from 2 and 3 needles and from 4 and 1 needles until 6 loops remain on the needles. We pull them together with a loop. This is how we knit the right mitten. We knit the left one in the same way, only remove the loops for the thumb from the second knitting needle, first knitting 2 loops, then remove 7 loops on the pin, collect new ones and knit the remaining 1 loop.
- Now we knit the thumb. We transfer the removed loops to the knitting needle and in a circle we collect 14 more loops. We distribute all the loops on 3 or 4 knitting needles, as convenient. We knit in a circle with face loops of 5 centimeters until the height of the finger reaches the desired length. Next, we knit all the loops in 2, then in the next row again all the remaining loops in 2 and tighten the remaining loops.
The mittens are ready. We hide the ends of the threads and enjoy the result. In order to knit mittens with a pattern of braids or jacquard or openwork, you can use this knitting principle and rely on the pattern of the pattern, knitting it on front side mittens (on 3 and 4 needles). Photos, diagrams and descriptions of knitting mittens with a knitting pattern will be considered further.
Braid pattern mittens
Use a set of 5 knitting needles and yarn to work on these mittens. gray shade footage of 250 meters in 100 grams. Cast on the knitting needles the required number of loops (see the diagram) and knit with an elastic band 2 by 2 centimeters 10 or 12.

We make such a long elastic band in order to form a fold on the mittens. Then we move on to knitting the pattern.
Berry mittens with patterned insert
To work, you will need a set of 5 stocking needles and berry-colored yarn, semi-wool, measuring 250 m per 100 g.
These stylish mittens are knitted as described above, but a stripe with a pattern on 3 and 4 knitting needles is knitted. The strip must be knitted according to the scheme given below.

First, type the loops on the knitting needles and knit 12 centimeters with an elastic band 2 by 2. Then we go to the front surface with knitting a strip with a pattern according to the scheme.
Hinges for thumbs set aside, respectively, to the right and left of the strip with a pattern for the right and left hands. We close the toe according to the description given above. We knit the thumb with facial loops, as described above.
Jacquard pattern
Mittens with a jacquard pattern look very stylish and fashionable. It is knitted from threads of two or more colors. They alternate with each other according to the pattern. This type of knitting is already suitable for experienced craftswomen.

The following are interesting and beautiful schemes with jacquard for mittens. It is important to follow the chosen pattern exactly, then the pattern will turn out beautiful and correct. With the help of jacquard, you can knit floral patterns, ornaments, snowflakes, curls and even pictures with animals, birds, insects. The jacquard pattern on the mittens will be good for both adults and children.

Sew-on or embroidered mittens
Mittens with an embroidered or sewn pattern look very beautiful and feminine. For such a pattern, use threads for knitting or floss, beads, beads, fur pom-poms, embroidery or crocheted elements.
An elastic band for mittens can be crocheted or made on a drawstring by knitting the first couple of rows with purl loops, then add several loops evenly and knit with the front stitch, then reduce the added loops and knit a couple of rows with purl and repeat the drawstring formation again.

Mittens look interesting, in which the cuffs are knitted with threads of a different color (to match the future embroidered pattern on the mitten itself) and then crocheted with crochet laces. This fold over the cuff is sewn on. After that, the mitten itself is knitted and decorated with embroidery.
Finished products can be decorated with embroidered flowers, knitted titmouses, beads, ties with small thread or fur pom-poms and beads.
The end of autumn. The weather does not spoil us at all: gloomy sky, cold winds, sleet. It's time to warm up. A great hobby for many women - a favorite knitting that will help keep your hands warm. As an old Russian proverb says: "A craftsman and a needleworker brings joy to himself and to people." Who will deny himself the pleasure of long autumn evenings to painstakingly knit, and then amaze the family with his creation? The main thing in this matter fresh ideas for creativity.
Beautiful patterns for mittens will not leave you indifferent. Putting the warmth of your hands and a part of your soul into your work, please your loved ones with tender love and care.
Tips from Oktyabrina-n from the Osinki club:
I really love to knitmittens, here are some of my creations.
I knit them with very thin knitting needles, I don’t know the numbers, they are very old. I put 56 loops on the cuff, and when the main pattern begins, I add 4 more loops = 60 loops.
From the main pattern upwards 53 rows, then I begin to subtract 4 loops.
The finger is 22 loops and 20-22 rows to decreases. And I start knitting it on the 15th row from the beginning of the main pattern. This is an algorithm for all my mittens. And to change the size, I just knit more freely or vice versa.
 The mice are knitted very simply: dial 30 loops on the needles No. 3.5 and knit the cuff with the front stitch (the number of rows as you wish), for the string alternate 2 together with the front and the yarn, in the next row knit the yarns with the front ones and knit about 14-16 rows to the finger. Then close 5 loops and knit a row further, and in the next row above the closed loops, dial new 5 loops and knit another 28 rows approximately, then begin to decrease 4 loops in each 2nd row. How to make 2 decreases - change the main thread to that , with which you will make the nose of the mouse and continue to make decreases in the same rhythm, only you do not knit the nose facial, and purl in rows. Pull a few remaining loops with a thread.
Then you sew on the bead nose and eyes (for the eyes, just knit a circle of single crochet columns and a bead on top), sew on the fur ears (I take the fur from hair ties).
Crochet a finger in 1 thread - 15 tbsp without a crochet for 11 rows, then make the decrease gradually and at the end pull the remaining loops.
Knit the string from about 115-130 loops, depending on the yarn, decorate it with beads.
 My threads are Semyonovskaya "Liza", with the addition of angora. They are not thick, so I knit in 2 threads. Sometimes I take any woolen thread that is not very thick and add exactly the same color mohair, it turns out very warm and soft.
 I knit the fringe like this: 1 row - front (we knit everything in a circle on 5 knitting needles), 2 row - knit the front loop and pull it to the desired length (do not remove the loop from the left knitting needle), remove the elongated loop from the right knitting needle and twist the working thread from right to left Press the long loop with your finger (it lies facing you) and knit the front loop from which the fringe was pulled.
 For 64 stitches on a narrow arm, very thin knitting needles are needed. I knit for 60, the needles are very thin, I don't even know the number. It turns out for the middle hand.
 Another problem arose - in those places where the canvas ends with one knitting needle and begins with another, creases (stretch marks) appear. Whatever one may say, but it is almost impossible to get rid of them. I pulled the thread more in these places so that the loop was more accurate , but she still comes out ugly.


 A cheerful, bright as a rainbow collection! Tell me, can you stay indifferent?