An Easter card using the quilling technique will be a rather unexpected, but very pleasant addition to the traditional colored eggs and Easter cakes, which are given as gifts to loved ones on this day.

Now we need to take a narrow yellow paper strip and turn one edge into a fringe.

By twisting such a strip into a roll, we get a lush flower. We make two such flowers of different sizes.

We straighten the fringe a little, making the roll more “fluffy”.

Making the roll “fluffy”
We turn the dark green paper tape into loose rolls.

Simultaneously squeezing them on both sides, we give the rolls the shape of feathers. For several rolls, we leave a long enough tip free so that they resemble a comma.

"feathers" and "commas"
We lay out the postcards on the blank. Two yellow flowers turn into chickens, commas and feathers into flowers. From the green strip we make grass, on which this entire composition is made.

We arm ourselves with an orange strip and wind it around a pencil to get a tight roll with a hollow middle. We make several such figures.

Slightly pressing them from the edges, we give them a pointed shape.

Let's turn these orange figures into flower petals.

From a yellow ribbon we make a weak curl - a sun, from a blue ribbon - a cloud.


All that remains is to find the warmest words and write them down inside the postcard.
Easter card using quilling technique
Completed by: 6th grade student of the MKS(K) educational institution "Krasninskaya school - boarding school of the VIII type" Leninsk-Kuznetsky district, Kemerovo region Maksimova Ekaterina, 13 years old
Curator: Sizikova Valentina Vasilyevna, art teacher of the MKS(K) OU "Krasninskaya boarding school of the VIII type"
To work we will need:
A sheet of red cardboard;
Quilling kit (set of colored strips of paper);
PVA glue;
Scissors (regular and curly);
Wooden skewer;
Step-by-step production.
1. First, we need to roll paper rolls (22 pcs.). To do this you need:
Glue the white and yellow (orange and white) strips together and screw them onto the strip.
.jpg)
.jpg)
Remove the roll, loosen it a little and form a part in the shape of an eye.
.jpg)
2. To get a fluffy flower, take a wider strip of paper and cut a fringe along one edge. Glue it to a narrow strip, then twist everything and form a flower shape (4 pcs.).
.jpg)
3. You need to wind green spirals (10 pcs.). We bend the ribbon in the center and twist its ends in one direction. One end should be higher than the other.
.jpg)
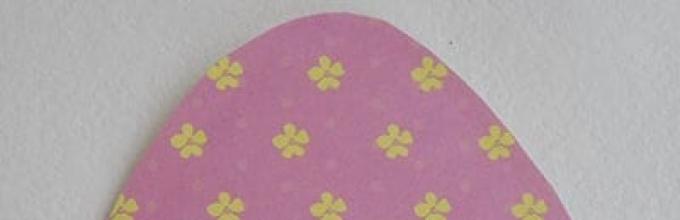
4. Take a sheet of red cardboard and use curly scissors to cut out an egg shape. This will be our card base.
5. Glue several colorful stripes onto the base.
.jpg)
.jpg)
6. Now we will glue the details of the drawing.
.jpg)
.jpg)
7. To make it more original, add a small pink bow.
.jpg)
8. This is how our Easter card turned out.
.jpg)
Hello, dear blog readers! The time to prepare for Easter has begun. All needlewomen prepare for it in advance, trying to surprise with new Easter crafts. And of course, I am no exception. The first Easter paper craft I made was a basket. After all, it is in the basket that we put various delicacies for consecration, and we give Easter eggs to our family and friends in the basket. And that's why I started Easter crafts from the basket. Easy-to-make Easter crafts, namely an Easter basket, will be easy to repeat for a beginning quilling enthusiast and even for children. In this article I share with you detailed master class And step by step photos making an Easter basket using the 3D quilling technique.
Materials:
- Paper ribbons 7 mm, length 29.5 cm, density 80 g/m2: light beige
- Scissors
- PVA glue
- Glue gun
- Twisting tool
- Quilling ruler
- Wire
- White openwork ribbon 4.5 cm wide
- White openwork ribbon 3 cm wide
- Pink ribbon 2 cm wide

We begin work by making the bottom of the Easter basket. We twist a tight roll from light beige paper strips 7 mm wide with a diameter of 11.5 cm. We glue one side of the roll, which will be inside the basket, with PVA glue (so the bottom of the basket will be dense and strong, and will not unravel).

We fold the basket with quilling elements into a tight roll. We twist elements from light beige paper tapes 7 mm wide with a diameter of 10 mm.

Glue the twisted small rolls to the bottom of the basket. Glue 9 rows up. On each circle I glued 36 tight roll elements. That is, for the sides of the basket I needed 324 elements. The height of the basket without a handle is 7.5 cm. To glue the elements I used a glue gun (it glues faster and stronger).

We glue a white openwork ribbon 4.5 cm wide around the top of the basket. For gluing, we use a glue gun.

We use wire for the handle; it will strengthen the handle and with its help you can easily give the desired bend. Glue two wires to the inside of the basket. WITH front side glue 2 elements of a tight roll (10 mm in diameter) from light beige paper tapes 7 mm wide onto the wire. We glue 22 rows of 2 elements onto the wire for the handle. That is, to make a handle we need 44 tight roll elements. To glue the wire and rolls we use a glue gun.

When all the elements are glued, we attach the ends of the wire and the last two rolls to the side of the basket with a glue gun. We form the handle of the basket by bending the wire.

On the inside of the basket handle we glue light beige paper tapes to hide the wire.

We also glue a white openwork ribbon 3 cm wide to the inside of the handle of the Easter basket.

We tie a bow to the handle of the Easter basket. We make a bow from a pink ribbon 2 cm wide.


Easter basket, Easter crafts, using the 3D quilling technique is ready!
Can Easter baskets do different colors, use different widths of openwork ribbons, change the color of the bows. That is, use your imagination and preferences.


That's how different my Easter baskets turned out!

I started my preparations for Easter with these baskets. In the following articles you will find new Easter paper crafts using the 3D quilling technique.
You can view other Easter crafts in the section.
Thank you for your attention! I wish you inspiration and successful creativity!
Hello, dear friends!
Imagine, our competition “Gifts for loved ones with your own hands”, one might say, has acquired international status! =) The fact is that the next participant who sent us her master class lives in Poland. Her name is Joanna Łada. Generally speaking, we have already gotten to know Joanna a little. For some time now she has been a regular reader of KARTONKINO, hosting active participation in the life of the site. (And this is a great honor for me! Thank you, Joanna!) At the same time, Joanna's decision to join the competition was a big surprise for me =). I admit, I was even a little worried, because I “know” the Polish language at the level of a Google translator, capable of conveying the general meaning of what is written, but absolutely helpless when you demand precise wording from it... Be that as it may, the “language barriers” were safely overcome (although what barriers could there be when we all here essentially speak the same language - the language of creativity?). And now I am pleased to present to you a master class on creating an amazing Easter egg using the technique volumetric quilling. Do you think such a product is very difficult to make with your own hands? You'll never know for sure until you try =). Perhaps Joanna's master class will give you optimism and inspiration.
Master class by Joanna Łada:
Easter egg (quilling)
Hello! My name is Joanna Lada. I am 70 years old. I live in Poland, in the city of Bialystok.
My hobbies include cross-stitching, quilling, scrapbooking, origami and other types of needlework. But I can't draw at all...
I was invited to a children's hospital as a volunteer, where I am happy to share my knowledge with children. During one hour of quilling lessons, children can, for example, make a sprig of rowan with a bunch of berries. Despite their illness, they are happy and ready to learn something new with pleasure. Please forgive me, but as soon as I start talking about children... I love children!
.
The idea for this Easter egg using the quilling technique is not mine, I discovered it on the pages of one of the craft blogs (www.innascreations.blogspot.com). I tried my hand and, as you can see, everything worked out.
Before starting work, you need to prepare in advance:
- strips of paper from which we will create our model, (in in this case I used paper in four shades of red)
- scissors,
- paper glue or any other non-toxic glue,
- a box of sewing pins (hairpins),
- ruler,
- quilling needle,
- stencil for quilling with holes of various diameters,
- a brush for applying glue.

As basic form I used a foam egg 20 cm high, on which, for my own convenience, I drew vertical lines that made the work much easier (in this case there are 16 of them).
The foam egg must be placed in a plastic bag, pulling the latter tightly and tying it in the place from which you are going to start working.
In truth, it wouldn't be a bad idea to first design the pattern we want to create, but I've learned from personal experience that the best patterns come from the work itself.
Let's start with strips 15 cm long, twisting them into circles with a diameter of 10 mm. We glue all the quilling elements together and, after gluing, fix them on the egg with two pins.
Lay out the first row in a circle, then the second and so on. It all depends on your imagination.

Approaching the middle of the egg, it is necessary not only to increase the diameters of the circles in the rows, but also to use strips to make them different lengths.

Important! When working on such a large object, it is necessary to make at a time only the number of quilling elements that we need for one row, while comparing the size of each new element with the first.
The pattern will be formed during the work process. Of course, having a photo of a ready-made egg will greatly simplify the work.
.
Features of gluing.
- You need to use very little glue - literally as much as will fit on the tip of the needle. When too large quantities glue, it will begin to flow onto the surface, and this can lead to a local change in the color of the paper.
— Having reached the middle of the model, you must remember that you do not need to glue the next row. The egg begins to narrow, and the next row will run along a smaller circle. This means that if this row is glued to the previous one, remove finished product It just won't work with a styrofoam egg. Therefore, we fix it, as they say, “dry”.
We make the second half of the model by turning the form over and moving upward.


Once you have finished gluing, you will need to wait about 12 hours to ensure that all the pieces are well secured and connected to each other. After this, you can remove the pins (except for the middle row) and carefully cover everything with varnish or glue, being careful not to glue the middle rows together.
Leave the work for another 4-6 hours and then the product can be removed from the mold. This process is quite a difficult task, since in the absence of the proper skills, the work on which so much time and effort has been spent can simply be ruined. Therefore, you need to remove the structure very, very slowly, carefully covering each half with your entire palm.

During this operation, the bag in which the egg was wrapped usually remains on the mold. But, if difficulties arise, you can try to carefully cut the polyethylene with scissors - then the foam form will pop out on its own, and all we have to do is manually remove the parts of the bag from the halves of the quilling egg.

Next, we glue both halves, and at this point the Easter egg using the quilling technique can be considered almost ready. Of course, if you used paper with a density of 80 g/m2, then the product at this stage will have to be varnished again.
The last thing that remains to be done is to glue a paper circle of the appropriate diameter into the hole in which the end of the bag was located.
In total, the whole job took me 10 hours (excluding gluing time), but, nevertheless, I am satisfied with the result.
The admiration of your friends will be the best reward!
I remind you that everything competition works presented in the “Competitions” menu section. Go ahead, get acquainted, share your impressions in the comments.
Have a great mood and creative inspiration!
See you again in KARTONKINO !


