Teacher's Day is not a holiday for which you should give big gifts. However, making a postcard with your own hands for the teacher will still be right. Any teacher will appreciate the efforts of the student and will be truly touched. We have put together a selection of master classes for you, in which you will find several interesting and unusual options.
All lessons are designed for students to work independently. That is, children will be able to make any of these cards for the teacher on their own. No complex materials or complicated explanations - everything is simple and clear. At the same time, the postcards do not look primitive in appearance - the teacher will understand that the child tried.
We advise you to look through all the options and choose the best one. Consider your child's abilities. And not only creative, but also perseverance, attentiveness, and willingness to do monotonous work. If he is a restless person, it is better to do it for the teacher simple postcard, and not one that you have to tinker with for, say, half an hour.
Quilling
Using this technique you can make quite a lot of different cards for Teacher's Day. True, this is an option for the assiduous. Earlier we told you what quilling is. If you like how the card was made in this master class, check out this article. There we talk in detail about how to correctly roll strips into quilling figures - this important point.

We will need:
- colored cardboard;
- colored paper;
- quilling needle;
- PVA glue;
- any decor.
Quilling always has the same process. First you need to draw an image on paper or cardboard, and then roll out the required number of small parts. Place them in in the right order, then glue one at a time.
On postcards for Teacher's Day, you can make small template congratulations. It is best to choose flowers as the main pattern. You can complement the card with ribbons, buttons or templates of school supplies.

Take a look at the examples provided for inspiration or come up with something of your own. If you are just getting started with quilling, you can take a ready-made stencil with a school theme and then simply fill it with small, beautifully folded pieces.
Application
This card for teachers is more universal than strictly thematic. Its advantage is that it is very simple to implement. If you add congratulations, it will turn out just fine. By the way, such a postcard can be given to a teacher in kindergarten on Teacher's Day - it also deserves attention on this holiday.

We will need:
- cardboard;
- colored paper;
- buttons;
- glue.
To create parts you can use colored paper or cardboard taken from the cover of something cute. For example, from an old notebook. If it has some patterns on it, it can make a good base for a card. Take a stencil of a bird or flower, transfer it to cardboard, cut out the image.
To make the picture on the postcard a little more voluminous, you can glue a circle of thick cardboard onto the base, and then glue the template on top of it.
Add some buttons to make your Teacher's Day craft even more interesting. And then add sincere congratulations.
With pocket
Any teacher will admire this voluminous homemade postcard. It’s immediately clear that they approached its creation with all their heart and dedication. Just keep in mind that such a postcard can only be made by diligent child– here you have to tinker.

We will need:
- cardboard;
- colored paper;
- notebook sheet;
- denim;
- pencil, pen pen, ruler;
- decorative flowers;
- any decor;
- superglue.
For this postcard you need to take the thickest cardboard possible. It is better to glue two sheets together if you only have standard colored cardboard. Glue a piece of decorative or colored paper on top of the cardboard. It should be 1.5-2 cm less than the base.
Then glue the notebook paper. It should be 1-1.5 cm smaller than colored paper. If desired, you can stitch the workpiece with a decorative seam - this will give it a special charm.
Glue a denim pocket into the central part of the card. You can remove it from old jeans and adjust it to the size of the postcard. Or cut it out of fabric (not even necessarily denim) - you can imagine the shape. Don’t glue it on top - just leave it as a pocket so you can insert something there.
Glue a small ruler and pencil onto the pocket. Add any decor that fits into the Teacher's Day card: it can be autumn or school. To keep everything tighter, sew the decor directly to the cardboard. Just thread the thick one decorative thread, and tie a bow on top.
Place a calendar in your pocket and circle October 5th. Place a piece of paper with congratulations there. If they don't stick quite well, add a paperclip.
Your teacher will definitely love this homemade card. At first glance, it is clear how much effort was required to create it.
Pencils
This Teacher's Day card is very easy to make with your own hands. But it looks so original that this is the last thing you can think about. It will only take you 10-15 minutes to make this option.

We will need:
- cardboard;
- colored paper;
- notebook sheet;
- worn-out pencils;
- sharpener;
- superglue;
- stapler
We make the base for the postcard as usual: glue a small sheet of colored paper onto the cardboard. The imitation school board looks very nice.
Cut out rectangles from a notebook sheet (approximately 3x5 cm). Make 3-4 pieces of paper to simulate one notebook. Draw the margins with a red pencil and staple them to the card.
Sharpen 2-3 pencils so that you get nice long shavings. From these colored shavings, collect flowers so that you get bright petals. The stem is a colored pencil. We attach them with superglue. Add a few more pencils next to the notebooks.
By the way, do this postcard It’s also good for the teacher in the sense that in this way you can get rid of pencils that are inconvenient to draw with. It’s also simple, and it’s unlikely that anyone else will give it to you.
Lush flowers
A homemade postcard for Teacher's Day is most often an applique with beautiful flowers. If you like this option, make it original: let them be voluminous.

We will need:
- cardboard;
- colored cardboard;
- buttons;
- PVA glue;
- any decor.
Cut out the base from colored or decorative cardboard. We glue it in several layers on top of each other. We form the front part of the postcard.
It is very convenient to make blanks for flower petals using a decorative hole punch or using stencils. You can simply cut out circles and then gather them towards the center, making folds at equal distances. It is also very convenient to take a rectangular piece of colored paper and fold it like an accordion. And then collect in the center, straighten the petals and glue.
Place these “petals” on the card in several layers, add buttons, any decor and the inscription “Happy Teacher’s Day!”
You can decorate your homemade card with something else. For example, braid satin ribbon or pieces of fabric. Just don't use dry glitter: they're not very appropriate for a back-to-school card.
With decorative frame
This video master class will help you do beautiful postcard for Teacher's Day, which is unlikely to be brought by anyone else. If you are looking for something original and discreetly solemn, this option is for you.
We will need:
- cardboard;
- colored paper;
- decorative rhinestones;
- glue.
Rhinestones can be replaced with satin braid or small star-shaped stickers (these can be found in craft departments). You can also cut out small circles from colored paper using a hole punch to create an interesting, bright frame.
Volumetric postcard: desk and board
Everyone will be delighted with this card: the teacher, the child himself, and classmates. It is so original that it seems difficult to perform. In fact, you will spend only 15-20 minutes on it. Perseverance is not required here, but accuracy will come in handy.
We will need:
- cardboard;
- colored paper;
- markers;
- office glue.
Take a look at this video tutorial to make a card without any mistakes. Everything is shown clearly and in detail here.
By the way, in the same way you can make congratulations for any holiday - not just for school.
We hope that you liked these master classes, and your child has already chosen what he wants to make with his own hands for the holiday for his teacher. As you can see, all materials are available and available to almost every student. Add something of your own to these ideas, actively use stencils and create with pleasure. The teacher will definitely appreciate such work!
Views: 20,149
Hello friends! We continue to actively prepare for the upcoming professional holiday of all teachers. Last time you got acquainted with one of the options for a greeting card with quilling decor. And today you will find another idea on how to make original gift to the teacher with his own hands - a panel using the quilling technique “Scientific Owl”. All the nuances of its production, as usual, will be revealed by Ekaterina Shkodovskaya. And during her new master class, you will, in particular, learn how to make one of the elements of loop quilling, which will allow you to create the lush plumage of your future paper owl.
Materials and tools:
quilling paper;
quilling tool, scissors;
PVA glue;
thick cardboard;
bird feather.
To create the panel we will need a backing made of thick cardboard. On it you must first make a pencil sketch of our scientific bird. This can be done by hand or find a suitable image on the Internet and transfer the outline onto cardboard.
Since my quilling owl will be smart and well-read, I will put it on a stack of books :)

When the image of the owl has been formed, you can start rolling the paper. First let's make the eyes. To do this, we twist 2 tight black rolls and, without allowing them to unravel, seal them. These will be the pupils.

Then we grease the tip of the yellow paper strip with PVA glue and continue to tightly screw it onto the ready-made black rolls to a size corresponding to the size of the eyes in the sketch.

Next, take a strip of white paper and finely chop the fringe. Having smeared the uncut part with glue, carefully glue the strip to the black and yellow roll. Repeat the procedure with the second roll. Let them dry, then open the fringe a little - and the owl’s eyes are ready.

Let's digress a little from owl anatomy and pay attention to books, or rather, their spines. Cut out 2 strips of colored paper suitable size.

Since the spines of books are usually convex, we will give our “spines” volume using a pencil or other cylindrical object.


Generously coat the edges of the blanks with glue and glue the book “spines” to the corresponding places in the picture. And at the same time we will decorate them with golden rims.

Now our learned owl has something to sit on, and we can continue to work on translating her image into paper. We will lay out all the elements from bottom to top, starting with the paws.
We will make 6 “drop” elements from light beige quilling paper. I made them from half strips, since my quilling owl will be small.

We glue the blanks to the cardboard backing and to the top book “spine”, three pieces on each side.

For further work we will need a lot of strips of light brown, brown and dark brown.

From light brown stripes we make many “drop” elements and glue the first row of stripes clearly above the paws.

And we glue each next row, slightly extending onto the previous one. We spread it like this until the end of our owl’s breast.

Now we will make the wings. To do this, we will prepare looped elements consisting of three or four loops.
We first fold one loop from a strip of paper, then add another and a third, leaving a small tip of the strip. We bend this tip over the first loop and glue it.

This is how the loops came out.

We begin to glue them with the loops down, also overlapping and in the direction from bottom to top.

And so we lay it out to the end of the wings.

After the wings are ready, let's work on the owl's head. We glue the ready-made eyes and around them we lay out the head “feathers” - looped elements of white and light brown, as well as brown and dark brown.


Let's not forget about the beak. For him from a strip yellow color let's make 3 tight triangles different sizes and glue them on top of each other - from largest to smallest.
Fill the space under the beak with looped elements in 2 layers.


Our quilling owl is ready. And to emphasize her learning and wisdom, we will glue a real bird feather to her paw.

A voluminous frame will give the finished look to our panel using the quilling technique. It can be made from cardboard according to the classic scheme:
To do this, we measure the finished panel and, in accordance with the obtained dimensions, draw and make a frame.
Can you use ready-made circuit by printing it on cardboard. In this case, it will be necessary to determine in advance the following dimensions for the quilling panel: 68 x 91 mm. These are the internal dimensions of the frame, and the external ones are 92-115 mm.
* * *
Well, friends, now you know what other gift you can make for a teacher with your own hands, and maybe not only for a teacher. Create yourself, create with your children and enjoy the process :).
If you are still tormented by the question of what to give for the upcoming holiday, then perhaps you will like an autumn bouquet of sweets with real maple leaves. You will find out how to make it very soon.
Sincerely,
Your Inna Pyshkina.
Materials and tools:
Quilling paper;
Sheets of paper in pale orange, light orange and bright orange;
Designer cardboard, scrap paper;
Scissors, quilling tool;
PVA glue;
Thermal gun;
Half beads for decoration;
Printed inscription “Happy Teacher's Day”.
Master class:
Teacher's Day card with quilling decor
This time we will make a postcard with two doors. To create the postcard base, we will need a rectangle of designer cardboard measuring 28x15 cm. It must be folded in two places so that the opening parts close exactly in the middle (this will be clearly visible below).
Let's immediately prepare the following parts: 1 large circle (cut out using a regular CD) and 3 small ones (about the size of a coin).

Now we need scrap paper. I used two types: light with polka dots and dark with ornaments.

I used the light one for the postcard flaps, cutting out rectangles slightly smaller in size (2-3 mm in length and width) than the flaps. Dark - for the circle, which is also slightly smaller than its backing made of designer cardboard. We glue the corresponding blanks. And then we glue the large circle to one of the flaps so that the middle of the circle coincides with the middle of the postcard.


Let's start decorating our postcard for Teacher's Day. I decided to make perhaps the most autumn flowers - chrysanthemums - as the main element. There are many ways to make them from paper. In this case, I suggest using this: fold colored paper into several layers and draw an approximate diagram by hand,

along which we then cut out such petals of two colors and in large quantities.

Additionally, we will make cuts between the corners to make the petals more magnificent.

Now let's glue the petals to our blanks, to the same circles with a diameter of a large coin. Glue it in several layers, shape it into a flower and fluff it up.

To ensure that the middle does not remain empty, we will fill it with a small flower, which we will make from a strip of paper of the same color as the flower itself. Cut the fringe and twist it paper strip.


Important!The strip should expand slightly along its length, then when twisting and “opening” the flower, all its petals will lie flat and be visible.
This is the flower I got.

Let's make 2 more quilling chrysanthemums, one of which will be two-color (it will have alternating petals of different colors).


Let's put the finished flowers on our blank postcard, placing them beautifully on big circle.

Add green leaves (element"wave"):

And then we’ll complement the composition with a couple of unusual curls. They are made as follows:
First, fold 4 quilling strips green, gluing their ends on one side together,

We twist the strips from the same end until a certain point,

We release the roll, allowing it to unwind a little spontaneously, after which we begin to slightly tighten the strips one by one - first the first, then the second, and so on - until our curl unwinds sufficiently,

The result should be this interesting decorative curl:

We make another one of the same kind and glue both of them to the card in suitable places.

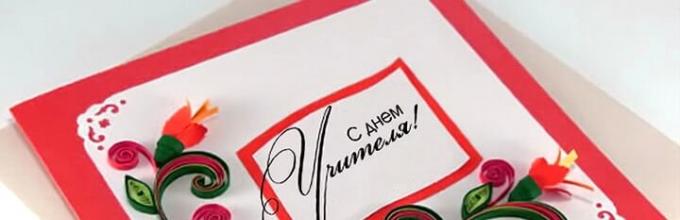
As finishing touches to the decor, we glue on the half-beads (using a hot-melt gun). And then all we have to do is paste the congratulatory inscription “Happy Teacher’s Day.” We decorate it and glue it to another fold of our postcard.

That's all, the postcard as a gift for the teacher is ready

And you can find several more options for cards for Teacher's Day - using scrapbooking and paper cutting techniques .
Hello friends! As you know, at the beginning of October Teacher's Day is celebrated - a holiday that in one way or another affects everyone: some work selflessly in the field of pedagogy, some study, and for others this day is an occasion to remember their school and student years and congratulate favorite teachers and educators or teachers of their own, already grown-up children. In Russia, Teacher's Day is officially celebrated on October 5, and, by the way, World Teacher's Day falls on the same date. In a number of countries, for example, in Ukraine, Belarus, Kazakhstan, professional holiday teachers is celebrated on the first Sunday of October, which means this year it will happen almost synchronously with the celebration in Russia.
Be that as it may, there is not much time left to prepare for the holiday, and it’s time to think about what to give the teacher. The first thing that comes to mind is traditional flowers and postcards. Moreover, it is much better if the latter are made with your own hands - such a gift is more sincere and touching and is always perceived with special trepidation. But you can learn how to do this (at least one of the options) from Ekaterina Shkodovskaya’s new master class, dedicated to creating a postcard for Teacher’s Day, decorated using the quilling technique. Along the way, you will become familiar with another method of making flowers from paper, namely paper chrysanthemums, as well as the technology for making interesting decorative curls from paper strips.
Materials and tools:
quilling paper;
sheets of paper in pale orange, light orange and bright orange;
designer cardboard, scrap paper;
scissors, quilling tool;
PVA glue;
heat gun;
half beads for decoration;
printed inscription "Happy Teacher's Day."
This time we will make a postcard with two doors. To create a postcard base, we will need a rectangle of designer cardboard measuring 28x15 cm. It must be folded in two places so that the opening parts close exactly in the middle (this will be clearly visible below).
Let's immediately prepare the following parts: 1 large circle (cut out using a regular CD) and 3 small ones (about the size of a coin).

Now we need scrap paper. I used two types: light with polka dots and dark with ornaments.

I used the light one for the postcard flaps, cutting out rectangles slightly smaller in size (2-3 mm in length and width) than the flaps. Dark - for the circle, which is also slightly smaller than its backing made of designer cardboard.
We glue the corresponding blanks. And then we glue the large circle to one of the flaps so that the middle of the circle coincides with the middle of the postcard.
Let's start decorating our postcard for Teacher's Day. I decided to make perhaps the most autumn flowers - chrysanthemums - as the main element. There are many ways to make them from paper. In this case, I suggest using this: fold colored paper into several layers and draw an approximate diagram by hand,
along which we then cut out such petals of two colors and in large quantities.

Additionally, we will make cuts between the corners to make the petals more magnificent.

Now let's glue the petals to our blanks, to the same circles with a diameter of a large coin. Glue it in several layers, shape it into a flower and fluff it up.

So, cut the fringe and twist the paper strip.


Important! The strip should expand slightly along its length, then when twisting and “opening” the flower, all its petals will lie flat and be visible.
This is the flower I got.
Let's make 2 more quilling chrysanthemums, one of which will be two-color (it will have alternating petals of different colors).


Let's put the finished flowers on our postcard blank, placing them beautifully on a large circle.
Let’s add green leaves (“wave” element):

And then we’ll complement the composition with a couple of unusual curls. They are made as follows:
- first we fold 4 green quilling strips, gluing their ends on one side to each other,

- twist the strips from the same end to a certain point,

- let go of the roll, allowing it to unwind a little spontaneously, after which we begin to slightly tighten the strips one by one - first the first, then the second and so on - until our curl unwinds sufficiently,
- cut off the end and also glue the 4 ends of the strips on the other side.
The result should be this interesting decorative curl:

We make another one of the same kind and glue both of them to the card in suitable places.
As finishing touches to the decor, we glue on the half-beads (using a hot-melt gun). And then all we have to do is paste the congratulatory inscription “Happy Teacher’s Day.” We decorate it and glue it to another fold of our postcard.
That's all, the postcard as a gift for the teacher is ready :)

* * *
Friends, next time you will find a master class on creating a quilling panel “Scientific Owl”, which can also become a wonderful handmade gift for Teacher’s Day, and the MK itself can be an interesting tool for classes with children, for example, in technology lessons or for independent mastering the quilling technique. Subscribe to site updates so you don't miss anything.
You can also find several more options for cards for Teacher's Day - using scrapbooking and paper cutting techniques.
Have a wonderful mood and success in your creativity!
Sincerely,


