If you have accumulated a sufficient number of photographs for an exhibition, it’s time to think about their design. Currently, many photo printing centers offer their services for arranging photographs in passe-partout. A photograph framed this way looks more impressive. Side margins separate the image from its surroundings and make it a separate object that attracts attention.
You can also arrange photographs yourself. We will look at two methods: gluing a photograph onto a mat and cutting out a window into the mat.
But first of all, what is a passport? Passepartout is a multi-layer cardboard designed for processing photos with a thickness of 0.8 to 3 mm. In art stores you can find mats of different colors, but the most common is white and its shades. The surface can be smooth or textured. The optimal dimensions of cardboard are 80 by 100 cm.
Method 1. Pasting a photo onto a passe-partout
We take a photograph 11 by 15 cm. For this format, we will make the side margins equal to 5 centimeters, the top - 4, bottom - 6 cm (measurement by eye). This method of arrangement is explained by the fact that the photograph must be located in the optical center of the sheet (and in the physical one). You can measure the optical center of the sheet as follows: suppose we have a sheet of 25 by 20 cm. We combine the upper left corner of the photo with the upper left corner of the mat, measure the distance from point A to point B, divide the resulting distance in half, and from this point lower the perpendicular down.
After this, measure the distance from point C to point E, divide in half in the same way and draw a parallel line relative to the bottom edge of the mat. From point C we draw a diagonal to point P. The point of intersection of two straight lines I will be exactly the coordinate where we will place the lower right corner of the image. By placing the photograph in the optical center, we get the results: the side margins are 5 cm, the top margin is 3.5 cm, and the bottom margin is 6.5 cm.

Use a pencil to mark the vertices of the photograph on the mat and turn it over. You can stick a photo with rubber glue; it can be easily removed and does not spoil the photo. You can also use double-sided stickers or corners.
Method 2. Passepartout with a window
This method of decorating photos is more expensive than gluing, but the result is worth it.
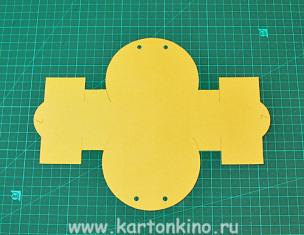
You will need a sheet of thin and a sheet of thick cardboard, a pencil, a ruler, an eraser, a cutting knife, a breadboard knife, photo corners or double-sided stickers, fine sandpaper, and paper tape.
The size of the mat is the same as in the previous example. Cut two sheets of the same size, a thin one for the backing, a thick one for the window.

Turn the thick sheet of passe-partout face down and draw a window, taking into account the margins: side - 5 cm, top - 3.5 cm, bottom - 6.5 cm. In order for the edges of the passe-partout to fit into the photo, you need to subtract 3 mm.
Using a mat cutting knife, a cutout is made on the surface of the cardboard at an angle of 45 degrees and a neat cut is made on four sides.

The bevel creates the impression smooth transition from mat to image. After cutting, we squeeze out the window and carefully sand the bevel.

We place the photograph in the optical center of the substrate mat. Glue the corners. We connect the lower part of the passe-partout to the window using paper tape on the upper side. The fastening must be on the inside.
Content
It is impossible to imagine a painting without a frame, because... without it important element the work of art looks defective. In addition, nothing decorates and gives an image more originality than a skillfully selected passe partout. It will add the necessary effectiveness and completeness to the creation, thanks to which the painting will become an important accent element in any room. It will attract the attention of your guests and fit harmoniously into the overall style of interior design.
What is passe-partout
Before ordering such a product, remember that a passe-partout is a wide frame (French passe partout), made of multi-layer cardboard, which frames a photograph, collage, drawing, illustration or any other work of art. This creates a boundary between the frame and the painting. It is customary to highlight portraits in this way. The difference between a passe-partout and a regular frame is that it is, essentially, a piece of cardboard with an oval, round or quadrangular hole cut out in the middle. Moreover, this was done for a frame of smaller thickness.
Passepartouts are presented on the modern market with a rich palette of colors and shades and a wide range of sizes, which allows you to more freely select a frame for a specific image. In addition, such a product often contains the autograph of the person depicted or explanatory signatures. A correctly selected option gives the creation its full value and helps solve a number of decorative problems associated with artistic design. When designing, designers can apply both double and triple mats.
Purpose
Having decided to order a passe-partout for a photo or any image that will look aesthetically pleasing and original, first familiarize yourself with the purposes of such an item. Often it acts as a unique element of art, emphasizing a particular work of art. In addition, this type of frame performs the following functions:
- facilitating the perception of the work due to the fact that it is separated from the rest of the interior;
- focusing on individual elements of the image that enhance the impact on viewers;
- protection of a piece of art from the negative effects of the environment.
Dimensions
The passe-partout frame (most of it) has the same dimensions on all sides. This approach is considered justified from a commercial point of view, because it can be used for both portrait and landscape versions. True, this format is not always appropriate from an aesthetic point of view. This is explained by the features visual perception person, because When considering vertical objects, the most harmonious will be the one whose lower part has more weight.
It should be said that a symmetrical frame is not always bad, for example, if the picture has bright accent in the lower part, then additional visual enhancement will not be required. There is no need for an asymmetrical mat if it is purchased for educational and scientific illustrations. In general, a well-chosen frame and dimensions can give the status of a work to any linear and color chaos, and even naive children's drawings.
What are they made from?
When planning to purchase a passport for photographs, familiarize yourself with the materials used to make such an item. For this purpose, manufacturers use a sheet of paper or cardboard, which is covered on both sides with layers of paper. The front side is covered with a colored layer. Cardboard can be plain or colored - thickness ranges from 0.5 to 3 mm. In the first case, the cut color and front side are the same, but in the second, the cut differs in the color of the top layer.
Museum-quality cardboard, which is less susceptible to fungus, has the best properties. Cardboard with conservation quality, made from natural cotton, is considered to be of higher quality - it does not allow the fungus to spread at all. There is also a material made from cellulose containing lignin - it undergoes oxidation and spoils the picture paper. More information about making a passe-partout:
- The cardboard for such a frame is sheets of whatman paper pressed into several layers, which are covered with a sheet of colored paper. Cellulose from wood fiber is often used for production.
- Cardboard consists of a surface layer, an inner layer and a reverse layer. Each of them has special requirements.
- Except aesthetic requirements, the surface of the product must be resistant to light. In this regard, paper for the surface layer is produced in highly specialized paper mills that meet high quality standards.
- The back of the item is no less important than the others, because... this layer also touches the work of art. To make the backing, acid-free paper treated with calcium carbonate is used.
- The inner layer is the thickest. To a greater extent, a standard inner layer made of wood and a layer of non-oxidizing cellulose are used. If the first one is made from selected and free from any impurities wood fiber, then this minimizes the appearance of blackheads. The advantage of cellulose is that it does not turn yellow over time and this structure provides reliable protection from any external influences.
- An additional aesthetic effect when framing is given by the painted inner layer of cardboard. The contrasting outline helps make the artwork stand out more clearly.
Methods for arranging a passe-partout
Paintings with mats can be subconsciously perceived as art objects. Sometimes, to enhance the decorative properties, a passe-partout edging is used, made in the form of a wooden or plastic strip - located between the image and the field. It is advisable, before choosing an item, to decide on the optimal way to arrange it. There are two of them:
- Below the picture. In this case, the picture is fixed on a solid sheet of cardboard. For this, rubber glue can be used, which can be easily removed if necessary - this will not spoil the design. Another way is to use corners or double-sided stickers. This location option is not suitable if the photograph is placed under glass. It can stick tightly and be irretrievably lost. In addition, this type of item adds rigidity to the children's craft and can later be placed on the wall.
- Above the picture. This option looks like a thick frame under which the finished work of art is placed. To make it, you can take a couple of sheets of cardboard: the thin one is used for the backing, and the thicker one is used to make the frame. In the latter, you will need to cut a window to the size of the picture, leaving an allowance of 3 mm, which will be used for an inclined cut at a 45-degree angle. The picture is secured to the backing and then the top frame is attached to the edges with 2-sided adhesive tape.

Options
Passepartout may differ in texture or coating, which is used as velvet, silk, linen and decorative films. White, gray or another color solution is ideal for engravings, paintings, and regular photography. Depending on the size of the creation, you can choose a narrow or wide mat for its design. The first option focuses attention on the frame, and the second adds “air” to the picture. In addition, decide on suitable option such details:
- Multilayer. It differs in that it consists of two or three versions of cardboard with different shades. At the same time, it must be combined with the image. The inner layer can be darker or lighter than the outer one. Often, a gold-colored product is used as the bottom layer, ideally combined with a gold baguette frame. Double option from close shades of the same color it can create a deep “facet” effect, which is enhanced when using thicker cardboard. A design option using a multi-layer mat, where an oval bevel is used, and then, in the form of a rectangle, separated by a wide edging, has gained some popularity.
- With edging. This is a bar (ruler) made of plastic or wood, appearance which is varied: from tinted and painted to aged, from carved to smooth. The edging acts as a partition between the picture and the mat, being an additional decor. The plank must match the mat and frame, both in color and finish. Due to the special profile shape, it can be inserted into a passe-partout window. The edging prevents the painting from coming into contact with glass, if the latter is used for decoration.
- No window cutout. In this case, the work is superimposed on the sheet of the product, so that the image is completely preserved. The bordering parts of creation are not closed.
Size selection
When choosing the optimal solution, pay attention to the diagonal, height and width of the product. Fields that are too small will not perform their primary function. Their width is almost always chosen slightly larger than the width of the frame. Sometimes wide margins are considered inappropriate because an overly large product distracts attention from the picture itself. The width of the field ranges from 1/4 to 1/3 of the narrow side of the design. If the image itself is not balanced, then it is permissible to make the side margins very wide. In addition, the wide option can be used in the following cases:
- depicts a portrait, still life;
- a large subject covering almost the entire picture;
- the landscape lacks sea (make the bottom even larger) or sky (increase the strip at the top).
Choosing a size is a serious matter. If you do not make a mistake with it, you will be able to present the image in the best possible way. Options:
- for images of all sizes – the top and side margins are equal in width to each other, the bottom margin is slightly wider;
- for medium and large ones – about 1/3 of the narrow side of the picture;
- for vertically directed ones – side margins measuring 1/3 of the width of the narrow side of the image, bottom margin – 1/3 of the height, top – 1/5;
- for small drawings with a large number of small details (for example, engravings) - a wide product up to 15 cm, and sometimes more.

Color selection
Plain products are produced in a wide range of colors - from snowy white to deep black. The mat acts as a tool to achieve color balance between the painting and the frame. When selecting, it is very important to follow the color combination:
- For black and white works, use similar options for the product and frame: black-black, white-white, black-white and vice versa.
- White color and its shades are widely used in the design of monochrome graphics and black and white photographs.
- When designing color works, pay attention to the subtlest nuances of color and light in the image and the style in which the interior of the room is designed.
- Dark products are able to enhance the intensity of the colors in the picture depending on their shade, highlighting cold or warm colors in the general range.
- Antique etchings and engravings often require options for their design in calm pastel shades that do not distract attention from the work itself.
- When using a color frame, it is advisable to focus on muted, calm tones. Saturated colors are used in the design of posters and modern graphics, and catchy poster colors are appropriate when solving special problems (design).
- Often the color of the product is chosen to match the tone of one of the elements of the picture. In most cases, it differs from the shade of the frame, although sometimes there are good combination both elements are similar in color.
- The color of whipped cream (cream) is a neutral white with a slight yellowish tint, which has long become an integral element of the “new” color scheme. It goes harmoniously with the color of stone, suede, slate gray.
- White visually increases the creation, and black - reduces it. On a white background, the picture seems to come to the foreground, and the black frame is a kind of window through which viewers look at the picture. Is it true, white often unnecessarily distracts from work, and black can negatively influence the correct perception of tonalities.
- Ivory is a soft white that is more pleasing to the eye. In interior art, the combination of ivory and black helps achieve the most dramatic sounds. This shade can reflect light, creating a feeling of warmth - goes well with muted dark colors.
- When it comes to black and white photographs, it makes sense to choose a frame gray shade– from white to black.
DIY passe-partout
If you are going to make a mat yourself, then prepare a ruler, scissors, cardboard, thick colored paper, a ruler, a metal corner and glue. Stages of work:
- Draw a rectangle twice the size of your finished piece on a blank piece of cardboard. Then cut according to the markings made and place a photograph, painting, etc. in the center of the resulting rectangle. Make sure the distance to the edges is the same. Carefully outline the photo with a pencil, remove it and, stepping back from the edges 1-2 mm, cut out a smaller rectangle. The result is a rectangle with a window cut out in the center.
- Start making the contrasting edging. Cut out two pairs of strips from colored paper (thick): the dimensions of the first two should correspond to the length of the inner window, and the second to the width. Fold each strip in half and leave a narrow edge in the center - 2 mm wide. Using a metal corner, check that all the cut strips fit.
- Next, connect the strips to the cardboard frame with glue, which is applied only to the cardboard. Pay special attention to the joints at the corners.
- As soon as the glue dries, place a photo on the back of the mat and decorate the finished work with a frame - with or without glass. If you are going to frame embroidery, first attach it to thick cardboard and secure the fabric on the back side with a small stapler or double-sided tape.

Sometimes you have to face that the baguette does not have the mat of the required color;
or the production time for the mat is set to be long, but the embroidery, for example, is intended for a gift and the deadlines are running out;
agree that there can be a lot of reasons.
If you have the desire and a little skill in working with cardboard and paper, there is always a way out. True, without a special professional tool it will not be possible to achieve a chamfer of 45° here, but you can get a thin strip 1-3 mm wide, which from a distance of about half a meter will be indistinguishable from a chamfer.
We will need:
1. Metal ruler, preferably at least 4 cm wide
2. Knife with replaceable blades
We buy in finishing materials stores, or in construction stores.
3. Double-sided tape
4. A sheet of good cardboard (that’s what it’s called - cardboard for passe-partout),
5. Paper (40x60 cm) for drawing with pastels (it can be different shades, I think made in Italy).
We buy it at a stationery store, or at an artist supply store.
If there is no paper of the required color, and the size of the mat does not exceed the size of an A3 sheet (this size is determined by the printing capability of a color printer), I simply use graphic programs to select the desired shade, “fill” the sheet, and then print it on the printer and use it in further work. Moreover, those printed on a string printer are much better than those printed on a laser printer.
The mats in the photo were made using sheets printed on a printer.

I make markings on the back of the cardboard required sizes mat, then using a knife and a ruler, very carefully cut out a frame from the purchased cardboard.
Of course, you need skill, you can practice on small pieces.
It is not possible to cut immediately in one cut, especially at the corners, so sometimes you have to cut with the knife twice. Is it better to cut on special mats or on a piece of glass or mirror? I cut on thick glass.

If the color of the mat is not suitable for this design, I continue.
Cut it out from purchased paper suitable shade the same size passe-partout. I cut out the inner window 1-1.5 mm larger than the original one, this is done so that a light strip is preserved along the inner perimeter, which visually looks the same as the “chamfer” cut into the baguette, cut at an angle of 45°.
On the cardboard passe-partout from the front side I paste strips of double-sided tape around the perimeter. At the same time, I retreat from the inner window by about 3-5 mm. Why I am doing this will become clear at the next stage.

Then I carefully “plant” the paper passe-partout onto the cardboard. I precisely place the cutout on top of the protective layer of tape.
It is most convenient to start gluing with one of the horizontal stripes.
One by one, carefully bending back the paper passe-partout, I remove the protective layer from the strips of tape and secure the horizontal and then the vertical sides.

Paper is still a delicate thing, subject to slight stretching or displacement, and when gluing it is not always possible to ensure that the remaining light strip at the passe-partout window is the same width (up to a fraction of a millimeter) on all four sides.
Using a knife and, again, a metal ruler, very delicately (so as not to cut through the cardboard mat) I trim the paper mat.
This is not difficult to do, you just need to either accurately mark it, or carefully and carefully navigate by eye.
The trimmed paper is easily removed, since (remember?!), the glued tape does not reach 3-5 mm to the inner window.
Voila! As a result, we have a ready-made mat of the desired color with a light outline of the same width

If you want to highlight the design even more, get a volumetric effect, we do contrasting outline - double passe-partout.
I usually make a similar second frame out of cardboard and connect them with double-sided tape.
But in this case, the size of the finished work is 60x45 cm, and I didn’t want to weigh it down with additional cardboard.
That's why I'm on wrong side I paste the tape and attach the top passe-partout to a sheet of contrasting paper.
Even the most beautiful and exquisite painting without the appropriate design and correctly selected frame will look poor and completely out of place. Therefore, the craftsmen and needlewomen who create masterpieces, at the end of the work, are faced with the question of how to make a mat for a painting with their own hands. Of course, you can take your creation to a framing workshop, but this option is not cheap and many will simply not afford it. That’s why the ideal solution is to figure out how to do it yourself.
What is a passe-partout and what is it for?
A passe-partout is a special cardboard frame with an oval, round or rectangular hole into which a painting, photograph or any other work is inserted. This type of frame is perfect for drawing or embroidery. The main task of the mat is to create harmony between the frame, the painting and the overall design of the room in which the work will be located. Using this design, you can focus attention on the center of the composition and harmoniously fit it into the interior.
A passe-partout will be a great way to highlight a painting on the wall, especially if the color of the wall covering and the image match. For example, if you want to hang a photo or picture of a forest in shades of green, and the wallpaper on the walls of the room is light green, a mat of some contrasting color will be the ideal solution in this case.
When creating a mat with your own hands, you can leave as much free space around the painting as you deem necessary in order to maximize the focus on the painting itself.
Important! By the way, you can place a famous quote or author’s signature in this free space.
Another important advantage of mat is its versatility - it is suitable for paintings or photographs of absolutely any size.
What is needed for production?
In order to make a mat for a painting, you need to stock up on the following materials and tools:
- Colored thick paper required color.
- Whatman paper or cardboard.
- A simple pencil.
- Scissors.
- Any glue.
- Ruler.
- Metal corner.
Master class on creating a passe-partout
Self-production A mat for a photo or picture will require some effort and patience from you, however, people with any level of skill can handle this work. Step by step diagram creation looks something like this:
- Take a sheet of thick cardboard and draw a rectangle on it. Its size should be doubled more sizes a finished drawing or painting for which a mat is made. Cut out this rectangle and place it in the center of the picture so that the distance from the sides of the picture to the edges of the frame is the same. Next, outline the drawing or picture with a simple pencil and cut out the resulting rectangle. As a result, you should get a kind of frame with a window in the middle. Set this detail aside for now.
- The next step is to make a contrasting color edging. To do this, take colored paper and cut out four strips of equal width - approximately 3 cm. The first pair of strips should be equal in size to the width of the window, the second to the length. Then bend the resulting strips in half lengthwise, leaving a narrow edge no more than 2 mm wide.
- Place the strips on the inner window and check if they fit. Using a metal triangle, measure out the excess corners and then cut them off.
- Now you need to glue the strips into the frame itself. Glue should only be applied to cardboard, because colored paper thinner and can stretch, swell, resulting in unsightly bumps.
Important! Pay special attention to the joints at the corners of the frame.
- When the glue is completely dry, you can attach a picture or drawing to the back side and frame the finished work with or without glass.
Important! It is worth noting the peculiarity of the design of the embroidered work in the passe-partout. It must be fixed on a sheet of thick cardboard using a stapler or tape, and only after that decorate the passe-partout with a frame.
Small tricks that will make the mat a masterpiece:
- When choosing the width of the mat, you need to take into account the fact that small images look more impressive in narrow frames, and bright and large ones - in wide ones.
- The passe-partout should be twice as wide as the frame.
- In order for the picture and mat to fit freely in the frame, they should be made 3 mm smaller on all sides than the dimensions of the frame itself.
- For a romantic picture, the mat can be decorated with ribbons, lace or dried flowers - this will add even more charm to the work.
- A passe-partout for children's drawings can be decorated with a variety of badges, buttons, mini-toys and other cute things.
Important! Mats made from fabric look very original. They add special warmth and comfort to the interior.
Video material
No matter how beautiful and unique a painting may be, it can be ruined by a completely inappropriate and incorrectly selected frame. Beginners and experienced needlewomen very often face the question of beautiful and correctly selected design of a completed handicraft. The simplest and most affordable solution to this complex and important issue will be to create a passe-partout with your own hands for registration. finished product.
Of course, now you can easily purchase a wide variety of frames in specialized stores. However, you will not always be able to find exactly what you saw in your imagination and idea of your product. In such cases, you will need to put in very little effort and spend a little of your time and create a passe-partout and a picture frame with your own hands.

When decorating paintings made of fabric or beads, it is very important to correctly and organically fit the mat into the finished work. The role of mat as a decorative element cannot be overestimated. Making your own mat allows you to give a photograph or embroidery a sense of space, leaving as much free space along the perimeter, as much as necessary to indicate emphasis, place a corporate signature or text inscription. In addition, you do not have to “adjust” the dimensions of the work to fit the mat, because it, in fact, has universal dimensions and characteristics.
We study some aspects and rules for creating a passe-partout with your own hands
If you decide to make your own passe-partout, for example, from cardboard, you should know and take into account the following features and rules:
- When choosing the width of the frame you like, you need to take into account the fact that small images and paintings look more beautiful in narrow frames.
- The backing for your mat should be chosen according to its texture and color scheme in such a way as to complement and enhance the finished work without distracting attention from it. If you want to add a sense of depth to your artwork, create a double mat. Often, the color of the outer mat reflects the main color of the work, while the color scheme of the inner one focuses attention on interesting details. All sides of your mat can be the same width, or the bottom edge can be twelve centimeters wider than the other three pieces. In order to determine the width of the decorative mat that suits you, you can experiment with strips of paper.
- To freely place the mat and backing cardboard in the frame, shape them three millimeters smaller than the size of the sides of the inner frame of your work.
- Opt for a hard backing layer of cardboard or plywood to avoid warping of the finished painting.
- The frame must support the entire glass and have enough depth to accommodate the cardboard backing and mat.
- The outer side of the inner mat should be six millimeters smaller than the outer sides of the outer mat.

We present to your attention detailed master class for making mats for embroidered paintings or photographs. To work you will need following materials and tools:
- Sheets of cardboard;
- Colored thick paper;
- Sharp scissors;
- Ruler;
- Metal corner;
- PVA glue.
Start making a passe-partout. On a piece of thick cardboard, draw a rectangle whose dimensions are twice as large as the dimensions of the finished product that you want to place on the passe-partout. The distance to the edges of the frame should be the same. Then carefully trace the photo or drawing with a pencil, remove the work and, stepping back from the edge just a millimeter or two, cut out a rectangle. You should end up with a cardboard rectangle with a window cut out in the center.

Now you can start gluing the strips to the cardboard frame. Carefully glue the strips, paying attention special attention joints at corners.
When the glue has dried, you can place a drawing or photo on the back of the passport, and then decorate the finished work with a frame (with or without glass, it’s up to you). If you plan to place embroidery on a passe-partout, you must first attach it to a sheet of thick cardboard, securing the fabric on the back side with double-sided tape or a small stapler.
Thematic video on the topic of the article
We present to your attention a selection interesting video on the topic of the article presented. We hope you find it interesting and useful. Enjoy watching.