Absolutely, each of you made small aircraft in childhood - airplanes, helicopters, various weather vanes. At the same time, hardly anyone thought that making paper products is a fairly ancient Japanese art called origami.
That part of this truly fascinating science, which explains how to make various (schemes): fighter, bomber, light glider and many others, is called aerogs. The existing models are so diverse that it is simply not possible to describe and study them all.
Where did the paper airplane come from?
If you put aside the Japanese history of the development of origami and turn your gaze to Europe, you can see that Leonardo da Vinci loved to build paper models of airplanes - their diagrams remain relevant today. Using parchment, he made one of the first airplane models. A little later, the Montgolfier brothers built a paper model hot air balloon. By the way, paper ones are very popular and today, filled with warm air from a burning candle, they can rise into the air a considerable distance.
John Cayley is considered the inventor of the first glider models. He made such airplanes from flax at the beginning of the 18th century; they were supposed to be launched manually.
Despite the fact that the earliest mention of flying models dates back to 1909, paper crafts are also very popular today. Children begin to assemble airplanes, the designs of which are amazing in their diversity, at the age of 4-5, and for some this hobby remains relevant throughout their lives.
Glider

One of them is enough simple models, which each of you folded in childhood, is a paper airplane (diagram below) called “Arrow” or some kind of “Glider”. This model has excellent flight characteristics and is very easy to make. You can make a paper airplane - the diagram is in front of you - in just six steps:
- Place a rectangular piece of paper in front of you and fold it in half along the long side (lengthwise);
- bend the corners towards the center of the sheet inwards, forming an isosceles triangle; try to make the sides as even as possible, the flight characteristics of the product will depend on this;
- bend the resulting structure in width so that about 2-3 cm remains from the corner to the bottom edge;
- fold the isosceles triangle again, and bend the corner that sticks out from under it upward, thereby fixing the fuselage;
- turn the resulting structure over and bend it in half lengthwise;
- bend the wings, make them wider or narrower at your discretion, this will determine how high and easily the airplane will fly.
Zilk
This German paper airplane, the design of which is also not very complicated, is very maneuverable and has increased speed characteristics. This is achieved by combining a light tail and a fairly heavy fuselage, as a result the wind is not a hindrance to it.

Origami paper airplane - Zilka diagram:
- take a rectangular piece of paper and bend it in half lengthwise (from right to left), then straighten it again;
- now do the same from top to bottom, straighten the sheet and bend the top part to the middle (widthwise);
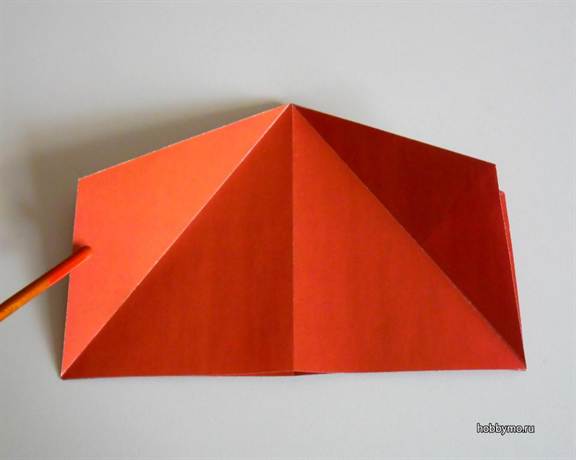
- bend the top corners inward to the center line, upper part should look like a truncated pyramid;
- fold the top part in half from top to bottom, touching the center line again;
- turn the structure over with its back side facing you and fold it in half lengthwise from right to left;
- bend the upper right right corner downwards and straighten it again;
- open the right corner and bend it downwards, while folding the upper part in half back;
- make the right wing - to do this, bend the top sheet diagonally to the right;
- turn the product over and decorate the second wing;
- spread your wings - the plane is ready to fly.
Delta

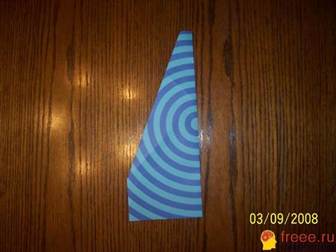
Another truly flying model. Let's try to make such an airplane out of paper, we have a diagram:
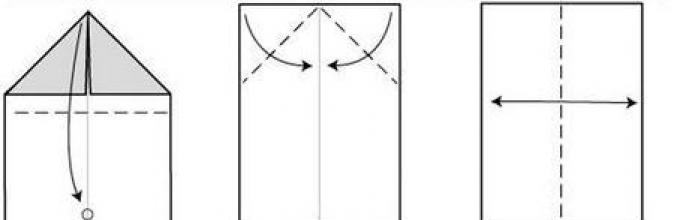
- take a sheet of paper (rectangular) and mark the main horizontal axis;
- leave a small mark in the middle, dividing the sheet vertically;
- divide left side the blanks into 4 equal parts, while bending 2 more lines;
- twist the lower part to the central axis and fix the line to the middle, do the same with the upper half;
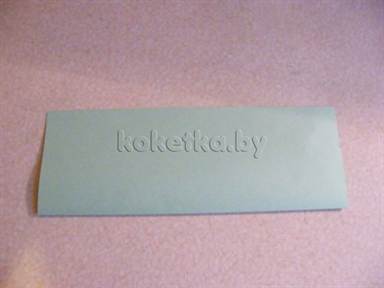
- Now we bend the right side vertically towards the middle of the sheet;
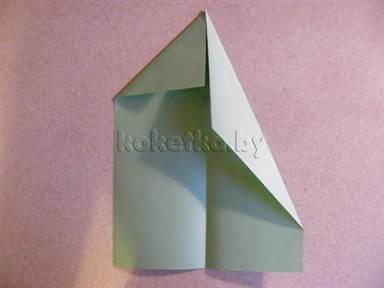
- after this, the edge of the workpiece must be bent in such a way as to obtain an angle that starts from the middle of the part and reaches the third bend line (shown in the diagram, Fig. 4);
- fold the other edge in the same way;
- bend the resulting sharp triangle to the top formed by the sides;
- tuck the protruding part of the upper wing into the small pocket you have created;
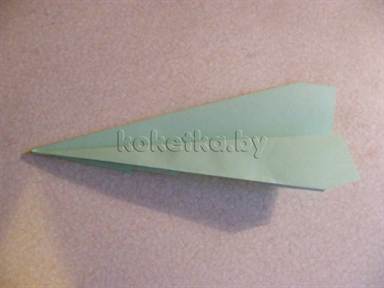
- bend the workpiece in half lengthwise along the center line and begin to form the wings.
That's all, the Delta aircraft is ready! Launch!
I would like to add that when performing this model it is best not to use too much thick paper, otherwise you won’t be able to lay out the nose lines beautifully and clearly, and this may affect the aerodynamic characteristics of the airplane.
Canard
The next paper airplane, the design of which is a little more complicated than the previous ones, is intended for long-distance flights. Its distinctive feature is the ability to beautifully plan and carefully land on the runway.

So let's begin:
- take a sheet of A4), bend it in half lengthwise (from right to left) and then unbend it again to its original state;
- bend the upper corners to the central center line, which is clearly visible;
- turn the structure over;
- bend the side edges towards the center, but there is no need to bend the back part;
- fold the central diamond in half, from top to bottom;
- fold the top sheet of the central triangle upward, placing the fold just below the previous fold;
- bend the resulting product back in half;
- lay down top layer diagonally to the right - this will be the wing; turn the workpiece over and fold the second wing of the aircraft.
Spread your wings, the Canard is ready to fly. Of course, some evil tongues say that this aircraft model is non-flying, but who is stopping you from refuting this statement. Make such an airplane yourself and check it out.
Little Nicky
To make such an origami plane from paper, the diagram will be very useful to you, because “Little Nicky” is not so easy to fold, you need to be very careful. This curved-wing airplane is very reminiscent of a fighter, it has excellent maneuverability and can reach good speed.

To make this aircraft you will need a square sheet of paper:
- bend the sheet in half, and then fold the right and left rectangular parts in half too, you should get 4 equal parts;
- bend the lower corners to the first folds and mark the fold lines;
- turn the structure over and bend the triangles towards the center;
- then the lower acute corner of the figure and turn it down and back so that it touches the upper border of the sheet;
- now bend the side parts towards the center;
- turn the product over and press on the top edge of the craft, while pulling the layers out;
- bend the resulting triangle back as shown in the figure;
- fold the airplane in half lengthwise, bend the wings down;
- bend the edges of the wings and straighten the airplane.
That's it, baby Niki is ready for long journeys! Let's fly!
Another option
But what if you still can’t fold airplanes, or maybe you just want to try something new?
There is another way to make paper airplanes yourself - print out the diagrams, cut out the finished parts and bend them along the suggested lines. By collecting such paper models, you can get a lot of attack aircraft, fighters and bombers no worse than real ones, and if you collect a lot of them, you can organize a personal mini-exhibition that your friends will appreciate.

- if you cannot print a color picture, it’s okay - use a black and white printer, and then color the finished plane;
- if you want to glue a large plane, then take fairly thick paper, otherwise the parts will be deformed;
- for a small airplane, as well as for working out small details, use thin office paper, it is easier to glue;
- To ensure that the folds are even and neat, use a metal ruler and;
- to beautifully round the necessary parts, use a simple pencil and move it along the workpiece until the edges begin to curl;
- It is better to paint over the white side sections immediately, otherwise they may spoil the appearance of the finished model;
- for work it is better to use transparent glue of the “Moment” type;
Its flight characteristics depend on how correctly and accurately you fold your model airplane. Despite the fact that paper is a fairly light and thin material, when folded correctly, it has sufficient strength and, under certain conditions, can retain its shape for a long time.
Take your time, try to follow the instructions exactly - the more accurately you can repeat the diagram, the better the airplane will turn out.
For a good flight, choose models whose wing area is much larger than the fuselage.
When working, pay special attention to the tail - if they are folded incorrectly, the plane will not fly.
Choose models with curved wings, this will help improve the aerodynamic characteristics of the airplane and increase its flight range.
First flight
All paper airplane models, the diagrams of which are discussed in this article, fly quite well (maybe with the exception of the Canard). However, there are several rules for a successful launch:
- make sure that the plane is folded correctly, in exact accordance with the diagram;
- carefully check how smoothly and correctly the wings of the model are deployed;
- launch the plane upward, maintaining an angle of approximately 40-45˚;
- adjust the launch force, it depends on whether your device will glide easily or fly fast enough;
Good luck with your flights, endurance and patience. Making an ordinary airplane out of paper is not a difficult task - the main thing is that it is light, original and truly able to fly.
Many of us (yes, almost all!) folded paper airplanes as children. But still not all mothers and fathers know that they were engaged in aerogami, one of the branches of origami. In Japanese, by the way, it will not be aerogi at all, but kami hikoki - kami = paper, hikoki = plane. So we present to you today the 12 most popular models Kami Hikoki - paper airplanes that are ready to bravely cut through the expanses of the ocean of air and will undoubtedly delight your children!
Glider No. 1

Glider No. 2

(Click on diagram to enlarge)
Scientists believe that the use of paper to create toys began 2000 years ago in China, where they invented kites. The modern paper airplane, according to one of the most popular versions, was invented (yes, yes, that’s right!) in 1930 by Jack Northrop, co-founder of Lockheed Corporation. Northrop used paper airplanes to test new ideas in the design of real airplanes.
"Silk"

(Click on diagram to enlarge)
"Drake" (Canard)

(Click on diagram to enlarge)
"Delta"

(Click on diagram to enlarge)
In 1989, one Andy Chipling founded the Paper Aircraft Association, and in 2006 the first launch championship was held paper airplanes. The competition is held in three disciplines: the longest distance, the longest gliding and aerobatics - performing aerobatic maneuvers using paper models.
Shuttle

(Click on diagram to enlarge)
However, there are also commercial competitions. Perhaps the most famous of them is Red Bull Paper Wings. The last world championship was held in Austria, the designers competed in three categories: “aerobatics”, “flight range” and “flight duration”.
"Gomez"

(Click on diagram to enlarge)
Numerous attempts to increase the time a paper airplane stays in the air from time to time lead to the breaking of new barriers in this sport. Ken Blackburn held the world record for 13 years (1983-1996) and won it again on October 8, 1998, by throwing a paper airplane indoors so that it stayed in the air for 27.6 seconds. This result was confirmed by representatives of the Guinness Book of Records and CNN reporters. The paper airplane used by Blackburn can be classified as a glider.
"Locked"

(Click on diagram to enlarge)
Although light paper airplanes are believed to fly further than heavy ones, this claim is disputed by Blackburn. Blackburn's world record-breaking airplane in 1983 was designed on the assumption that the best planes have short wings and are “heavy” during the launch phase, when a person throws them into the air. Although longer wings and less weight would seem to help the airplane achieve longer flight times, such a paper airplane cannot be thrown high. According to Blackburn, “to achieve maximum altitude and a good transition to gliding flight, the throw should be made with a deviation from the vertical of no more than 10 degrees.”
Who said that origami is an activity for girls? Yes, yes, a lot of flowers, butterflies, hearts, of course, can lead a person to such a conclusion. But, everything is completely wrong, because among origami crafts there are those that have the right to be called purely masculine. And this is a very realistic technique, weapons and armor, made of ordinary paper. Like, for example, today's craft - an origami f15 fighter.
Today's master class is a detailed diagram demonstrating how to make an airplane from a sheet office paper. And it doesn’t matter that now you can only do origami folding, although you dream of real fighting machines. After all, such work with paper will allow you to find out more about technology, so that in the near future you can easily and simply design working mechanisms.
So, if you are ready to start creating an origami f15 fighter, then go ahead and take the provided boarding instructions.


Well, for those who still don’t know how to get out of dead-end situations only through origami diagrams and tips on them, we offer an excellent video master class that will put everything in its place.
Paper is a great tool for creativity. The art of origami provides us with great opportunities, as well as the opportunity to create paper crafts ourselves. You can do a lot with paper crafts. For example, create a beautiful decoration. You can also make it from colored paper beautiful flowers, postcards, cars and much more. Masters even create entire flower beds from paper flowers.
The art of origami is a great way to keep your child busy and spend time together. One of the best and most useful hobbies for children. Making these crafts develops accuracy, attention and fine motor skills. Airplanes using the origami technique, made from paper, come in a wide variety: from the classic ones that everyone made in childhood, to the coolest fighters. The problem is that not all of them are good flying airplanes. You can consider several schemes of the simplest and fastest models. You will soon learn how to make a beautiful airplane out of paper using the origami technique.
Making an airplane from childhood using origami technique
Take paper of any color, A4 format.
Folds in half lengthwise.
It is straightened back and placed vertically. The corners are bent towards the middle.

Then the sides are folded inwards again, as shown in the photo.

Now it bends in half, lengthwise.

We need to spread our wings. Fold them over the sides.
It turns out an old familiar airplane, like this:

More difficult work using plain paper
The creators claim that he holds the record for longest flights. The paper format is the same, A4. The sheet is taken by the corner and bent into a triangle.

Then you need to straighten it back and, holding the other corner, bend it into a triangle too. Folds are needed, so you need to carefully iron the folds. It turns out like this:


Now you need to fold the future plane in half, lengthwise.
Unfold it back and fold it again, but across it.

The middle is folded upward and two new side lines are made for the fold.

Now the sides are bent, up to the fold line and again.


The sides are now vertical and you need to bend the nose towards them.

The plane neatly folds in half.

The wings bend down.

And the plane is ready!
Just don’t throw the airplane too hard, this will only make it fly worse.
We create a fighter plane using interesting designs
In the instructions for the airplane, the creators claim that it flies perfectly in open areas. He needs room to fly.
The paper format does not change, A4. The sheet is folded in half, lengthwise, then unfolded.
Now folds across.

The corners are bent inward and straightened again.

The side parts are folded again, but now up to the fold line.

A pencil is inserted into the side parts and moves them apart, making a pocket.
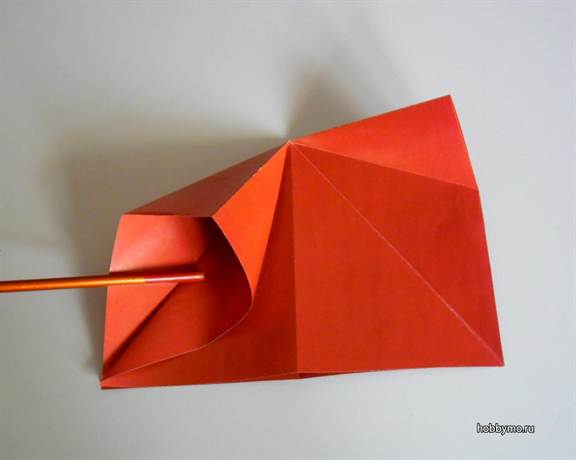
The sides are flattened and smoothed.

Fold in half, towards the edge. You will get a figure like this:
The movable top of the small triangles now bends inward.

The figure is turned to the opposite side and here the sides are also bent.

Bend diagonally towards the middle, as shown in the photo.

The sides of the resulting diamonds are folded under the figure.

It turns out to be a triangle that needs to be folded in half vertically.

The figure is placed down with the longer side and a line is drawn, approximately 2.5 cm from the edge of the fold. Like this.

The upper part of the triangle (wing) bends down exactly along the line.

It's the same on the other side.

The movable edge of the delta wing bends upward at a right angle.


Who hasn't made an airplane from a piece of notebook paper? Indeed, depending on the circumstances, it can become a vehicle for a love note, a means to calm a child’s crying, or a projectile in a gambling competition. Until recently, few people knew that the production of such three-dimensional figures is part of a surprisingly ancient ritual art that arose in China immediately after the invention of paper.
Origami is the name of the technology self made, which offers an airplane workshop where you can learn new techniques to improve your aircraft. appearance and flight abilities.


Standard model
Almost any paper is suitable as a material for work: office or drawing sheets, and thinner ones - notebooks or newspaper. The folding process itself will not take much time, and you can practice on different textures and sizes.

Before you make an airplane with your own hands, you need to learn the main rule of classic origami - the folds must be neat and sharp, the surfaces must be perfectly smooth.

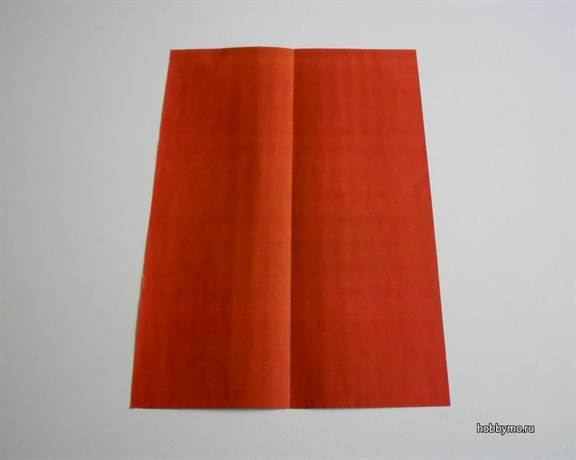
Take a rectangular sheet and begin step-by-step actions:
- Fold the paper in half, parallel to the long edge.
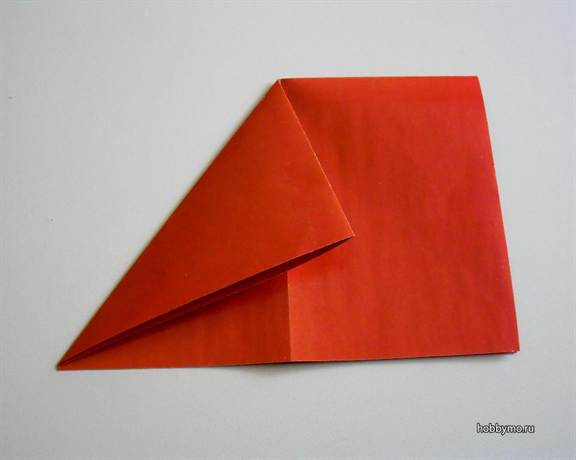
- We place the workpiece in a house and straighten it with the edge outward.
- We bring two corners to the axial fold and fold them into triangles. The result is a figure similar to a house with a roof.
- We fold the lower corners of the roof so that the ribs are in the middle, close to each other.
- We fold the model along the fold that was made in step N1, we also secure the folds, and the body of the aircraft is already emerging in front of us.
- We make wings: symmetrically on the right and left sides we lower the upper ribs close to the axial fold.
- We spread the wings 90 degrees to the body.


Jet flying model
This is a more complex origami model: a template is pre-made with various types folds that outline the edges of the structure, creating a kind of pattern for folding surfaces at certain angles.

To work, you need a square blank, but it is better to use special origami paper. The term “deep fold” refers to a double fold: fold, unfold, and fold again in the opposite direction.

Step-by-step instructions for folding the flying template jet plane origami:

We make a deep middle fold. We bring the parallel sides to the center with ordinary folds, so as to divide the workpiece into 4 identical rectangles.

We make a middle deep fold crosswise. Fold the sides towards the axis. 16 identical squares are marked on the unfolded blank. Turn the paper over and fold it diagonally.

Having set the diagonal vertically, we bring the left corner of the rhombus to the center and bend it into a triangle.

Then we apply another corner fold on the left segment, assembling the other half of the rhombus along the previously marked folds so that the end result is a trapezoid. In order to correctly complete this and subsequent stages of constructing the wings and tail of an airplane, it is worth using photo and video illustrations of this origami model.


Airship, hang glider, and helicopter
Small flying objects can be made from lightweight paper with additional details for balance. This is a modular type of origami that is also used in complex 3D aircraft models. In this case, several individual blanks are cut out of paper according to geometric patterns and are joined without the use of glue.

The simplest device for launching from a high position can be made from a strip of paper 20 cm long and 2 cm wide. Stepping 2 cm from the edges, you need to make two cuts of 1 cm each so that you can thread them into each other and get a figure similar for a fish.
For hang glider wings you will need a rectangle with a width to length ratio of ¼. If you use a standard paper clip as a weight, then the dimensions of the workpiece are 5x20 cm.

We draw and cut out a uniform arc along the entire length of the rectangle, make a 1 cm wide fold on the straight edge and straighten the cuff at a right angle. We fix the weight on the roundness of the wing in the middle, and placing the surface of the wings parallel to the floor - we launch.

For a helicopter with two blades, you need to make a drawing from two rectangles 10x8 and 8x3. The smaller one should be joined in width, located in the middle of the larger one.


At the junction we make a bend and form the leg at a right angle. Then we divide the large part in half and cut along the fold, forming 2 blades on the right and left. We attach a weight to the lower leg and launch it from a height.

Photos of airplanes using origami technique


