Summer has arrived and we've started pairing sandals with our outfits. They are comfortable, beautiful and versatile. Many of us have several pairs at once and continue to add to our collection every season. How do you feel about having personalized sandals? Not like everyone else? Agree, it sounds good. You can make them yourself. You will simultaneously save money on buying new ones and get a unique pair of shoes. Any fashionista can make them without having special skills for this. We offer you steps that will explain to you how to get this or that result. Knock out suitable option and create!
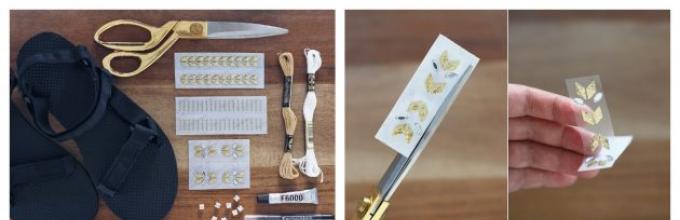
Any dark shoe will look smart if you add gold metallic material to the heel and a leather strap and cut out a zigzag pattern using scissors.
In recommended stores you will also find metallic stickers that can be easily applied to leather shoes, completely changing their appearance.
You can create real gladiator sandals. To do this, you will need the simplest leather sandals and leather bands that match their texture. The length of the ribbons depends entirely on how high you want to tie them on your shins. There is another option for how to decorate a pair of sandals in a gladiator style. For this method, prepare skeins with colored threads and create any patterns with your own hands, braiding straps with threads.
Buy large stones of various shapes and metal frames for them in the store. Using pliers, secure the latter to the stones, and then, using glue, decorate the sandals with stones. Also stick multi-colored beads onto your shoes, creating patterns from them, or make tassels from multi-colored strips of leather. You can decorate your sandals by stringing beads or coral-shaped decorations onto a fishing line and attaching them to the sides of the sandals, decorating the leather strip.
Sandals that have a simple thin stripe and a stripe that secures the shoe at the ankle can be decorated with a decorative contrasting insert.


 New way, decorate sandals with your own hands - study a whole selection of tutorials in pictures.
  A new way to decorate sandals with your own hands is to study a whole selection of tutorials in pictures.
 A new way to decorate sandals with your own hands is to study a whole selection of tutorials in pictures.
 A new way to decorate sandals with your own hands is to study a whole selection of tutorials in pictures.

 A new way to decorate sandals with your own hands is to study a whole selection of tutorials in pictures.
 A new way to decorate sandals with your own hands is to study a whole selection of tutorials in pictures. A new way to decorate sandals with your own hands is to study a whole selection of tutorials in pictures.
  A new way to decorate sandals with your own hands is to study a whole selection of tutorials in pictures.
 A new way to decorate sandals with your own hands is to study a whole selection of tutorials in pictures.
 A new way to decorate sandals with your own hands is to study a whole selection of tutorials in pictures.
 How sometimes they suddenly come to mind good ideas. I was wandering around a shoe store, and suddenly my gaze fell on women's sandals in greek style. Sandals that were almost entirely lace-up. Yes, that's it great solution for on a quick fix, especially for those who are not very good with sewing and shoe making!
So, I present to your attention doll sandals that do not need to be sewn. Creating them does not require any special skills or time.
You will need the following materials:
1. Thick suede, leather or leatherette . Keep in mind that the underside of the material will be visible in the insole area. Suede is best suited in this case.
2. Thick cardboard to give rigidity to the structure. Not corrugated, but the kind that is used in packages as a substrate. If you find a material for the sole that does not bend, you can do without cardboard at all.
3. Outsole material . Everything that is at hand - linoleum, rubber foam or foam, leather, shoe materials.
4. Thin cord , thick as waxed and similar. For large legs, you can use soutache and other thicker cords.
5. Two types of adhesives - “Moment universal gel” and “Moment super-glue gel” . The universal gel is good because it sets quickly, but allows time for correction. It easily rolls off your fingers, and after drying, you can simply pull it off with a film from the dirty part. Super glue is needed for instant and rigid fixation of small parts; I find it more convenient to work with gel; it sets faster than regular super glue, but does not dry as quickly in the air.
6. Tools - scissors, punch/awl, hard backing.
Here is our pattern. It is designed for the legs of paolok and similar dolls; when printing, you need to set the scale to 100%. For other legs you can easily adjust the size.
I give a description for my materials, and you adjust according to the situation.
STEP 1. Cut out 2 pieces of sandals (I have natural furniture suede), punch holes for the cord. Cut out 2 interlayer pieces from cardboard. Cut 2 parts from the sole material (I have thin prophylaxis for shoes). We cut out the right and left parts respectively. For the first time, in a burst of inspiration, I sewed two left sandals :)

STEP 2. Glue the parts together. First, we smear the cardboard piece with “universal Moment Gel” and IMMEDIATELY press it to the suede pattern from the FRONT part. There is no need to withstand anything, contrary to the manufacturer’s recommendations. In 10 min. a thin layer of glue on a small part will dry completely. Therefore, press lightly and set aside for a couple of minutes. At this time we glue the second sandal. A couple of minutes have passed - now you can press it hard. And here the manufacturer is right, “the decisive factor is the compression force, not the pressing time.”
We glue the sole to the cardboard in the same way, only we coat both parts - first the cardboard, then the sole.

STEP 3. Set aside the glued parts to dry for 5 minutes and press firmly again. Take “Moment Super Glue” and overlap the back seam.

STEP 4. We decorate the unaesthetic edge of the sole. You can use a fom, a strip of suede, decorative cord- what is enough imagination? I took rubber foam. Carefully glue it with super glue, covering only the end of the sole (both layers). We also coat the sides of the sandals at the junction so that they stick to the edge on top and do not come off the sole when lacing.

STEP 5. Insert the cord, put it on the leg, tighten it. Voila, your doll is wearing shoes!


Please note that the back seam is glued in the wrong direction. The cut needs to look inward, not outward.


Do you love to sew and can’t imagine your life without sewing machine? Then you will certainly appreciate the idea of sewing such beautiful sandals for your child! Agree: this idea is a real curiosity, because you rarely see sewn shoes self made. There is nothing complicated here: you just need to cut out the necessary parts, put everything together and stitch.
But special attention you need to pay attention to the materials: the top should be soft, and the sole, naturally, quite rigid. If desired, you can even sew a soft underliner here (in the world - “instep support” or “pad”), so everything is in your hands!
To create such shoes you will need: thick cotton for the upper part (you can also add non-woven fabric or adhesive calico), rubberized material for the sole (preferably with stoppers so that the baby does not slip in the sandals), threads, a border in the color of the fabric, Velcro, scissors , paper and pencil for the template, and tailoring pins.
So, how to sew children's sandals?
Use the pattern template, which is located at the end of this master class. Place the paper on the monitor, trace the contours of the parts you need, and then cut them out, adding 5 mm seam allowances on all sides. Then place the templates on the fabric, pin and cut out.

Make sure that all details are cut in a mirror image.

If you decide to use non-woven fabric or adhesive calico, trace the templates on this material as well. After cutting out, the interlining must be folded with the corresponding cotton parts and ironed together. The hot temperature bonds the interlining to the fabric, so you should end up with a dense material.

These are the details you should get for a pair of sandals. Two fabric soles, two straps and two parts that will be located above the toes.

Attach the Velcro to the strap. To the part that sticks out to the side, you need to sew one part of the Velcro (softer), and to the opposite corner - the second part (such as bristles). The same thing applies to the second strap.

A very important part of the master class is processing the edges of the material. The point is that the fabric (especially if you have sealed it with calico or non-woven fabric) will be quite stiff and can rub the baby’s feet. So those edges that will come into contact with the baby’s delicate skin need to be trimmed with a border. It is best to choose a soft material for this purpose, aimed specifically at children's clothing or shoes. Fold the border over so it covers both sides of the edge and stitch in the places shown in the photo. The same sides where the border is not stitched will be sewn with the sole.

Sew the straps and upper parts of the sandals to the fabric sole.

Using the same patterns, cut out two soles from rubber material. Place them under fabric sandals and secure them with pins. Sew a border around the entire perimeter of the edge.

DIY children's sandals are ready! And here is the pattern for the details of these shoes! Increase it according to your child's shoe size.
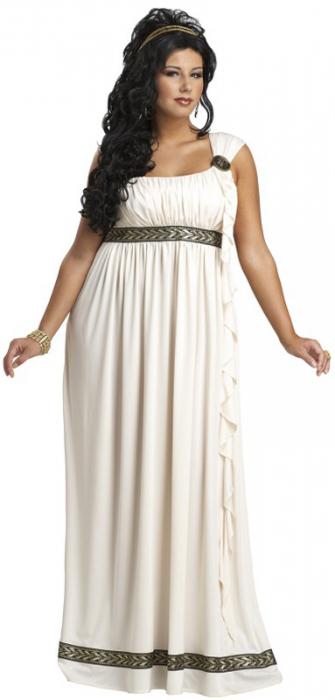
One of the characteristic features of ancient Greek society is the complete absence of large-scale slavery. This is what influenced the development of democracy in this state. The greatest ancient Greek culture was that of the free citizen. The costume of the ancient Greeks could not help but inherit this feature. In addition, the freedom of citizens was reflected not only in their clothing, but also in their hairstyle and jewelry. Below will be briefly summarized ancient Greece.
Ancient Greece costume
The cultivated craving for simplicity led to the fact that clothing in the ancient state was, perhaps, one of the few ways to stand out from other people and stand out from the crowd. It should be noted that the ancient Greek dress only seems natural and simple. Although, at first glance, what could be simpler - fold it in half and wrap a couple of pieces of fabric around the body? However, in fact, the fashion of ancient Greece consisted of all kinds of pinching, draping and different ways of wearing the same thing. This was considered a real art, which was brought up in the family from a young age. In addition, such a skill was part of good manners and etiquette.
Color and fabric
The ancient Greeks, whose clothing previously consisted only of pieces of fabric, began to sew tailored suits relatively early. Ionian flax was soon replaced by woolen threads introduced by the Dorians. They were painted blue, purple, red and yellow colors. A complex multi-colored ornament could be achieved by weaving with threads of a different color or by embroidering on the main background. As a rule, the Greek chiton was embroidered along the border with geometric patterns, and leaves, stars or flowers could be embroidered on the field. In addition, there were various figurines of gods and animals, scenes of battles and hunting.
Pink or pink clothes were especially popular in ancient Greece. white flowers, which were edged with a contrasting red or black border.
The history of clothing tells that in the early period the Hellenes preferred large designs. However, starting from the turn of the 5th-4th centuries BC, plain fabric began to predominate in the wardrobe of the Greeks. Often the costume of ancient Greece was either brown or decorated with a blue or yellow border, as well as an ornament that was a broken line with curls. It was called a meander.
Chiton
The main clothing of the ancient Greeks, the name of which was the chiton, as already mentioned, was distinguished by its simplicity and convenience. Chiton is the main item of clothing for a Greek. It was a piece of fabric that had a hole for the arm on one side and was attached to the shoulder with a buckle or clasp on the other. Less often it was simply stitched together. Before the wars with the Persians began, in ancient Greece it was customary to tie the waist tightly. The belt played a special role in the ancient Greek costume. It had two functions: firstly, to select the chiton, and secondly, to make it of the required length. Short version- to the knees - the Dorians loved it more, and the Ionians preferred to wear a chiton to the toes. A little later, fashion changed, so even the Athenians began to wear a shortened Dorian version of this clothing.

There were few slaves in Greece, but for them there was a special version of the tunic: it was distinguished by the fact that the slave’s right shoulder always remained open.
Himation
Himation, or himation, is a spacious cloak that the ancient Greeks threw over a chiton. The clothing was fastened to the chest just below the left shoulder, and then the fabric was simply thrown behind the back.

Women also wore gimation when leaving the house. They could throw the edge of this cloak over their heads. Terracotta figurines and multiple designs on vases demonstrate the endless variety of ways to wear a himation. If the weather was hot outside, it served as nothing more than a scarf, which was thrown back over the arms bent at the elbows. But if she wanted, the girl could easily wrap herself entirely in it in such a way that even part of her face was hidden from view.
Chlamys
In addition to the long cloak - himation, the ancient Greeks also had a short cloak, which was called the chlamys. It was fastened with a clasp at the neck. The chlamys was worn on the road, during wars or hunting by the ancient Greeks. Clothes in Athens were reserved only for young guys, and in Sparta chlamys could only be worn by adult citizens.
Tunic
Women in ancient Greece knew hundreds of ways to turn simple clothes- the same as for men - in a refined and original costume. One of the varieties of chiton is a tunic; it fell to the heels and was made of soft, but at the same time heavy woolen fabric. In most cases it was white with a colored border. The folds on the tunic, draped in many ways, were held in place by a belt that held the garment together. Using irons and starch, the folds were carefully fixed. It should be noted that the girls wore a belt at the waist, but married women I should have worn it under my chest.
It was the loose style of clothing that provided great scope for all sorts of feminine tricks for modeling the figure. Usually, special fabric inserts could be hemmed under the tunic to make the chest fuller and the hips more rounded. Strips of linen canvas could be used to pull the bulging belly tightly. Women who were tall, wore shoes with very thin soles, while short girls, on the contrary, wore thick ones.
Fans in the shape of a lotus leaf were popular among Greek women. They were usually painted blue.
Hairstyles in ancient Greece
The hairstyles of the inhabitants of Greece, which are depicted on vases and frescoes, are striking in their diversity. Assyrian fashions dominated during archaic times. During this period, they also preferred not to cut their hair, but to carefully curl it and then intertwine it with each other. According to Cretan fashion, young men preferred to wear their hair, which was divided into strands that reached the elbows in length.
Greek men wore long and thick beards. They went from the temples to the cheeks and protruded strongly forward, leaving the strip around the mouth free. Often the beard was cut so that it bristled downwards like a comb and curled. A thick beard among the Greeks was considered a sign of the masculinity of its bearer. However, after the Greco-Persian War, it began to be somewhat shortened, and from the period of Alexander the Great, the Greeks generally preferred to shave. However, the razor was known to the Hellenes since the Mycenaean period. Later, some Athenian fashionistas, even during the time of Pericles, plucked or shaved their hair, for which they were ridiculed by the townspeople.
For a long time long hair were considered a sign of noble origin. However, by the 4th century BC, the male population began to cut their hair relatively short so that it could lie around the head in natural curls. The curls were left only to children, and while the young man was studying at the gymnasium, short hairstyle was required. Later, when he became a citizen, he was free to choose any length, and in most cases they settled on the medium one.

In Greece, there were many options for women's hairstyles. After the wars with the Persians, they lost the bulkiness for which they were famous in the east. Spartan girls wore their hair long and unbraided, but on their wedding day they had to shave their heads. In other regions, the hair was tied in a knot at the back of the head, combed up, strengthened with a wreath or several turns of ribbon, shortened at the back and hidden in some kind of net or bag.
With the help of plant substances, hair was dyed and lightened golden. White curls were a rarely achieved ideal. However, most Greek fashionistas had to be happy with one hair color or another. Curling irons were used for curling.
As excavations show, there were many hairdressers in Athens. There, hair was not only dyed, cut and curled, but also strangled. In addition, they could order a wig or attach artificial strands to their hair. Other people's curls are one of the most popular goods in all of Greece, except Sparta. Women there were famous for their thick hairstyles.
Hats
The ancient Greeks, whose clothing was simple but unusual, did not cover their heads in cities. But on the road or in the countryside, a small felt hat that had no brim protected from the sun. It was called pilos. On the contrary, they could wear wide-brimmed hat made from straw and felt.

Ancient Greek shoes
Residents of Greece in most cases walked barefoot, so ancient Greek sandals were very popular. It is interesting that a woman was considered a real artist if she knew how to lace her shoes so that her feet seemed almost naked to others. However, in this country there were also shoes with thick leather soles, and leather boots, laced with straps in the front, reaching the owner to the middle of the shin. In most cases, such rough shoes were used for horseback riding.
Cosmetics in ancient Greece
In classical Greece the art of perfumery was extremely developed. Vegetable white, blush, wax - all this was part of the Greek. Of all the incense, spikenard was most valued. Egyptian pencils were used for eyeliner; Greek women also knew lipstick and powder. Numerous “guises of husbands” have survived to this day. They called for appearing “in a decent and simple manner.”

Such behavior was unquestioningly condemned, since it was believed that it led to effeminacy, and, moreover, promised a decline in morality in the near future. Boxes with fashionable trinkets and blush were presented as real Pandora's boxes, from which numerous troubles and misfortunes were already emerging right before the eyes of strict husbands. The main one - imitation of the barbarians and the desire for luxury - was especially condemned. But the larger and wider the Greek world became, the more closely it intertwined with the cultures of other peoples, the more difficult it was to resist the emergence of fashionable and everyday trends that had become established there. Jewelry art is where this manifested itself especially clearly.
Jewelry in ancient Greece
The ancient Greeks were able to make elegant and at the same time complex jewelry, both for local sale and for export to the barbarian world, for example, the Scythians, artisan jewelers had to cater to the tastes of buyers.
They were very restrained in their choice of jewelry. They tended to wear almost no jewelry. An engraved stone in a simple frame is the maximum of their imagination and imagination. The imprint of such a carved seal was perceived as the signature of its owner. It was impossible to find a single men's bracelet or necklace in Athena's shops.
However, a completely opposite picture was revealed in the colonies that came into contact with the barbarian world. There, wealthy townspeople, natives of Olivia and Panticapaeum, under the influence of local culture, could, without any twinge of conscience, succumb to the desire to look as impressive as the visiting nomadic kings. In turn, the border guards were not averse to adopting Greek culture, but at the same time not giving up their passion for jewelry.
Regarding Greek women, then they, anywhere in the country, be it the capital or the province, were distinguished by their uncontrollable desire to bathe in jewelry. They wore elegant earrings, bracelets, belts, chains, tiaras and hairpins.
We are trying to make ultra fashionable gladiator sandals with our own hands.
Perhaps this is the most important fashion trend shoes this year. Gladiator sandals, which are so reminiscent of the footwear of people of distant antiquity, came into fashion relatively long ago, but acquired their true “gladiator” form this year. Now they are sandals or high open boots with many straps and lacing. There are such models of gladiators as on high heels, and completely without it.
Gladiator sandals photo
I would especially like to note the high gladiator sandals that reach almost to the knee; they have become a real must-have of this season.


What to wear with gladiator sandals
You can wear such beauty in the Roman-Greek style with both short dresses and skirts, both long and straight to the floor.

Without a doubt, they will look great with a wide variety of shorts, both classic cut and any fashionable denim shorts and overalls.

The ideal option is dresses just above or below the knees. The style can be almost any.

Well, for short “gladiators” options with trousers, leggings and jeans are suitable.

DIY gladiator boots
Now let's try to make gladiator sandals with our own hands in the Alexander Wang style.

You will need:
- some leather fabric,
- scissors,
- glue,
- old sandals,
- hole punch and buttons.

We decide what length you want to get sandals or gladiator boots. To do this, measure the length of the leather strips in different places on the leg. For example, starting from the calf to the ankle.

Cut the strips to the required length. Our straps are the same width. The two longest stripes are for the front of the sandals (see photo).

We start gluing from the longest, front strap strip.

This is roughly what you should get.

For greater convenience, you can glue something hard under the same front strip (for greater fixation). For example, a PVC strip.


