On the eve of the holiday, thousands of boys and girls are wondering what crafts for Mother’s Day they can make with their own hands, without involving their parents in this amusing process. After all, you really want the gift to remain a surprise for your mother!
At this time, it is better to take advantage of simple, original master classes on creating bright children's crafts from paper and napkins. These popular materials are available in every home where children live, so there will be no problems finding “raw materials” for inspiration. Another thing is crafts for Mother's Day for school and kindergarten. There is no way to do this without mom, dad or grandma’s help. After all, a product for an exhibition or competition must be almost perfect. Well, let's talk about everything in order!
Simple DIY children's crafts for Mother's Day - master class with step-by-step photos and videos

Applique and trimming are the most popular techniques for simple DIY children's crafts. From ordinary pieces of bright paper and simple stationery glue you can create real living characters. For example, a delicious rainbow fish. Children will definitely enjoy the process of creating it, and mothers will be delighted with such an unusual, but at the same time simple, DIY children's craft for Mother's Day.
Supplies Needed for a Simple Kids Craft for Mother's Day
- large sheet of white cardboard
- sheet of red cardboard
- bright tinted or colored paper
- pencil
- PVA glue
- eraser
Instructions for making a simple children's craft for Mother's Day - step-by-step photos and videos

DIY crafts from napkins for Mother's Day in kindergarten - step-by-step photos and videos

What could be simpler than making a simple craft from napkins for Mother’s Day in kindergarten? A radiant sunflower, created with your own hands using mixed media, will be the cutest gift for mom at a themed party, will complement the colorful kindergarten exhibition of children's products and will expand mom's collection of her baby's original creations. Take advantage of our master class and help your child complete a solar craft for Mother's Day in kindergarten. Or leave the “creator” alone with his little masterpiece.
Necessary materials for kindergarten crafts in honor of Mother's Day
- sheet of white A4 paper
- green marker
- PVA glue
- yellow napkins
- green napkins
- burgundy napkins
Step-by-step instructions for crafts from napkins for Mother's Day for kindergarten - master class with photos and videos

Original DIY crafts for Mother's Day for school (1st grade) - step-by-step photos and videos

The owl is a symbol of wisdom for many peoples of the world. An original gift craft for Mother's Day in the form of this amazing character will not only delight the beloved parent, but will also become an obvious confirmation of her deep mind, boundless wisdom and eternal tendency to compromise. An owl handbag as a DIY craft for Mother's Day is an ideal option. This is a delightful gift item and equally beautiful packaging for another smaller gift.
Necessary materials for children's crafts for school for Mother's Day
- blue thick cardboard
- pieces of thick paper in yellow, red, green and beige
- white stencil paper
- Double-sided tape
- scissors
- sharpened pencil
- eraser
- stationery knife
- blue half beads
- white silk ribbon
Instructions for an original craft dedicated to Mother's Day for 1st grade school - step-by-step master class with photos and videos

DIY colored paper crafts for Mother's Day in kindergarten or school: step-by-step master class

A bright multi-colored daisy with wishes is a wonderful holiday gift for mom. Created by the hands of a child, it will radiate invisible warmth and warm the beloved parent with childish effort and diligence. This DIY craft made from colored paper will be the best present for Mother’s Day and an excellent exhibition item for a thematic display at school. Follow our master class, and creating a cheerful rainbow daisy will not give you any trouble.
Necessary materials for DIY crafts for Mom on her Day
- sheets of colored or tinted office paper
- utility knife or sharp scissors
- red cardboard
- red thin ribbon
- double-sided tape or super glue
- half beads and rhinestones
Instructions for crafts from colored paper for kindergarten or school for Mother's Day - step by step photos and video

Almost all countries on the globe, although not at the same time, celebrate a unique holiday - Mother's Day. It can truly be called a holiday of eternity, because the most important person in the life of any person, passing through generations, is the mother. And if, say, on traditional Women's Day - March 8, all females are honored, be it a friend from kindergarten or a grandmother, then this holiday is dedicated only to mothers. Congratulations on Mother's Day, poems and songs are heard for them; they are given gifts. And every mother is always much more pleased to receive a souvenir not bought with dad’s money, but even a modest one, but made with her own hands. If you think a little, you can make a variety of crafts for Mother’s Day with your own hands.
The level of handmade crafts, of course, will differ depending on the age of the young donor. What a schoolchild can do, a kindergarten student is unlikely to be able to do. But it’s probably worth starting with preschoolers.
What will a preschooler please his mother with?
As a rule, crafts for Mother's Day in kindergarten are made by the whole group, and most often they are the same.
It can be:
- a drawing for Mother's Day imitating a greeting card;


- The applique on cardboard is also in the form of a Mother's Day card. A composition of autumn leaves will look interesting;


- colorful bookmarks for books;

- crafts made from plasticine. You can, for example, make a basket and place a bouquet of plasticine flowers in it;

- It’s easy to make a craft from a walnut shell – for example, a turtle. You can even create a whole family. And all you need from the auxiliary materials is plasticine, from which the paws, tail and head are made, and a couple of beads for the eyes. Based on the same material, a ladybug, a boat with a sail - a yacht for mom - would work well;


- Flowers are always in place as a DIY craft for Mother’s Day. Preschoolers are quite capable of making paper tulips from ordinary colored or corrugated material;


- Combining bright colored paper with beads, it’s easy to make an elegant butterfly. You can give it separately, or you can add it to a bouquet;


- Both boys and girls will be interested in making a bright fan for their mother from thick paper pre-painted by the child himself. You can make a flower arrangement based on the fan.


Older kids can make original cards for Mother's Day with their own hands using a figured hole punch. Its “waste”, unlike the traditional one, consists of a variety of figures of different sizes. These can be flowers and leaves, snowflakes and angels, dragonflies and butterflies. Can you imagine what beauty you can create with their help?!

What does fantasy tell to children of primary school age?
What to give your mom for Mother's Day? Many schoolchildren ask this question long before the holiday itself. And this is good - there is time to carefully think through all the details of your future product.
- Someone will have time to master several interesting figures using the origami technique.

- Children often want the gift to be practical, and therefore someone will make an elegant case for glasses or a case for a mobile phone from felt or other dense fabric.


- A business mom will definitely love a spacious and functional stand for pencils and pens.


- DIY crafts for Mother's Day can be stylized bouquets of flowers. An interesting and - again - practical option is a flower bouquet of... pencils. It’s not at all difficult to make, but such a gift will delight any mother with its creativity.

How to make a bouquet of pencils
To do this, you need several (5, 7, 9 - at your discretion) simple pencils with an eraser “on the top”; a container that will serve as a vase; polystyrene foam (not bad - floral); colored paper or cardboard. You will also need superglue and a hole punch.
Styrofoam must be glued to the bottom of the “vase”; from colored paper - cut out multi-colored flowers and punch holes in their centers with a hole punch. The pencil eraser should fit into them. All that remains is to plant the flowers on the pencils and secure them in the foam bottom of the vase. A long-lasting gift is ready: eternal flowers and pencils will come in handy around the house.
- By the way, about vases. Another great DIY craft for Mother's Day. Vases can be made from an ordinary plastic or glass bottle or jar, decorating them to the best of your imagination and taste. The material for gluing them can be corrugated colored paper, various ribbons, colored yarn and colored electrical tape, etc.


- Two plastic bottles, or rather their bottoms, fastened with a zipper, will become a nice little box for small items. The zipper can be glued to them or simply carefully sewn.


As you can see, there are quite enough options for original congratulations to mothers on Mother’s Day. You just need a little patience and, of course, the desire to sincerely please the person you love.
DIY Mother's Day cards
By using your imagination, you can create very interesting ones that will not only please the mother, but will also become an excellent creative practice for the child. Working with various materials is especially useful because the child develops in several directions at once; he not only learns to handle glue and other elements of the product, but also develops fine motor skills, learns to think quickly and creatively, and also to turn it into something unique and interesting. . All skills will definitely be useful to the child in the future and will make him an interesting and developed personality.
Attention! The main thing that parents and educators should take into account is the age of the child.
Do not forget that working with scissors and glue will be dangerous for young children, so preparing crafts for Mother’s Day should only be done under adult supervision.
By using your imagination, you can create very interesting crafts that will not only please your mother, but will also be an excellent creative practice for your child.
Bouquet of threads and wire
This version of the craft turns out very beautiful. This bouquet can be placed in a vase and used to decorate your home. But working on a craft is quite difficult for younger children, so it is best to offer the making of such a bouquet to younger schoolchildren, who will definitely cope with it.
To give your mother a beautiful gift, you will need a medium-thick wire that holds its shape well but bends easily. In addition, you need to stock up on thin threads for knitting in red and green. This will create a bouquet of red poppies. For the middle you will need black buttons. They should be taken in the quantity in which you plan to make flowers.
Next, you need to take the wire and bend it so as to get the frame of the flower. It is most convenient to start with the petals. To do this, you need to make 5 circles that will be connected in the center. You should grow a stem from them, not forgetting to select 2 wire leaves.
This bouquet can be placed in a vase and used to decorate your home.

After the base is ready, you can start decorating the flower. For this you will need a red thread. It needs to be secured at the junction of the petals, and then carefully wrapped around the wire base. When the thread reaches the end, it must be thrown down, and then continue to wrap the next petal. When the entire flower is wrapped, the red thread can be secured and cut.
Now you can start working on the stem. Here you need to use green thread. It needs to be wrapped around the stem and leaves. At this point the poppy will be almost ready. All that remains is to glue the middle of the button. It can be replaced with a few coffee beans. So the gift bouquet will additionally serve as a flavoring agent.
This bouquet will be an excellent gift for Mother's Day.
For the craft you need to make 3, 5, 7 or more flowers. They can be placed in a beautiful vase, which can also be made, including from threads. To do this you will need a plastic bottle of glue and knitting thread. The bottle is cut in the center. A thread is attached to the bottom, after which it is carefully wound around the vase to the very top, where it is secured with glue.
On top of the main decor, you can stick additional elements, for example, coffee beans or small beautiful buttons. This vase holds a bouquet of poppies, making an excellent gift for Mother's Day.
Craft for young children
If the baby is only 4 years old, this does not mean that he cannot please his mother with something interesting that he can make with his own hands. They make a lot of paper crafts. It’s time for a child to learn how to handle scissors and glue; besides, creativity develops fine motor skills and perseverance.
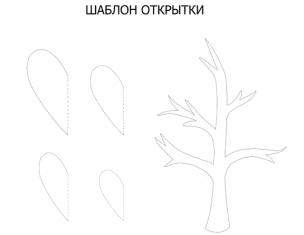
Advice! DIY crafts for Mother's Day can come in many different forms. For example, a postcard with a bouquet of flowers would be an excellent gift. To make it you will need a landscape sheet, a set of colored paper, scissors and glue.
The white sheet must be folded in half to make a postcard-book. Now you need to cut out a blank from green paper, which should be shaped like an hourglass, but only one part will be smaller than the other. Next, it is pasted onto the cover of the postcard. The top should be larger than the bottom. This will be the green part of the bouquet. It is necessary to cut a bow for it, which is glued to the narrowest point of the green blank.
Now you need to cut out the flowers from paper of one color, and the centers of another. All this is glued and the result is simply an excellent postcard. Inside, with the help of adults, the baby can write a wish for his mother.
This is the easiest holiday craft for Mother's Day. Even a four-year-old child can handle such a postcard. For older children, you can choose a more complex version of the product in the form of a three-dimensional postcard. For it you will need paper, including colored paper, scissors, pencil and glue.
A bouquet of voluminous flowers will be placed inside the card, so the A4 sheet needs to be folded in half. On the front part you can stick a flower made of colored paper or make an interesting thematic design that your mother will be very happy about.
Next we move on to working on volumetric flowers. To do this, 7 small identical squares are cut out of colored paper. It is best to take double-sided material so that the flowers look beautiful and colorful from all sides.
The squares must be gathered into a corner, as is usually done when cutting out snowflakes. That is, first the paper is folded in half, then into a triangle, and then into a sharp triangle. The upper part should be carefully trimmed in a semicircle. If you unfold the flower, you will get a blank with 8 petals. Next, you need to make a cut about one petal to the center and fold the flower so that you get only 7 petals. The result will be a cone. There should be 7 of them in total.
All flowers should be carefully glued together by the upper petals so that they form a semicircle. If everything is done carefully and correctly, the workpiece will easily fold into a flat picture and arrange into a large and lush bouquet. It needs to be secured in the center of the postcard spread. Thus, when the craft is opened, the flowers will “bloom”. When closed, the postcard will be quite compact.

You can decorate the front part of the product in any way, put a congratulatory inscription from small flowers, or simply decorate the postcard with a design. Very original options are obtained when decorating a product using openwork napkins.
Cotton pads for crafts
Recently, a lot of different materials have been produced for children's creativity. But not all of them are better than those that can be found in every home. So, for example, you get simply excellent products from ordinary cotton pads, which can be purchased very cheaply in any store.
This option is also perfect for crafts for Mother’s Day. You can make a whole basket of flowers from cotton pads. In addition to this material, you will also need colored cardboard, scissors, and glue. Additionally, you can take a few cotton swabs and yellow paint.
First of all, you should create a base: cut a circle out of cardboard and cut a hole in it so that you get a basket with a handle. In this case, the upper edges of the basket should protrude slightly. This is necessary in order to make it more convenient to glue the flowers.
Next, you can move on to working on the bouquet, which should fit in the basket. Cotton pads make very beautiful and voluminous callas. They can be made in large quantities to create a very original bouquet for Mother's Day. But first you need to prepare the stamens. They are quite large and pronounced in calla lilies.
They can be cut out of yellow paper, but it turns out much more interesting when these elements are made from scrap materials. To do this, you need to take them, cut them into two halves and paint them yellow. You will get 2 stamens at once.
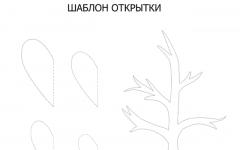
Now you can start making the flower itself. To do this, the stamen is glued in the center, and then the cotton pad is rolled up into a little bag. Many such blanks can be made. The main thing is that there is an odd number of flowers. All that remains is to glue the callas to the basket. Additionally, you can decorate everything with leaves. It is most convenient to cut them out of corrugated paper using ready-made templates.
Cotton pads are a huge space for imagination. They can be used for any occasion, including making beautiful gifts for everything.
Idea! The discs also make original postcards. The material is absolutely safe for children of all ages. Cotton wool dyes well, so the discs can acquire any color that is needed.
What to give to the most important person in our destiny - mom? DIY gifts for Mother's Day with detailed master classes and step-by-step photos. At the same time, it is not at all necessary to create masterpiece works of art - even the simplest crafts for Mother’s Day, made with soul, will melt a mother’s heart.
So, what should you give your mom for Mother's Day?

We bring to your attention a real gallery of interesting and easy-to-make gifts.
Paper flowers for Mother's Day
Paper flowers are a universal decoration for any Mother's Day craft. How to learn to make simple paper flowers? From soft pink paper we cut out three blanks with five petals.

The first piece will be the outer layer of the petals. We make small cuts between the petals. We apply glue to them. Glue the petals to each other, placing them one on top of the other.

We twist the ends a little.

The second blank will be the middle layer of petals. We cut off one of its petals.

We glue the workpiece in the place of the cut petal. Again we make small cuts between the petals and glue them together, laying them on top of each other.

Curl the petals of the middle layer.

We connect the outer and middle layers of the flower together.

The last blank is the inner part of the flower. Cut it into petals.

We twist the first petal into a tube.

We bend the other two petals.

We wrap the bent petals around the petal folded into a tube.

We insert the inner part of the flower into its rightful place. The paper flower is ready!

This flower can serve as a wonderful decoration for any craft.

For example, they can be used to decorate a photo frame, making it a stunning Mother's Day gift.

Quilling card for Mother's Day “Mom and baby”
For Mother's Day, you can make a beautiful card using the quilling technique. This card will depict a mother holding a small child in her arms - the most touching subject for a Mother's Day gift. For this craft you will need a drawn or printed template.

We begin to lay out mom’s hair from paper strips. We place each strip on glue.

We lay out the contour of the face and the silhouette of the mother.

We lay out the outline of the baby.

We fill the hair space with paper tapes. Move to the bottom of the image.

We roll the red stripes into tight rolls and press them on one side. We get red droplets.

Glue and twist three small green strips.

We place green curls and red droplets on our composition.

We continue to decorate the composition with curls and droplets. Greenery and flowers begin to fill the space of the postcard.

Your Mother's Day card using quilling technique is ready! The hero of the occasion will definitely like the charming mother and baby.
 Postcard "mother and baby"
 Watch how to make another beautiful quilling card in the video:
And this is a version of a postcard with a whole field of flowers made using the quilling technique.

Volumetric 3D postcard “Mom”
A postcard with three-dimensional letters “Mom” looks incredibly stylish and beautiful. We attach these letters to special steps cut on the fold of the base.

Volumetric card for Mother's Day.
 Volumetric 3D postcard “Mom”
 Volumetric card-book as a gift for Mother's Day
Watch how to make a trendy postcard using three-dimensional technique in the video:
A handmade postcard for your beloved mother is a great gift. We make the base of the card from thick paper. We make a heart-shaped hole in the front.

We decorate the edges of the hole with green “waves” made of paper.

We decorate the front side of the card with balls of paper and thread. Glue the word “mom” onto the balloons. We complement the card with paper butterflies.

We write a holiday greeting on the inside of the card. Opposite the hole we draw a symbol of Mother's Day - a mother and baby.

We made a very beautiful Mother's Day card! Please your beloved mother - she will be very pleased!

Mother's Day card with palms, heart and flowers
This amazing and simple card will make your beloved Mom very happy. To begin, trace the palm on paper and cut it out. Using this template, we draw counter palms on the fold of white paper. Cut out palms from white paper.

We make another layer of purple paper with palms. It should be a little larger in size. Glue two layers together.

Cut out a heart from paper and fold it like an accordion. Glue the heart onto the palms.

Decorate the card with delicate spring flowers. A gift card for Mother's Day is ready.

Card with candy for Mother's Day
A card with candy makes a wonderful homemade Mother's Day gift.

Card with flowers as a gift for Mother's Day
As a gift to your mother for Mother's Day, you can make a very impressive card with flowers from foamiran. Foamiran is foam rubber, which is now easy to find in any craft store. For this craft we will need yellow and green foamiran. First we design the front side of the postcard. Glue blue cardboard, ribbon and a sequin heart onto the base.

Cut out leaves from yellow foamiran. We color them by rubbing crushed pastel chalk into the edges. We heat the leaves on the iron and before they cool down, roll them into a tube and straighten them, trying to give a natural look.

We roll the first petal into a tube and wrap the rest around it. Fix the petals with glue. We will get a flower bud.

We wrap the wire with green adhesive tape - this is the future stem of the flower. Glue the bud to the stem.

We cut out a cup from green foamiran. We make a hole in it and insert the stem into it. Fix the cup with glue.

Cut out green leaves from green foamiran. We heat them on an iron and apply them to a real sheet. We should still have a pattern with veins. We make the edges of the leaves with notches.

Glue our flowers and leaves onto the front side of the card.

We collect three large roses from leaves.

Glue them onto the card. A wonderful gift for Mother's Day - ready!

Paper handbag as a gift for Mother's Day (video)
Drawing “beloved mother”
For those who love and know how to draw, you can make a portrait of your mother. To make the portrait look similar, use your mother’s photo. Try to emphasize the advantages, because you want to please, not upset your mother. First we make a pencil sketch.

We paint the face with paints. Use a black felt-tip pen to highlight the main lines.

We color mom's dress, hands, hair and flowers. The painting for mom is ready!

Drawing of tulips for Mother's Day
If you know how and love to draw, then try to draw a bouquet of colorful tulips for Mother's Day. This drawing is done in pencil and watercolor. To begin, make a sketch using a red pencil according to the sample.

Fill the flower with soft pink color. Add expressiveness to the flower by making its base darker. The leaves and stems of the design look interesting if you do them not in the classic green color, but play with shades of green, purple and beige.

We continue to fill the leaves with color. The inside of the sheet should be darker than the outside.
 Drawing "tulips" for Mother's Day
 A bouquet of tulips for mom is ready! You can make a congratulatory inscription on the free space and place the drawing in a frame.
Foamiran flower as a gift for Mother's Day
A wonderful material for creativity - foamiran - is becoming increasingly popular. How to make a gift out of it for Mother's Day? We will need foamiran in white and green colors. Cut out petals from white foamiran. Lightly color the edges of the petals. You can simply rub a little paint or crumbled pastel chalk into them.

Foamiran becomes pliable when heated. Take the petal and heat it a little on the iron. Until it cools down, we twist it at the edges and bend it in the middle, trying to give it a natural shape.

We heat the last petal and leave it curled - this is the middle of the flower.

We paste over the middle of the flower with our petals. We straighten the petals.

Cut out green squares from green foamiran. We heat them on an iron and leave a pattern on them, applying a real leaf.

We give the blank the shape of a leaf and paint it.

We got a wonderful gift for Mother's Day - a delicate rose.

A bouquet of sweets as a gift for Mother's Day
A very beautiful and pleasant gift is a bouquet of sweets and corrugated paper. First, we make the base - insert long thin sticks into the candies. They will be the stems of future flowers.

Cut a strip from corrugated paper. It should be slightly larger than candy in size.

We wrap the strip around the candy - this will be the first layer of the flower. At the bottom, twist the paper around the stick and secure it with thread or an elastic band.

On the next tape we cut out the outlines of the petals.

We twist them with a stick.

We wrap the layer with petals around our workpiece. The more layers, the more magnificent our rose will turn out.

We make several flowers and decorate the bouquet with green petals. A bouquet of sweets as a gift for mom is ready!

A very beautiful rose for mom can be made from paper strips. Cut the red paper into strips 2 cm wide.

We glue the strips together, forming a long piece. We bend the tape at an angle of 90 degrees. We begin to twist the tape.

We transfer the folded tape to the left hand, and begin to twist the tape on the left side.

See the detailed master class.

For Mother's Day, you can make a very beautiful and tasty “Heart with Candy” craft. The most difficult thing in this craft is to cut out a heart of the correct shape from polystyrene foam. Using double-sided tape, secure the red corrugated paper around the heart on both sides. Decorate the heart with red and white ribbon
We tie the heart with a yellow ribbon. Glue candies to the heart. An excellent and inexpensive gift for Mother's Day - ready!

Salt dough flowers for Mother's Day
For Mother's Day, you can make a picture with salt dough flowers. Knead the salt dough with the addition of a small amount of PVA glue - this will give the craft strength. Add color while kneading the dough. Preparing the canvas for the painting. Glue a cardboard base behind the frame. Lay out the green dough leaves.

We make a strip of red dough, which we then twist. We should get a rosebud.

Glue the buds to the base. We add petals to the three buds to create voluminous flowers. The salt dough picture is ready!

Bouquet of candy on a stick and paper
You can arrange lollipops in the form of a bouquet. To do this, cut out flower petals from paper or cardboard. We pierce the candy into the center of the paper flower. Cut out a petal from green paper and glue it on.

We make a congratulatory inscription on the outside of the flower.

If you take a small pot and fill it with foam rubber. We stick a plastic stick into the foam rubber. We get a whole bouquet of candy flowers.

Bouquet of foamiran flowers in a pot
From foamiran and wooden ice cream sticks you can make a wonderful gift for Mother's Day - a bouquet of flowers in a pot.
We cut out flowers from pink and purple foamiran. We cut out cores from yellow foamiran. From green - leaves. Prepare wooden ice cream sticks and good glue.

Glue the flower and leaves to the wooden stick. To make the craft look good, you can cover the stick on both sides with foamiran. We take a small plastic pot and put foam rubber, polystyrene foam or plasticine on the bottom. We need a base into which we insert the stems of our flowers.
Flowers in a pot for Mother's Day from foamiran
For mothers who watch their figure, a bouquet of fruits is suitable as a gift. To do this, place the fruit on wooden sticks.

We tie the sticks with tape, arrange the packaging of the bouquet and tie it with a ribbon.

DIY Mother's Day Gift Ideas
Another great gift idea for Mother's Day is a pot of tulips. We decorate the pot itself with bright photographs.
 Gift for Mother's Day - a pot of tulips
 You can give your mother a beautiful homemade jewelry box.


An ordinary chocolate bar can be decorated with corrugated cardboard flowers. Everything will be used: ribbons, beads, decorative flowers - in the end we will receive an amazingly beautiful and tasty gift.

Each craft will acquire its own charm when a loving child takes on it. Check out more ideas in our Mother's Day Crafts section.
Congratulations on Mother's Day (video):
Watch the video greeting "Happy Mother's Day."