With my own hands. The two-color palette gives interesting combination. This unusual craft, which can be made from paper of all colors.
Necessary parts for creation:
- Paper triangles for origami purple and white;
- Glue gel or glue gun.
Stages of work:
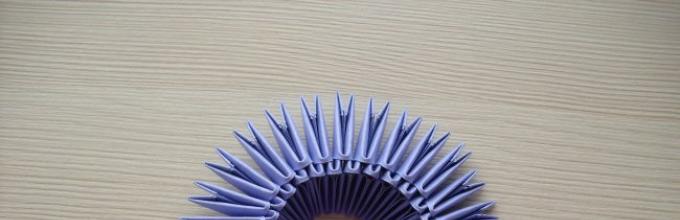
We start the assembly with triplets purple, which we place as illustrated in the photo:In total you need to make 14 triplets. We close the blanks in a circle. We assemble two more circular rows of purple triangles with 28 parts in each row. The result is the following:

4r. – assembly is carried out using white triangles. In the current row, you need to increase the number of modules to 35. To do this, for every fourth origami triangle from the previous row, you need to string not 1, but 2 elements at once

5 rub. – 35 purple triangles;
6r. – alternating elements according to the scheme: 1 white origami triangle, 4 purple

7r. – in this row you need to increase the number of component elements to 42. To do this, perform the assembly as follows:
We string 2 white paper triangles onto a white element of the previous row, then 1 purple, then 2 purple ones onto one triangle of the previous row.

and again purple, we dress as usual.
Next, repeat the combination until the end of the row.
8 rub. – alternation of elements: 3 white, 3 purple modules;

9r. – alternation: 4 white, 2 purple elements;

10 rub. – alternation: insert 1 white triangle between two purple ones of the previous row, then – 1 purple, 3 white, 1 purple;
11r. – alternation of elements according to the scheme: 1 purple, 2 white;

12 rub. – alternation: insert 1 purple origami triangle between the two white ones of the previous row, then 1 white one;


13r. – alternation of elements: 2 purple, 1 white;

14 rub. – alternation: 1 purple, 1 white, 3 purple, 1 white;

15 rub. – alternation: 2 white, 4 purple triangles;

16 rub. – alternation: 1 white, 5 purple;

17r. – 42 components of purple color;
18 rub. – 42 white triangles;
19 rub. – in this row you need to reduce the number of elements to 28. To do this, put 1 white on the 3 corners of the modules of the previous row (1.5 modules).

This is what the final product looks like:

In this row, you can fix the triangles with adhesive so that they do not move as a result of subsequent assembly.
20 rub. – 28 purple origami triangles. Starting from this row, we put on each triangular module, slightly lifting it and moving it forward.
21r. – alternation: 1 white, 1 purple element;
Origami items made by yourself look bright and unusual. A good example a vase made using modular origami can serve as a solution. It will perfectly decorate one of the rooms and can accommodate sweets or light flowers.
This is painstaking work that takes many hours, but the vase will look nice in your home for many years. Made using colored paper, it will stand out from all other items and make the design more unique.

Today you can meet various master classes on how to make an origami vase. Anyone, following the necessary instructions, can assemble this simple item.

Working with modular origami
To understand how to make a modular origami vase, you need to draw a diagram of the future item. Mark all the patterns on it, and break it down into the number of steps and modules.


Individual elements are made from colored paper. Each piece is called a module, and is attached to each other to form a vase.

Due to the elasticity of the elements, the entire structure remains assembled. For reliability, the parts are glued together, and especially large parts are secured with toothpicks. Thus, the craft is protected from accidental destruction, which can happen due to pets.

Manufacturing of modules
Each element is folded according to one pattern. Differences may be in paper size and type. For volumetric origami The paper should be rough and thick. Then the parts will sit more tightly in their places. This will give the structure rigidity.

The quality of the paper should be such that when folded, the folds do not turn white. The color of the entire craft and each element is chosen based on your imagination. There are two types of element sizes: 1/16, and 1/32. This means that an A4 sheet is divided into 16 or 32 identical rectangles, and then folded according to the following diagram:
The leaf is folded in the center. Fold in the center again and unbend. Each edge of the rectangle is folded towards the center.


Turn over. Bend the corners of the edges. Bend the corners a little. The resulting edges are folded upward. The resulting element is folded in half.

Each element should be folded carefully. Its sides should be smooth and carefully smoothed. Due to poor assembly, the figure will not look neat.

Caring for origami crafts is quite simple. You should prevent water from getting on the surface of the figure and wipe off any accumulated dust. Greater safety can be achieved with the help of varnish or paint that coats the product.

On the Internet you can find simple and modular origami vases. There are various diagrams, photos, and even video tutorials on assembling the most different models. Each design is assembled step by step. This activity is available to people different ages, and is perfect for family time.

Assembly option
There is a diagram for folding a simple origami vase. It folds in a completely different way, different from the modular type. Its appearance is less elegant, and it is used for storing small items.

The assembly instructions look like this:
- Two sheets of paper are folded on top of each other. It turns out to be a two-sided square.
- We bend it diagonally and unbend it.
- Repeat the fold along the other diagonal.
- We do horizontal flexion and extension.
- A rhombus is formed along the resulting folds.
- Its edges are carefully ironed.
- The right corner is folded towards the center.
- We do the same action with the left corner.
- The workpiece should be turned over and the remaining corners bent.
- The top edge of the left corner is folded into the center.
- The central corner unbends and falls to the middle.
- Turn the workpiece over to the other side and repeat steps 10, 11.
- The last right corner is bent to the center. Then it is unbent and set inward along the intended folds.
- There is an angle at the bottom to make the bottom stable, it should be bent and straightened.

Simple DIY origami vase with step by step instructions looks exactly like this. If folded incorrectly, you must carefully unbend the product and find out where the mistake was made.

It doesn't take much time to make a vase. It can be decorated with sparkles or rhinestones. You can put sweets or dried flowers in it. But the origami flowers will look best. For children, this craft will serve as a good opportunity to give a birthday present to their parents.


Photo of a vase using origami technique


Hello dear masters and craftswomen. I present to your attention a master class on making such an origami swan, and I called it “Swan in Pink”. How to make an origami swan? We will make a pink drawing, highlight the swan with pink modules around the perimeter and place it on a round stand, and also glue small eyes. Please watch this video on making an origami swan. IN […]
Hello dear masters and craftswomen! Today I bring to your attention a master class on making a tricolor Swan from triangular modules. It would seem that what else can you come up with, what other options are there for making Swans using the modular origami technique. But it turns out there are still options and this is not the last thing in my arsenal. The tricolor swan is so simple […]
Hello dear masters and craftswomen! I present to your attention new master class for making a Swan in black from 3D modules. In the last lesson we made a Swan in red, but now I decided to change the style a little and make a Swan in black. The scheme is not complicated and will suit anyone, even a beginner in modular origami. Specially […]
Hello dear masters and craftswomen! I bring to your attention a new master class on making a Swan in red shades. On the Internet you can find a huge number various schemes and master classes on making Swans using the modular origami technique. I'm sure you've never seen a swan like this before. This scheme is quite simple and even [...]
Swan in blue. Video tutorials and diagram. Part 3. In the third part of the master class, I offer you two video lessons and detailed diagram origami how to make a swan. The first video shows how to make a swan's neck and how to make a small stand. The second video talks about how to glue a swan better and faster. Lesson 6 (neck and […]
Swan in blue. Video tutorials and diagram. Part 2. In the second part of the “Swans in Blue” tutorial we finish making the body. I have prepared for you two video tutorials and a detailed diagram of an origami swan from modules. To assemble a swan you will need 1438 modules of 1/16 size, of which: 317 - purple modules 471 - blue modules 552 - blue […]
Swan in blue. Video tutorials and diagram. Part 1. I bring to your attention a new master class on making an origami swan from paper from 3D origami modules. The design is quite unusual and the appearance of the wing is not quite classic. In the photo you can see small through holes and a mesh pattern. I'll be honest - the scheme is quite complicated! Especially for this scheme I […]
“Rainbow Swan” diagram and video tutorials (part 3). The third part of the “Rainbow Swan” master class consists of three video tutorials on assembling the stand. And I also decided that a video tutorial on gluing the “Rainbow Swan” would be very useful for you. Lesson 5 (stand part 1) Lesson 6 (stand part 2) Lesson 7 (stand part 3) […]
This origami is very simple and will not take much time to make. All you need to do is just look at the photos that will show you. what and how you will do.
Origami vase diagram
An origami paper vase may not be able to perform the functions of a real vase, but it can still be useful to you. It is convenient to store all sorts of little things in it so as not to lose them throughout the house, and you can also pull forfeits from it during games.
Or maybe you still decide to use such an original vase for its intended purpose? Place a vessel with water in it and place the flowers in it. Just know that they won’t be able to stand there for long.
Origami vase step by step instructions
That's all, our origami vase is ready.
Origami paper vase video
Finally, let's give useful recommendation for beginners - perhaps during the assembly process you got lost and somewhere made a mistake in the required action, then just do everything in reverse order and return to the stage where everything went wrong for you. As soon as you understand where you made a mistake, refer to the instructions again and repeat everything again. Special attention Pay attention to the correct manufacturing of bends. If they are done correctly, then remaking origami will not be difficult. In addition, you can watch a video tutorial on assembling an origami vase from paper, which is a useful master class for beginners.
Article genre - Origami
Real masterpieces are made from paper by those who have mastered the technique of modular origami. But if a person is just learning, it is better for him to start with the vase diagram.
Modular origami is a technique of folding interesting shapes from many parts. Various animals, flowers, cartoon characters from small modules turn out colorful and almost real. Since they completely retain their three-dimensional shape. So, let's see how it develops step by step modular origami- vase diagrams, in our case.
How are the circuits assembled?
The parts (modules) assembled according to a certain scheme are not difficult in themselves. But the figures from them require patience. Large scale crafts sometimes require a huge amount of these parts.
As for the question of how simple modular origami, diagrams of a vase, for example, or a swan are made, these crafts serve as the “base” of learning.
The rules for constructing any object in modular origami are simple. The first row of modules connects and holds the second row, which is placed on top of the bottom row. And the third row holds the second, and serves as the basis for 4 - and so on.
You just need to put the multi-colored elements in the correct sequence. If you disturb the order of the colored elements, the pattern contained in the diagram will be lost. Simple drawings are visible visually, and if desired, you cannot go astray. But more complex drawings require special care.
How to make corner modules?
Acquaintance with modular origami begins with the construction of elementary particles of this world - with modules. Before you go into detail about how a vase is made from modules, you still need to learn how to make modules and know how they are connected to each other.
Divide the A4 sheet into equal rectangles and cut them out. Each rectangle is folded in half twice. We bend the corners along the second bend and lift the remaining squares at the bottom up. bend the resulting triangle in half. This part will be used for crafts.
Simple vase with diagonal stripes of modules
We collect simple vase, placing the necessary modules one by one in a checkerboard pattern according to a simple diagram. Two parts of the first row and one part of the second; two second row - one third. So we go through 3 rows.
But first, let's explain one subtle rule. The bottom of the vase is thinner, then the craft expands in volume. And to expand this craft, you need to increase the number of modules in the circle. To do this, on each tooth of the previous row, we place 1 module of the next row, only the next 3 modules should be set according to the basic rule. After all, the figure must hold tight. And so we alternate the modules starting from the 4th row.
Already from the 3rd row you need to add 2 parts of a different color to create a diagonal pattern. After each row, it is necessary to bend the folded elements in the desired direction. Thus, the diameter of the vase first expands, then, in the same sequence and with the same pattern, gradually decreases.

And when the top of the vase becomes as thin as the bottom, you can make beautiful triangular stands to raise the length of the vase a little more. In total, you need to prepare 392 modules of one color and 296 of another.

The result is a vase with diagonal stripes along it. This is a very interesting scheme for beginners.
Modular origami vase: craft diagram
Complex drawings require special care from a person. Advice for beginners - do not forget to count the modules in each row.
Modular origami (vases), the assembly patterns of which are complicated by various decorative elements, must be assembled while watching the master class. However, you can also rely on a graphical diagram. Let's give an example.

Knowing how the elements are attached to each other, you can safely begin assembling simple-shaped vases using similar patterns. For convenience, we also present a scheme for counting modules.

It is impossible to visually follow the design in the process without getting lost. Especially when a person takes on a design for the first time. A check is definitely needed.
Vase with a complicated shape and pattern
A more beautiful vase in the shape of a lotus is assembled according to a different pattern. Let's look at some of the assembly details.
Modular origami (vase diagrams) is characterized by the fact that all the designs are symmetrical. There are equal numbers of white and yellow pieces in each row. The trick of this scheme is that the patterns in the form of petals are made as if in separate windows. They are built according to the principle: 9 triangles - one side of the petal, and 9 - the other. Below and above they are held together by common units. All other stages are already familiar, we will not dwell on them. And the number of elements can be calculated based on the height of the craft, and you can build your own diagram. You can continue to train and try to make alternative patterns, relying on your imagination.
Origami crafts of varying complexity
The rest of the crafts are made according to the same principle as shown in the example of the previous diagrams. When you have mastered the usual patterns, you can start making openwork models, dotted with various small decorations from multi-colored designs. IN complex crafts There are such elements as carved “windows” and columns. At the same time, it is important not to lose count of the modules used in each row.

This is what a modular origami “vase” looks like, the diagram of which is much more complex than the diagram in the form of an elementary “cocoon”. But the craft is more interesting and colorful.
This art knows no limits and all patterns are dynamic. If you want to build a larger modular origami, the design of a large vase will be the same, only you need to create twice as many elements. And it also takes twice as long to fold a large vase. Essentially, to build large-scale modular origami, the vase designs need to be scaled up.
Scheme of an origami floor vase
Let's move on to the explanations of the assembly. Here we need a skeleton made of cardboard that would support such a large modular origami. Floor vase (craft diagram) does not contain limited number elements. Origami exactly copies the scale of a real floor vase. And the number of elements is even difficult to calculate. In this case, you need to focus on your creative vision of the subject.
First, you need to find the model you like, and then build on it. What will this modular origami (vase diagram) look like? And what should you do next?
- You need to take the cardboard tube as tightly as possible. Glue cardboard circles along the entire height that will maintain the shape.
- The bottom is also made of thick cardboard.
- Origami modules should be built in stages from one floor to another.
- You shouldn’t make a vase that is too “thick” for the first time.
- It is advisable to write down the number of all modules in a row on paper while working.

It’s clear here: the more of these cardboard layers, the higher the vase will turn out. If the “creator” still experiences difficulties in the method of constructing origami drawings, then it is easier to make a plain vase, without any drawings.
Once you learn how to build various modular origami (vases), the assembly diagrams for these crafts will become easy fun.


