
This material describes various ways how a ladybug can be made from plastic bottles. There is also a list of all necessary materials and tools that may be needed during the work process. So, feel free to take it and do it.
Materials and tools
In the process of work we will need the following tools and materials:
- A set of paints with a brush (black, white and red are required).
- Scissors or knife.
- Marker for marking.
- Plastic bottles.
It is better to prepare all this in advance and collect it in one place. Exactly where you plan to make a ladybug using any of the methods below.

Methods
A ladybug from plastic bottles can be made like this:
- From three cuttings plastic bottle.
- From a set of plastic bottles with the bottom up.
- From the lids of this container.
- Actually from one plastic bottle.
Patterns from a bottle
In this case, a ladybug from plastic bottles is made as follows:
- We apply a tablespoon to the narrowing part near the neck of the plastic bottle and outline it with a marker. We make three similar blanks and cut them out.
- We paint two of the resulting blanks red, and one black. Then wait for the paint to dry.
- After this, on the red blanks we make black dots in a random order, and on the black blank - two white dots strictly on one side (this will be the ladybug's face). Again we pause to let the paint dry.
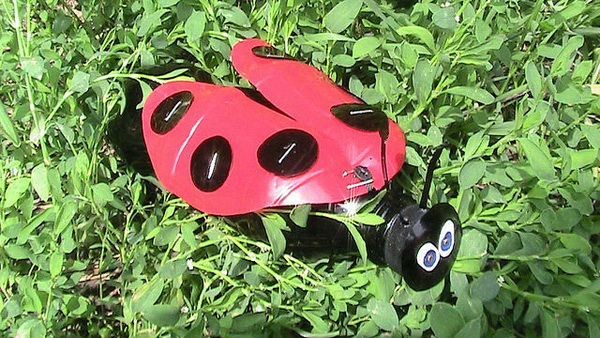
- Then we symmetrically glue two wings onto the black blank so that a black face with white eyes protrudes on one side. The wings themselves do not have to be glued close to the body. They can be made protruding, and this will create the appearance of a ladybug flying.
- At the end, we coat the finished ladybug with varnish. After it dries, the craft is ready.

Flowerbed
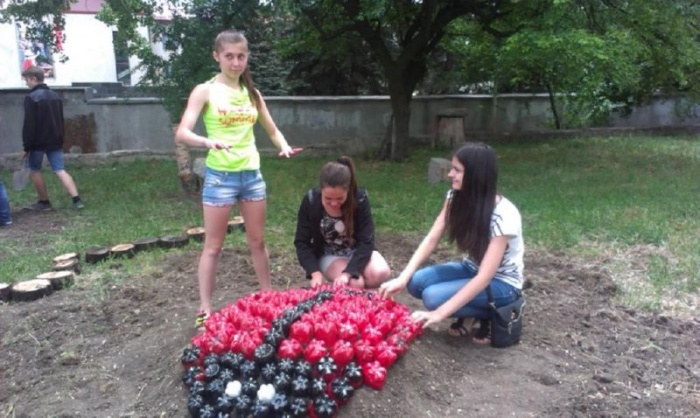
This the simplest way how to make a ladybug from plastic bottles with your own hands. In this case, you need an impressive set of plastic bottles. It is recommended that they all be the same shape. First, we make a circle, inside of which our ladybug will be located. Then we fill it completely with bottles. At the same time, we strive to ensure that the distance between them is minimal. Next, we paint lines from black bottles across the entire ladybug. On one side we also paint a small piece black - this will be the head. We also paint 2 bottles on it symmetrically relative to the central black line white (these will be the eyes). We make the remaining bottles in two sectors red, but selectively paint some of them black, since these will be the dots on the wings.

Making a ladybug from a lid
This is the easiest way to make a ladybug from plastic bottles. The photos once again confirm this. Take the red lid from the plastic container. Then we divide it in half with a black line. On one side of the line we draw the muzzle in the same color. Let it all dry. Then we make eyes on the muzzle white, and there are black dots on the red wings.
Directly from a plastic bottle
Finally, let's figure out how to make a ladybug from a plastic bottle. For these purposes, it is recommended to choose a container that is more similar in size to a circle. For example, a 5-liter container is perfect for these purposes. Cut the bottle in half along with the cap. Using glue, fix half of the lid on the neck of the container. Then, after the glue has dried, we paint the resulting workpiece completely black. Next, wait until the paint dries. After this, we apply two white dots in the area of the tapering part, and from the bottom we draw the wings in red. Then we apply black dots in a chaotic order on the red wings. At the final stage, after the paint has dried, the resulting craft must be varnished. After it dries, the ladybug is ready.

Results
The article describes various ways in which a ladybug can be made from plastic bottles. There is nothing overly complicated in the above methods, and anyone can make this kind of craft.
In order to decorate your garden, make it original and different from others, it is not at all necessary to spend huge sums. You can very easily make a lot of garden crafts with your own hands from a variety of available materials. And one of the simplest and at the same time cutest crafts is a ladybug. Today we will look at a master class on how to make a ladybug from stones, paper, concrete, plastic bottles and spoons, from plasticine and beads, and also sew, knit or mold it.
How to make a ladybug for the garden with your own hands photo
How to make a ladybug from stones and pebbles
In order to introduce bright and cheerful ladybugs into your garden, you can use ordinary round stones - sea pebbles or whatever you can find will do just fine. This craft is done in an elementary way - the stone is painted red, with black paint - you draw wings, dots, eyes and antennae. Then you can place the resulting insects in the grass, plant them on stumps, glue them to tree branches, or decorate a flower bed. Another option is to paint ladybugs on a large rock.
 Ladybugs made from stones and jackdaws with your own hands photo


Concrete ladybug: DIY mosaic
A similar way to make a ladybug, but this time we will use artificial stone and colorful tiles. Making a ladybug out of concrete is very simple. We will need cement, which can be bought at any hardware store, an old basin or bowl - a mold for crafts, polyethylene and red and black tiles or something from which we can make a mosaic. This is what we get:
 Mosaic: concrete ladybug master class
We put it in a basin plastic bag To prevent the cement from sticking to the sides, pour the cement and wait until it hardens and dries. We take it out and sand it with sandpaper. Next, we glue a mosaic on top of pieces of red and black tiles. The cement ladybug is ready, all that remains is to place it in a prominent place in your garden.


Making ladybugs from clay
If not found suitable stones and it’s difficult for you to make a mosaic, you can simply make a ladybug out of clay with your own hands and paint it with paint.
 How to make a ladybug from clay photo
Plastic crafts
Craft for the garden: ladybug made from a construction helmet
If you have an old construction helmet lying around somewhere, preferably red or orange, then there is another simple way to make a ladybug from a helmet. The only thing you need here is black paint. As a last resort, use a regular black marker. We just draw spots, eyes and wings - the figurine for the garden is ready.
 How to make a ladybug from a helmet photo


How to make a ladybug from plastic bottles
You will find more ideas for crafts made from plastic bottles in our previous article. Today we’ll see how to make a ladybug from plastic bottles with your own hands. The most popular idea is a flower bed in the shape of this insect. For such a flower bed, the bottles will first need to be painted black and red (not entirely, but only the bottoms + 5-10 cm). Here is a diagram for such a flower bed:
 Scheme of a ladybug flower bed made from bottles photo
Another way is to string cut bottles on a fishing line to create a three-dimensional ladybug that can be used to decorate the garden. This figure can then be trimmed with scissors. And this is what we can get:


DIY ladybug made from plastic spoons
You can also use plastic spoons for garden crafts. It's very easy to make a funny ladybug from plastic spoons with spread wings. For each craft you will need three spoons. We paint two red and draw dots - these will be the wings, one - black (this will be the body). Glue all three spoons together. Add a head - made of buttons, clay or something suitable. The craft is ready:
 How to make a ladybug from plastic spoons photo
  DIY ladybug made from spoons
How to make a ladybug from corks
For garden crafts, you can use any available materials, and a ladybug can be made from any round or oval object. For example, you can use caps from beer or plastic bottles. You just need to paint them with red paint and black - draw dots, eyes and antennae.
 Cute ladybugs made from corks for garden decoration
Handicrafts: sewing, weaving and knitting
Beaded ladybug
Needlewomen can also use the ladybug symbol for their crafts. For example, you can weave it from beads. Of course, you won’t get a large figurine, but even such miniature beaded ladybugs can be used to decorate the garden, for example, you can hang or glue them on trees.
 How to make a ladybug from beads photo


ladybug pillow
Sewing a pillow in the shape of a ladybug is also not difficult. All you need is red and black fabric. If you want a fluffy pillow, just sew it from fur. It's time for details: the dots can be made from beads if you are sewing a small pillow, or not round, but in the shape of hearts.
 Making a ladybug pillow with your own hands


Knitted ladybugs
If you like to knit, then why not knit a ladybug that can be used to decorate both your garden and your home. It could be round knitted pillow, a figurine that can be hung on a tree or fence, placed on a fireplace or on a shelf, a toy, a fun pot holder or something else.
 How to knit a ladybug photo


Crafts with children
How to make a ladybug out of paper
You can also make ladybugs out of paper - great idea for crafts with children. As an option, you can simply fold red paper using the origami technique and draw eyes with dots. You can also glue a ladybug from several parts. You can simply place such crafts on the grass or make a garland and decorate the veranda or trees in the country with it.
 Decorating the garden with paper ladybugs photo


Ladybug using quilling technique
A more complex way to make a ladybug out of paper is to use the quilling technique. We have already written about spring quilling. There is a simpler option - you will get a flat ladybug or a small round one - if you wind strips of red paper in a circle with a slight shift. Or you can make this gorgeous one volumetric quilling- ladybug:
 DIY quilling ladybug photo


How to make a ladybug from plasticine
Also, together with your children, you can make a ladybug from plasticine. There is nothing difficult about this, even the most small child. Great idea for kids.
 Plasticine craft: ladybug photo


Edible figurines
Ladybugs made from salt dough
The idea is the same - you just need to mold a ladybug, as you already did from clay or plasticine, and then paint it in the desired colors and use it as a garden figurine.
 How to make a ladybug from dough photo
How to make ladybug sandwiches from tomatoes
Delicious and original idea for sandwiches - decorate them with ladybug made from tomatoes and olives. For the body, you can take either regular or cherry tomatoes (in the second case, the figures will simply be smaller), we make the head from black olives, and the dots and tendrils are made from them. The sandwiches themselves can be anything.
 Sandwiches in the shape of a ladybug photo


Cake or salad in the shape of a ladybug
Another delicious idea is to make a sala or cake in the shape of a ladybug. A cake in the shape of this funny insect is a great idea for children's party, you can easily bake one for your child’s birthday. A salad in the shape of a ladybug can be a decoration for anyone festive table. This is what it looks like:
 Ladybug cake for children's party


Sushi Ladybug
And the last one for today is ladybug sushi. For me personally, this is an unattainable ideal, but if you have extensive experience in making sushi and rolls yourself, you can try this interesting idea:
 DIY ladybug sushi
In order to decorate your garden, make it original and different from others, it is not at all necessary to spend huge sums. You can very easily make a lot of garden crafts with your own hands from a variety of available materials. And one of the simplest and at the same time cutest crafts is a ladybug. Today we will look at a master class on how to make a ladybug from stones, paper, concrete, plastic bottles and spoons, from plasticine and beads, and also sew, knit or mold it.

Stone crafts
How to make a ladybug from stones and pebbles
In order to introduce bright and cheerful ladybugs into your garden, you can use ordinary round stones - sea pebbles or whatever you can find will do just fine. This craft is done in an elementary way - the stone is painted red, with black paint - you draw wings, dots, eyes and antennae. Then you can place the resulting insects in the grass, plant them on stumps, glue them to tree branches, or decorate a flower bed. Another option is to paint ladybugs on a large rock.


Concrete ladybug: DIY mosaic
A similar way to make a ladybug, but this time we will use artificial stone and multi-colored tiles. Making a ladybug out of concrete is very simple. We will need cement, which can be bought at any hardware store, an old basin or bowl - a mold for crafts, polyethylene and red and black tiles or something from which we can make a mosaic. This is what we get:
Related article: Folding interior doors: accordion or book?

We put a plastic bag in the basin so that the cement does not stick to the sides, pour the cement, wait until it hardens and dries. We take it out and sand it with sandpaper. Next, we glue a mosaic on top of pieces of red and black tiles. The cement ladybug is ready, all that remains is to place it in a prominent place in your garden.


Making ladybugs from clay
If you haven’t found any suitable stones and it’s difficult for you to make a mosaic, you can simply make a ladybug out of clay with your own hands and paint it with paint.

Plastic crafts
Craft for the garden: ladybug made from a construction helmet
If you have an old construction helmet lying around somewhere, preferably red or orange, then there is another simple way to make a ladybug from a helmet. The only thing you need here is black paint. As a last resort, use a regular black marker. We just draw spots, eyes and wings - the figurine for the garden is ready.


How to make a ladybug from plastic bottles
You will find more ideas for crafts made from plastic bottles in our previous article. Today we’ll see how to make a ladybug from plastic bottles with your own hands. The most popular idea is a flower bed in the shape of this insect. For such a flower bed, the bottles will first need to be painted black and red (not entirely, but only the bottoms + 5-10 cm). Here is a diagram for such a flower bed:

Another way is to string cut bottles on a fishing line to create a three-dimensional ladybug that can be used to decorate the garden. This figure can then be trimmed with scissors. And this is what we can get:


DIY ladybug made from plastic spoons
You can also use plastic spoons for garden crafts. It's very easy to make a funny ladybug from plastic spoons with unfolded wings. For each craft you will need three spoons. We paint two red and draw dots - these will be the wings, one - black (this will be the body). Glue all three spoons together. Add a head - made of buttons, clay or something suitable. The craft is ready:
Related article: Bed as an everyday element of our life


How to make a ladybug from corks
For garden crafts, you can use any available materials, and a ladybug can be made from any round or oval object. For example, you can use caps from beer or plastic bottles. You just need to paint them with red paint and black - draw dots, eyes and antennae.

Handicrafts: sewing, weaving and knitting
Beaded ladybug
Needlewomen can also use the ladybug symbol for their crafts. For example, you can weave it from beads. Of course, you won’t get a large figurine, but even such miniature beaded ladybugs can be used to decorate the garden, for example, you can hang or glue them on trees.


Making crafts for a summer cottage is very common due to the fact that people want to see beauty around them. If there are a lot of flower beds on the site, then you can reproduce ladybugs from plastic around them, which will attract insects that pollinate the flowers with their bright colors.
You can make a ladybug from the very simple material- a plastic bottle, and if you involve a child in the process, doing the craft will not only be exciting, but also educational for the baby. The article will tell you how to make just such products.
Variety of options
A ladybug made from a plastic bottle can be made in a variety of ways. For example, you can make a large flower bed in the shape of this insect, several figurines for the garden, or other craft options. In this article we will look at the most popular methods of making this craft.

Flowerbed in the shape of a ladybug
To make a large, bright flowerbed, you will need plastic bottles with the same volume, which is selected individually depending on the size of the flowerbed you plan to make. You will also need acrylic in red, black and red colors. To design the finished flowerbed you will need sand and stones. It is also worth having a stationery knife, scissors and paint brushes available.
Before making a flower bed, you need to cut blanks from the prepared bottles. These should be halves or thirds of the containers. They are painted a certain color depending on their location in the flowerbed.

While the preparations are drying, the base of the flowerbed is completed: a slightly elongated circle is outlined on the ground and surrounded with stones. Sand is poured inside, forming a kind of pillow. The back of the insect is marked on it, which will be used to determine the location of the wings and head. In accordance with the marked pattern, already dried plastic blanks are laid out, observing the color.

Important! The sand cushion must be watered generously before laying out the workpieces.
Thus, if the drawing is laid out carefully, you will get a mosaic of painted bottle bottoms.
Small garden ladybug
If there is not enough space on the site or there is no desire to make a flower bed, you can decorate the trees or veranda with hanging insects.
These can be made from ordinary bottles or from round containers that can be found on the open market. For production, in addition to 1 and 2 liter containers, you will also need glue, acrylic paints and scissors.

A small bottle will be the body of a ladybug; it should be painted black. You can also make a body by cutting out the middle of a one and a half liter bottle and joining the remaining parts together. In order to fix them, the bottom and neck at the junction are wrapped with tape or tape. Two wings are cut out of a large bottle and painted bright red. After drying, black dots are added to the wings. The finished wings are glued to the body using a heat gun. eyes on ready-made craft are applied with paint.

Advice! If you don’t have glue on hand, you can attach the wings using a furniture stapler.
The wings can also be made using two large plastic spoons, which are also painted red with speckles. This performance will look most advantageous.

If you want to make a small ladybug that can be conveniently attached to the railings, veranda boards or “planted” on a decorative fence, you will need:
- two plastic bottles of any color;
- acrylic paints or spray paints (black, red and white);
- wire for antennae;
- reliable glue or a construction stapler.
1. Cut three semicircles from plastic bottles - two smaller and one larger. On the last one you need to keep the plug (i.e. it will top part bottle, gripping the neck).
2. Paint them with paints - the larger one is black (together with the cork), and the two small ones are red. On the red ones, which will play the role of wings, draw black spots. You can also make a ladybug of a “reverse” color - with black wings and red spots; such insects are also found in nature.
Draw two eyes on the cork with white paint.
3. Unscrew the cap, put two pieces of wire inside and tighten the cap, making sure that the “antennae” remain in one specific place (it is better if it is the bottom part of the cork, close to the base - this way they will not prick anyone, even by accident).
4. Attach the wings to the body with glue or a stapler. The wings should start at the head itself, i.e. traffic jams They can be made closed, but a ladybug that looks like it's about to take off will look more impressive, so place them at an angle to each other with the connecting point near the plug.
A little ladybug made from a plastic bottle is ready! Now attach it with glue or wire (the second part of the antennae, which are now inside the body) wherever you want.


