New Year is a special holiday! And I want to make it magical and unforgettable.
Do Christmas tree toy making your own from salt dough is exciting and simple. A funny snowman will decorate the holiday and become a great gift for friends. Please note that the crafts must dry well, so it is better to do them at least three weeks before decorating the house. Using the same principle, it is easy to make other toys, for example, the Snow Maiden, Santa Claus, and snowflakes.
Preparing the dough and template
For sculpting you will need:
- 2 cups flour;
- 1 glass of salt;
- 0.5 glasses of water.
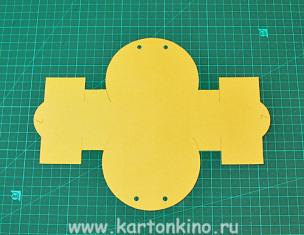
First, we draw a future snowman on paper. To make the template, cut it out.

Cooking salt dough according to the classic recipe: 2 parts flour + 1 part “Extra” salt + 0.5 parts water. If this is your first time taking up sculpting, take a look at. After mixing the flour and salt, gradually add water and knead the dough. Knead with your hands until it stops sticking to your fingers. If the dough is too sticky, you can add a little flour.

Snowman sculpting and decor
Roll out the dough to about 1 cm thick. Apply the template and cut out the base with a sharp knife. Use your fingers to smooth out the top edge so that the snowman has no corners.


In the upper part of the workpiece we make a hole for the rope. It can be made into a juice straw. We make a cap lapel. To do this, roll a piece of dough into a sausage and pat it well. Moisten all places where the dough will come together with water.

Attach the flap to the hat. If there is dough left around the edges, simply cut it off with a knife.

We make two identical small balls, glue them below the cap and make indentations in them.


The indentations can be made with a knitting needle or a sharpened pencil. Make a carrot nose by rolling the dough into a cone in water.

Draw the mouth with the tip of the knife. We make a scarf using the same principle as the lapel of a hat.

The next stage of sculpting a snowman from salt dough is a gift in his hands. Make a square of dough and glue it.

On top are two thin sausages crosswise and two drops of dough, slightly flattened. Roll the dough into a thick sausage, with one edge slightly thicker. We press it lightly and glue it from the scarf along the body.

We make mittens from large and tiny balls. Glue them so that the snowman is holding the gift. The final touch we will add is the ends of the scarf. We make two triangles and cut one side with scissors. Glue it as in the photo.


We leave the Christmas tree decoration made from salt dough to dry on the radiator. It will take at least two weeks to dry completely.


After drying, paint the body with white acrylic paint. The pupils in the eyes are painted black. The hat, mittens and ribbon on the gift are red, the scarf and gift are blue, and the nose is orange. When the paint has dried, we open the snowman with a layer of acrylic varnish. We thread the ribbon and hang the snowman on the Christmas tree!


A similar toy can be made from or - choose a more convenient material, add your own twist and enjoy the holidays!
Have a nice holiday! Let everyone New Year brings happiness and good luck! Don't rush to leave us, look at other interesting publications.
And for Christmas, even the prints of children's feet can be turned into an original one - for example, into a pendant with the image of the funny snowman Olaf.
This pendant will definitely please all your family's relatives and close friends.
To make it, we use it, which we mix as follows: pour half a glass of salt with a small amount of hot water, dissolve it and mix in a glass of flour. Add warm water until the mass becomes plastic. Knead and leave the dough for a while (about 20-30 minutes) so that the gluten dissolves. Now you can get to work.
We form a small oval pendant from the dough, be sure to pierce a hole on top for the ribbon. Place the child’s leg in the center of the pendant and press down a little. The cast is ready! We leave it to dry at room temperature or put it in the oven, the temperature in which does not exceed 40 °C. Drying naturally will take several days, and in the oven - about three hours.

After our cast has dried well, we paint the dough around the footprint in the main color, and turn the print of the foot into Olaf:

the heel will become his head, and his toes will become his legs. The outline of the snowman can be outlined with a thin black marker. To make it bright and the snowman Olaf should be as expressive and funny as possible.

Then we thread a ribbon into the hole, form a loop, and our pendant is ready. Such a New Year's tree will not only decorate the tree and apartment, but will also help preserve the memory of how small your child's legs once were. And if you indicate the year on the craft, you can easily determine the baby’s age. Good luck making with your little one!
Making a snowman from salt dough with your own hands
Every parent knows how much their child loves to tinker with all kinds of modeling materials. Plasticine, regular dough, whatever. Offer him puff pastry. The material is extremely cheap, but incredibly functional. New Year is just around the corner. There is a reason to spend a lot of fun moments with your child.
Or just create wonderful souvenirs self made, which are not sold in stores and will become a wonderful gift for colleagues, acquaintances and friends.
Make a cute snowman from salt dough that will lift your spirits even on gray winter evenings.
What you will need for the snowman:
- Salt.
- Flour.
- Water.
- Toothpick as a modeling tool.
- Gouache blue.
- Garlic press is like an extruder.
- PVA (optional).
- Starch (optional).
- Artistic small brush.
Let's get started. And the first thing to do is come up with future sketch figurines. As an example, a snowman can be made from two circles, wearing a hat and scarf, with a snow broom in hand.

Making salted play dough, recipe
It depends on the test what kind of snowman you end up with. Fragile and unreliable or strong and knocked down. So we mix it conscientiously. Use a mixer in the process - this will make the task easier and the material for modeling will be of better quality. Although you can knead the dough simply with your hands, most importantly, do not forget to wear gloves since the salt will sting a little before dissolving.
Watch the video: How to make salt dough for crafts
The most common recipe for salt dough is this: two parts of flour, without exceeding the volume, you can mix in dry starch. Starch will give the dough elasticity. Elastic dough makes good small parts. Well, we digress, add some salt to the flour, very finely ground. Next, water. It must be introduced into the dough carefully, in small portions. The dough should reach the consistency of soft plasticine or a little softer and must be elastic. And yes, if you want to make the dough stronger, add 2 tablespoons of PVA glue before adding water.
The result should be a homogeneous white elastic mass. Form it into a ball and wrap it in cling film or a simple T-shirt bag. The main thing is to seal it tightly and put it in the refrigerator for about 30 minutes. During this time, the salt will completely dissolve, the starch will react with the rest of the ingredients, and the flour will add a paste.
Let's start with the color test. The next batch is identical to the previous instructions. Only during the process should you add dye.

Let's start building a snowman
Decorating the head
Form two balls of uncolored dough. One is more, the other is less. You can take a white sheet of paper as a basis for laying out the figure. Next, place the smaller ball on the paper and flatten it into a flat cake shape. Since the salt dough quickly becomes crusty, you should either cover the cake with a piece of white paper, or immediately start decorating the snowman's head. Place a snowman body under the smaller cake. Flatten it about the same way as your head.
Take a toothpick and shape the mouth. Gently scratch and press the face of the future snowman. First, he outlines the location of the eyes, lightly placing dots in the right places on the head-cake. And around these points we form something like the rays of the sun, shallowly pressing the dough. Tear off a little dough and form two tiny identical balls.
Lightly moisten the areas marked for the eyes with a brush dipped in water. Helping yourself with a toothpick, place small balls on the places for the eyes, pressing, but not too much. Take the blue dough and form two very small balls in the same way. Which we then turn into pancakes. And we place eyes on the balls - these will be the pupils. We also pinch off just a little bit of the blue dough and roll into miniature sausages, which we place above the snowman’s eyes. Eyebrows are one of the main means of conveying emotions, so make sure that your snowman's eyebrows do not make him angry or sad. We tear off a piece of blue dough and form a small icicle or carrot, most importantly, not long, since this part can break off. This is the nose. Carefully place under the eyes, on the pre-moistened dough. Then we press the toothpick into the snowman’s mouth.

We design the snowman's body
Legs and arms should be attached to the body cake. From the uncolored dough we form two sausages of equal length, slightly thicker at one end. We place them on the body. These will be the hands. We place one arm, with its thickening toward the hand, along the body, and place the second arm as if holding something, bent at the elbow. This hand can hold a shovel or broom.
Next we sculpt the legs. From the blue dough we form two elongated drops of the same size and place them on one straight line under the snowman’s body, with the thin ends inward, slightly flattening them. We attach all the parts with a brush and water. Well, if an embarrassment does happen and after drying some part falls off, it can be glued back using PVA glue.

Dressing up a snowman from salt dough
Let's make a hat. There is a huge field for imagination here. The hat can be fashioned in any size and shape. But for example, let’s choose the most ordinary hat with cuffs. From a small and fairly wide blue dough pancake we make something like a crescent with an elongated middle part. We apply it to the head and “dress” it like a cone. We form a small sausage from the same dough and carefully place it in the place of the lapel, between the naked and the cap. Flatten it a little. Use a toothpick to apply any pattern you like. You can get by with simple dots and it turns out very nice.
The next step is the scarf. It should be “wound” around the snowman’s neck. It will consist of two parts. Roll out the blue dough into a small rectangle and separate one of the narrow ends with a toothpick, forming a “fringe”. The scarf will be wrapped around the neck, as it were, and therefore the section of the scarf that is thrown on the shoulder is placed on the body first, being glued with ordinary water. Then the part that wraps around the throat. Steal a scarf in a pattern with a hat.

Making a panicle
A toothpick with pre-broken sharp ends is perfect for the role of the shaft of a future panicle. This can be done with scissors, usually cutting off the excess. The cut will be smooth.
Next, put a ball of blue dough into the garlic press and squeeze out many threads of the same diameter. We even them out in length and assemble them into a bundle. Place the prepared toothpick inside the bundle. We “give” the finished broom into the snowman’s hand and “tie” a bunch of blue threads with a thin thread from ordinary dough.
That's it, the work on sculpting the snowman is completed.
We design the figurine
The dough needs to be dried. At this stage, it is risky to heat and cool the product too much. Because the dough may crack and then the work will be lost forever. Of course, you can dry the product in the most traditional way - on the windowsill, in the sun. Still, the risk of cracks is always present. And the thicker the craft, the more serious the risk. But those who don’t take risks don’t eat tangerines on New Year’s Eve according to carriage norms. Dry in stages. By the way, you can use the microwave oven in the “Defrost” mode. Staged drying means that you dry vigorously in periods and periods of letting it dry on its own. Heated it a little in the oven, took it out, cooled it, and repeated.
When the product is completely dry, to add gloss and extend its service life, open it with varnish.
That's it. You can present a salt dough snowman just like that without unnecessary decorations, or glue a magnet and present it as a decoration on the refrigerator, or glue a ribbon and use it as a pendant on a Christmas tree. Happy New Year!
With the arrival of winter, both children and even adults are looking forward to snow and the opportunity to build a snowman - funny, with a carrot nose, in a hat and scarf. But what if you are a resident of the warm south, and you only see snow in pictures or in movies? Or maybe the weather is just not cooperating with snowdrifts? You can take the creation of a snowman into your own hands in the literal sense of the word - make it from scrap materials: various fabrics, yarn, paper, salt dough and beads.
You can do these crafts with your kids, creating not only cute snowmen, but also a great mood. In addition, cute little things can become Christmas tree decoration for the New Year, and a funny gift for family and friends. And most importantly, such snowmen will not melt either with the arrival of summer or in a warm room.
Salt dough snowman
You can involve kids in creating such crafts. Modeling exercises have a beneficial effect on fine motor skills child. Kneading the dough with their fingers and palms, sculpting various small details, kids use their imagination and imagination, imagining what the snowman will be like. The right hemisphere of the brain develops, vocabulary increases, and speech skills improve. Children will not only enjoy the process of creating crafts, but also enhanced development of the necessary skills.
You can buy salt dough ready-made or make it yourself.
You will need:
- Flour (1 part);
- Salt Extra (1 part);
- Water (0.5 parts);
- A little starch and PVA glue (1 tbsp each);
- Toothpicks;
- Food paint;
- Garlic press;
- Clear varnish;
- Brush.
To make dough for modeling you will need good premium flour. Salt must be finely ground, or preferably extra. Make sure that there are no dark inclusions that will spoil the appearance of the craft. It is better to use very cold water for kneading the dough. It will be necessary to prepare 2 types of dough: with and without dye. The principle is the same.
Mix all dry ingredients. Stir and start adding water a little at a time. During the process, add glue or vegetable oil in the same proportion. Mix well. The result will be a mass similar to soft plasticine. It should be elastic and not stick to your hands.
We give our dough the shape of a ball, wrap it tightly in film and put it in the refrigerator for 20 - 30 minutes.

Once the dough has rested and rested, you can begin modeling. Advice! The dough quickly becomes crusty in the air, so while modeling, cover the finished parts with a wet napkin or towel.
We sculpt from uncolored dough. We roll 2 balls - smaller and larger. Immediately take an even and flat base on which you will lay out the parts, for example, a sheet of paper on a cutting board. Place the smaller ball on the sheet and flatten it into a flat cake. This will be the snowman's head. It is better to initially form the ball as neat and even as possible so that the cake does not need additional leveling. Next we flatten a larger ball - the body of a snowman. Use a toothpick to create a smiling mouth. Press carefully. Our snowman is cheerful, so we mark the places for the eyes and draw with a toothpick the rays of wrinkles that everyone who smiles sincerely has. Now you need to roll two small balls - these will be the snowman's eyes. We moisten with water the places that we have identified for the eyes. Using a toothpick and fingers we attach our balls. Lightly press down. We roll two thick sausages - handles. We attach them to the sides of the snowman’s body and bend one of them. He will hold a broom in it.

Let's get down to it colored dough. You need to form two completely tiny balls. Their size should be smaller than the eyes - these are the future pupils. We flatten them with our fingers and attach them to the eyes. Now you need to roll out a thin sausage and cut off 2 pieces - these are the edges. They should be placed on the face very carefully, since the placement of the eyebrows can make our snowman sad or angry. We make a spout from a piece of colored dough. First we form a ball, then we roll out one edge and get a cone. We glue it to the workpiece, like all other parts, using a wet brush. For the legs, we make two large drops and place them in the same plane at the bottom of the body cake.
It's time for the snowman's clothes. Buttons - two round cakes. You can come up with your own hat shape or make a very ordinary hat, as in the photo. To do this, you need to form a cone-shaped (triangular) cake with a wide base. We attach it on top of the head. We roll the sausage and attach it like a lapel on a hat. You can use a toothpick to make a pattern. We make a scarf from 2 parts. Two rectangles (larger and smaller). Let's deal with the smaller part first. We narrow one of the narrow sides even more, and, on the contrary, flatten the other. Using a toothpick or the blunt side of a knife, cut this edge into a fringe. Attach the narrow edge up on one side of the snowman. We wrap the second rectangle around the snowman's throat. It turns out that the fringed end seems to be peeking out from under the scarf wound around the neck. We decorate the scarf with a pattern like on a hat.

Now we need to make a broom. To do this, a piece of colored dough must be passed through a garlic press. We set aside one flagellum. Align the remaining sausages in width. Take a toothpick and cut off one sharp end. We attach our sausages to the handle and wrap them with the reserved flagellum. We give our snowman a broom in his hands, and the craft is almost ready.
All that remains is to dry it. The most the best option It will just air dry. In the oven or microwave there is a risk of deformation or cracking of the product. Let the snowman dry on its own. This may take a couple of days, depending on the air temperature.
After the snowman has completely dried, cover it with glossy or matte varnish and the craft is ready.
Fabric snowmen
Fleece snowman

You will need:
- White and blue fleece;
- Threads with a needle;
- Button;
- Stuffing material;
- Toothpick;
- Paints;
- Glue;
- Scissors.
First you need to cut out all the parts. For the body we cut out a circle with a diameter of 17 cm from blue fleece, for the head - 11 cm. For the hat you need a rectangle of blue material 8 x 15 cm, for the scarf 27 x 2 cm.

We make a basting stitch along the edges of the circles. Now you need to tighten the blanks a little, fill them with stuffing material and tighten them thoroughly. We tie a knot and secure it with glue for reliability.

Now we pass the needle through the edge of the white ball, next to the thread knot, and then pass the needle through the blue ball, starting from the thread knot. We leave the blue ball, put on a needle and thread and go in the opposite direction through the blue ball to the white one. We fix the thread in the white ball. Now the two parts are securely fixed to each other.

We make a hat for a snowman as follows: we make a small fold at the bottom of the future hat and wrap it around the head. We glue the edges. Now we tie the cap with a thread and cut it top part on the fringe.


We simply tie the scarf in a knot. We embroider the eyes. You can also make them from beads. Cut off the sharp tip of the toothpick. We paint it and glue it instead of a carrot.
The snowman is ready.
Snowman made from socks

Surely in every home where there are children, there are a lot of things that they have grown out of. Well, or hopelessly spoiled in the course of carrying out their important children's affairs or pranks. It’s quite possible to give old things new life For example, these adorable snowmen are made from old socks and tights.
You will need:
- Directly old socks and stockings. White and multi-colored;
- Filler. IN in this case rice;
- Strong threads;
- Scissors;
- Decorative elements (buttons, beads);
- A piece of toothpick painted orange for the spout.

First you need to cut the necessary blanks. We cut off only the straight part from the stocking. From one sock in a pair, cut off both the toe and heel. From the second only the heel.

Now let's start creating a snowman. We tie the stocking blank at one edge. You can even go over it with a needle to be sure. Now turn the resulting bag inside out. The connection point will be the bottom. Pour rice inside. The bag should not be stuffed tightly (see photo).

Now we take the sock blank from which we cut off both the toe and the heel, and put it on our bag. We place it in the middle. Using coarse threads, we divide the workpiece into 3 parts. We pull the threads tighter. We got spherical segments. The upper segment on which the tie is located is the head. You need to put the blank from the second sock on it. You will get a hat. We also tighten the top part of the cap with thread.

We tie all the constrictions with beautiful bows.

Now all that remains is to decorate the snowman. Sew small and large buttons, glue on the nose. To do this, coat the end of a toothpick with glue and insert it between the fibers of the stocking. You can add any other decorations to your taste.
Crocheted snowman

You will need:
- Yarn (white required, remains of red, orange and any other;
- Hook of the corresponding number;
- Buttons (small for eyes and large for decoration);
- Thin wire;
- Stuffing material;
We will knit the body of the snowman from bottom to top.

First r. In a ring of 3 ch. knit 6 tbsp. b/n. replace the first column with 1 v.p., ending the circle with 1 d.s.
Second r. Double the amount of tbsp. b/n. In each loop we knit 2 tbsp. b/n with a common basis. There should be 12 loops.
Third r. Now we knit 2 tbsp in every second loop. b/n with a common basis. 18 loops.
Fourth r. We knit 2 tbsp. b/n with a common base we knit in every third loop. 24 loops.
Fifth r. 2 tbsp. b/n in every fourth stitch. 30 loops.
We knit 5 more rows by analogy.
In the tenth row there should be 54 loops.
We knit the next 4 rows without increases.
Now we begin to knit rows with decreases symmetrically to the increases earlier. After 6 rows, you need to stuff the workpiece tightly with padding polyester, padding polyester or any other material. And knit 2 more rows. In the 21st row you should get 12 loops, in the 22nd row - 6, and then knit all the loops in 1 and secure the thread.

We knit the snowman's head according to the same pattern and principle, only the maximum number of stitches in a circle is 42. This will be the 8th circle. We knit 2 rows without increases. We make decreases in the same way.

We knit the snowman's arms simply. Cast on a chain of v.p. and knit 5 - 6 rows of st. b/n. Now we take threads of a contrasting color and we will knit a cuff. We work across the rows. We knit a row of st. b/n. next row of 2 tbsp. b/n in each loop. third row 1 tbsp. b/n in each loop. The mitten is also knitted in st. b/n threads of a different color. We knit the first row 2 tbsp. b/n, then a row of 1 tbsp. b/n in each loop. We knit the next 2 rows, alternating 1 tbsp. b/n and 2 tbsp. b/n with a common basis. Now you need to pull the loops together and use connecting posts to tie the edges of the mitten to the place of the thumb. To make a thumb we knit 3 ch. and 1 tbsp. b/n in the same base loop. We fasten the thread and cut it off. We hide the tail. We sew or tie the white part of the handle. When you have two handles ready, you can take a thin wire, pierce it through the place on the snowman’s body where the handles should be attached, make loops on both ends and put the handle blanks on the wire tails. Sew it on. Now the snowman can bend his arms.


Legs. We begin to knit both the head and torso. First round 6 tbsp. b/n, second - 12, third - 18, then another 10 rows without increases. Now you need to fill the leg to the middle with stuffing material. We knit the next 2 rows with decreases. First 12 loops, then 6, and then tighten into 1 loop and secure the thread. Sew to the body.

We knit a carrot in a circle of 3 stitches until the right size. Pull the thread of the last loop to the beginning of knitting.

We knit the scarf with a rectangular fabric. We knit the hat as half of the head. Sew on the bubo and put on the hat. We tie a scarf. Sew on the nose and eyes.
Greetings, dear friends! It's getting closer, it's getting closer magical holiday! Ah, New Year, a time of miracles and bright hopes! At this time, we all turn into naive children and wait and wait for miracles and magic! And we also really want to create, create and please our loved ones.
Today I invite you to make wonderful souvenirs from salt dough for the New Year with your own hands. I hope you enjoy these Christmas crafts from salt dough, a master class of which I will show you with photos below.
Materials and tools for manufacturing New Year's crafts from salt dough:
- Sunflower oil
- Toothpick
- Glitter for decoration (optional)
- Food coloring blue, red and white, or blue, white and red gouache
- Paperclip and thin ribbon or string
- Small magnet (optional)
- Gloss varnish
- Parchment paper on which we will sculpt and cut.
New Year's crafts from salt dough master class
For the dough, take salt and flour in a ratio of 1:2 by volume. Add about 1 more part of water and knead into a tight, elastic dough. That is, if you took a glass of salt, then we take only two glasses of flour and 1 glass of water. By the way, I gave a recipe for salt dough in this article, see at the very end of the article, you can use it if you need exact proportions in grams, so to speak).
The main thing is to make sure that the amount of water is sufficient, otherwise the dough will simply crumble and tear. To make it elastic, you need to add a little vegetable oil and knead very thoroughly (and therefore for a long time).
I would advise you to let the dough sit in the refrigerator for a while before using it - then it will become exactly the right consistency. Overall, it should resemble plasticine.
What salt to use for making salt dough
Now about the size of salt crystals. In theory, the finest salt is best for this purpose. For example, extra, it’s just like flour.
However, you can experiment and add larger crystals - they will be visible and sparkle on finished product like little pieces of ice. It looks very beautiful and gives some unusualness to the figure. In general, try it.
Finally, it's time to diversify the making process and make the dough colorful! To do this, use any coloring agent, for example, food coloring or the most ordinary gouache.
You'll have to get your hands a little dirty, but the result is worth it - after this you should have cute balls of dough in the colors you want on your table. By the way, throughout the entire work it is best for you to keep them under cellophane so that they do not dry out and become airy.
Snowman made from salt dough master class
I think the moment has come when you have a chance to fully unleash your creative potential and make such a cute snowman that can serve as a souvenir gift to your loved ones as a refrigerator magnet or peacefully hang while the chimes are chiming on your own home Christmas tree. I think it should turn out very cute.

So let's get started. Prepare a small blue ball and a medium-sized uncolored ball for the base.
From a light piece, roll two “snow balls” (torsos) of a snowman and use a notch in your palm to give them the shape of a convex cake. Each pancake should resemble a convex thick lens, lying upside down.
To make the head sit more firmly on the peculiar shoulders of the snowman, place both cakes on a toothpick and slightly moisten them with water where they touch - it will work like glue.

Now comes the fun part. Decorate the face: press a toothpick into the mouth, glue on eyes, eyebrows, nose and create facial wrinkles to make the character look more alive. Attach the blue legs and one arm using glue and water (the second will be on top of the scarf).
Roll out the blue dough into a thin layer and cut out a piece of scarf from it with a toothpick. Attach it to the body. As a decoration, you can put dots on it with the same toothpick.
Now cut a strip from the same layer and cover the neck of the snowman, as in the photo. Trim off the excess and add dots. And make a second hand for your snowman. Don't forget about glue water, it will save you in any situation if you use it sparingly.

Attach button balls and make a hat with a pompom. Don't forget about the dots on the hat, and give the pompom a shaggy look with a toothpick. If you want to hang the figurine on the Christmas tree later, now stick a curved piece of wire, for example made from a paper clip, into the snowman’s head.
Dry the product. You can simply leave it on the table for a couple of days, or you can speed up the process by drying it in the oven - at a low temperature and without sudden changes.
Then coat the product with glossy varnish in 1-2 layers. You can add glitter or any other elements, you can glue a good magnet on the back if you want.
Salt dough snowmen photo

I think you can give such cute snowmen as a gift; the recipient will definitely like it, especially since you did it yourself and didn’t just buy a soulless magnet in the store.

Santa Claus made from salt dough master class
Now let's start making Santa Claus, or rather we will only make his head with a cap. I made two heads in slightly different variations, the eye color is different, the pompom, well, in general, look at the photo.

Let's make the head of everyone's favorite grandfather in a red cap and a white beard. For it you will need as many as four colors of dough: red, white, pink and natural, that is, an uncolored piece.
Roll a ball of regular dough and, keeping in mind the hollow of your palm and the lens, create a convex cake out of it.
Add cheeks, nose and mouth to it. Don’t be afraid to make your mouth big - it will still be half covered by your mustache and beard.
Attach eyebrows, make eyes and expression wrinkles. Try to give a kindness to your facial expression by highlighting the dimples under your eyes from a smile, placing your eyebrows at an angle.
In general, there should be love in the old man’s gaze. You will succeed, I believe. By the way, press your face down a little - this will serve as a platform for the beard.

Now proceed to the beard: make it in several layers of sharp flagella. Grow a mustache under your nose. Look, grandpa has already begun to take on the appearance of a really good wizard.
It's time to work on the pompom hat. Roll out a thin layer of red dough and place the flat side on Grandpa's forehead.
Trim off the excess and shape the headdress into the shape you want. Don't forget the fuzzy pom pom and dot pattern! And if you want to hang the toy later on the Christmas tree, then stick a hook into it from above, for example from a paper clip.

Dry the product in the oven at low temperature or simply on the table until completely hard and durable. If something comes off, use any liquid glue. Then coat it with varnish and sprinkle it with glitter in places, tie a ribbon or attach a good magnet to the back. Here you have a finished toy for the Christmas tree and a magnet for the refrigerator))).

Ready! Look at your work, how interesting the New Year's crafts made from salt dough turned out! Now you can give them to friends and relatives, they will be delighted with such gifts!

The main thing is to give them with sincere love and tenderness, because it is so important for your loved ones to feel warmth and care, especially during family holidays. I think that this master class on manufacturing may also be useful to you.
We still don’t have snow (so we’ve already decorated the Christmas tree in the square; today we took a photo while out for a walk with the children. In the photo, my daughter Diana looks behind the fence around the tree in search of Santa Claus).

Closer to the New Year they should put him there with a big bag). In the meantime, Moroz is not there). Finally, we didn’t cut down a bunch of poor living pines to make a huge spruce out of them, but bought an artificial tree.
My soul is truly happy that the Christmas trees that would have been intended for a large holiday tree will live and grow further. I’m like Sharik from the cartoon “Prostokvashino”, I don’t want to cut down the Christmas trees, I feel sorry for them)!
Since I remembered this cartoon, let’s watch it at the end of the master class and relax a little with the kids.
God bless you!
Your Elena Kurbatova.