Everyone in childhood let the boats through the puddles, into the river or just in the bathroom. Some had simple boats, some managed to send entire ships sailing. Teach your child how to make an origami paper boat so that your child will have an active and fun childhood, just like your generation.
There are many models of paper ships made in this technique. Some are made from a single sheet, there are modular designs. It takes a lot of time and patience to create a large and majestic ship.
You can make snowflakes from a hexagon. There are also circle puzzles. The paper maker as we know him today is Cai Long, an official of Emperor Han Ho Ti who comes from Hunan Province in southern China. He tried to create material that was light, subtle and well written. He tried plant fibers and it was made from wood bark, cannabis, and fishnets, supposedly around 105 AD. Similar materials are still produced today.
With the expansion of the Chinese empire, papermaking technology began to penetrate beyond the empire. First it was Korea, and then Buddhist monks brought the newspaper to Japan. In this century, the newspaper spread to other Asian countries. The Arabs came to Europe through Africa. The first paper workshops created by the Arabs appeared on the territory of today's Spain, as well as in Italy. In the century, this document began to be issued in Switzerland, Austria, the Czech Republic, Poland and England.
But origami classes do not require special qualifications and skills. Moreover, this technique does not require additional costs for materials - only paper is needed. Watch the video “origami paper boat” at the end of our article, where you will be offered various methods folding boats, sailboats and steamships.
regular boat
The seminars of the conference will be conducted by teachers of the Polish Origami Center from various association clubs. We invite everyone who is looking for ideas for decorating, embellishing and entertaining using origami and other paper technologies, both advanced and beginner paper lovers, teachers, students and parents who are looking for interesting art ideas.
Video: Making a big sailboat
Please fill out the application form, clearly indicate the lunch option, carefully write down the invoice. The fee includes organizational expenses, the cost of materials for workshops, lunch, coffee, tea. Bring scissors and glue. During the meeting, it will be possible to purchase origami paper and other plastics.
- Fold a rectangular sheet of paper horizontally.
- Fold the top corners towards the center.
- Lay the bottom sides and fold on opposite sides of the workpiece. Bend the corners into a large triangle. Carefully press the corners so that the structure does not fall apart.
- Open the workpiece and press in another position. Should be a rhombus.
- Bend the bottom corners up on different sides.
- Take two corners and form a boat. You can go sailing.
For children, a real miracle when you, like a magician, create voluminous objects from flat paper. The child will be delighted if he himself learns the wisdom of such magic, and will be able to build various structures.
This little boat is our trademark
To feel oneness with the yacht, listen to the wind. Her understanding is the beginning of a great adventure in sailing. This friendly talisman can be the first step to the great pleasure that sailors give. Fold in half again, and then unfold.
You can do this with a piece of paper, it's very easy. You can even make an entire fleet and give each boat an individual name. Laying such a boat is also one of the first steps in Origami. Fold the remaining paper tape up. Origami is the Japanese name for creative folding paper and is well known throughout the world. This art has millions of devotees in many countries.
DIY paper sailboat
1) Bend a square sheet in half vertically. Carefully draw along the fold line so that it is expressive. Straighten.
2) Bend the sides to the center of the vertical bend.
3) Bend the upper and lower sides to the middle, fix well and straighten back.

4) Bend the corners, straighten them to make folds. Flatten the entire sheet. You should get a mesh of bends.
5) Fold the sheet as shown in the diagram, connecting the side points in the center.


6) Turn the workpiece over and connect the corners of the square diagonally. At the same time, you need to turn one of the corners away from you.

7) Open the workpiece and bring the corners together.

8) Shape the sailboat. Favorable wind!
You can make a whole flotilla of boats and play sea battle with your baby. Put paper animals in boats that will steer sea vessels. The kid will have fun playing with mom or dad, it will charge the whole family with positive.
Origami paper boat: the scheme is available not only for adults, but also for schoolchildren. Parents will be surprised when they see how the origami technique can be of interest to the younger generation. You just need to interest the kid and action movies with video games will be forgotten. And this means that the child will become healthier, will develop thinking and imagination, and not plant vision and distort posture.
origami steamer

- Bend the square sheet diagonally, press the bends well and open back.
- Wrap the four corners so that they meet at the center of the square.
- Turn the workpiece over and bend all the corners, aligning in the middle.
- Turn the workpiece over again and bend all the corners.
- Flip the square. Open two small squares located opposite each other.
- Turn out the side squares, folding the figure in half. Straighten the ship with pipes. You can imagine yourself in the role of a captain and plow the waters of a bathroom or a local stream.
When making origami with children, use a photo where each step is clearly visible. You can show the child a video, then, showing by example, build ships and boats. Teach your child to art, develop the desire to do something with your own hands. This will help him a lot in the future.
A selection of interesting video tutorials
One of the classic childhood crafts that left vivid memories for almost every one of us is, of course, the origami boat. This paper ship has many variations, and today we will look at several master classes - from simple, accessible to beginners, to complex ones.
Classic paper boat
Among various crafts the origami ship takes pride of place along with the airplane - after all, you can play with such toys, run in the bath or through real puddles! And even a child can make a boat out of paper. To do this, we need a regular A4 sheet.
Step-by-step instruction
The result should be like this. 
These boats are made in minutes. It is best to make them thick paper so that fun water trips last as long as possible.
There are an infinite number of paper boat design options - it all depends on your imagination. The photo shows only a small fraction of the decor ideas of the model.

Video support for the creation of a classic boat
You can see clearly how to assemble an origami ship out of paper yourself from the step by step instructions, which is presented in this video.
Making a fishing boat
Let's take on a more complex model - an origami paper boat. By the way, with some effort, beginners can make it with their own hands. There can be many ideas about the types of models in this technique. Let's consider one of them.
Step-by-step instruction

The result should be about the same boat as in the photo. 
Video master class of creating a boat
Steamboat with two pipes
And now it's time to do something really complex and original. A wonderful version of the origami boat is a steamer with two pipes.
 Such a figure will not sail the seas, but it will serve as another model of a boat in the origami home collection.
If it feels angular or desaturated, then that's the right feeling. But who's stopping you from coloring and decorating it to your taste? Any child would love to do this.
 It is not difficult to make such an origami boat - you need to follow the instructions for the template, which is presented below.

- Make 2 diagonal folds.
- We bend each corner to the center.
- We turn the figure over and again bend the corners of the future origami boat.
- During steps 4-7, repeat these steps.
- Now straighten the pockets (step 8).
- Fold the figure in half (step 9).
- We straighten the model, and our boat is ready for water adventures! (10).
Video: Making a paper steamer
Origami for kids: Paper steamer
And finally - a model for real aesthetes. It is even easier to make, but you will also need scissors and a felt-tip pen. What for? Find out from this video.
Origami is not only a developing art, but also an excellent opportunity to captivate a child with an entertaining game with paper figures. If the kid does not yet know how to make a paper boat, be sure to teach him how to fold such a toy. The child will develop the further scenario of the game himself: a paper boat can roll animals from Kinder Surprise, and a “real” canoe is simply indispensable for every Indian for hunting and exploring the mysterious rocky grottoes.
What would you name the boat? Canoe and punt made of paper.
The origami boat is folded simply and the detailed step-by-step instruction. Having mastered the proposed schemes, show them in practice to the kids. For children, the first origami skills will be very useful: this is an educational game, accuracy training, and an exercise in concentration. Let's take a step-by-step look at how a paper boat is folded with our own hands, based on 2 elementary schemes.
Option 1 "Punt"
 We make a punt boat from a sheet of paper
This paper toy for kids is especially interesting because it is quite possible to put little passengers in it and send them on a real river cruise - this origami boat can easily keep miniature crafts and small toys on real water. The scheme is simple:
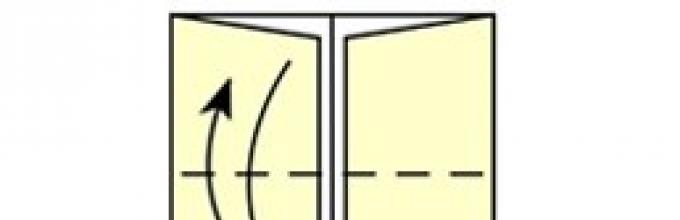
- Fold a rectangular (can be square) sheet in half lengthwise, then across (for ease of orientation to the center), then return it to its original state;
- Wrap the upper edge of the sheet inward to the middle, repeat the operation with the bottom side. Note that the rectangular (not square) sheet is folded similarly from the horizontal orientation;
- Continuing to fold the paper boat, evenly bend inward each corner of the workpiece (as in Fig. 1);
- Aggravate the sharpness of the conical parts of the paper blank to go to the final stage of folding the toy - bend the corners again, as shown in the diagram;
- Fold the product away from you along the central edge of the workpiece, and then carefully turn the structure out, opening the central crevice (take pliable paper, it may not work out of cardboard);
- Gently straighten the toy, tighten the inner folds - your origami boat is ready to be launched.
Option 2 "Canoe"
Making a canoe from a piece of paper
You can fold another paper boat with your own hands without spending too much time. The Indian canoe will require a little more attention due to its design features - the closed bows of the toy. It is better to make a pie out of paper, because it may not work out of cardboard. A canoe is folded similar to a punt. Let's take a closer look:
- Fold the square sheet in half and from top to bottom, and from left to right - the central intersection of the workpiece will be formed;
- Then wrap each corner evenly inward, focusing on the center - you get a neat smaller square;
- Expand the sheet to its original state and again bend inward each corner, but now align the top of the corner with the nearest edge (see Fig. 2);
- It turns out that each corner will now be bent inward twice - a “TV” is formed (a square in a neat “frame”);
- Turn the paper-folded boat upside down and fold the top quarter of the workpiece towards you, focusing on the center. Do the same with the bottom quarter;
- Bend the corners of the resulting rectangle inward - the boat is almost ready;
- Aggravate the sharpness of the conical protrusions by additionally bending the corners inward (as in Fig. 2), obtuse corners also “break” towards you;
- Carefully open the workpiece and, holding the folds, turn it inside out, then straighten the noses of the canoe from the inside.
Not immediately, but your child will also be able to fold the original boat from a simple sheet of paper. It is possible that soon a growing family member will surpass you in origami skills. After a couple of months, do not be surprised if the child comes up to you and shows you how to fold a submarine or, or maybe even more difficult - a real one! Origami is a fascinating art, you just have to get carried away once. Why not start now with a small paper boat?
How to make a boat from improvised means? The answer to this question is in this article, which will tell you how to make a real boat out of cardboard and paper.
Yes, real boats that you can sail on the water, not paper boats as you may have already thought.
They are quite suitable for hiking, fishing. Almost any junk paper is suitable for their construction, up to newsprint. But best of all is the so-called kraft - durable wrapping paper used for packaging cement, bulk piggy products. Suitable waterproof cardboard (isoplit), the cheapest grades cotton fabric, even gauze. A rag will do too.
Both synthetic resins and nitro-based adhesives and even simple casein are used as binders. Hulls glued from these materials, after being treated with waterproof paints and varnishes, proved to be in operation from the best side. Small boats with fabric and paper lining can be built in just a few days and sail on them all summer long. Their gluing itself is very simple and does not involve harmful influence on the human body, which allows you to perform this work even in residential premises.
Here is a list of small vessels that can be manufactured using the described technology:
1. Kayaks, tuziks and canoes of various types, from 1.5 to 4 m long. Boats with round contours are especially good.
2. Small sailing vessels, both sharp-chinned and round-bottomed, of the same dimensions.
3. Motorboats, hydrocarts, water bikes, catamarans - both collapsible and non-collapsible.
Boats with cardboard and paper lining can be made in two ways: on a wooden frame and on a special block, as well as in a matrix removed from this block. In the first case, if the hull has straight-chine contours, cardboard is first attached to the frame, just like plywood, that is, with glue and nails. After that, the body is cleaned and pasted over in 2-4 layers with narrow strips of kraft paper, then with one layer of fabric, after which it is primed, puttied and painted with waterproof materials. From the inside, the details of the frame and cardboard after assembling the case are covered with hot drying oil and modern synthetic primers and paints (alkyd, glyph-tal, etc.). As for ships with round contours (kayaks, canoes), it is better to glue them out of paper tape, having previously increased the number of stringers in order to obtain a large supporting surface and smooth contours. Having assembled the frame, as usual, on glue, screws and nails (Fig. 1), carefully clean the outer surface of all its elements to which the paper lining will be glued. This is done first with a rasp and cycles, then with sandpaper. The outer edges of the posts, fenders and stringers must be rounded as shown in Figure 1, otherwise the paper will quickly fray.
Having finished assembling the frame, you should prepare paper strips for gluing the skin. If the builder has rolled kraft paper at his disposal, it is first cut into pieces of such a length that it is enough to glue the hull at an angle of 45 ° from side to side, with an allowance of about 50 mm. The required length is determined by measuring the frame along the frames using a soft tailor's meter. Strips 120–150 mm wide are made from the prepared pieces, tearing them off with a heavy ruler, as shown in Figure 2. “Torn” paper, when glued together, gives a more even surface than cut with scissors. This should be firmly remembered and in the process of work, the excess tape should also be torn off by hand, and not cut. Kraft paper, depending on the direction of the fibers, has different tensile strength. In order to obtain an equally strong "shell" and not to be afraid of its warping during gluing, each subsequent layer must be applied at an angle of 45-50 ° to the previous one.
Preparing paper for pasting the frame is done as follows. Putting the tape on a piece of polyethylene or oilcloth, moisten its glossy side with warm water using a wide flat brush. The glossy side should become evenly damp, and the reverse (matte) should be slightly noticeably damp. Moistened paper tape is placed on the frame, gently lubricated with casein glue. It is impossible to stick the first layer, spreading it directly on the paper, because after that it will not absorb drying oil and primer from the inside of the case. The second and subsequent layers of paper are glued, lubricating the “matte” (dry) side of the moistened tape with glue. As mentioned above, the tapes are overlapped with an overlap of 1-2 cm per side. The last layer of paper should be glued very carefully, without smearing the outer surface with glue: the fabric will be glued to it with nitro glue or nitro varnish, which sticks to casein - badly. The paper is molded to the posts and the fender with fingers, making breaks in those places where folds and wrinkles form. This work requires a certain skill, so it is advisable to first "practice" on some piece of wood of the appropriate shape. 
The number of paper layers is determined by the dimensions of the hull, the construction of the frame and the quality of the paper, as well as the purpose of the boat. On average, with one outer layer of tissue, 5-6 layers are sufficient. For strength, glue another 1-2 layers of longitudinal tapes in the gap between the diagonal tapes, edge to edge, carefully smoothing their joints with your fingers. Sometimes, for the same purpose, an additional layer of thin, durable fabric is glued between the layers of paper. All work can be done in one or two steps, after drying the first layers well. After drying, a completely glued body (due to shrinkage of the paper) becomes smooth and very rigid. Before pasting with a cloth, it is sanded and primed. For this, primers of grade 138 or AG-2 should be used - nitro-lacquer adheres well to them, with which the fabric will be glued. Pasting with fabric is carried out from the bow to the stern, in whole pieces, with an extract from the fenders to the keel or vice versa, depending on the type of hull. First, the fabric is glued with one edge and nailed with small nails to the keel (25-30 mm pitch) and from this line is superimposed on the surface of the hull, abundantly lubricated with nitro-glue. A hard brush stretches the fabric so that there are no wrinkles and air bubbles. This work is best done by two or three people. One of the workers should have scissors ready to cut the fabric when pasting the stems and other areas where folds and wrinkles form. How to glue roundings is shown in Figure 3. The teeth on the edges of the fabric should be cut out so that there is not much overlap, but no voids remain. When stretching the fabric, it is necessary to push the glue into its pores. To do this, sometimes you have to add glue directly to the surface of the fabric and “rub” it into the fabric with a brush. It is recommended to use such gluing on the frame if the construction of no more than 1-2 boats is planned; if it is decided to make a series of ships of the same type, it would be more expedient to glue them on a blank or in a matrix.

Source materials:
1.
CRAFT PAPER. Available in rolls or sheets different lengths. When building small ships, recycled kraft paper (tare bags that are cut into strips 120-150 mm wide along the long side) can be successfully used.
2. PRESSED WATER-RESISTANT CARDBOARD (isoplit). Available in thicknesses from 3 to 6 mm, different size; most often there are sheets of 1000X500 mm.
3. COTTON FABRIC: gauze, madapolam, dense unbleached linen or canvas - depending on the purpose of the boat and the material capabilities of the builder.
4.
BINDING AGENTS (adhesives): polyester resin PN-1. It is used to make glue for paper and fabric. Glue recipe: resins - 100% (by weight), cobalt naphthenate (initiator) - 8%, isopropylbenzene hydroperoxide (abbreviated: hyperiz - accelerator) - 4%. The sequence of glue preparation: naphthenate is first poured into the resin, mixed well, and only after that, with continuous stirring, hyperiz is introduced. Naphthenate and hyperis must be stored separately, as their combination causes an explosion.
a)
Urea formaldehyde adhesive, commercially known as "synthetic joinery". It consists of two components: an adhesive and a hardener (an aqueous solution of oxalic acid). Glue can be used in the same way as the previous one.
b)
Casein. Heavy powder of white or grayish color. For the preparation of glue is mixed with boiled water room temperature in the proportion: 1.5 parts of water per part of glue (depending on the type of glue and its moisture content, this proportion may vary slightly). Applicable only for gluing paper "shells". In order to increase the water resistance of casein glue, some amateurs add up to 10% drying oil or high-grade cement in powder to it.
v)
Parquet varnish. There are several varieties for sale. Some of them require the addition of a hardener, some cure on their own, but for a longer time. Suitable for pasting the finished case with a cloth.
G)
Nitroglue and nitrovarnishes. The best nitro adhesives for fabric stickers are colorless enamel, AK-20 glue or similar. In their absence, any nitrocellulose glue or varnish can be used, in extreme cases, liquid nitro-paint or primer No. 138.
5. OLIFA AND LACO-OIL MATERIALS. They are used to cover cases from the inside and outside in the absence of nitro-varnishes. Liquid red lead can be used to stick fabric on the body.
6. BITUMEN AND VEGETABLE RESINS. Can be used as a last resort - if there is nothing else - to cover the inside and outside of the finished case.
Are you having trouble finding a specific video? Then this page will help you find the video you need so much. We will easily process your requests and give you all the results. No matter what you are interested in and what you are looking for, we can easily find the video you need, no matter what direction it would be.
If you are interested in current news, then we are ready to offer you the most relevant news reports in all directions at the moment. The results of football matches, political events or world, global problems. You will always be up to date with all the events if you use our wonderful search. The awareness of the videos we provide and their quality does not depend on us, but on those who uploaded them to the Internet. We only supply you with what you are looking for and require. In any case, using our search, you will know all the news in the world.
However, the world economy is also quite interesting topic which worries a lot of people. Quite a lot depends on the economic state of different countries. For example, import and export, any food or equipment. The same standard of living directly depends on the state of the country, as well as wages and so on. How can such information be useful? It will help you not only adapt to the consequences, but it can also warn you against traveling to one country or another. If you are an inveterate traveler, be sure to use our search.
Today it is very difficult to understand political intrigues and to understand the situation, you need to find and compare a lot of different information. That is why we can easily find for you various speeches of the State Duma deputies and their statements for all the past years. You can easily understand politics and the situation in the political arena. The policies of various countries will become clear to you and you can easily prepare yourself for the coming changes or adapt to our realities.
However, you can find here not only various news from all over the world. You can also easily find a movie that will be nice to watch in the evening with a bottle of beer or popcorn. In our search database there are films for every taste and color, you can easily find an interesting picture for yourself. We can easily find for you even the oldest and hard-to-find works, as well as well-known classics - for example star Wars: The Empire Strikes Back.
If you just want to relax a bit and are looking for funny videos, then we can quench your thirst here too. We will find for you a million different entertaining videos from all over the planet. Short jokes will easily cheer you up and will amuse you for the whole day. Using a convenient search system, you can find exactly what will make you laugh.
As you already understood, we work tirelessly so that you always get exactly what you need. We have created this wonderful search especially for you so that you can find the necessary information in the form of a video and watch it on a convenient player.
Canoes are the most ancient type of water transport, because even 10 thousand years ago people used just such structures. And even today such boats are very popular, especially when it comes to the countries of South America or Asia. And it is the canoe boat that we suggest you assemble now. How to make a boat from improvised means? The answer to this question is in this article, which will tell you how to make a real boat out of cardboard and paper.
Yes, real boats on which you can sail on the water, and not paper boats, as you probably already thought. This boat model belongs to traditional origami, as it is folded from one sheet of paper without the use of glue and scissors. At the same time, such a model is very simple in execution, therefore, a novice origamist, and even a child, can try to create a boat. In addition, a paper canoe perfectly holds small loads, therefore it can even be used for children's play.