In an effort to decorate the Christmas tree in white colors, I crocheted several bells. In my opinion we need different sizes: small ones - for the top of the head, large ones - for the lower part and medium ones - hang in the middle.
I bring to your attention diagrams and descriptions of three bells knitted in different sizes.
You need to be able to do:
- v.p. - air loop;
- s.s. — connecting column;
- senior biological sciences - single crochet;
- Art.s1n., Art.s2n., Art.s3n. - columns with one, two and three crochets;
- w.2st.s1n. - a cone of two stitches with one crochet (the hook is inserted into the same place at the base, the first stitch is not knitted completely, the second stitch is not knitted completely, then all the loops remaining on the hook are knitted in one fell swoop - you get a cone of 2 stitches. .
To work you will need:
- cotton thread like “Poppy” or “Iris”;
- hook 0.6 mm;
- scissors;
- needle with a large eye;
- tray;
- starch agent;
- drying bases of suitable size.
I recommend that knitting experts find a base in advance and try on a bell on it during the knitting process, make small changes to the pattern, ensuring that the product acquires the required size and shape while maintaining the main pattern. If your experience is not enough to make such changes, you will have to work hard to find a good drying base. In my case, a small bell dried on a ball from an old deodorant, a medium one - on a regular-sized Kinder Surprise capsule, and a large one - also on a Kinder capsule (it was only enough for top part), placed on a toy cup from a doll set.
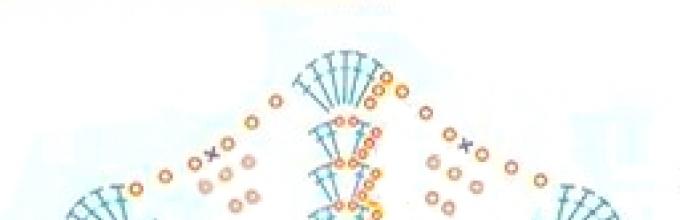
How to crochet bells (3 options):

Diagram of a small bell
Little bell
1st row: 6 ch. close in a circle.
2nd row: 3ch. to rise, st.s1n. in the ring, *2 ch, 4 dc. in the ring* - 5 times, 2 ch, 2 dc. into a ring, close the row with a connecting post.
3rd row: 2s.s., 3v.p. to rise, st.s1n. in a chain of 2 ch, 2 ch, 2 dc. in the same chain, *2st.s1n. in the next chain of 2 ch, 2 ch, 2 dc. in the same chain* - 5 times, close the row with a connecting column.
4th row: 2s.s., 3v.p. to rise, st.s1n. in a chain of 2 ch, 2 ch, 2 dc. in the same chain, v.p., *2 dc.s1n. in the next chain of 2 ch, 2 ch, 2 dc. in the same chain, ch* - 5 times, close the row with a connecting column.
Row 5: 2 dc, 3 ch. to rise, st.s1n. in a chain of 2 ch, 2 ch, 2 dc. in the same chain, 2 ch, * 2 dc. in the next chain of 2 ch, 2 ch, 2 dc. in the same chain, 2 ch* - 5 times, close the row with a connecting column.
Row 6: 2 dc, 3 ch. to rise, st.s1n. in a chain of 2 ch, 2 ch, 2 dc. in the same chain, 3 ch, * 2 dc. in the next chain of 2 ch, 2 ch, 2 dc. in the same chain, 3c* - 5 times, close the row with a connecting column.
7th row: 2 dc, 3 ch. on the rise, 6st.s1n. in a chain of 2 ch, 3 ch, st.b.n. in a chain of 3 ch, 3 ch, * 7 st. s1n. in the next chain of 2 ch, 3 ch, dc. in a chain of 3 ch, 3 ch, * - 5 times, close the row with a connecting column. Make a knot, cut the thread and hide or hem the tip.


Middle bell
1st row: 6 ch. close into a ring with a connecting loop.
2nd row: 2 v.p. on the rise, 11 st.s1n. in the ring, s.s. in the 2nd ch. the beginning of the row.
3rd row: 2 ch. to rise, st.s1n. in each column of the previous row, 2 tbsp. in every third column of the previous row, close the row into a ring with a connecting column. - you should get 16 tbsp in total.
4th row: 7ch, *st.s3n. in the column before row, 2 ch* - 15 times, s.s. in the 5th ch. the beginning of the row.
Row 5: ch 1 on the rise, *2 st.b.n. in a chain of two v.p.*- 16 times, d.s. in v.p. the beginning of the row.
Row 6: ch 1 on the rise, *2 st.b.n. in a chain of two v.p.*- 16 times, d.s. in v.p. the beginning of the row.
Row 7: ch 1 on the rise, *2 st.b.n. in a chain of two v.p.*- 16 times, d.s. in v.p. the beginning of the row.
Row 8: ch 1 on the rise, *2 st.b.n. in a chain of two v.p.*- 16 times, d.s. in v.p. the beginning of the row.
9th row: *20v.p., s.s. in the 5th ch. from the beginning of the chain, 5 v.p., s.s. in the 2nd st. of the previous row from the chain, s.s. in the next st. of the previous row, s.s. in the next st. of the previous row* - 8 times.
10th row: 6st.b.n. in a chain of 5 chain stitches, (8 chain stitches, 2 chain stitches, 8 chain chain stitches) - in a ring of 15 chain stitches, 6 chain chain stitches. in a chain of 5 ch, * 6 st. b.n. in a chain of 5 ch.p., (4 st.b.n., s.s. in the 5th column of the previous festoon, 4 st.b.n., 2 ch.p., 8 st.b.n.) - in ring made of 15 chain stitches, 6 chain stitches in a chain of 5 ch* - 7 times. Make a knot, cut the thread, hide the tip.


Big bell
1st row: 6 ch. close in a circle with a connecting loop.
2nd row: 4ch, *st.s1n. in the ring, v.p.* - 11 times, d.s. into the third chain stitch of the beginning of the row.
3rd row: 5ch, *st.s1n. in the column of the previous row, 2 ch.* - 11 times, d.s. into the third chain stitch of the beginning of the row.
4th row: 2 ch. on the rise, 2 st.b.n. in a chain of 2 ch, * st.b.n. in the column of the previous row, 2 st.b.n. in a chain of 2 ch* - 11 times, s.s. in the second ch. from the beginning of the row.
5th row: 5ch, *st.s1n. in the third column of the previous row, 2 ch* - 11 times, d.s. in the third ch. from the beginning of the row.
6th row: 5ch, *st.s1n. in the column of the previous row, 2 ch.* - 11 times, d.s. in the third ch. from the beginning of the row.
7th row: 4 vp, treble s1n. at the base of the chain, 2 ch, * w. 2 st. s 1 n. in the column of the previous row, 2 ch.* - 11 times, d.s. in the 4th ch. previous row.
8th row: 4 vp, treble s1n. at the base of the chain, 3 ch, * w. 2 st. s1n. in the column of the previous row, 3 ch* - 11 times, d.s. in the 4th ch. previous row.
9th row: 6ch, *st.s1n. in the column of the previous row, 3 ch* - 11 times, d.s. in the third ch. from the beginning of the row.
10th row: 6ch, *st.s1n. in the column of the previous row, 3 ch* - 11 times, d.s. in the third ch. from the beginning of the row.
11th row: 8 vp, treble s1n. at the base of the chain, 4 ch, * w. 2 st. s1 n. in the column of the previous row, 4 ch* - 11 times, d.s. in the 4th ch. previous row.
12th row: 8 vp, treble s1n. at the base of the chain, 4 ch, * w. 2 st. s1 n. in the column of the previous row, 4 ch* - 11 times, d.s. in the 4th ch. previous row.
13th row: * 4 ch, treble s2n. at the base of the chain, st.s2n. in the next column of the previous row, 4 ch. at the base of the column * - 11 times, 4 ch, treble s2n. at the base of the chain, 2st.s.2n. in the next column of the previous row.
14 row: * 4 ch, treble s2n. at the base of the chain, st.s2n. in the next column of the previous row, 4 ch. at the base of the column * - 11 times, 4 ch, treble s2n. at the base of the chain, 2st.s.2n. in the next column of the previous row. - break the thread and hide the tip.

Starching
Soak the knitted bells well in a starch solution, squeeze them lightly, and stretch them onto the mold to dry. Carefully straighten the work on the form (after drying, it will no longer be possible to correct the distortions).
We are waiting for it to dry completely. Using a thin needle, carefully separate the knitting from the mold and remove the product.
Using a needle and thin thread, we make a suspension.
If desired, the top of the bell can be decorated with a tiny bow made of organza or satin ribbon, tie a white bead bead on a thread from the inside, or lightly walk along the edge with a brush dipped in PVA glue, and then dust the edge with gold or silver sparkles.

Shared master class
Anastasia Kononenko
Knitted bells can be used to decorate a little princess’s hat, handbag, dress or hat. Believe me, after this, your princess will undoubtedly attract attention.
To knit bells you need to prepare the yarn
Yarn blue;
For the middle, the yarn is yellow;
For leaves - green yarn;
Bell
So, to perform a bell, dial 2 VP( air loops).

In the 2nd loop, cast on 6 single crochets (hereinafter sc). This is the first row.

In the second row, increase 2 times (12 sc).
If the diameter of the bell is equal to the diameter of the circle of the resulting size, continue knitting without adding. If a flower is needed larger size, then an increase should be made. Maybe just a couple of loops. The main thing is to do it evenly.
Tie sc until received required size flower.


So knit the last row.
Middle
Cast on 8 ch with yellow yarn, knit several sc into the second loop and continue tying the chain with connecting stitches. The middle is ready. Connect the main part of the flower with the middle.


Cup
Knit the same way as a bell. Just add 2 loops so that it is slightly larger than a bell.


leaf
Dial a chain of VPs (I have 17 VPs). Knit it on both sides, leaving 3 loops of the previous row undone. Continue tying and turning the knitting. On turns, make increases as when knitting a circle, i.e. first row - 3 loops, then 6, then 9, 12, etc.
Winter is just around the corner, and with it the wonderful holidays - Christmas and New Year. Recently, decorating a home with handmade decor has become extremely fashion trend. If you want to decorate your home, make it festive, elegant and at the same time unique, crochet bells. The diagrams and descriptions that we will offer in this article will be an excellent help in creative work. We hope that even novice masters will not have any difficulties.
Beautiful crochet Christmas bells. Description for beginner knitters
Cute New Year's accessories decorate and transform the interior of any home on the eve of your loved ones. winter holidays and give a great mood. Bells can be made into magnificent Christmas decorations, colorful garlands or interesting decor for windows, doors and fireplace area.
To complete these indispensable New Year's attributes, you will need to purchase the following tools and materials:
- hook No. 3.5;
- acrylic yarn with the addition of lurex or metallized polyester in a silver shade (YarnArt Gold, YarnArt Bright, etc.);
- scissors;
- white round beads with a fairly large hole;
- a needle with a wide eye;
- small bows made of satin ribbon.
Having prepared necessary tools and materials, let's start crocheting a bell. The scheme of work is as follows. First, we make a magic ring, knit 6 single crochets (SC) into it and close the circle (SP) with a connecting loop.
At the beginning of the second row we make 1 VP (chain loop) and 1 RLS in the same base loop. In the second row we perform increases. In all remaining five loops of the base we knit 2 sc. We get 12 columns in a row. We close the joint venture in the first VP of the row.
In the third row we knit 1 VP, in the next loop we make *2 RLS, and then we knit 1 RLS*. We repeat the rapport *-* until the end of the row. By alternating 2 sc and 1 sc we get 18 loops. We close the row with SP.

We continue to work on Christmas bells
At the beginning of the fourth row we perform 1 VP. We knit 1 sc into each base loop and close the joint. We perform rows five, six, seven, eight by analogy with the fourth.
At the beginning of the ninth row we make 1 VP. In the next base loop we knit 2 sc. Then we knit 1 sc. Let's increase again. In the next loop we perform 2 sc. We continue to work according to this pattern until the end of the row. Thanks to the alternation of elements (2 sc - 1 sc) we end up with 27 loops. We close the joint venture.
In the tenth row we perform 1 VP. We knit 1 sc into each base loop. Close the joint, cut the thread and fasten it. Congratulations, you have crocheted your first bell. We also use this pattern to knit a second decorative element of the same type.
Finishing knitting New Year's decor
Now let's start making the bell tongue. We take a needle with a wide eye and thread through it a piece of thread that remains inside the bell after creating the amigurumi ring. We string one bead onto a thread and make a knot. We check that the bead holds well. Cut off the excess thread. The first tongue is ready, we perform the second by analogy.
We connect both bells with a thread, sewing and securing it from the inside, in the center of the arch. We decorate the product with a bow from satin ribbons. That's it, we have crocheted beautiful Christmas bells! We hope there were no difficulties with the work schemes. I wish you creative success.

Openwork New Year's bells
We bring to your attention another simple and understandable diagram of a bell. The crocheted product turns out to be openwork and beautiful, and knits quickly and easily. Having made several of these bells, you can decorate the Christmas tree in an original way, using them instead of ordinary balls and Christmas tree decorations.
To work, you will need knitting threads of any color, a corresponding hook, and scissors. Having prepared necessary tools, let's start crocheting a New Year's bell. The diagram is shown in the following figure.

We start with an amigurumi ring and 5 VP. Then we knit 1 C1H (single crochet) and 2 VP into the ring. We perform 5 more columns, between which we make 2 VPs. We close the first row of joint ventures into the third loop of the initial chain.
We knit the second row using the pattern: “2 C1H - 2 VP”. Please note: the columns should be made in arches from air loops of the previous row. We close the knitting using a connecting loop.
In the third row, we first move with connecting half-columns to the first VP of the previous row. Next, we perform 3 VP lifts, 1 C1H, 3 VP, 2 C1H. We knit all other arches using the pattern: 2 C1H - 3 VP - 2 C1H. We knit the fourth, fifth, sixth rows according to the pattern of the third.
In the seventh row, using SP, we move to the first C1H of the previous row. We make three lifting loops. In the first arch we knit 7 C1H. In all other arches we make 8 C1H. This way we form the lower, wider part of the bell. In the eighth row we tie the edge with single crochets. Don’t forget to do 1 VP at the beginning of the row, and SP at the end. We fasten the thread and cut it off.
We attach yarn to the top of the bell and make air loops until the lace reaches the desired length. Attach the edge of the chain to the bell, forming a loop.
Processing the product after knitting
To ensure that the finished bells keep their shape well, you can treat them with potato starch. To do this, dilute 1 or 2 tbsp in half a liter of water. l. potato starch. Next, you need to put the container with the solution on the fire and bring to a boil, stirring constantly, after which you need to let the thickened starch cool a little and saturate the bell with it. Be sure to squeeze out excess liquid. After impregnation, the workpiece must be pulled onto a suitable form (for example, a glass), straightened and allowed to dry completely. Thanks to these simple manipulations, the product will keep its shape perfectly.
Original crochet garland of bells
If you want to decorate your home on New Year's Eve, make it especially cute and cozy - crochet a garland of bells. The operation scheme is extremely simple, even a beginner can handle it. And the decoration itself turns out to be bright, stylish and very elegant. You can hang it on the Christmas tree, decorate the walls with it, or decorate the fireplace area.

To work, you will need cotton threads of different colors (density 175 g per 50 m), hook No. 2.5, scissors.
Description of the process of working on a garland of bells
Let's look at how to crochet bells. We present to your attention the diagram and description of the work. We start creating the first decorative element with a chain of 3 VPs, using a joint venture we connect it into a ring. We start the second row with three VPs, then we knit 10 double crochets into a ring (C2H). Rotate the workpiece.
We knit the third row like this. We collect 2 VP. For the leg of the nearest column of the previous row, we perform 3 double crochet stitches (C1H). We knit 2 C1H into the ring. We knit 4 C1H for the leg of the next column. The series is completed. We perform 2 VPs and turn the workpiece over.
In the fourth row we knit 1 C1H in each base loop. There will be 9 of them in total. Again we make 2 VPs and turn the part over. We do the fifth row by analogy with the fourth, at the end we again perform 2 VPs and turn.
In the sixth row, first knit 1 C1H in the same base loop (where the chain is from VP). Next we make increments. We knit 2 C1H into the base loop, and one at a time into the next 6. In the last two loops of the row we make 2 C1H. This way we get the necessary expansion of the canvas at the bottom of the future bell.

In the seventh row we make 1 VP and decorate the entire workpiece along the edge with single crochets (SC). Please note that when tying double crochets, you should perform 2 sc.
We are finishing work on the bell for a cozy garland
Having reached the middle of the lower part of the bell, we make a tongue. In one loop of the base we knit a combination of 1 half double crochet (HDC), 1 C1H and 1 C2H. In the next loop we knit these elements in the reverse order (first 1 C2H, then 1 C1H and 1 hdc). We get the tongue. We finish tying the bell with single crochets, close the knitting joint, fasten the thread and cut it off. The first bell is ready. By analogy, we knit the required number of similar parts and form a garland from them, connecting them with chains of air loops.
Our New Year's decoration is ready! Now you know how to make unique ones with your own hands New Year decorations- bells, crocheted. The diagrams presented in our article will help you do this quickly and easily! I wish you creative success!
Diameter 4 cm.
You will need:
- blue yarn (100% cotton, 200 m/50 s);
- hook No. 1.5-1.75;
- stems for flowers.
Job description:
For 1 flower, knit a chain of 8 air. p. and close it into a ring using the connection. Art. Perform 1 air. p. instead of 1st tbsp. b/n and knit 11 tbsp. b/n in the ring, close the circular r. using connection Art. in the 1st air. lifting point = 1st circular r. Then knit according to the description below.
every circular r. start with 3 air. p. lifting instead of the 1st st. double crochet or resp. 2 air p. lifting instead of the 1st half st. double crochet Close the circular rivers. using connection Art. If necessary, move to the beginning of the next circular river. using connection Art.
2nd circular row: in each st. b/n perform 2 tbsp. double crochet
From the 3rd to the 6th circular rows: * 2 tbsp. double crochet in st. double crochet of the previous row, 1 air. n... repeat from *.
7th circular row: * 1 tbsp. double crochet in st. double crochet of the previous row, 2 tbsp. double crochet in next st. double crochet of the previous row, 2 air. p., repeat from *
8th circular row: * 1 half stitch. double crochet in st. double crochet of the previous row, 3 tbsp. double crochet in next st. double crochet of the previous row, 1 half stitch. double crochet in st. double crochet of the previous row, 1 air. p., 1 tbsp. b/n for an arch of 2 air. n., 1 air. p. repeat from *.
Make the required number of flowers, put the flowers on the stems and secure them. You can use glue.
Diameter 4 cm.
You will need: blue yarn (100% cotton, 200 m/50 s); hook No. 1.5-1.75; stems for flowers.

Job description: for 1 flower, tie a chain of 8 air. p. and close it into a ring using the connection. Art.
Perform 1 air. p. instead of 1st tbsp. b/n and knit 11 tbsp. b/n in the ring, close the circular r. using connection Art. in the 1st air. lifting point = 1st circular r. Then knit in accordance with the description below, each circular p. start with 3 air. p. lifting instead of the 1st st. double crochet or resp. 2 air p. lifting instead of the 1st half st. double crochet Close the circular rivers. using connection Art. If necessary, move to the beginning of the next circular river. using connection Art.
2nd circular row: in each st. b/n perform 2 tbsp. double crochet
From the 3rd to the 6th circular rows: * 2 tbsp. double crochet in st. double crochet of the previous row, 1 air. n... repeat from *.
7th circular row: * 1 tbsp. double crochet in st. double crochet of the previous row, 2 tbsp. double crochet in next st. double crochet of the previous row, 2 air. p., repeat from *
8th circular row: * 1 half stitch. double crochet in st. double crochet of the previous row, 3 tbsp. double crochet in next st. double crochet of the previous row, 1 half stitch. double crochet in st. double crochet of the previous row, 1 air. p., 1 tbsp. b/n for an arch of 2 air. n., 1 air. p. repeat from *.
Make the required number of flowers, put the flowers on the stems and secure them. You can use glue.